Home >Backend Development >PHP Problem >How to install php environment in iis
How to install php environment in iis
- 藏色散人Original
- 2020-10-19 10:47:384639browse
How to install PHP environment in iis: first download PHP and unzip it; then modify the php.ini file; then open the IIS manager and click "Add Module Mapping"; finally restart the iis service.

Recommended: "PHP Video Tutorial"
Quickly build a php environment under Windows (IIS7 PHP phpMyAdmin)
The Internet is full of tutorials like this, but many of them are too cumbersome to operate, or have too many open functions that you cannot use at all, and there are also evil one-click installation packages that have endless bugs; install PHP like this I just couldn't bear to use phpMyAdmin, so I combined several tutorials and found a simple and fast method.
1. Install IIS7
Windows7 Ultimate version comes with IIS7, you just need to open it in "Programs and Features".
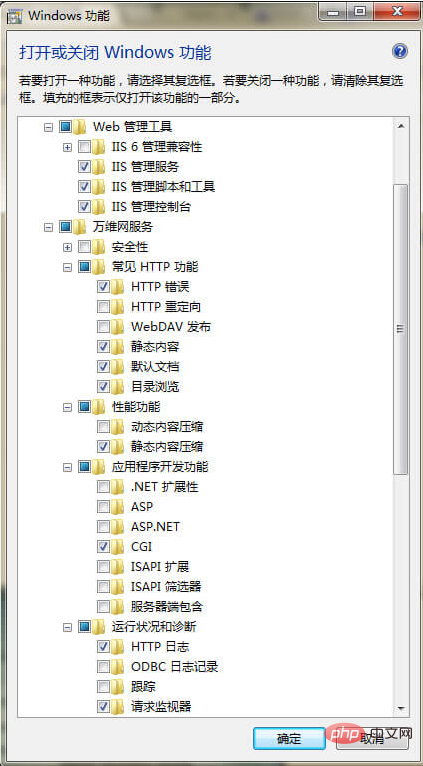
However, if it is just simple web development or light application, you do not need to turn on all functions, you only need to look like this:

Note: " "Application Development Function", you can check it as appropriate. If you only need to use PHP, you only need to check CGI, because fastCGI is used.
Click "OK" and wait for the configuration to be completed. You may be prompted to restart. The IIS service runs automatically upon startup, so you can now access http://localhost/ directly in the browser, and a large IIS picture will appear. Indicates that IIS is installed successfully.
2. Configure PHP
PHP can be downloaded directly from www.php.net. Under Windows, it is a zip package. Unzip it and put it in a certain directory. For example, I directly use C:\PHP5 .
Rename the file C:\PHP5\php.ini-development to php.ini.
Modify php.ini:
extension_dir = "ext"前“;”去掉;
cgi.force_redirect = 0,并将前“;”去掉;
;date.timezone =,修改为date.timezone = PRC
Remove the ";" before the expansion below:
extension=php_curl.dll
extension=php_gd2.dll
extension=php_mbstring.dll
extension=php_mysql.dll
extension=php_mysqli.dll
extension=php_pdo_mysql.dll
extension=php_pdo_odbc.dll
extension=php_xmlrpc.dll
extension=php_xsl.dll
extension=php_zip.dll
Optional operation: In order to avoid PHP errors when importing or exporting larger databases, You can modify the restrictions in the PHP configuration:
upload_max_filesize = 1000M;
post_max_size = 1000M;
max_execution_time=600;
Configure the PHP environment in IIS:
Open the IIS Manager (search for IIS in the Start menu)
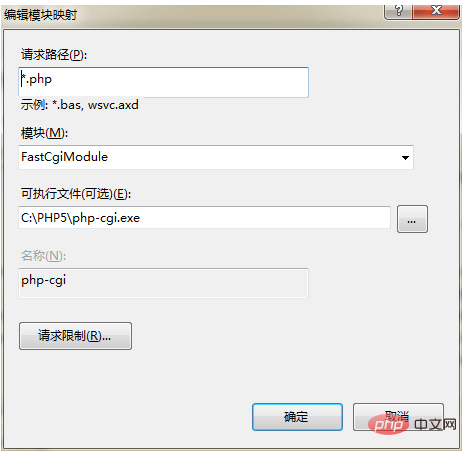
Select /Website in the IIS Manager /Default Web Site, double-click "Handler Mapping", then click "Add Module Mapping", fill in as shown below:

In this way, fastCGI is used to complete IIS mapping to PHP analysis.
Note: You may need to go back to the website you just created in the IIS Manager, double-click "Default Document" and add index.php.
Go back to the root homepage in the IIS manager and restart the IIS service (you can also use the command line).
In the default website physical path C:\inetpub\wwwroot, create a new file index.php with the content:
PHP
<?php
    phpinfo();
?>
After saving, visit http in the browser ://localhost/index.php, the PHP5 info interface will appear as expected.
Performing certain operations in MySQL, such as importing and exporting large databases, will take a long time, and errors are prone to occur at this time:
HTTP Error 500.0 - Internal Server Error
C:\PHP\php-cgi.exe - The FastCGI process has exceeded the configured activity timeout period
To avoid the above error, you can modify the IIS default activity timeout period:
Enter IIS management Device home page
Double-click to open "FastCGI Settings"
Double-click "php-cgi.exe"
Find "Activity Timeout" and change the default value of 70 (seconds) to 600 (or higher)
Configure phpMyAdmin:
phpMyAdmin is not actually a configuration. Here, MySQL must be configured first.
Download the phpMyAdmin compressed package and unzip it to C:\inetpub\wwwroot, and change the folder name to phpMyAdmin.
Then you only need to access http://localhost/phpmyadmin/ with your browser, and the phpMyAdmin login interface will appear. The account number and password are both MySQL account passwords, for example, the account number is root.
The above is the detailed content of How to install php environment in iis. For more information, please follow other related articles on the PHP Chinese website!

