
Home >WeChat Applet >Mini Program Development >Practical Chapter---WeChat Mini Program Engineering Exploration Webpack
Practical Chapter---WeChat Mini Program Engineering Exploration Webpack

- coldplay.xixiforward
- 2020-09-19 10:07:243440browse

## ForewordWeChat mini program spreads at an extremely fast speed and attracts a large number of users because of its convenient use. With the sharp increase in market demand, every Internet company wants to take advantage of the benefits, so mastering the technology of small program development is undoubtedly an indispensable skill for a front-end developer. However, there are always some inconveniences in the development of small programs that have always been criticized by developers. The main manifestations are:Related learning recommendations: WeChat Mini Program Tutorial
- The lack of convenient npm package management mechanism in the early stage (at this stage, it is indeed possible to use npm packages, but the operation is really inconvenient) )
- Precompiled language processing styles cannot be used
- You cannot switch between different development environments through script commands, and you need to manually modify the configuration required for the corresponding environment (regular projects must have at least development and production environments)
- Unable to integrate specification checking tools into project engineering (such as the use of EsLint and StyleLint)
/* 创建项目 */$ mkdir wxmp-base$ cd ./wxmp-base/* 创建package.json */$ npm init/* 安装依赖包 */$ npm install webpack webpack-cli --dev复制代码After installing the dependencies, we create a basic directory structure for this project, as shown in the figure:
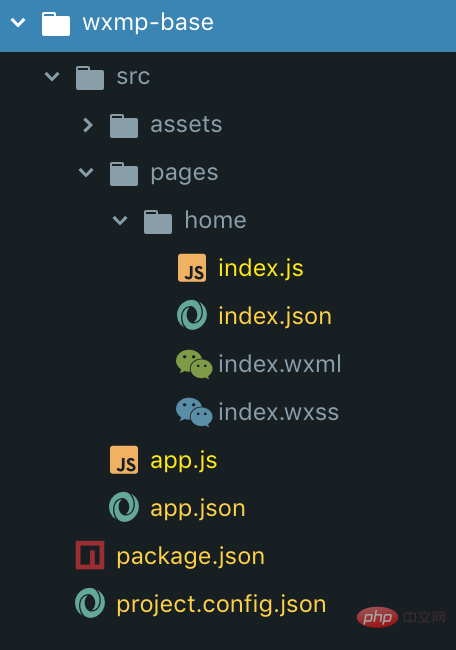
app global configuration file and a home page. Next, regardless of the global situation or the page, we divide the file types into js type files that need to be processed and wxml, wxss# that do not need to be processed and can be copied directly. ##, json files. With this idea, we started to write the configuration file for webpack execution, and created a build directory in the project root directory to store the webpack.config.js file. <pre class="brush:php;toolbar:false;">$ mkdir build$ cd ./build$ touch webpack.config.js复制代码</pre><pre class="brush:js;toolbar:false;">/** webpack.config.js */const path = require(&#39;path&#39;);const CopyPlugin = require(&#39;copy-webpack-plugin&#39;);const ABSOLUTE_PATH = process.cwd();module.exports = { context: path.resolve(ABSOLUTE_PATH, &#39;src&#39;), entry: { app: &#39;./app.js&#39;, &#39;pages/home/index&#39;: &#39;./pages/home/index.js&#39;
}, output: { filename: &#39;[name].js&#39;, path: path.resolve(ABSOLUTE_PATH, &#39;dist&#39;)
}, module: { rules: [
{ test: /\.js$/, exclude: /node_modules/, use: { loader: &#39;babel-loader&#39;, options: { presets: [&#39;@babel/preset-env&#39;], plugins: [&#39;@babel/plugin-transform-runtime&#39;],
},
},
}
]
}, plugins: [ new CopyPlugin([
{ from: &#39;**/*.wxml&#39;, toType: &#39;dir&#39;,
},
{ from: &#39;**/*.wxss&#39;, toType: &#39;dir&#39;,
},
{ from: &#39;**/*.json&#39;, toType: &#39;dir&#39;,
}
])
]
};复制代码</pre>After writing the above code, let me explain to you what the above code will do:
- entry
- I wrote two An attribute is intended to use
app.jsandhome/index.jsas the construction entry point of webpack. It will use this file as the starting point to create their respective dependencies, so that when we When other files are introduced in the entry file, the imported files can also be processed by webpack. In module - , I used
babel-loaderto convert thejsfile from ES6 to ES5, and added the new syntax Processing, so that we solve the problem of always repeatedly introducingregenerator-runtimein the development of native small programs. (In this step we need to install@babel/core,@babel/preset-env,@babel/plugin-transform-runtime,@babel /runtime,babel-loaderThese dependency packages)Usecopy-webpack-plugin - to process files that do not need to be reprocessed. This plug-in Files can be copied directly to the target directory.
command in the terminal. webpack will compile the source code into the dist folder, and the content in this folder can be run, previewed, and uploaded in the developer tools. Optimization
After completing the most basic webpack construction strategy, we achieved the conversion of
app and home pages, but this is still far away not enough. We still need to solve many problems:
- How to do expected pre-compilation
- How to integrate specifications into the project
- How to deal with environment variables
- Next we will upgrade the webpack strategy based on the above points:
Pages and components
At the beginning I The implementation method is to write a tool function to use
glob to collect the js files under pages and components and then generate the entry object and pass it to entry. But in practice, I found that this approach has two disadvantages: <ol>
<li>当终端中已经启动了命令,这时候新增页面或组件都不会自动生成新的入口,也就是我们要重跑一遍命令。</li>
<li>工具函数写死了匹配pages和components文件夹下的文件,不利于项目的延展性,如果我们需要分包或者文件夹命名需要改动时,我们就需要改动工具函数。</li>
</ol>
<p>本着程序员应该是极度慵懒,能交给机器完成的事情绝不自己动手的信条,我开始研究新的入口生成方案。最终确定下来编写一个webpack的插件,在webpack构建的生命周期中生成入口,废话不多说上代码:</p><pre class="brush:js;toolbar:false;">/** build/entry-extract-plugin.js */const fs = require(&#39;fs&#39;);const path = require(&#39;path&#39;);const chalk = require(&#39;chalk&#39;);const replaceExt = require(&#39;replace-ext&#39;);const { difference } = require(&#39;lodash&#39;);const SingleEntryPlugin = require(&#39;webpack/lib/SingleEntryPlugin&#39;);const MultiEntryPlugin = require(&#39;webpack/lib/MultiEntryPlugin&#39;);class EntryExtractPlugin { constructor() { this.appContext = null; this.pages = []; this.entries = [];
} /**
* 收集app.json文件中注册的pages和subpackages生成一个待处理数组
*/
getPages() { const app = path.resolve(this.appContext, &#39;app.json&#39;); const content = fs.readFileSync(app, &#39;utf8&#39;); const { pages = [], subpackages = [] } = JSON.parse(content); const { length: pagesLength } = pages; if (!pagesLength) { console.log(chalk.red(&#39;ERROR in "app.json": pages字段缺失&#39;));
process.exit();
} /** 收集分包中的页面 */
const { length: subPackagesLength } = subpackages; if (subPackagesLength) {
subpackages.forEach((subPackage) => { const { root, pages: subPages = [] } = subPackage; if (!root) { console.log(chalk.red(&#39;ERROR in "app.json": 分包配置中root字段缺失&#39;));
process.exit();
} const { length: subPagesLength } = subPages; if (!subPagesLength) { console.log(chalk.red(`ERROR in "app.json": 当前分包 "${root}" 中pages字段为空`));
process.exit();
}
subPages.forEach((subPage) => pages.push(`${root}/${subPage}`));
});
} return pages;
} /**
* 以页面为起始点递归去寻找所使用的组件
* @param {String} 当前文件的上下文路径
* @param {String} 依赖路径
* @param {Array} 包含全部入口的数组
*/
addDependencies(context, dependPath, entries) { /** 生成绝对路径 */
const isAbsolute = dependPath[0] === &#39;/&#39;; let absolutePath = &#39;&#39;; if (isAbsolute) {
absolutePath = path.resolve(this.appContext, dependPath.slice(1));
} else {
absolutePath = path.resolve(context, dependPath);
} /** 生成以源代码目录为基准的相对路径 */
const relativePath = path.relative(this.appContext, absolutePath); /** 校验该路径是否合法以及是否在已有入口当中 */
const jsPath = replaceExt(absolutePath, &#39;.js&#39;); const isQualification = fs.existsSync(jsPath); if (!isQualification) { console.log(chalk.red(`ERROR: in "${replaceExt(relativePath, &#39;.js&#39;)}": 当前文件缺失`));
process.exit();
} const isExistence = entries.includes((entry) => entry === absolutePath); if (!isExistence) {
entries.push(relativePath);
} /** 获取json文件内容 */
const jsonPath = replaceExt(absolutePath, &#39;.json&#39;); const isJsonExistence = fs.existsSync(jsonPath); if (!isJsonExistence) { console.log(chalk.red(`ERROR: in "${replaceExt(relativePath, &#39;.json&#39;)}": 当前文件缺失`));
process.exit();
} try { const content = fs.readFileSync(jsonPath, &#39;utf8&#39;); const { usingComponents = {} } = JSON.parse(content); const components = Object.values(usingComponents); const { length } = components; /** 当json文件中有再引用其他组件时执行递归 */
if (length) { const absoluteDir = path.dirname(absolutePath);
components.forEach((component) => { this.addDependencies(absoluteDir, component, entries);
});
}
} catch (e) { console.log(chalk.red(`ERROR: in "${replaceExt(relativePath, &#39;.json&#39;)}": 当前文件内容为空或书写不正确`));
process.exit();
}
} /**
* 将入口加入到webpack中
*/
applyEntry(context, entryName, module) { if (Array.isArray(module)) { return new MultiEntryPlugin(context, module, entryName);
} return new SingleEntryPlugin(context, module, entryName);
}
apply(compiler) { /** 设置源代码的上下文 */
const { context } = compiler.options; this.appContext = context;
compiler.hooks.entryOption.tap(&#39;EntryExtractPlugin&#39;, () => { /** 生成入口依赖数组 */
this.pages = this.getPages(); this.pages.forEach((page) => void this.addDependencies(context, page, this.entries)); this.entries.forEach((entry) => { this.applyEntry(context, entry, `./${entry}`).apply(compiler);
});
});
compiler.hooks.watchRun.tap(&#39;EntryExtractPlugin&#39;, () => { /** 校验页面入口是否增加 */
const pages = this.getPages(); const diffPages = difference(pages, this.pages); const { length } = diffPages; if (length) { this.pages = this.pages.concat(diffPages); const entries = []; /** 通过新增的入口页面建立依赖 */
diffPages.forEach((page) => void this.addDependencies(context, page, entries)); /** 去除与原有依赖的交集 */
const diffEntries = difference(entries, this.entries);
diffEntries.forEach((entry) => { this.applyEntry(context, entry, `./${entry}`).apply(compiler);
}); this.entries = this.entries.concat(diffEntries);
}
});
}
}module.exports = EntryExtractPlugin;复制代码</pre><p>由于webpack的<code>plugin相关知识不在我们这篇文章的讨论范畴,所以我只简单的介绍一下它是如何介入webpack的工作流程中并生成入口的。(如果有兴趣想了解这些可以私信我,有时间的话可能会整理一些资料出来给大家)该插件实际做了两件事:
- 通过compiler的entryOption钩子,我们将递归生成的入口数组一项一项的加入
entry中。 - 通过compiler的watchRun钩子监听重新编译时是否有新的页面加入,如果有就会以新加入的页面生成一个依赖数组,然后再加入
entry中。
现在我们将这个插件应用到之前的webpack策略中,将上面的配置更改为:(记得安装chalk replace-ext依赖)
/** build/webpack.config.js */const EntryExtractPlugin = require('./entry-extract-plugin');module.exports = {
  ...
  entry: {    app: './app.js'
  },  plugins: [
    ...
    new EntryExtractPlugin()
  ]
}复制代码
样式预编译与EsLint
样式预编译和EsLint应用其实已经有许多优秀的文章了,在这里我就只贴出我们的实践代码:
/** build/webpack.config.js */const MiniCssExtractPlugin = require('mini-css-extract-plugin');module.exports = {
  ...
  module: {    rules: [
      ...
      {        enforce: 'pre',        test: /\.js$/,        exclude: /node_modules/,        loader: 'eslint-loader',        options: {          cache: true,          fix: true,
        },
      },
      {        test: /\.less$/,        use: [
          {            loader: MiniCssExtractPlugin.loader,
          },
          {            loader: 'css-loader',
          },
          {            loader: 'less-loader',
          },
        ],
      },
    ]
  },  plugins: [
    ...
    new MiniCssExtractPlugin({ filename: '[name].wxss' })
  ]
}复制代码我们修改完策略后就可以将wxss后缀名的文件更改为less后缀名(如果你想用其他的预编译语言,可以自行修改loader),然后我们在js文件中加入import './index.less'语句就能看到样式文件正常编译生成了。样式文件能够正常的生成最大的功臣就是mini-css-extract-plugin工具包,它帮助我们转换了后缀名并且生成到目标目录中。
环境切换
环境变量的切换我们使用cross-env工具包来进行配置,我们在package.json文件中添加两句脚本命令:
"scripts": {
	"dev": "cross-env OPERATING_ENV=development webpack --config build/webpack.config.js --watch",
	"build": "cross-env OPERATING_ENV=production webpack --config build/webpack.config.js
}复制代码
相应的我们也修改一下webpack的配置文件,将我们应用的环境也告诉webpack,这样webpack会针对环境对代码进行优化处理。
/** build/webpack.config.js */const { OPERATING_ENV } = process.env;module.exports = {
  ...
mode: OPERATING_ENV, devtool: OPERATING_ENV === 'production' ? 'source-map' : 'inline-source-map'}复制代码虽然我们也可以通过命令为webpack设置mode,这样也可以在项目中通过process.env.NODE_ENV访问环境变量,但是我还是推荐使用工具包,因为你可能会有多个环境uat test pre等等。
针对JS优化
小程序对包的大小有严格的要求,单个包的大小不能超过2M,所以我们应该对JS做进一步的优化,这有利于我们控制包的大小。我所做的优化主要针对runtime和多个入口页面之间引用的公共部分,修改配置文件为:
/** build/webpack.config.js */module.exports = {
  ...
  optimization: {    splitChunks: {      cacheGroups: {        commons: {          chunks: 'initial',          name: 'commons',          minSize: 0,          maxSize: 0,          minChunks: 2,
        },
      },
    },    runtimeChunk: {      name: 'manifest',
    },
  },
}复制代码webpack会将公共的部分抽离出来在dist文件夹根目录中生成common.js和manifest.js文件,这样整个项目的体积就会有明显的缩小,但是你会发现当我们运行命令是开发者工具里面项目其实是无法正常运行的,这是为什么?
这主要是因为这种优化使小程序其他的js文件丢失了对公共部分的依赖,我们对webpack配置文件做如下修改就可以解决了:
/** build/webpack.config.js */module.exports = {
  ...
  output: {
    ...
    globalObject: 'global'
  },  plugins: [    new webpack.BannerPlugin({      banner: 'const commons = require("./commons");\nconst runtime = require("./runtime");',      raw: true,      include: 'app.js',
    })
  ]
}复制代码相关学习推荐:js视频教程
小小解惑
许多读者可能会有疑惑,为什么你不直接使用已有的框架进行开发,这些能力已经有许多框架支持了。选择框架确实是一个不错的选择,毕竟开箱即用为开发者带来了许多便利。但是这个选择是有利有弊的,我也对市面上的较流行框架做了一段时间的研究和实践。较为早期的腾讯的wepy、美团的mpvue,后来者居上的京东的taro、Dcloud的uni-app等,这些在应用当中我认为有以下一些点不受我青睐:
- The black box makes it sometimes difficult for us to locate whether the problem lies in our own code or in the compilation process of the framework (this caused me to step on a lot of pitfalls)
- Revolving around the framework The resources that can be used are limited. For example, the use of UI basically relies on the official team for supporting development. If there is no community, it is extremely difficult to find the required resources (I think the uni-app community has done a good job in this regard)
- It cannot be combined with some existing native resources. These frameworks are basically based on the compilation principle and provide the ability to use react or vue as the development language. This makes it difficult to achieve seamless access to native resources (if your company has accumulated If you lose some business components, you will have a headache).
- The last point, and the most important point I worry about, is whether the upgrade speed of the framework can keep up with the official iteration speed, and how to deal with it if it lags behind existing projects
The above are basically the reasons why I want to explore mini program engineering by myself (in fact, there is another point of curiosity, hehe)
Written at the end
The above is my understanding of native mini program engineering I have also applied some related style specifications in my team. I have not mentioned them in detail in this article. If you are interested, you can check out the article "Team Specifications - Style Specification Practice" in my column. In fact, there is also the management of static resources and the addition of project directories. These details can be improved and supplemented according to the needs of the team. I hope this article will be helpful to teams that need to practice in this area. If you have any incorrect opinions or areas that need improvement, please let me know in the comments.
The above is the detailed content of Practical Chapter---WeChat Mini Program Engineering Exploration Webpack. For more information, please follow other related articles on the PHP Chinese website!
Related articles
See more- Build a js library using webpack
- Deep understanding of webpack
- In those years, take a look at the related playback of WeChat applet imitating NetEase Cloud Music
- In those years, the WeChat applet imitated the real-time search function of NetEase Cloud Music
- Detailed explanation of Medusa WeChat mini program engineering practice plan