Home >WeChat Applet >Mini Program Development >Use WeChat applet to implement banner carousel image
Use WeChat applet to implement banner carousel image
- angryTomforward
- 2020-03-10 10:25:145052browse
This article introduces the effect of using WeChat applet to achieve banner carousel. It has certain reference value. I hope it will be helpful to friends who are learning WeChat applet development!

Use WeChat applet to implement banner carousel image
In the work of front-end engineers, banners are essential. So how does a small program that lacks DOM implement a banner diagram? Just like other frameworks encapsulate different methods of banner diagrams, small programs also encapsulate banner methods. Let me explain them one by one:
Recommend learning "小programdevelopment"
1: Preparation
I will use two pictures, as shown below:


Two: Write xsml code (i.e. html)
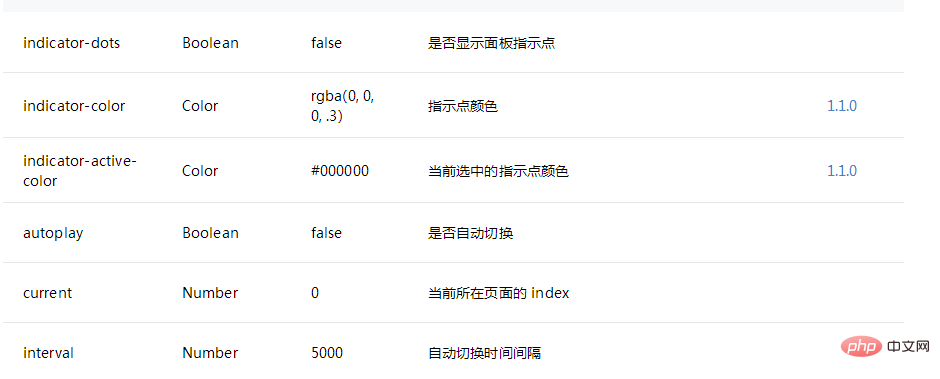
If we use

 These attributes are enough for us. In order to keep the xsml page simple, I use a for loop here to put the used resources Enter js to loop. And in order to enable two-way binding of data, I plan to put its attribute values in js for configuration. My xsml code is as follows:
<swiper indicator-dots="{{indicatorDots}}"
        autoplay="{{autoplay}}" interval="{{interval}}" duration="{{duration}}" circular="true">
      <block wx:for="{{arr}}">
        <swiper-item>
            <image src="{{item}}" class="slide-image" width="355" height="150"/>
        </swiper-item>
      </block>
</swiper>
Three: js configuration
Since it is a two-way binding, we only need to configure the required parameters in js. Since my two pictures use 1.jpg and 2.jpg, I only need to perform a small loop in js. This depends on the situation. You can also put the address of the picture directly in In the array; after the final change, remember to setData, otherwise it will have no effect. The js code is as follows:
Page({

  /**
   * 页面的初始数据
   */
  data: {
    mode:"scaleToFill",
    arr:[],
    indicatorDots: true,
    autoplay: true,
    interval: 2000,
    duration: 1000,
  },

  /**
   * 生命周期函数--监听页面加载
   */
  onLoad: function (options) {
    var array = this.data.arr
    for (let i = 1; i < 3; i++) {
      array.push("img/" + i + ".jpg")
    }
    this.setData({ arr: array})

  },

  /**
   * 生命周期函数--监听页面初次渲染完成
   */
  onReady: function () {


  },

  /**
   * 生命周期函数--监听页面显示
   */
  onShow: function () {

  },

  /**
   * 生命周期函数--监听页面隐藏
   */
  onHide: function () {

  },

  /**
   * 生命周期函数--监听页面卸载
   */
  onUnload: function () {

  },

  /**
   * 页面相关事件处理函数--监听用户下拉动作
   */
  onPullDownRefresh: function () {

  },

  /**
   * 页面上拉触底事件的处理函数
   */
  onReachBottom: function () {

  },

  /**
   * 用户点击右上角分享
   */
  onShareAppMessage: function () {

  },

  /**
   * 页面上拉触底事件的处理函数
   */
  onReachBottom: function () {

  },

  /**
   * 页面相关事件处理函数--监听用户下拉动作
   */
  onPullDownRefresh: function () {

  },


})
Okay, let’s take a look at the final effect:

Some small details still require you to adjust the xsss code yourself.
For more related tutorials, please pay attention to PHP Chinese website!
The above is the detailed content of Use WeChat applet to implement banner carousel image. For more information, please follow other related articles on the PHP Chinese website!

