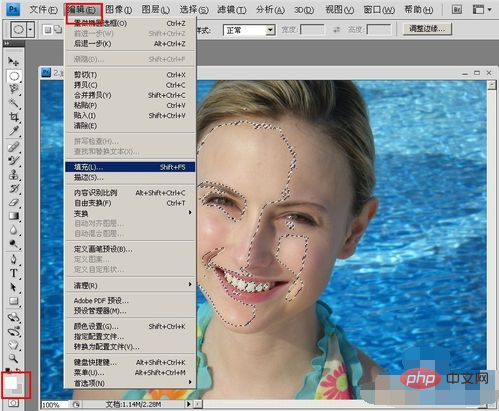
Method: 1. Open the picture that needs to be whitened in PS; 2. Copy the layer to get a copy of the background; 3. Open the "Channel" window, hold down the Ctrl key, and left-click the mouse, it will appear Remove the excess selection; 4. Set the foreground color to white and fill the selection with the foreground color; 5. Right-click "Add Mask Selection", modify the proportion, and merge the layers.

The operating environment of this tutorial: Windows 7 system, Adobe Photoshop CS6 version, Dell G3 computer.
How to whiten skin with PS software
Open the PS software, click "File"-select Open, and find the picture you need to open

##In the lower right corner of the software, right-click "Background" -> Click "Copy Layer" -> Get a copy of the background -> Copy the image Operation in the layer (if an error occurs, you can delete it directly, it is simple and convenient)

Open the "Channel" window——>Hold down the Ctrl key and left-click the mouse——> ;A selection will appear -> Remove the excess selection (hold down the Alt key and use the elliptical selection to remove the excess) - Get the following picture

Change the foreground color Change it to white, click "Edit" -> "Fill" -> "Foreground Color" above - OK

Return to the "Layer" window, Click the mask below, right-click "Add Mask Selection" - get the selection that does not need to be adjusted to white, fill it with black

Click the fill above the background copy, Modify the proportion (until you are satisfied with it)

Click on the background copy and merge the layers downward, indicating that the picture has been whitened.

The above is the detailed content of How to use ps software to whiten skin. For more information, please follow other related articles on the PHP Chinese website!
Statement:The content of this article is voluntarily contributed by netizens, and the copyright belongs to the original author. This site does not assume corresponding legal responsibility. If you find any content suspected of plagiarism or infringement, please contact admin@php.cn


