Home >Java >javaTutorial >Practical skills sharing of SpringBoot
Practical skills sharing of SpringBoot
- 不言forward
- 2018-10-15 13:35:272315browse
The content of this article is to share practical tips about SpringBoot. It has certain reference value. Friends in need can refer to it. I hope it will be helpful to you.
Preface
Some source code and framework design things that have been shared recently. I found that everyone is not very enthusiastic. Thinking about it, most of them should be serious about writing code. This time I will share something down-to-earth: some tips on using SpringBoot.
It’s not a fancy thing, but it’s quite useful.
Shielding external dependencies
The first is to block external dependencies. What does it mean?
For example, do you have such troubles during daily development:
The project is based on distributed services such as SpringCloud or dubbo, and you need to rely on many basic services.
For example, the generation of an order number, obtaining user information, etc.Due to service splitting, these functions are provided in the form of interfaces in other applications. Fortunately, I can also use Mock to block it for single testing.
But what if you want to start the application and run your own related code at the same time?
There are usually several approaches:
Start all services locally.
Change the registration center to the development environment and rely on the services of the development environment.
Directly push the code to the development environment for self-testing.
It seems that all three are possible. I used to do this too. But there are still a few small problems:
Local startup may have a lot of services. It is unclear whether the computer can support them all. If there is a problem with the service, it will not continue.
The premise of relying on the development environment is that the network is open. Another problem is that the development environment code is very unstable and may affect your testing.
Pushing to the development environment should be a more reliable solution, but if you want to debug, there is only the log method, which is not as efficient as local debugging.
So how to solve the problem? You can debug locally without starting other services.
In fact, you can also use the single test method to remove other external dependencies Mock.
The rough process is divided into the following steps:
After SpringBoot starts, find the bean of the API you need to shield in Spring (usually this interface is It is managed by Spring).
Manually remove the bean from the bean container.
Re-create an object of this API, but it is just out of Mock.
Then manually register it into the bean container.
Take the following code as an example:
    @Override
    public BaseResponse<ordernoresvo> getUserByHystrix(@RequestBody UserReqVO userReqVO) {

        OrderNoReqVO vo = new OrderNoReqVO();
        vo.setAppId(123L);
        vo.setReqNo(userReqVO.getReqNo());
        BaseResponse<ordernoresvo> orderNo = orderServiceClient.getOrderNo(vo);
        return orderNo;
    }</ordernoresvo></ordernoresvo>
This is a Spring Cloud application. It relies on orderServiceClient to obtain an order number.
The orderServiceClient is an external API and is also managed by Spring.
Replace the original Bean
The next step is to replace the original Bean.
@Component
public class OrderMockServiceConfig implements CommandLineRunner {

    private final static Logger logger = LoggerFactory.getLogger(OrderMockServiceConfig.class);

    @Autowired
    private ApplicationContext applicationContext;

    @Value("${excute.env}")
    private String env;

    @Override
    public void run(String... strings) throws Exception {

        // 非本地环境不做处理
        if ("dev".equals(env) || "test".equals(env) || "pro".equals(env)) {
            return;
        }

        DefaultListableBeanFactory defaultListableBeanFactory = (DefaultListableBeanFactory) applicationContext.getAutowireCapableBeanFactory();

        OrderServiceClient orderServiceClient = defaultListableBeanFactory.getBean(OrderServiceClient.class);
        logger.info("======orderServiceClient {}=====", orderServiceClient.getClass());

        defaultListableBeanFactory.removeBeanDefinition(OrderServiceClient.class.getCanonicalName());

        OrderServiceClient mockOrderApi = PowerMockito.mock(OrderServiceClient.class,
                invocationOnMock -> BaseResponse.createSuccess(DateUtil.getLongTime() + "", "mock orderNo success"));

        defaultListableBeanFactory.registerSingleton(OrderServiceClient.class.getCanonicalName(), mockOrderApi);

        logger.info("======mockOrderApi {}=====", mockOrderApi.getClass());
    }
}
The CommandLineRunner interface is implemented, and the run() method can be called after the Spring container initialization is completed.
The code is very simple. To put it simply, first determine what environment it is. After all, except the local environment, the rest need to actually call the remote service.
The next step is to obtain the bean and delete it manually.
The key step:
OrderServiceClient mockOrderApi = PowerMockito.mock(OrderServiceClient.class,
                invocationOnMock -> BaseResponse.createSuccess(DateUtil.getLongTime() + "", "mock orderNo success"));

defaultListableBeanFactory.registerSingleton(OrderServiceClient.class.getCanonicalName(), mockOrderApi);
Create a new OrderServiceClient object and manually register it into the Spring container.
The first piece of code uses the API of PowerMockito.mock, which can create a proxy object so that all methods calling OrderServiceClient will return by default.
BaseResponse.createSuccess(DateUtil.getLongTime() + "", "mock orderNo success"))
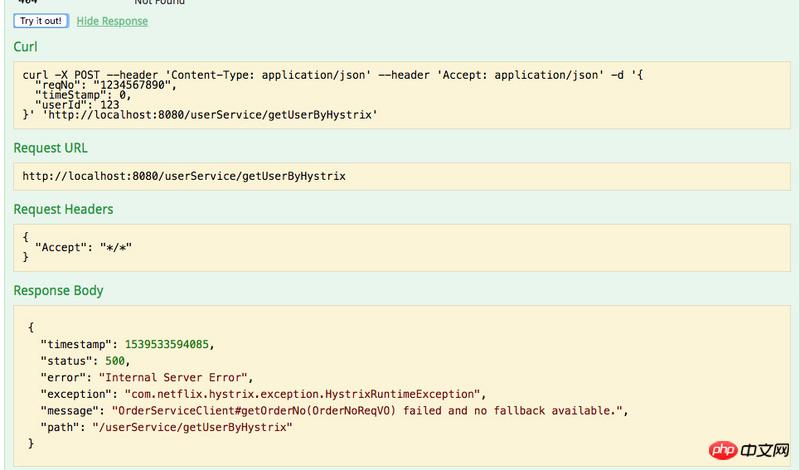
Test it, when we call the interface just now without replacement and it is not started locally OrderService:

Because fallback is not configured, an error will be reported, indicating that the service cannot be found.
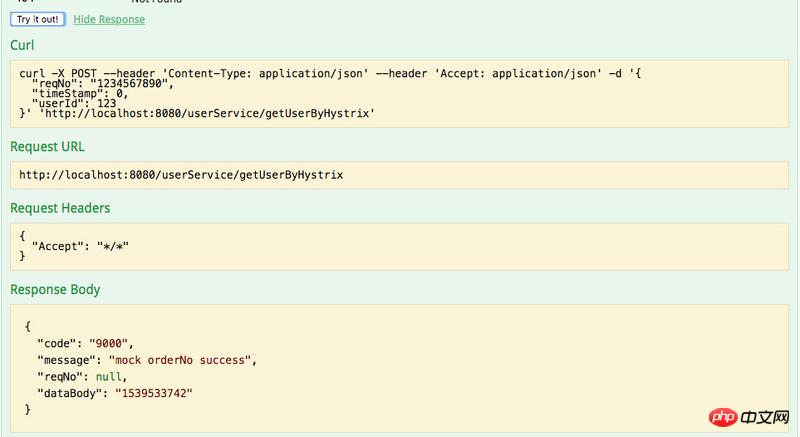
When replacing the bean:

No error was reported when requesting again, and our default return was obtained.

You will also find through the log that OrderServiceClient has finally been proxied by Mock and will not go Call the real method.
Configuring encryption
The next step is to configure encryption, which should be considered a basic function.
For example, some accounts and passwords in our configuration files should be saved in cipher text.
So this time an open source component is used to implement encryption and decryption, and it is very friendly to SpringBoot and only requires a few pieces of code to complete.
首先根据加密密码将需要加密的配置加密为密文。
替换原本明文保存的配置。
再使用时进行解密。
使用该包也只需要引入一个依赖即可:
<dependency>
    <groupid>com.github.ulisesbocchio</groupid>
    <artifactid>jasypt-spring-boot-starter</artifactid>
    <version>1.14</version>
</dependency>
同时写一个单测根据密码生成密文,密码也可保存在配置文件中:
jasypt.encryptor.password=123456
接着在单测中生成密文。
    @Autowired
    private StringEncryptor encryptor;

    @Test
    public void getPass() {
        String name = encryptor.encrypt("userName");
        String password = encryptor.encrypt("password");
        System.out.println(name + "----------------");
        System.out.println(password + "----------------");

    }
之后只需要使用密文就行。
由于我这里是对数据库用户名和密码加密,所以还得有一个解密的过程。
利用 Spring Bean 的一个增强接口即可实现:
@Component
public class DataSourceProcess implements BeanPostProcessor {


    @Autowired
    private StringEncryptor encryptor;

    @Override
    public Object postProcessBeforeInitialization(Object bean, String beanName) throws BeansException {
        return bean;
    }

    @Override
    public Object postProcessAfterInitialization(Object bean, String beanName) throws BeansException {

        if (bean instanceof DataSourceProperties){
            DataSourceProperties dataSourceProperties = (DataSourceProperties) bean;
            dataSourceProperties.setUsername(encryptor.decrypt(dataSourceProperties.getUsername())) ;
            dataSourceProperties.setPassword(encryptor.decrypt(dataSourceProperties.getPassword()));
            return dataSourceProperties ;
        }

        return bean;
    }
}
这样就可以在真正使用时还原为明文。
同时也可以在启动命令中配置刚才的密码:
java -Djasypt.encryptor.password=password -jar target/jasypt-spring-boot-demo-0.0.1-SNAPSHOT.jar
The above is the detailed content of Practical skills sharing of SpringBoot. For more information, please follow other related articles on the PHP Chinese website!
Related articles
See more- Parsing springboot using thymeleaf times html has no closing tag
- Share some frequently asked questions about web-mvc projects building SpringBoot on IDEA
- Detailed explanation of the code example of springboot integrating mybatis
- In-depth analysis of how springboot configures multiple redis connections
- Detailed explanation of examples of Spring Data JPA integration implemented by SpringBoot
- Introduction to usage examples of verification code combined with springboot when logging in

