Home >Web Front-end >CSS Tutorial >How to use pure CSS to achieve the image of Dabai (source code attached)
How to use pure CSS to achieve the image of Dabai (source code attached)
- 不言forward
- 2018-10-08 16:53:053149browse
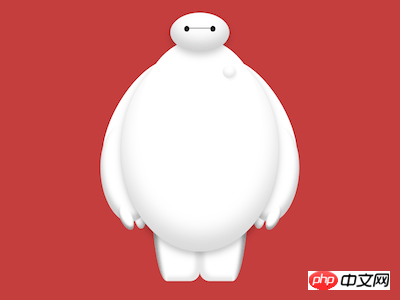
The content of this article is about how to use pure CSS to realize the image of Dabai (source code attached). It has certain reference value. Friends in need can refer to it. I hope it will be helpful to you. .
Effect preview

Source code download
https://github.com/comehope/front- end-daily-challenges
Code Interpretation
The whole character is divided into 3 parts: head, body, and legs. Draw them separately in this order below, and draw the head first.
Define dom, container .baymax means Dabai, head means head:
<div>
    <div>
        <div></div>
    </div>
</div>
Centered display:
body {
    margin: 0;
    height: 100vh;
    display: flex;
    align-items: center;
    justify-content: center;
    background-color: rgba(176, 0, 0, 0.75);
}
Define container size and child Element alignment:
.baymax {
    width: 30em;
    height: 41em;
    font-size: 10px;
    display: flex;
    justify-content: center;
    position: relative;
}
Draw the outline of the head:
.head {
    position: absolute;
    width: 9em;
    height: 6em;
    background-color: white;
    border-radius: 50%;
    box-shadow:
        inset 0 -1.5em 3em rgba(0, 0, 0, 0.2),
        0 0.5em 1.5em rgba(0, 0, 0, 0.2);
}
Draw the line between the eyes:
.head .eyes {
    position: absolute;
    width: 4.8em;
    height: 0.1em;
    background-color: #222;
    top: 2.3em;
    left: calc((9em - 4.8em) / 2);
}
Draw the eyes:
.head .eyes::before,
.head .eyes::after {
    content: '';
    position: absolute;
    width: 0.8em;
    height: 0.9em;
    background-color: #222;
    border-radius: 50%;
    top: -0.3em;
}

.head .eyes::after {
    right: 0;
}
Continue Come down and draw the body.
Add the dom element of the body to the html file:
<div>
    <div>
        <!-- 略 -->
    </div>
    <div>
        <div>
            <span></span>
        </div>
        <div></div>
        <div>
            <div></div>
        </div>
        <div>
            <div></div>
        </div>
    </div>
</div>
Define the width of the body:
.body {
    position: absolute;
    width: inherit;
}
Draw the chest:
.body .chest {
    position: absolute;
    width: 19em;
    height: 26em;
    background-color: white;
    top: 4em;
    left: calc((100% - 19em) / 2);
    border-radius: 50%;
    z-index: -1;
}
Draw the button on the chest:
.body .chest .button {
    position: absolute;
    width: 2em;
    height: 2em;
    background-color: white;
    border-radius: 50%;
    top: 4em;
    right: 4em;
    box-shadow:
        inset 0 -0.5em 0.8em rgba(0, 0, 0, 0.15),
        0.2em 0.3em 0.2em rgba(0, 0, 0, 0.05);
    filter: opacity(0.75);
}
Draw the belly:
.body .belly {
    position: absolute;
    width: 24em;
    height: 31em;
    background-color: white;
    top: 5.5em;
    left: calc((100% - 24em) / 2);
    border-radius: 50%;
    z-index: -2;
    box-shadow:
        inset 0 -2.5em 4em rgba(0, 0, 0, 0.15),
        0 0.5em 1.5em rgba(0, 0, 0, 0.25);
}
Define the starting point of the height of the arm:
.body .arm {
    position: absolute;
    top: 7.5em;
}
The arm is divided into the part above the elbow and the part below the elbow.
First design the common attributes of these two segments:
.body .arm::before,
.body .arm::after {
    content: '';
    position: absolute;
    background-color: white;
    border-radius: 50%;
    transform-origin: top;
    z-index: -3;
}
Then use pseudo elements to draw these two parts respectively:
.body .arm::before {
    width: 9em;
    height: 20em;
    left: 7em;
    transform: rotate(30deg);
}

.body .arm::after {
    width: 8em;
    height: 15em;
    left: -0.8em;
    top: 9.5em;
    transform: rotate(-5deg);
    box-shadow: inset 0.4em -1em 1em rgba(0, 0, 0, 0.2);
}
Define the common attributes of the two fingers:
.body .arm .fingers::before,
.body .arm .fingers::after {
    content: '';
    position: absolute;
    width: 1.8em;
    height: 4em;
    background-color: white;
    border-radius: 50%;
    transform-origin: top;
}
Use pseudo elements to draw two fingers:
.body .arm .fingers::before {
    top: 22em;
    left: 2em;
    transform: rotate(-25deg);
    box-shadow: inset 0.2em -0.4em 0.4em rgba(0, 0, 0, 0.4);
}

.body .arm .fingers::after {
    top: 21.5em;
    left: 4.8em;
    transform: rotate(-5deg);
    box-shadow: inset -0.2em -0.4em 0.8em rgba(0, 0, 0, 0.3);
    z-index: -3;
}
At this point, the right arm is completed. Duplicate the right arm and flip it horizontally to get the left arm:
.body .arm.left {
    transform: scaleX(-1);
    right: 0;
    z-index: -3;
}
Next, draw the legs.
Add the dom element of the leg to the html file:
<div>
    <div>
        <!-- 略 -->
    </div>
    <div>
        <!-- 略 -->
    </div>
    <div></div>
    <div></div>
</div>
Draw the inside of the leg:
.leg {
    position: absolute;
    width: 5em;
    height: 16em;
    bottom: 0;
    background-color: white;
    border-bottom-right-radius: 1.5em;
    left: 10em;
    box-shadow: inset -0.7em -0.6em 0.7em rgba(0, 0, 0, 0.1);
    z-index: -3;
}
Draw the outside of the leg:
.leg::before {
    content: '';
    position: absolute;
    width: 2.5em;
    height: inherit;
    background-color: white;
    border-bottom-left-radius: 100%;
    left: -2.5em;
    box-shadow: inset 0.7em 1.5em 0.7em rgba(0, 0, 0, 0.4);
}
Now, it’s complete Right leg. Copy the right leg and flip it horizontally to get the left leg:
.leg.left {
    transform-origin: right;
    transform: scaleX(-1);
}
You're done!
The above is the detailed content of How to use pure CSS to achieve the image of Dabai (source code attached). For more information, please follow other related articles on the PHP Chinese website!
Related articles
See more- How to use pure CSS to achieve a diamond-shaped loader effect (source code attached)
- How to use pure CSS to achieve text fade-in animation effect (source code attached)
- How to use pure CSS to achieve the hover effect of buttons (source code attached)
- How to use pure CSS to achieve the hover effect of sliding elements from both sides of the button (source code attached)
- How to use pure CSS to animate Baolo Mints (source code attached)

