Home >Web Front-end >JS Tutorial >Introduction to advanced design and control of React
Introduction to advanced design and control of React
- 不言Original
- 2018-09-13 16:31:221487browse
This article brings you an introduction to the advanced design and control of React. It has certain reference value. Friends in need can refer to it. I hope it will be helpful to you.
Control - This concept is crucial in programming. For example, the "competition" between the "wheel" encapsulation layer and the business consumption layer for control is a very interesting topic. This is no different in the React world. On the surface, of course we hope that the "wheel" can control as many things as possible: Because the more logic the abstraction layer handles, the fewer things we need to care about when calling the business, and the more convenient it is to use. However, some designs "dare not go too far". The tug-of-war between the "wheel" and the business over control is very interesting.
At the same time, control capabilities are also closely related to component design: atomic component designs such as Atomic components are highly respected; on top of the concept of atomic components, there are also molecular components: Molecules components. Whether they are molecules or atoms, they all have a reason to exist in solving business problems.
This article will use the React framework as the background to talk about some of my thoughts and conclusions on control during development. If you don't use React, in principle, it still doesn't prevent you from reading
Before starting the article, I would like to introduce a book to you.
Since last year, Yan Haijing, a well-known technology tycoon, and I have started a co-authoring journey. This year, the book "React State Management and Isomorphism in Practice" that we jointly polished has finally been officially published! This book takes the React technology stack as the core. Based on the introduction of React usage, it analyzes Redux ideas from the source code level, and also focuses on the architectural patterns of server-side rendering and isomorphic applications. The book contains many project examples, which not only opens the door to the React technology stack for users, but also enhances readers' overall understanding of cutting-edge fields.
Start with controlled and uncontrolled components
When we first enter React, the first thing we come into contact with about the concept of control is controlled components and uncontrolled components. These two concepts are often associated with forms. In most cases, it is recommended to use controlled components to implement state control such as forms and input boxes. In controlled components, data such as forms are handled by the React component itself. Non-controlled components mean that the data of the form is controlled by the Dom itself. The following is a typical uncontrolled component:
For React, the state and user input of uncontrolled components cannot be directly controlled and can only rely on the native capabilities of the form tag for interaction. If the uncontrolled component in the above example is changed into a controlled component, the code is also very simple:
class NameForm extends React.Component {
  state= {value: ''}

  handleChange = event => {
    this.setState({value: event.target.value});
  }

  handleSubmit = event => {
    alert('A name was submitted: ' + this.state.value);
    event.preventDefault();
  }

  render() {
    return (
)
}
}At this time, the form values and behaviors are controlled by the React component, making development more convenient.
This is of course a very basic concept. I would like to raise the topic of control. Please continue reading.
UI "wheel" and Control Props mode
The examples introduced above are what I call "narrow sensecontrolled and uncontrolled" components. Broadly speaking, I think a completely uncontrolled component refers to a functional component or stateless component that does not contain internal states and only accepts props. Its rendering behavior is completely controlled by external props and has no "autonomy" of its own. Such components achieve good reusability and have good testability.
But in UI "wheel" design, "semi-autonomous" or "not fully controlled" components are sometimes a better choice. We call this the "control props" pattern. To put it simply: The component has its own state. When no relevant props are passed in, its own state statea is used to complete the rendering and interaction logic; when the component is called, if relevant props are passed in, it will be handed over. Control right, controlling its behavior from the business consumption level.
After researching a large number of community UI "wheels", I found that downshift, a component library written by Kent C. Dodds and used by PayPal, widely adopts this pattern.
Simply use a Toogle component as an example. When this component is called by the business party:
class Example extends React.Component {
  state = {on: false, inputValue: 'off'}
  handleToggle = on => {
    this.setState({on, inputValue: on ? 'on' : 'off'})
  }
  handleChange = ({target: {value}}) => {
    if (value === 'on') {
      this.setState({on: true})
    } else if (value === 'off') {
      this.setState({on: false})
    }
    this.setState({inputValue: value})
  }
  render() {
    const {on} = this.state
    return (
      <p>
        <input>
        <toggle></toggle>
      </p>
    )
  }
}
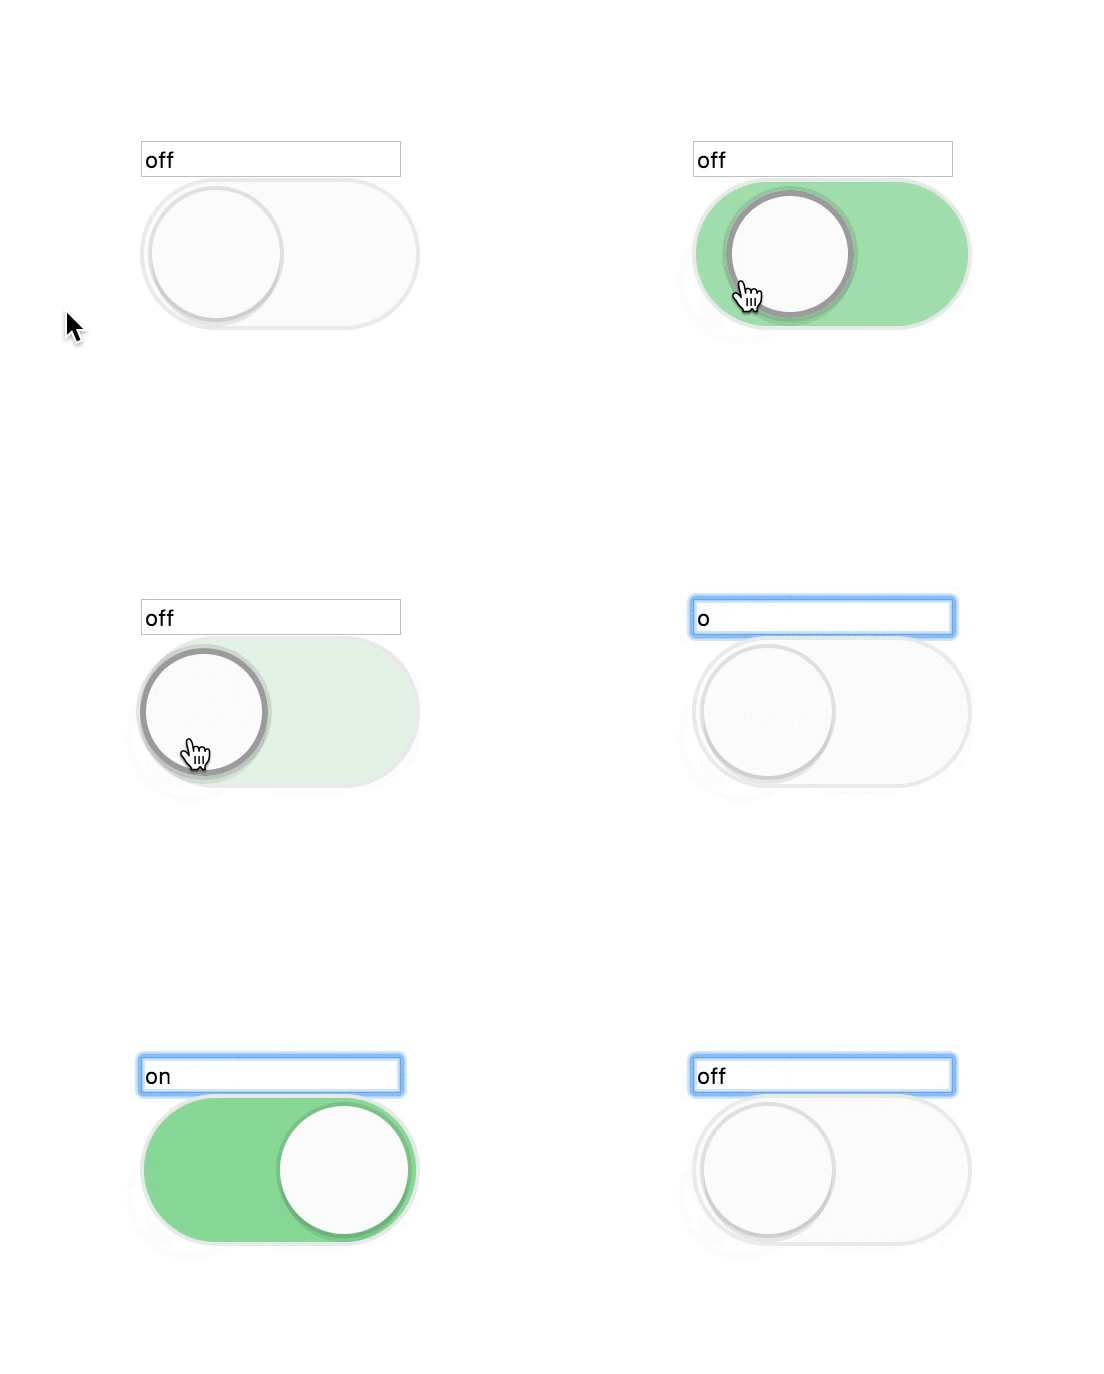
The effect is as shown:

We can control the status switching of the Toggle component through the input box (enter "on" to activate the state, enter "off" to gray out the state), and we can also click the mouse to switch. At this time, the content of the input box will also change accordingly.
Please think about it: For the UI component Toggle, its state can be controlled by the business caller, which gives consumption convenience at the usage level. In the business code, whether it is Input or any other component, its state can be controlled, and we have complete control when calling.
At the same time, if you do not pass the props value when calling the Toggle component, the component can still function normally. As follows:
  <toggle>
    {({on, getTogglerProps}) => (
      <p>
        <button>Toggle me</button>
        </p>
<p>{on ? 'Toggled On' : 'Toggled Off'}</p>

    )}
  </toggle>
When the Toggle component switches states, it maintains its internal state to achieve the switching effect. At the same time, it outputs the state information of this component to the outside through the render prop mode.
Let’s look at the Toggle source code (some links have been deleted):
const callAll = (...fns) => (...args) => fns.forEach(fn => fn && fn(...args))

class Toggle extends Component {
  static defaultProps = {
    defaultOn: false,
    onToggle: () => {},
  }
  state = {
    on: this.getOn({on: this.props.defaultOn}),
  }
  getOn(state = this.state) {
    return this.isOnControlled() ? this.props.on : state.on
  }
  isOnControlled() {
    return this.props.on !== undefined
  }
  getTogglerStateAndHelpers() {
    return {
      on: this.getOn(),
      setOn: this.setOn,
      setOff: this.setOff,
      toggle: this.toggle,
    }
  }
  setOnState = (state = !this.getOn()) => {
    if (this.isOnControlled()) {
      this.props.onToggle(state, this.getTogglerStateAndHelpers())
    } else {
      this.setState({on: state}, () => {
        this.props.onToggle(
          this.getOn(),
          this.getTogglerStateAndHelpers()
        )
      })
    }
  }
  setOn = this.setOnState.bind(this, true)
  setOff = this.setOnState.bind(this, false)
  toggle = this.setOnState.bind(this, undefined)
  render() {
    const renderProp = unwrapArray(this.props.children)
    return renderProp(this.getTogglerStateAndHelpers())
  }
}

function unwrapArray(arg) {
  return Array.isArray(arg) ? arg[0] : arg
}
export default Toggle
关键的地方在于组件内 isOnControlled 方法判断是否有命名为 on 的属性传入:如果有,则使用 this.props.on 作为本组件状态,反之用自身 this.state.on 来管理状态。同时在 render 方法中,使用了 render prop 模式,关于这个模式本文不再探讨,感兴趣的读者可以在社区中找到很多资料,同时也可以在我新书中找到相关内容。
盘点一下,control props 模式反应了典型的控制权问题。这样的“半自治”能够完美适应业务需求,在组件设计上也更加灵活有效。
Redux 异步状态管理与控制权
提到控制权话题,怎能少得了 Redux 这样的状态管理工具。Redux 的设计在方方面面都体现出来良好的控制权处理,这里我们把注意力集中在异步状态上,更多的内容还请读者关注我的新书。
Redux 处理异步,最为人熟知的就是 Redux-thunk 这样的中间件,它由 Dan 亲自编写,并在 Redux 官方文档上被安利。它与其他所有中间件一样,将 action 到 reducer 中间的过程进行掌控,使得业务使用时可以直接 dispatch 一个函数类型的 action,实现代码也很简单:
function createThunkMiddleware(extraArgument) {
  return ({ dispatch, getState }) => next => action => {
    if (typeof action === 'function') {
      return action(dispatch, getState, extraArgument);
    }

    return next(action);
  };
}

const thunk = createThunkMiddleware();

export default thunk;
但是很快就有人认为,这样的方案因为在中间件实现中的控制不足,导致了业务代码不够精简。我们还是需要遵循传统的 Redux 步骤:八股文似的编写 action,action creactor,reducer......于是,控制粒度更大的中间件方案应运而生。
Redux-promise 中间件控制了 action type,它限制业务方在 dispatch 异步 action 时,action的 payload 属性需要是一个 Promise 对象时,执行 resolve,该中间件触发一个类型相同的 action,并将 payload 设置为 promise 的 value,并设 action.status 属性为 "success"。
export default function promiseMiddleware({ dispatch }) {
  return next => action => {
    if (!isFSA(action)) {
      return isPromise(action) ? action.then(dispatch) : next(action);
    }

    return isPromise(action.payload)
      ? action.payload
          .then(result => dispatch({ ...action, payload: result }))
          .catch(error => {
            dispatch({ ...action, payload: error, error: true });
            return Promise.reject(error);
          })
      : next(action);
  };
}
这样的设计与 Redux-thunk 完全不同,它将 thunk 过程控制在中间件自身中,这样一来,第三方轮子做的事情更多,因此在业务调用时更加简练方便。我们只需要正常编写 action 即可:
dispatch({
    type: GET_USER,
    payload: http.getUser(userId) // payload 为 promise 对象
})
我们对比一下 Redux-thunk,相对于“轮子”控制权较弱,业务方控制权更多的 Redux-thunk,实现上述三行代码,就得不得不需要:
dispatch(
    function(dispatch, getState) {
        dispatch({
            type: GET_USERE,
            payload: userId
        })
        http.getUser(id)
            .then(response => {
                dispatch({
                    type: GET_USER_SUCCESS,
                    payload: response
                })
            })
            .catch(error => {
                dispatch({
                    type: GET_DATA_FAILED,
                    payload: error
                })
            })
    }
)
当然,Redux-promise 控制权越多,一方面带来了简练,但是另一方面,业务控制权越弱,也丧失了一定的自主性。比如如果想实现乐观更新(Optimistic updates),那就很难做了。具体详见 Issue #7
为了平衡这个矛盾,在 Redux-thunk 和 Redux-promise 这两个极端控制权理念的中间件之间,于是便存在了中间状态的中间件:Redux-promise-middleware,它与 Redux-thunk 类似,掌控粒度也类似,但是在 action 处理上更加温和和渐进,它会在适当的时机 dispatch XXX_PENDING、XXX_FULFILLED 、XXX_REJECTED 三种类型的 action,也就是说这个中间件在掌控更多逻辑的基础上,增加了和外界第三方的通信程度,不再是直接高冷地触发 XXX_FULFILLED 、XXX_REJECTED,请读者仔细体会其中不同。
状态管理中的控制主义和极简主义
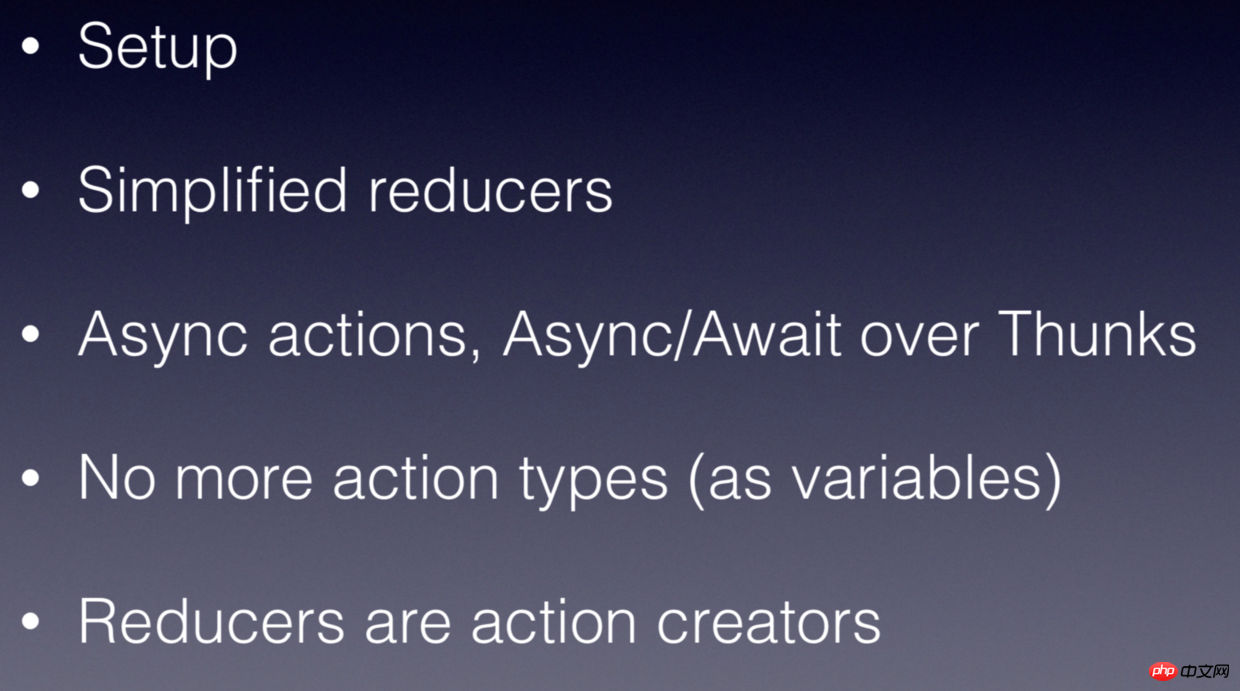
了解了异步状态中的控制权问题,我们再从 Redux 全局角度进行分析。在内部分享时,我将基于 Redux 封装的状态管理类库共同特性总结为这一页 slide:

以上四点都是相关类库基于 Redux 所进行的简化,其中非常有意思的就是后面三点,它们无一例外地与控制权相关。以 Rematch 为代表,它不再是处理 action 到 reducer 的中间件,而是完全控制了 action creator,reducer 以及联通过程。
具体来看:
业务方不再需要显示申明 action type,它由类库直接函数名直接生成,如果 reducer 命名为 increment,那么 action.type 就是 increment;
同时控制 reducer 和 action creator 合二为一,态管理从未变得如此简单、高效。
我把这样的实践称为控制主义或者极简主义,相比 Redux-actions 这样的状态管理类库,这样的做法更加彻底、完善。具体思想可参考 Shawn McKay 的文章,介绍的比较充分,这里我不再赘述。
Summary: Coders and control rights
In the final analysis, control rights are a kind of design idea, which is the confrontation and collision between third-party class libraries and business consumption. It has nothing to do with language and framework. This article only uses React as an example. In fact, the struggle for control can be seen everywhere in the programming field; it has nothing to do with abstract categories. This article has provided examples and analysis in UI abstraction and state abstraction respectively; control rights and coders Closely related, it directly determines our programming experience and development efficiency.
But in the early stages of programming, excellent control design is difficult to achieve overnight. Only by dedicating ourselves to front-line development, truly understanding our own business needs, summarizing a large number of best practices, and referring to the essence of the community and analyzing outstanding open source works, I believe we will all grow.
Related recommendations:
react router4 redux Detailed explanation of the steps to control routing permissions
How to use react router4 redux to implement routing permission control
The above is the detailed content of Introduction to advanced design and control of React. For more information, please follow other related articles on the PHP Chinese website!
Related articles
See more- An in-depth analysis of the Bootstrap list group component
- Detailed explanation of JavaScript function currying
- Complete example of JS password generation and strength detection (with demo source code download)
- Angularjs integrates WeChat UI (weui)
- How to quickly switch between Traditional Chinese and Simplified Chinese with JavaScript and the trick for websites to support switching between Simplified and Traditional Chinese_javascript skills

