Home >Web Front-end >H5 Tutorial >New analysis on tag video playback in html5
New analysis on tag video playback in html5
- 不言Original
- 2018-07-13 15:06:015229browse
This article mainly introduces the new analysis of tag video playback in HTML5. It has certain reference value. Now I share it with everyone. Friends in need can refer to it.
Front-end students should use HTML5 player For videos, the video tag is bound to be used, but most students only use simpler functions. In fact, it has extraordinary power waiting for us to discover.
First of all, let’s take a look at the most basic usage of video:
-
Use the src attribute
<video>
你的浏览器不支持 <code>video</code> 标签。
</video>
-
Use the source tag
<video>
  <source>
  <source>
  Your browser does not support the <code>video</code> element.
</source></source></video>
This is the basic use case given by MDN about video. Here we briefly introduce the difference between the two methods. src can only give video a playback address. When the browser does not support the decoding of this video format, an error will occur, causing the video to fail to play. In order to solve this problem, the source tag is used. Multiple source tags are used to introduce videos in different formats. They are parsed from top to bottom until they encounter the above code. When the browser does not support the ogg format, the browser will automatically play foo.mp4.
Practical Tips
We will find that playback failures often occur when using the video:src attribute to play videos. What should we do to improve the quality of video playback?
In this case, CDN is generally used. In order to be more safe, different CDN manufacturers are generally divided into main CDN and backup CDN. So the question is, how do we use the characteristics of video itself and combine it with CDN to ensure the quality of our video playback?
<video>
  <source>
  <source>
  Your browser does not support the <code>video</code> element.
</source></source></video>
It is not difficult to see that the source tag not only supports automatic switching of different video formats, but also applies to failed switching of the same video format, that is, when main.mp4 cannot be obtained due to network problems, the browser will automatically switch to backup. mp4.
Advanced Skills
If you browse videos, you can find that the videos on many websites look like this:
<video>
</video>
If you directly access the blob address, you will find that it does not exist. .
This address is the DOMString mapping the Blob object. In fact, the video attribute src supports Blob, but the new standard is to use the srcObject attribute to replace this function. The current code can be written like this:
const mediaSource = new MediaSource();
const video = document.createElement('video');
try {
  video.srcObject = mediaSource;
} catch (error) {
  video.src = URL.createObjectURL(mediaSource);
}
In this code, in addition to the Blob object, there is also a MediaSource object. The main factor that gives video its extraordinary power is the browser's support for the MediaSource object, which allows JavaScript to have greater room to manipulate video. How to use MediaSource is not described in this article. You can check it out by yourself. What we want to talk about is what can video combined with MediaSource do?
Seamless switching of definitions
In the on-demand field, mp4 is the most common and most compatible video container. However, mp4 also has its limitations, such as common definition switching. We are It is impossible to switch seamlessly like YouTube. We can look at the difference between network requests for ordinary mp4 playback and network requests for youtube video playback.
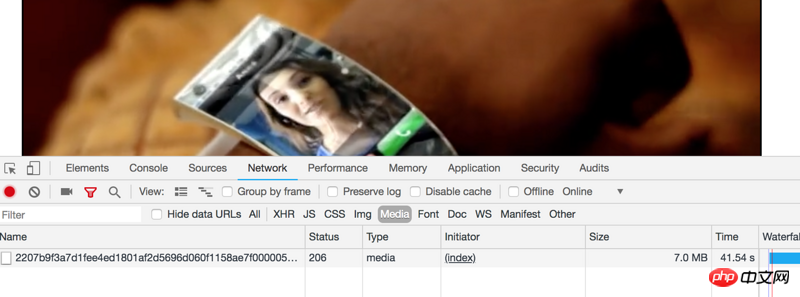
Figure 1.1 Common mp4 download request process
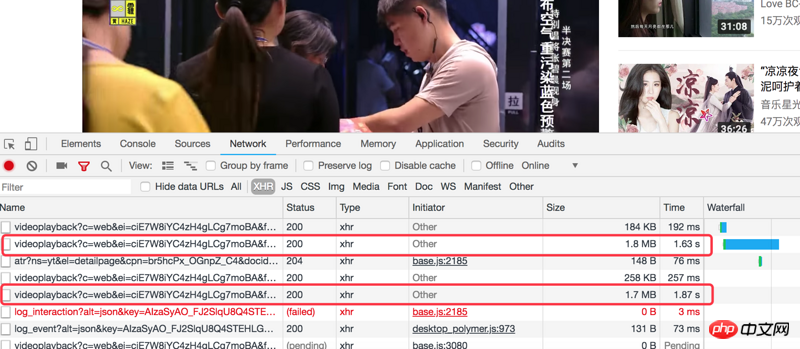
Figure 1.2 Youtube video download request process
It is not difficult to see from these two pictures that by default, mp4 uses http to request all video data once, while Youtube requests in batches. Of course, this description is very unprofessional, but it is indeed vivid. The reason for this difference is that video does not support streaming video data. Youtube uses the streaming video container webm, while mp4 is non-streaming. How to explain the streaming video data clearly? From a professional point of view, it is difficult to explain clearly in a few words, but translated in vernacular, streaming video data supports segmented independent playback, but non-streaming cannot. In other words, for a 10M video file, streaming video can request 0~1M data to be played back separately, but non-streaming video cannot.
We have described the different video formats above. What we want to say next is that the video loading in the first picture is controlled by the browser. By configuring the video address to the src attribute of the video, the browser triggers playback The download will start, and JS cannot interfere. Youtube video loading is controlled through JS. You can look at the network request type in the second picture again: xhr, which is enough to prove this.
上面两点搞清楚之后我们就该说下清晰度切换的事情了。这个需求大家都不陌生,但是直接使用 mp4 格式做无缝清晰度切换,难度还挺大的。先解释下“无缝清晰度切换”的概念:从播放一个分辨率的视频到另一个分辨率且保证画面、声音不停顿的平滑切换过程。了解了这个概念,大家应该知道了用 video 无缝切换 mp4 有多难。一方面,video 是不支持流式的视频格式的,一方面,video 的加载是不受JS控制的。通过切换 video 的 src 属性,必然会导致画面中断、重新请求视频数据等。有的同学想到说利用两个 video 再结合 z-index 来搞,但是当你生成另一个video去加载视频的时候,无法保证两个画面是严格一致的,即使将原来的画面暂停到一个时刻,用另一个视频通过 currentTime 属性与之同步,切换仍然看到画面闪烁,基本无法和 Youtube 无缝切换的体验匹敌。而且还会造成更多流量的浪费,背后的原因大家可以研究下 mp4 容器和 webm 容器的异同,也可以看下视频解码相关的文章。
还有一种方法就是将 mp4 格式统统转码到流式的视频格式比如 hls、webm 等。不过这种看上去可行的方式实际上会带来很大的成本开销,如将大量视频做转码会消耗高昂的机器资源、双倍存储的费用、CDN的双倍费用等等。其实我们也是在这种背景下研究出来新的技术问题解决清晰度无缝切换的。
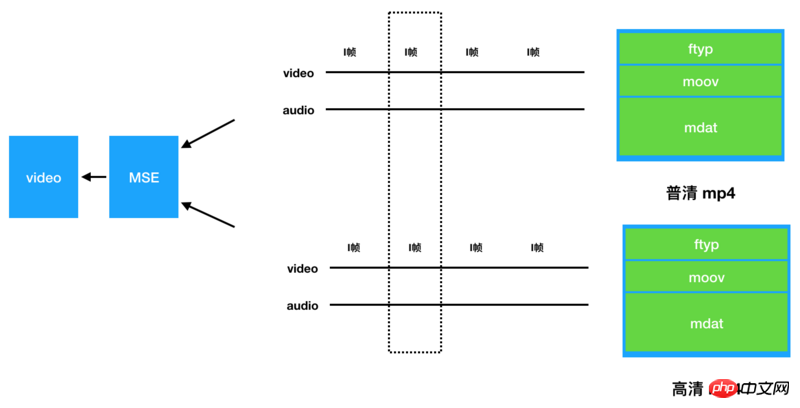
首先,我们改变对 mp4 视频的播放流程,不再直接使用 video 的 src 来播放,因为我们没有任何可以操作的空间。video不仅支持 src 属性还支持 Blob 对象,我们就是利用后者。播放的流程如下:
 图1.3 mp4 视频新播放流程
来请求 mp4 视频数据,这样可以结合视频 Range 服务,做到精确加载。
编写解析器将加载回来的部分 mp4 视频数据进行解复用
将解复用的视频数据转成 fmp4 格式并传递给 MediaSource
使用 video 进行解码完成播放
然后在做清晰度切换的时候流程如下:
 图1.4 mp4视频清晰度切换原理示意图
来请求 mp4 视频数据,这样可以结合视频 Range 服务,做到精确加载。
编写解析器将加载回来的部分 mp4 视频数据进行解复用
将解复用的视频数据转成 fmp4 格式并传递给 MediaSource
-
使用 video 进行解码完成播放
然后在做清晰度切换的时候流程如下:

图1.5 mp4视频清晰度切换流程示意图这个过程看上去比较繁琐,但是所有的操作都是在浏览器端完成,也就是说都是JS来实现的。这样之前说的所有成本问题都不存在,还能做到youtube相同体验的无缝切换。如果大家也想使用这个功能不需要自己再去实现一遍上述流程,可以使用如下代码:
import Player from 'xgplayer';
import 'xgplayer-mp4';

let player = new Player({
      el:document.querySelector('#mse'),
      url: [{src:'/mp4/',type:"video/mp4"},{src:'/mp5/',type:'video/mp4'}]
});

player.emit('resourceReady', [{name: '高清', url: '/mp4/',cname:'高清'}, {name: '超清', url: '/mp5/',cname:'超清'}]);
如果对这段代码有什么疑惑或者想深入了解下它背后是如何实现的可以参考 文档 或者 Github。
节省视频流量
我们平时直接使用video加载视频,大概是这样的:

图2.1 video默认下载截图
我随便找了个视频,大家看下视频总长度是 02:08,在播放到 00:05 的时候,浏览器已经下载到 01:30 了,如果用户终止观看,下载的视频就这样被浪费掉了。当然,如果不断的 seek 也会造成较多的流量浪费。按照我们之前的统计在短视频领域,用户 seek 的频率在 80%,所以这部分流量是可以节省掉的。具体原理如下:
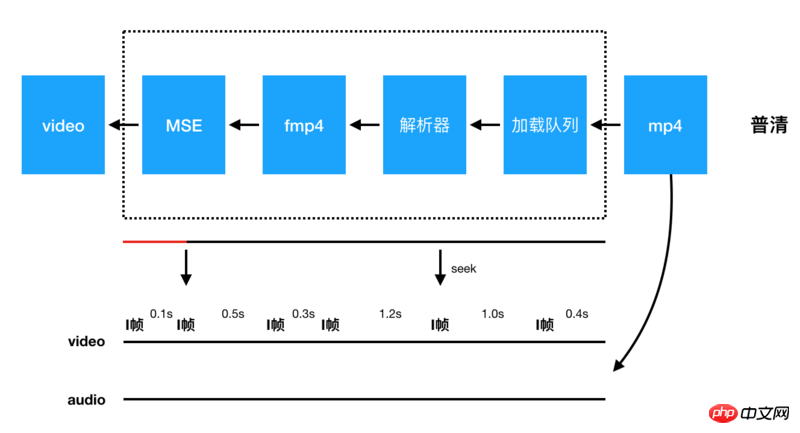
图2.2 播放器加载视频原理
设置每次加载的数据包大小
设置预加载时长
开启加载队列,完成第一次数据包下载,判断缓冲时间和预加载时长是否满足,不满足请求下一个数据包
具体实现代码如下:
  import Player from 'xgplayer';
  import 'xgplayer-mp4';
  const player = new Player({
    id:'vs',
    url:'//abc.com/a/mp4',
    preloadTime:10
  });
这样就实现了视频在播放过程中永远只预加载10秒的数据,进而保证节省流量。
以上就是本文的全部内容,希望对大家的学习有所帮助,更多相关内容请关注PHP中文网!
相关推荐:
The above is the detailed content of New analysis on tag video playback in html5. For more information, please follow other related articles on the PHP Chinese website!
Related articles
See more- AlloyTouch full-screen scrolling plug-in creates a smooth H5 page in 30 seconds
- HTML5 actual combat and analysis of touch events (touchstart, touchmove and touchend)
- Detailed explanation of image drawing examples in HTML5 canvas 9
- Regular expressions and new HTML5 elements
- How to combine NodeJS and HTML5 to drag and drop multiple files to upload to the server


