





这篇文章主要为大家详细介绍了vue2仿淘宝实现省市区三级联动,具有一定的参考价值,感兴趣的小伙伴们可以参考一下
三级联动,随着越来越多的审美,出现了很多种,好多公司都仿着淘宝的三级联动 ,好看时尚,so我们公司也一样……为了贴代码方便,我把写在data里面省市区的json独立了出来,下载贴进去即可用,链接如下:vue.json(这个直接是个data,放入你的vue2项目中即可。(因为我的项目是用的vue2,所以,其他的属性跟博客内容是吻合的。请配合博客再下载此json))。
首先页面显示如下:

然后我们县级所在地区会出现三级联动,如下:(以下是片段,背景色未截取)


这个张什么样,以什么形式出现,取决于贵公司的UI需求,我们公司是做成弹出层了。。然后背景色透明,这里为了节省流量,我只截取了一段,最后显示如下:
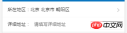
如果贵公司也跟我们需求一样,希望这个可以帮到你们。下面是在vue2项目中写的三级联动代码以及css样式:
  <section>
    <section>
      <section>
       <section>
         <span>所在地区:{{Province?Province:''}} {{City?City:''}} {{District?District:''}}</span>
       </section>
       <img>
       <p></p>
      </section>
    </section>
    <!-- 居住地址三级联动选项 -->
    <section>
     <section>
      <section>
       <h4>居住地址</h4>
       <span>×</span>
      </section>
      <section>
       <p>
         {{Province?Province:info[province-1].name}}
       </p>
       <p>
         {{City?City:'请选择'}}
       </p>
       <p>
         {{District?District:'请选择'}}
       </p>
      </section>
      <ul>
        <li>{{v.name}}</li>
        <li>{{v.name}}</li>
        <li>{{v.name}}</li>
       </ul>
     </section>
    </section>
    <!-- 页面内容 -->
    <section>
      <span>详细地址:</span>
      <input>
    </section>
  </section><script>
  import {
      mapActions,
      mapGetters
  } from 'vuex';
  import api from './../../fetch/api.js'
  export default {
    name: 'address',
    data(){},此处的data直接下载json复制进去即可。http://download.csdn.net/detail/zhaohaixin0418/9862255。
    components: {
      MineHeader
    },
    computed: {
        ...mapGetters([
          'BCcontextPathSrc',
          'sessionId',
          'token',
        ]),
  },
  methods: {
    choseAdd: function() {
      this.showChose = true;
    },
    closeAdd: function() {
      this.showChose = false;
    },
    _filter(add, name, code) {
      let result = [];
      for (let i = 0; i < add.length; i++) {
        if (code == add[i].id) {
          result = add[i][name];
        }
      }
      return result;
    },
    getProvinceId: function(code, input, index) {
      this.province = code;
      this.Province = input;
      this.showProvince = false;
      this.showCity = true;
      this.showDistrict = false;
      this.showCityList = this._filter(this.info, 'city', this.province);
      // 点击选择当前
      this.info.map(a => a.selected = false);
      this.info[index].selected = true;
      this.areaProvince = input;
    },
    provinceSelected: function() {
      // 清除市级和区级列表
      this.showCityList = false;
      this.showDistrictList = false;
      // 清除市级和区级选项
      this.City = false;
      this.District = false;
      // 选项页面的切换
      this.showProvince = true;
      this.showCity = false;
      this.showDistrict = false;
    },
    getCityId: function(code, input, index) {
      this.city = code;
      this.City = input;
      this.showProvince = false;
      this.showCity = false;
      this.showDistrict = true;
      this.showDistrictList = this._filter(this.showCityList, 'district', this.city);
      // 选择当前添加active
      this.showCityList.map(a => a.selected = false);
      this.showCityList[index].selected = true;
      this.areaCity = input;
    },
    citySelected: function() {
      this.showProvince = false;
      this.showCity = true;
      this.showDistrict = false;
    },
    getDistrictId: function(code, input, index) {
      this.district = code;
      this.District = input;
      // 选择当前添加active
      this.showDistrictList.map(a => a.selected = false);
      this.showDistrictList[index].selected = true;
      // 选取市区选项之后关闭弹层
      this.showChose = false;
      this.areaDistrict = input;
    },
    districtSelected: function() {
      this.showProvince = false;
      this.showCity = false;
      this.showDistrict = true;
    },
    saveProfile: function() {
      api.commonApi('后台接口', 这里是贵公司后台接口,按照你们公司的改了就好
          'param_key={"head":{"TYPE":"ADD_UPD_INFO",' +
          '"SESSION_ID":"' + this.sessionId + '",' +
          '"TOKEN":"' + this.token + '","DEVICE_ID":""},' +
          '"param":{"PROVINCE":"' + this.areaProvince + '", ' +
          '"CITY":"' + this.areaCity + '", "COUNTY":"' + this.areaDistrict + '",' +
          '"ADDRESS": "' + this.address + '"}}')
          .then(res => {
        console.log(res.data);
    });
    }
  }
  }
</script><style>
  .myAddress {
    width: 100%;
    background-color: white;
    border-top: 4px solid rgba(245, 245, 245, 1);
    color: #333;
  }
  .myAddress .cont {
    border-bottom: 1px solid rgba(245, 245, 245, 0.8);
  }
  .myAddress .cont span {
    display: inline-block;
    font-size: 0.28rem;
    color: #333;
    line-height: 0.88rem;
    margin-left: 0.32rem;
  }
  .myAddress .cont section {
    float: left;
  }
  .myAddress .cont img {
    float: right;
    width: 0.14rem;
    height: 0.24rem;
    margin: 0.32rem 0.32rem 0.32rem 0;
  }
  .showChose {
    width: 100%;
    height: 100%;
    position: fixed;
    top: 0;
    left: 0;
    z-index: 120;
    background: rgba(77, 82, 113, 0.8);
  }
  .address {
    position: absolute;
    bottom: 0;
    left: 0;
    z-index: 121;
    background: #fff;
    width: 100%;
  }
  .title h4 {
    display: inline-block;
    margin-left: 3.2rem;
    font-size: 0.32rem;
    line-height: 0.88rem;
    font-weight: normal;
    color: #999;
  }
  .title span {
    margin: 0.42rem 0 0 2.2rem;
    font-size: 0.45rem;
    line-height: 0.34rem;
    color: #D8D8D8;
  }
  .area {
    display: inline-block;
    font-size: 0.24rem;
    line-height: 0.88rem;
    margin-left: 0.42rem;
    color: #333;
  }
  .addList {
    padding-left: 0.32rem;
    font-size: 0.34rem;
    line-height: 0.88rem;
    color: #333;
  }
  /* 修改的格式 */
  .address ul {
    height: 100%;
    margin-left: 5%;
    max-height: 4.4rem;
    overflow: auto;
  }
  .address .title .active {
    color: #0071B8;
    border-bottom: 0.02rem solid #0071B8;
  }
  .address ul .active {
    color: #0071B8;
  }
</style>
这样就完成了一个省市区的三级联动。
上面是我整理给大家的,希望今后会对大家有帮助。
相关文章:
前端入门到VUE实战笔记:立即使用
在学习笔记中,你将探索 前端 的入门与实战技巧!


