The editor below will share with you an article about the flux method implemented on knockoutjs. It has a good reference value and I hope it will be helpful to everyone. Let’s follow the editor and take a look.
Implementing Flux unidirectional data flow state machine on knockoutjs mainly solves the problem of data coupling between multiple components.
1. Actually simple
flux’s design concept and implementation plan are largely based on the implementation of Vuex, but Some processes have been simplified. The data flow diagram is as follows:

From the above figure, it can be seen that the change of data is a one-way cycle. I think this is the core of the Flux concept. The Action specification in Vuex is Action and Mutation. Action triggers Mutation. Action can be asynchronous, while Mutation is updated synchronously. When I designed ko's Flux, I removed the mutation link because I understood that asynchronous requests are generally related to the api interface. This content has great variability and should be analyzed from the business or project perspective. Make a layer of distinction in the structure.
2. If you use
Of course, flux is only for knockoutjs, so you must introduce knockoutjs before using it. The main methods and objects of flux
2.1 Static methods
##Method | Description |
flux.use | In require mode, the method that associates flux with ko, of course, it must be called with the createStore method first. |
flux.createStore | Create a store (stater) instance. Of course, this method has a return value. Its return value can be registered to the specified by calling the register method. On the domain, but the first time this method is called, the rootStore (root stater) is created, and it is not allowed to be registered to the domain. |
2.1.1 flux.createStore parameter format
Parameter name | Description |
state | Stater related state data |
actions | Change the state State method, the first parameter of the method is state, and the second parameter starts with the incoming related content |
getters | Get the relevant status data on the state, Of course the return is a ko monitoring object. |
2.2 Instance method
The execution of the createStore method will add the $store attribute to the ko instance. This attribute is a stater Instance object, its dispatch can be called at any location to trigger events.
Method | Description |
register | Create and register a status domain, domain Domains are stored independently of each other, and action or get names can be repeated between domains |
unRegister | Remove a status field |
dispatch | Call the specified action based on actionName, no return value |
get | Call the specified get based on getName, There is a return value |
3. Simple use
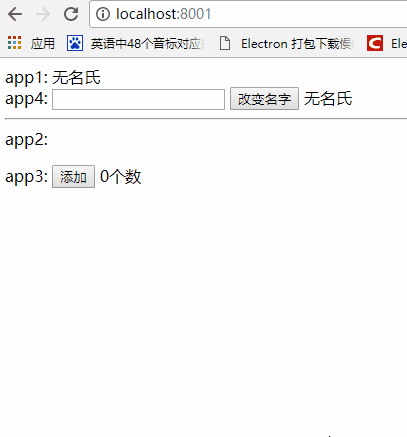
This example defines four ko binding areas, namely: app1, app2, app3, app4. Realize that changes to the name in app4 automatically affect app1, and changes to the list in app3 automatically affect app2.
3.1 Define vm and initialize store
function ViewModel(){
 this.list = ko.observableArray();
 this.name = ko.observable('无名氏');
 this.count = ko.computed(function(){
  //必须用this,这个时候ko.$store还没创建完成,应该ko.computed创建时会执行一次此处
  //如果是子vm依赖主vm,还是可以用ko.$store的
  return this.list().length + '个数'; //需要对监控对象求值,否则computed不能有效
 },this);
}
var fullVm = new ViewModel();
var index = 1;
fullVm.vf={
 add: function(){
  ko.$store.dispatch('addClass',{title: 'title' + (index++)});
 }
}
var opt = {
 state: {
  class: fullVm
 },
 actions:{
  "setName":function(state, name){
   state.class.name(name);
  },
  "addClass":function(state, classInfo){
   state.class.list.push(classInfo);
  }
 },
 getters:{
  "getName":function(state){
   return state.class.name;
  }
 }
}
flux.createStore(opt);
According to the above code, first define a class of ViewModel and create a An instance of fullVm, and then add the add method directly to the fullVm instance.
The state of opt refers to fullVm, which also configures actions and getters related objects, and then calls the flux.createStore(opt) method. Create a store and associate it with the ko.$store object.
3.2 Binding to the view
html code:
<p id="app1">
app1:
<span data-bind="text:ko.$store.get('getName')"></span>
</p>
<p id="app4">
app4:
<input type="text" data-bind="value:name" />
<button type="text" data-bind="click:changeName" >改变名字</button>
<span data-bind="text:ko.$store.state.class.name"></span>
</p>
<hr>
<p id="app2">
app2:
<ul data-bind="foreach:list" >
<li data-bind="text:title" ></li>
</ul>
</p>
<p id="app3">
app3:
<button type="button" data-bind="click:vf.add" >添加</button>
<span data-bind="text:count"></span>
</p>
js code:
var app1 = ko.applyBindings(fullVm, document.getElementById("app1"));
var app2 = ko.applyBindings(fullVm, document.getElementById("app2"));
var app3 = ko.applyBindings(fullVm, document.getElementById("app3"));
//测试两个vm之间的依赖 解藕
var app4 = ko.applyBindings({
 name: ko.observable(),
 changeName:function(data,event){
  ko.$store.dispatch('setName', this.name());
 }
}, document.getElementById("app4"));
4. Domain examples
##html code:
<p id="app1">
 <span data-bind="text:name" ></span>
</p>
<p id="app2">
 <span data-bind="text:name"></span>
 <span data-bind="text:full"></span>
 <button type="button" data-bind="click:changeName" >换名</button>
</p>
js code:
function rootViewModel(){
 this.name = ko.observable('root');
}
var rVM = new rootViewModel();
flux.createStore({ state: rVM}); //创建root状态器

var treeNode={
 name: ko.observable('node'),
 changeName:function(){
  ko.$store.areas.treeNode.state.name('新名字');
 },
 full: ko.computed(function(){
  //computed的职责:1. 监控其他对象属性的变化,而影响自身对象(flux解决);2. 合并自身对象的几个属性(在function下,有this可解)
  //不能通过ko.$store访问对象本身,因为首次对象本身还没初始化好
  var store = ko.$store;
  //(store.areas.treeNode? store.areas.treeNode.state.name() : '') 这样也是不行,因为解决第一次通不过,后面肯定不行
  return store.state.name();
 })
}

ko.$store.register('treeNode', flux.createStore({ state: treeNode})); //创建子状态机
var app1 = ko.applyBindings(rVM, document.getElementById("app1"));
var app2 = ko.applyBindings(treeNode, document.getElementById("app2"));
The above is what I compiled for everyone. I hope it will be helpful to everyone in the future. Related articles:
How to retrieve the WeChat delivery address in nodejs
How to implement WeChat payment in nodejs
Detailed interpretation of the responsiveness principle in Vuejs
How to use nodeJS to implement WeChat sharing
The above is the detailed content of How to implement flux on knockoutjs. For more information, please follow other related articles on the PHP Chinese website!