
Home >Web Front-end >JS Tutorial >Detailed interpretation of father-son communication in vue
Detailed interpretation of father-son communication in vue
- 亚连Original
- 2018-06-19 17:48:381448browse
This article mainly introduces Vue to learn the relevant knowledge of parent-child communication in Vue through the drop-down box component. The article involves the implementation code of parent components and child components. Friends who need it can refer to it
If you say If there is anything that should be understood in the first step of Vue component development, it is undoubtedly how communication is achieved between parent and child components (to put it bluntly, how data is transferred in parent and child components). Only by understanding this step can we do better Development component
Here are two keywords: props and emit:
Before writing this component, let’s take a look at the rendering:
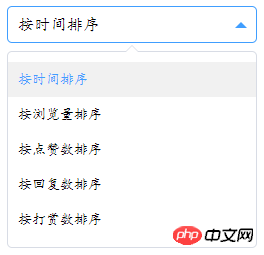
##Component development analysis:
Since it is a component:- First of all, the internal data content of the component must be variable (such as "sort by time" in the above picture), which must be passed in by the parent component (that is, how the parent component passes the data to the parent component);
- After selecting the content, how to pass the data out (that is, how the child component passes the data to the parent component)
Parent component
<!--下拉框父组件-->
<template>
<p id="app">
<oSelect @changeOption="onChangeOption" :selectData="selectData"></oSelect>
<!--
selectData: 传入父组件需要传入的数据;格式:childDataName="parentDataName";
onChangeOption: 子组件触发的事件名,通过触发一个事件从而来接收子组件的传过来的数据
格式:@childEventName="parentEventName"
注:可写多个
-->
</p>
</template>
<script>
import oSelect from "@/components/select.vue"; //引入组件
export default{
name: 'App',
data(){
return {
selectData: {
defaultIndex: 0, //默认选中的是第几个
selectStatus: false, // 通过selectStatus来控制下拉框的显示/隐藏
selectOptions: [ // 下拉框中的数据 name这样的参数,看项目是否有需求,可自行修改
{
name: 'time',
context: '按时间排序'
},
{
name: 'view',
context: '按浏览量排序'
},
{
name: 'like',
context: '按点赞数排序'
},
{
name: 'reply',
context: '按回复数排序'
},
{
name: 'reward',
context: '按打赏数排序'
}
]
}
}
},
methods:{
onChangeOption(index){
//子组件通过一个事件来触发onChangeOption方法,从而传递一系列参数,这里的index就是传过来的
this.selectData.defaultIndex = index;
//触发过后,动态改变了需要值
}
},
components: {
oSelect,
//注册组件
}
}
</script>
Child component
<template>
<!-- 下拉框组件html结构(子组件) -->
<p class="select-box" @click="changeStatus">
<!-- changeStatus事件: 点击实现下拉框的显示和隐藏 -->
<h3 class="select-title"
:name="selectData.selectOptions[selectData.defaultIndex].name"
:class="{'select-title-active': selectData.selectStatus}">
<!--属性name class的动态绑定-->
{{ selectData.selectOptions[selectData.defaultIndex].context }}
<!--这里主要绑定选择的数据-->
</h3>
<transition name="slide-down">
<!--transition 实现下拉列表显示隐藏时的动画-->
<ul class="select-options" v-show="selectData.selectStatus">
<li class="select-option-item"
v-for="(item,index) in selectData.selectOptions"
@click="EmitchangeOption(index)"
:class="{'select-option-active':selectData.defaultIndex===index}">
<!--
v-for:循环数据渲染下拉列表
EmitchangeOption:点击下拉列表事件
class:动态绑定被选中的数据
-->
{{ selectData.selectOptions[index].context }}
</li>
<p class="arrow-top"></p>
</ul>
</transition>
</p>
</template>
<script>
export default{
name: 'oSelect', //建议大家都写上这个,有利于我们知道这个组件叫什么名字
//通过props来接收父组件传过来的数据
props:{
selectData: {
type: Object //规定传过来的数据为对象,否则就会报错(其实这样写就是规避错误和良好的习惯)
}
},
methods:{
EmitchangeOption(index){
this.$emit('changeOption',index);
// 通过点击事件触发EmitchangeOption函数,传入当前点击下拉列表中的索引值index
// 下拉框通过emit方法触发父组件中changeOption函数,动态传给父组件需要的数据,这里为索引值
},
changeStatus(){
// 通过changeStatus事件动态改变selectStatus的值,从而控制下拉框的显示隐藏
this.selectData.selectStatus = !this.selectData.selectStatus
}
}
}
</script>
Summary
- As can be seen from the above example, when the parent component passes in data, a property needs to be bound in the middle of the parent component, and mounting needs to be passed Incoming data;
- The child component receives the data from the parent component through the props method;
- The child component needs to use the emit method to transfer data. Bind the pre-set method in the parent component to dynamically transfer the data required after the operation
Attached is the css in the component for reference only:
.select-box{
position: relative;
max-width: 250px;
line-height: 35px;
margin: 50px auto;
}
.select-title{
position: relative;
padding: 0 30px 0 10px;
border: 1px solid #d8dce5;
border-radius: 5px;
transition-duration: 300ms;
cursor: pointer;
}
.select-title:after{
content: '';
position: absolute;
height: 0;
width: 0;
border-top: 6px solid #d8dce5;
border-left: 6px solid transparent;
border-right: 6px solid transparent;
right: 9px;
top: 0;
bottom: 0;
margin: auto;
transition-duration: 300ms;
transition-timing-function: ease-in-out;
}
.select-title-active{
border-color: #409eff;
}
.select-title-active:after{
transform: rotate(-180deg);
border-top-color: #409eff;
}
.select-options{
position: absolute;
padding:10px 0;
top: 45px;
border:1px solid #d8dce5;
width: 100%;
border-radius: 5px;
}
.select-option-item{
padding:0 10px;
cursor: pointer;
transition-duration: 300ms;
}
.select-option-item:hover,.select-option-active{
background: #f1f1f1;
color: #409eff;
}
<!--箭头css-->
.arrow-top{
position: absolute;
height: 0;
width: 0;
top: -7px;
border-bottom: 7px solid #d8dce5;
border-left: 7px solid transparent;
border-right: 7px solid transparent;
left: 0;
right: 0;
margin: auto;
z-index: 99;
}
.arrow-top:after{
content: '';
position: absolute;
display: block;
height: 0;
width: 0;
border-bottom: 6px solid #fff;
border-left: 6px solid transparent;
border-right: 6px solid transparent;
left: -6px;
top: 1px;
z-index: 99;
}
<!--下拉框显示隐藏动画-->
.slide-down-enter-active,.slide-down-leave{
transition: all .3s ease-in-out;
transform-origin:0 top;
transform: scaleY(1);
}
.slide-down-enter{
transform: scaleY(0);
}
.slide-down-leave-active{
transition: all .3s ease-in-out;
transform-origin:0 top;
transform: scaleY(0);
}The above is what I compiled for everyone. I hope it will be helpful to everyone in the future. Related articles:
How to implement information crawler using Node.js (detailed tutorial)
Use mock.js to generate random data
How to implement background data sending in express mockjs
The above is the detailed content of Detailed interpretation of father-son communication in vue. For more information, please follow other related articles on the PHP Chinese website!
Related articles
See more- An in-depth analysis of the Bootstrap list group component
- Detailed explanation of JavaScript function currying
- Complete example of JS password generation and strength detection (with demo source code download)
- Angularjs integrates WeChat UI (weui)
- How to quickly switch between Traditional Chinese and Simplified Chinese with JavaScript and the trick for websites to support switching between Simplified and Traditional Chinese_javascript skills