Home >Web Front-end >CSS Tutorial >Tips for using CSS floats
Tips for using CSS floats
- php中世界最好的语言Original
- 2018-06-13 14:31:121625browse
This time I will bring you tips on using CSS floats, and what are the precautions for using CSS floats. The following is a practical case, let’s take a look.
Floats have the following properties:
Uncoverable text
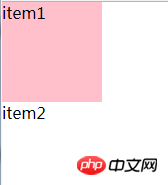
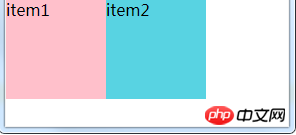
The floating element is not followed by a block-level element, and the following elements will be side by side with it (unless the width of the element is set, and it will wrap when the screen does not fit)
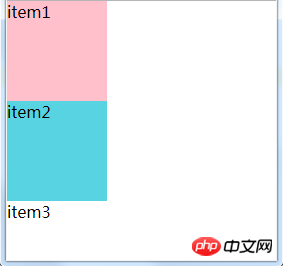
The floating element If the previous element has no float, the float will only float in the current row; when the float encounters the float, they will be sorted in one row unless there is no position anymore
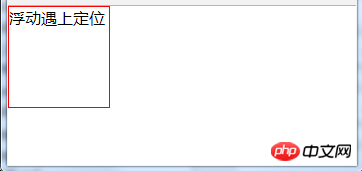
When the element sets the positioning value to absolute, When fixed, floating will be ignored
float causes the height of the parent element to collapse
- ##The floating element will be affected by the margin-top of the subsequent element
The text that cannot be covered
<style>
        body,p{
            margin:0;
            padding:0;
        }
       p{
           width:100px;
           height:100px;
       }
        .item1{
            float:left;
            background-color: pink;
        }
        .item2{
            background-color: #58d3e2;
        }
    </style>
<p class="item1">item1</p>
<p class="item2">item2</p>
<style>
        body,p{
            margin:0;
            padding:0;
        }
       p{
           width:100px;
           height:100px;
       }
        .item1{
            float:left;
            background-color: pink;
        }
        .item2{
            display: inline-block;
            background-color: #58d3e2;
        }
    </style>
<p class="item1">item1</p>
<p class="item2">item2</p>
<style>
        body,p{
            margin:0;
            padding:0;
        }
       p{
           width:100px;
           height:100px;
       }
        .item1{
            background-color: pink;
        }
        .item2{
            float:left;
            background-color: #58d3e2;
        }
    </style>
<p class="item1">item1</p>
<p class="item2">item2</p>
<p class="item3">item3</p>
 <style>
        body,p{
            margin:0;
            padding:0;
        }
       p{
           width:400px;
           height:100px;
           float: left;
       }
        .item1{
            background-color: pink;
        }
        .item2{
            background-color: #58d3e2;
        }
        .item3{
            background-color: #61dafb;
        }
        .item4{
            background-color: #e9203d;
        }
    </style>
<p class="item1">item1</p>
<p class="item2">item2</p>
<p class="item3">item3</p>
<p class="item4">item4</p>

 p{
           width:25%;
           height:100px;
           float: left;
       }

When the element is set to position When the value is absolute or fixed, floating will be ignored
<style>
        body,p{
            margin:0;
            padding:0;
        }
       p{
           position: absolute;
           float: left;
           width:100px;
           height:100px;
           border: 1px solid red;
       }
    </style>
 <p class="item1">浮动遇上定位</p>
 <style>
        body,p{
            margin:0;
            padding:0;
        }
       [class^='item']{
           float: left;
           width:100px;
           height:100px;
           line-height: 100px;
           text-align: center;
       }
        .item1{
            float: left;
            background-color: pink;
        }
        .item2{
            display: inline-block;
            background-color: #58d3e2;
        }
    </style>
<span class="item1">item1</span>
<p class="item2">item2</p>
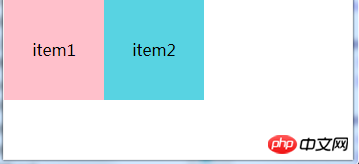
float causes the height of the parent element to collapse
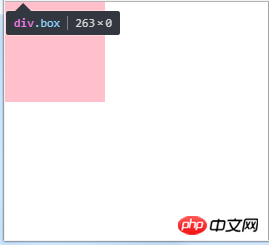
on the web page In design, a very common situation is to give the content a p as a wrapping container, and this wrapping container does not set a height, but allows the content inside to expand the height of the wrapping container. If you don't set float for the child element, there will be no problem. Once you set float for the child element, the parent element will not be able to adapt to the height of the float element. The height of the parent element will be 0, so the background color and other things will not work. Cannot be displayed. The reason is: Because the p height is not set in advance, the p height is determined by the height of the child elements it contains. Floats are out of the document flow, so the height of child elements is not calculated. At this time, in p, it is equivalent to the height of the sub-element in p being 0, so the height collapse of the parent element occurs. <style>
body,p{
margin:0;
padding:0;
}
.item{
float: left;
width:100px;
height:100px;
background-color: pink;
}
</style>
<p class="box">
<p class="item"></p>
</p>
Solution,
1. Add "overflow:hidden" to the parent elementOf course Can be "overflow:auto". But in order to be compatible with IE, it is best to use overflow:hidden..box{
overflow:hidden;
}So why does "overflow:hidden" solve this problem?
是因为“overflow:hidden”会触发BFC,BFC反过来决定了"height:auto"是如何计算的
,即计算BFC的高度时,浮动元素也参与计算,因此此时父元素会自适应浮动元素的高度。
所以呢,也可以设置"display:inline-block"、"position:absolute"、"float:left"来解决父元素高度坍塌的问题。因为凡是能创建一个BFC,就能达到包裹浮动子元素的效果。因此网上都说成“BFC能包裹浮动元素”.
2.在父元素内容的后面或者前面增加伪元素+清除浮动
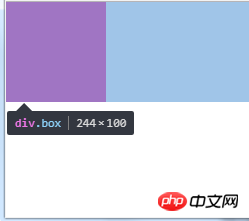
可以给父元素的内容添加一个伪元素,可以用::before或者::after,然后内容为空,这样就不会占据位置,最后为伪元素加上“clear:both"来清除浮动。
 <style>
        body,p{
            margin:0;
            padding:0;
        }
        .box::after{
            content: '';
            display: block;
            clear:both;
        }
        .item{
            float:left;
            width:100px;
            height: 100px;
            background-color: deeppink;
        }
    </style>
<p class="box">
    <p class="item"></p>
</p>
为什么这样可以呢?
弄清原因需要知道两点:一是伪元素的实际作用,二是css的清除浮动(clear)只能影响使用清除的元素本身,不能影响其他元素,并且清除浮动可以理解为打破横向排列。
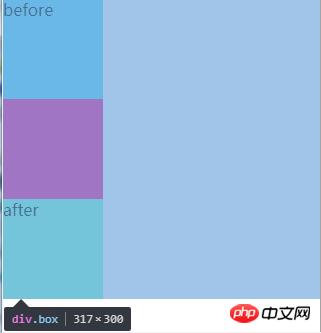
首先需要搞清除::after和::before起的作用,它们不是在一个元素的后面或者前面插入一个伪元素,而是会在元素内容后面或者前面插入一个伪元素(是在元素里面),之前我一直以为:before和:after伪元素 插入的内容会被注入到目标元素的前或后注入,其实注入的内容将是有关联的目标元素的子元素,但它会被置于这个元素的任何内容的“前”或“后”。我们来举个例子,可以看到.box的高度为300px,说明两个伪元素已经插入到.box内容里了。
<style>
        body,p{
            margin:0;
            padding:0;
        }
        .box::before{
            content: 'before';
            height: 100px;
            width: 100px;
            display: block;
            clear:both;
            background-color: #61dafb;
        }
        .box::after{
            content: 'after';
            width:100px;
            height:100px;
            display: block;
            clear:both;
            background-color: aquamarine;
        }
        .item{
            float:left;
            width:100px;
            height: 100px;
            background-color: deeppink;
        }
    </style>
<p class="box">
    <p class="item"></p>
</p>
综上,所以我们常用下列方式来清除浮动
.box::after{
  content:'';
  display:block;
  clear:both;
}
或者
.box::before{
  content:'';
  display:block;
  clear:both;
}
或者
.box::before,.box::after{
  content:'';
  display:block;
  clear:both;
}
//::before和::after必须配合content属性来使用,content用来定义插入的内容,content必须有值,至少是空。默认情况下,伪类元素的display是默认值inline,可以通过设置display:block来改变其显示。
在父元素的内容前后插入一个伪元素,content为空可以保证不占据位置(高度为0)。"clear:both"可以清除父元素左右的浮动,导致.box::before和.box::after遇到浮动元素会换行,从而会撑开高度,父元素会自适应这个高度从而不会出现高度坍陷。
其他解决高度坍塌的方法都是基于这两个思想的,一个是触发BFC,一个是添加元素+清除浮动(clear)。
浮动元素会被后一个元素的margin-top影响
<style>
        body,p{
            margin:0;
            padding:0;
        }
        p{
            width:100px;
            height:100px;
        }
        p:nth-of-type(1){
            float: left;
            background-color: #61dafb;
        }
        p:nth-of-type(2){
            margin-top: 100px;
            background-color: #58d3e2;
        }
    </style>
<p >p1</p>
<p>p2</p>
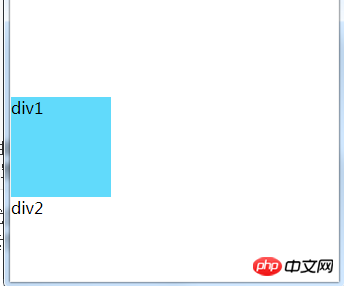
可以看到第一个p也跟着下来了,解决办法是给后一个元素设置clear,此时后一个元素的margin-top将无效
<style>
        body,p{
            margin:0;
            padding:0;
        }
        p{
            width:100px;
            height:100px;
        }
        p:nth-of-type(1){
            float: left;
            background-color: #61dafb;
        }
        p:nth-of-type(2){
            clear:both;
            margin-top: 100px;
            background-color: #58d3e2;
        }
    </style>
<p >p1</p>
<p>p2</p>
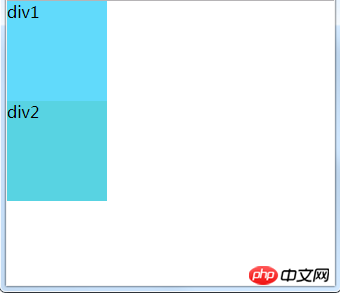
相信看了本文案例你已经掌握了方法,更多精彩请关注php中文网其它相关文章!
推荐阅读:
The above is the detailed content of Tips for using CSS floats. For more information, please follow other related articles on the PHP Chinese website!

