Home >Web Front-end >JS Tutorial >mint-ui+vue case analysis
mint-ui+vue case analysis
- php中世界最好的语言Original
- 2018-06-11 09:54:211941browse
This time I will bring you mint-ui vue case analysis. What are the precautions for mint-ui vue case analysis? The following is a practical case, let’s take a look.
First put the mint-ui Chinese documentation
I have been using mint-ui recently and found that the explanations of some plug-ins are not very detailed, and the codes used in some examples cannot be found. The sharing on github contains all markdown files, and the content is the online document
. I happen to be using it. The information I can find online is not very detailed, so I write it myself. Keep updating...emmmmm, it should be okay, I'm so lazy. Hope it can help others.
Introduce the features of mint-ui
Feature introduction
- ##Mint UI contains rich CSS and JS components, which can Meet daily mobile development needs. Through it, you can quickly build a page with a unified style and improve development efficiency.
- True loading of components on demand. You can load only the declared components and their style files, without worrying about the file size being too large.
- Taking into account the performance threshold of the mobile terminal, Mint UI uses CSS3 to handle various animations to avoid unnecessary redrawing and rearrangement of the browser, so that users can get a smooth experience. experience.
- Relying on Vue.js’ efficient componentization solution, Mint UI is lightweight. Even if all are imported, the compressed file size is only ~30kb (JS CSS) gzip.
1. How to use cell
Let’s throw a picture first↓
<mt-cell title="开关状态">
  <mt-switch v-model="openValue" @change="changeStatus"></mt-switch>
</mt-cell>
Use the cell layout and combine it with switch. produces the following results.

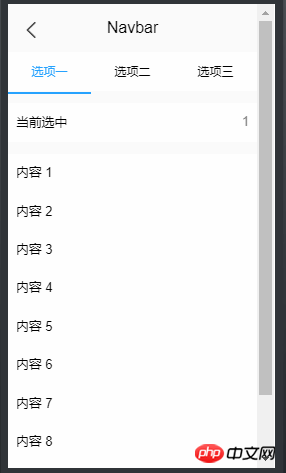
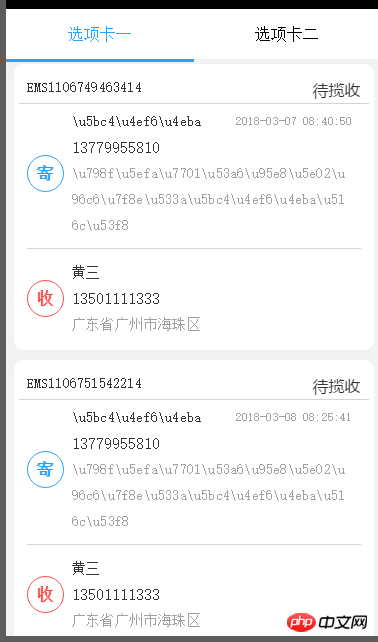
2.Infinite scroll is used in combination with Navbar.
Navbar is like this↓

, and then the effect will be Out.
<mt-navbar v-model="selected" >
  <mt-tab-item id="1">选项一</mt-tab-item>
  <mt-tab-item id="2">选项二</mt-tab-item>
</mt-navbar>
<mt-tab-container v-model="selected">
  <mt-tab-container-item id="1">
    <p v-infinite-scroll="loadMore"
        infinite-scroll-disabled="loading"
        infinite-scroll-distance="10"
        class="content"
    >
    </p>
  </mt-tab-container-item>
  <mt-tab-container-item id="2">
    <p v-infinite-scroll="loadMoreReceive"
        infinite-scroll-disabled="loadingReceive"
        infinite-scroll-distance="10"
        class="content"
    >
    </p>
  </mt-tab-container-item>
</mt-tab-container>
The basic page will appear.

v-if=selected == id, combine Infinite-scroll with the id and selected of the tab, and only when the selected selected corresponds to the id, the corresponding Infinite-Scroll.
<p v-infinite-scroll="loadMore"
  infinite-scroll-disabled="loading"
  infinite-scroll-distance="10"
  class="content"
  v-if="selected == 1"
>
Modify the v-if conditions as needed. The method bound to v-infinite-scroll will be executed for the first time after vue is mounted and before, and does not need to be called separately.
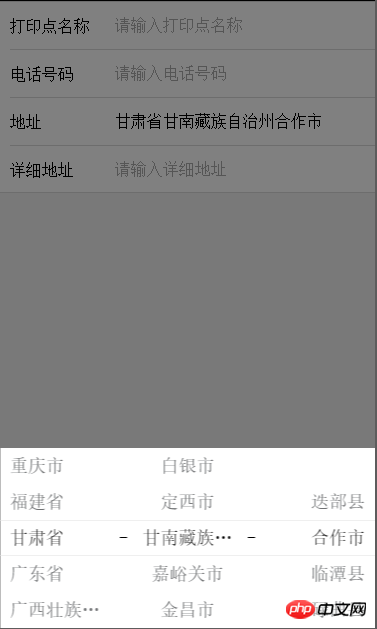
3. Picker, three-level linkage of address
There is a very simple three-level linkage here, but I couldn’t find it when I wanted to use it before. It’s so troublesome to write one myself. Put the picture first
getRegion(){
  var root=this;
  <!-- 通过/region 接口获取三级地址,然后存入regionArr -->
  http.get("/region").then(function (data) {
    root.regionArr=data.data.data;
    <!-- 存放省 -->
    for(var i=0;i<root.regionArr.length;i++){
      root.region_province[i]=root.regionArr[i].value;
    }
    <!-- 存放市 -->
    for(var i=0;i<root.regionArr[0].children.length;i++){
      root.region_city[i]=root.regionArr[0].children[i].value;
    }
    <!-- 存放区 -->
    for(var i=0;i<root.regionArr[0].children[0].children.length;i++){
      root.region_zone[i]=root.regionArr[0].children[0].children[i].value;
    }
    root.region=[
      {
        flex: 1,
        values: root.region_province,
        textAlign: 'left',
        className:'picker_Slot'
      },
      {
        pider: true,
        content: '-',
        className: 'slot2'
      },
      {
        flex: 1,
        values: root.region_city,
        textAlign: 'center',
        className:'picker_Slot'
      },
      {
        pider: true,
        content: '-',
        className: 'slot2'
      },
      {
        flex: 1,
        values: root.region_zone,
        textAlign: 'right',
        className:'picker_Slot'
      }
    ]
  });
},
Then set the third-level address
onValuesChange(picker, values) {
  var root=this;
  var str_1=[];
  var str_2=[];
  for(var i in root.regionArr){
    // 获取省,并重置市级名称
    if(root.regionArr[i].value == values[0]){
      for(var j in root.regionArr[i].children){
        str_1.push(root.regionArr[i].children[j].value);
        // 获取市级,并重置区级的名称
        if(root.regionArr[i].children[j].value == values[1]){
          // 当市级下不存在区名市,置空。
          if(root.regionArr[i].children[j].children != null){
            for(var k in root.regionArr[i].children[j].children){
              str_2.push(root.regionArr[i].children[j].children[k].value);
            }
          }else{
            str_2.push(" ");
          }
        }
      }
      picker.setSlotValues(1, str_1);
      picker.setSlotValues(2, str_2);
    }
  }
  // 赋值,初始时置为上一页返回的值
  root.$set(root.printerMessage,'province',values[0] == null ? root.printerMessage.province : values[0]);
  root.$set(root.printerMessage,'city',values[1] == null ? root.printerMessage.city : values[1]);
  root.$set(root.printerMessage,'area',values[2] == null ? root.printerMessage.area : values[2]);
}
相信看了本文案例你已经掌握了方法,更多精彩请关注php中文网其它相关文章!
推荐阅读:
The above is the detailed content of mint-ui+vue case analysis. For more information, please follow other related articles on the PHP Chinese website!
Related articles
See more- An in-depth analysis of the Bootstrap list group component
- Detailed explanation of JavaScript function currying
- Complete example of JS password generation and strength detection (with demo source code download)
- Angularjs integrates WeChat UI (weui)
- How to quickly switch between Traditional Chinese and Simplified Chinese with JavaScript and the trick for websites to support switching between Simplified and Traditional Chinese_javascript skills

