
Home >Web Front-end >JS Tutorial >How to implement webpack packaging optimization in vue
How to implement webpack packaging optimization in vue
- 亚连Original
- 2018-06-05 16:23:083128browse
Webpack is the standard packaging tool for react projects. It is very convenient to use the management module in conjunction with NPM. This article mainly introduces webpack packaging optimization (VUE Project). Friends who need it can refer to it
As the Spring Festival approaches, many colleagues in the company go home early to celebrate the New Year. The remaining staff will modify bugs according to Zen Tao, and when the bugs are corrected After completion, we need to repackage it for operation and maintenance, and put it on the test server for test colleagues to test. However, because the project itself is relatively large, the packaging time is too long (more than twenty-five minutes:sob:), so there is packaging optimization. The idea (in fact, I had the idea for a long time, but because my work schedule is usually quite full, I have never completed this work). This time I happened to have time, so I reconsidered this issue!
Webpack is the standard packaging tool for react projects. It is very convenient to use the management module in conjunction with NPM.
webapck regards all static resources as a module, and uses webpack to combine these modules into a bundle, thereby introducing a bundle.js on the page to load all static resources. .
Without further ado, let’s start the text directly
Let me first take a look at the directory structure of the project:

is a normal project Let’s talk about the structure briefly:
The build folder contains some packaged configuration things
The config folder is the basis of the project Configuration
dist is the packaged file
node_modules is the dependency package of the project
src Inside the folder is the source code of the project
The static folder contains some static resources used by the project
index.html is for the project Homepage
package.json file is the project configuration json
yarn.lock is the dependency for using yarn to lock the project
Optimization ideas
It takes a long time to package the project. The reason is simply that the overall project is relatively large, the dependencies are complex, and the components are not split enough before. Reasonable.
Regarding these three problems, we can deal with the following aspects:
Routine the project and only package what you need to package Part of it (our company merged several projects together. The reason is that the needs are similar, so it is easier to put them together -_-||| It saved a lot of trouble during the development process, but now it still needs to be paid back!! !!)
The dependency relationship is complicated. What I am talking about here is that there are many dependent modules in the project. For our current project, there are 40 dependent packages alone. Another important reason That is, there are dependencies with the same reference between components. The solution is to extract the reused dependencies in the project and package them separately.
In the process of writing a component, you need to consider the usage direction and implementation function of the component, and they cannot be confused.
Practical operation
Once you have the overall idea, you can start working on it. Go to the webpack documentation to read it. There is a DllPlugin. This plug-in is the key to helping us solve the problem. The following is the code of my webpack.dll.config:
var path = require("path");
var webpack = require("webpack");
function resolve (dir) {
 return path.join(__dirname, '..', dir)
}
module.exports = {
 // 你想要打包的模块的数组
 entry: {
 vendor: ['vue', 'lodash', 'vuex', 'axios', 'vue-router', 'iview', 'element-ui',
  'echarts','xlsx','jquery','vue-fullcalendar','vue-cookie','handsontable']
 },
 output: {
 path: path.join(__dirname, '../dist/vendor-dll-js'), // 打包后文件输出的位置
 filename: '[name].dll.js',
 library: '[name]_library'
 // vendor.dll.js中暴露出的全局变量名。
 // 主要是给DllPlugin中的name使用,
 // 故这里需要和webpack.DllPlugin中的`name: '[name]_library',`保持一致。
 },
 resolve: {
 extensions: ['.js', '.vue', '.json'],
 alias: {
  'vue$': 'vue/dist/vue.esm.js',
  '@': resolve('src'),
 }
 },
 plugins: [
 new webpack.DllPlugin({
  path: path.join(__dirname, '.', '[name]-manifest.json'),
  name: '[name]_library',
  context: __dirname
 }),
 // 压缩打包的文件,与该文章主线无关
 new webpack.optimize.UglifyJsPlugin({
  compress: {
  warnings: false
  }
 })
 ]
};
We need to extract the reusable packages from the project and put them in the vendor In the array, then define the file path of the packaged output in the output below, then configure the parsing parameters in resolve, and finally define the DllPlugin plug-in used. UglifyJsPlugin is a plug-in for compressing js.
The path in Dllplugin will be output A vendor-manifest.json, which is used for association ID. It will not be packaged during packaging, so there is no need to put it in static and run it webpack -p --progress -- config build/webpack.dll.conf.js
After success, there will be dll.vendor.js in the static directory and vendor.manifest.json open in the root directory. Take a look and you will see the source code of the dependent library and the matching id
ok. At this point, the extraction of the dependent library is completed. Then the next question is how to reference it and how to run it in dev and build. Woolen cloth?
Here are some conceptual differences between dll and commonsChunk. The reason why commonsChunk is slow and large is because every time it runs, it will be packaged, but in fact we don’t The dependent libraries we reference will always be updated, so the approach of dll is to package the dependent libraries in advance, and then only package the js that is modified each time.
Continue with the above steps, we need to modify the webpack.base.config file according to the generated json file:
const manifest = require('../vendor-manifest.json')
......
plugins: [
 new webpack.DllReferencePlugin({
  manifest
 })
 ]
Then open index.html and add 32853f66e92d3fd52e2df04e74abe85b2cacc6d41bbb37262a98f745aa00fbf0 ;
Execute npm run build , if everything is normal, it means your operation is correct.
Upgrade processing
至此优化的问题基本已经解决了,但是在处理过程中需要进行复制粘贴,还要对index.html文件进行操作,如果是对于项目不熟悉的人来进行开发项目的话,就会出现一些小的问题,所以我决定继续往下研究一下:
思路还是上面的思路,我们下面需要进行的操作呢就是对与之前的处理进行优化,通过配置文件,和命令去实现我们想要的效果
首先我们将上面 webpack.dll.config 文件里面的entry配置项拿出来,在config文件夹下新建一个dll.js
module.exports = {
 entry: {
 // 这里的依赖顺序必须是:对象从上往下依赖,数组从右到左依赖(如果互不依赖的可以忽略顺序)
 ui: ['iview', 'element-ui'],
 tool: ['lodash', 'jquery', 'axios', 'vue-fullcalendar'],
 vue: ['vue', 'vuex', 'vue-router', 'vue-cookie'],
 xlsx: ['xlsx'],
 echarts: ['echarts'],
 other: ['handsontable'],
 },
 outFile: '../static/dll'
};
这里面其实就是我们一开始写的entry的配置项,根据这个js去打包的文件有一个顺序,就是我总结的这个:
这里的依赖顺序必须是:对象从上往下依赖,数组从右到左依赖(如果互不依赖的可以忽略顺序)
如果不按照这个顺序去写的话,会出现依赖错误的问题!!!
然后在output里面再进行一下配置:
output: {
 path: path.join(__dirname, dllConfig.outFile), // 打包后文件输出的位置
 filename: '[name].dll.[chunkhash].js',
 library: '[name]_library'
 // 主要是给DllPlugin中的name使用,
 // 故这里需要和webpack.DllPlugin中的`name: '[name]_library',`保持一致。
 },
这样在执行 webpack -p --progress --config build/webpack.dll.conf.js 指令的时候会生成如下:
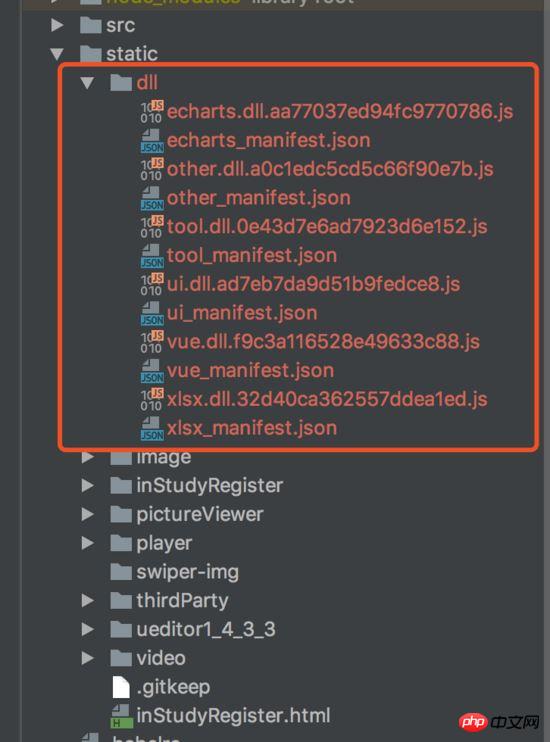
是不是看到文件后面的hash就一脸懵逼,这怎么办,我们没有办法去进行复制粘贴了!!(我们的目的不就是不进行复制粘贴吗 正经脸-_-)
要实现命令操作之后不进行复制粘贴操作就需要使用webpack的HtmlWebpackPlugin插件
在plugins里面配置一下HtmlWebpackPlugin
new HtmlWebpackPlugin({
 filename: path.join(__dirname, '../', config.dev.index),
 template: 'index.ejs',
 inject: false
}),
然后在根目录添加一个index.ejs模版(ejsGitHub地址 ), index.ejs中代码如下:
<body>
 <p id="app"></p>
 <!-- dll files will be auto injected -->
 <% for (var chunk in htmlWebpackPlugin.files.chunks) { %><script type="text/javascript" src="/<%= htmlWebpackPlugin.files.chunks[chunk].entry %>"></script>
 <% } %>
 <!-- built files will be auto injected -->
</body>
最后需要在config文件夹下的index.js进行一下修改: 在dev中添加: index: 'index.html',
项目在执行dev指令或者build指令之前需要先执行: webpack -p --progress --config build/webpack.dll.conf.js 在dll指令结束后 执行其他操作就可以完美的玩耍了:blush:
上面是我整理给大家的,希望今后会对大家有帮助。
相关文章:
通过在Vue中使用vue2-highcharts如何实现曲线数据展示的方法?
通过在Vue中使用vue2-highcharts实现top功能(详细教程)
The above is the detailed content of How to implement webpack packaging optimization in vue. For more information, please follow other related articles on the PHP Chinese website!
Related articles
See more- An in-depth analysis of the Bootstrap list group component
- Detailed explanation of JavaScript function currying
- Complete example of JS password generation and strength detection (with demo source code download)
- Angularjs integrates WeChat UI (weui)
- How to quickly switch between Traditional Chinese and Simplified Chinese with JavaScript and the trick for websites to support switching between Simplified and Traditional Chinese_javascript skills