
 Backend DevelopmentPython Tutorialpytorch + visdom CNN method of processing self-built image data sets
pytorch + visdom CNN method of processing self-built image data sets

This article mainly introduces the method of pytorch visdom CNN processing self-built image data sets. It has certain reference value. Now I share it with you. Friends in need can refer to it
Environment
System: win10
cpu: i7-6700HQ
gpu: gtx965m
python: 3.6
pytorch: 0.3
Data download
comes from Sasank Chilamkurthy’s tutorial; Data: Download link.
After downloading, unzip and place it in the project root directory:

The data set is used to classify ants and bees. There are about 120 training images and 75 validation images for each class.
Data import
You can use the torchvision.datasets.ImageFolder(root,transforms) module to convert images into tensors.
Define transform first:
ata_transforms = {
  'train': transforms.Compose([
    # 随机切成224x224 大小图片 统一图片格式
    transforms.RandomResizedCrop(224),
    # 图像翻转
    transforms.RandomHorizontalFlip(),
    # totensor 归一化(0,255) >> (0,1)  normalize  channel=(channel-mean)/std
    transforms.ToTensor(),
    transforms.Normalize(mean=[0.485, 0.456, 0.406], std=[0.229, 0.224, 0.225])
  ]),
  "val" : transforms.Compose([
    # 图片大小缩放 统一图片格式
    transforms.Resize(256),
    # 以中心裁剪
    transforms.CenterCrop(224),
    transforms.ToTensor(),
    transforms.Normalize(mean=[0.485, 0.456, 0.406], std=[0.229, 0.224, 0.225])
  ])
}
Import and load data:
data_dir = './hymenoptera_data'
# trans data
image_datasets = {x: datasets.ImageFolder(os.path.join(data_dir, x), data_transforms[x]) for x in ['train', 'val']}
# load data
data_loaders = {x: DataLoader(image_datasets[x], batch_size=BATCH_SIZE, shuffle=True) for x in ['train', 'val']}

data_sizes = {x: len(image_datasets[x]) for x in ['train', 'val']}
class_names = image_datasets['train'].classes
print(data_sizes, class_names)
{'train': 244, 'val': 153} ['ants', 'bees']There are 244 images in the training set and 153 images in the test set.
Visualize some pictures. Since visdom supports tensor input, you don’t need to change it to numpy. You can directly use tensor calculation:
inputs, classes = next(iter(data_loaders['val']))
out = torchvision.utils.make_grid(inputs)
inp = torch.transpose(out, 0, 2)
mean = torch.FloatTensor([0.485, 0.456, 0.406])
std = torch.FloatTensor([0.229, 0.224, 0.225])
inp = std * inp + mean
inp = torch.transpose(inp, 0, 2)
viz.images(inp)

Create CNN
net Based on the previous article's processing of cifar10, I changed the specifications:
class CNN(nn.Module):
  def __init__(self, in_dim, n_class):
    super(CNN, self).__init__()
    self.cnn = nn.Sequential(
      nn.BatchNorm2d(in_dim),
      nn.ReLU(True),
      nn.Conv2d(in_dim, 16, 7), # 224 >> 218
      nn.BatchNorm2d(16),
      nn.ReLU(inplace=True),
      nn.MaxPool2d(2, 2), # 218 >> 109
      nn.ReLU(True),
      nn.Conv2d(16, 32, 5), # 105
      nn.BatchNorm2d(32),
      nn.ReLU(True),
      nn.Conv2d(32, 64, 5), # 101
      nn.BatchNorm2d(64),
      nn.ReLU(True),
      nn.Conv2d(64, 64, 3, 1, 1),
      nn.BatchNorm2d(64),
      nn.ReLU(True),
      nn.MaxPool2d(2, 2), # 101 >> 50
      nn.Conv2d(64, 128, 3, 1, 1), #
      nn.BatchNorm2d(128),
      nn.ReLU(True),
      nn.MaxPool2d(3), # 50 >> 16
    )
    self.fc = nn.Sequential(
      nn.Linear(128*16*16, 120),
      nn.BatchNorm1d(120),
      nn.ReLU(True),
      nn.Linear(120, n_class))
  def forward(self, x):
    out = self.cnn(x)
    out = self.fc(out.view(-1, 128*16*16))
    return out

# 输入3层rgb ,输出 分类 2
model = CNN(3, 2)
loss, optimization function:
line = viz.line(Y=np.arange(10))
loss_f = nn.CrossEntropyLoss()
optimizer = optim.SGD(model.parameters(), lr=LR, momentum=0.9)
scheduler = optim.lr_scheduler.StepLR(optimizer, step_size=7, gamma=0.1)
Parameters:
BATCH_SIZE = 4
LR = 0.001
EPOCHS = 10
Run 10 epochs and see:
[9/10] train_loss:0.650|train_acc:0.639|test_loss:0.621|test_acc0.706
[10/10] train_loss:0.645|train_acc:0.627|test_loss:0.654|test_acc0.686
Training complete in 1m 16s
Best val Acc: 0.712418

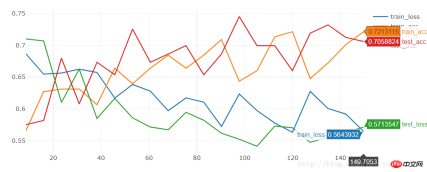
Run 20 epochs and see:
[19/20] train_loss:0.592|train_acc:0.701|test_loss:0.563|test_acc0.712
[20/20] train_loss:0.564|train_acc:0.721|test_loss:0.571|test_acc0.706
Training complete in 2m 30s
Best val Acc: 0.745098
model = torchvision.models.resnet18(True)
num_ftrs = model.fc.in_features
model.fc = nn.Linear(num_ftrs, 2)
[9/10] train_loss:0.621|train_acc:0.652|test_loss:0.588|test_acc0.667
[10/10] train_loss:0.610|train_acc:0.680|test_loss:0.561|test_acc0.667
Training complete in 1m 24s
Best val Acc: 0.686275
The effect is also very average, and we want to train it with good results in a short time models, we can download the trained state and train on this basis:
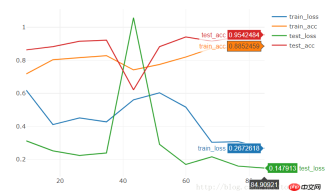
model = torchvision.models.resnet18(pretrained=True)
num_ftrs = model.fc.in_features
model.fc = nn.Linear(num_ftrs, 2)
[9/10] train_loss:0.308|train_acc:0.877|test_loss:0.160|test_acc0.941
[10/10] train_loss:0.267|train_acc:0.885|test_loss:0.148|test_acc0.954
Training complete in 1m 25s
Best val Acc: 0.954248
10 epochs can directly reach 95% accuracy.
pytorch
visdom handles simple classification problems
The above is the detailed content of pytorch + visdom CNN method of processing self-built image data sets. For more information, please follow other related articles on the PHP Chinese website!

 Merging Lists in Python: Choosing the Right MethodMay 14, 2025 am 12:11 AM
TomergelistsinPython,youcanusethe operator,extendmethod,listcomprehension,oritertools.chain,eachwithspecificadvantages:1)The operatorissimplebutlessefficientforlargelists;2)extendismemory-efficientbutmodifiestheoriginallist;3)listcomprehensionoffersf
 How to concatenate two lists in python 3?May 14, 2025 am 12:09 AM
In Python 3, two lists can be connected through a variety of methods: 1) Use operator, which is suitable for small lists, but is inefficient for large lists; 2) Use extend method, which is suitable for large lists, with high memory efficiency, but will modify the original list; 3) Use * operator, which is suitable for merging multiple lists, without modifying the original list; 4) Use itertools.chain, which is suitable for large data sets, with high memory efficiency.
 Python concatenate list stringsMay 14, 2025 am 12:08 AM
Using the join() method is the most efficient way to connect strings from lists in Python. 1) Use the join() method to be efficient and easy to read. 2) The cycle uses operators inefficiently for large lists. 3) The combination of list comprehension and join() is suitable for scenarios that require conversion. 4) The reduce() method is suitable for other types of reductions, but is inefficient for string concatenation. The complete sentence ends.
 Python execution, what is that?May 14, 2025 am 12:06 AM
PythonexecutionistheprocessoftransformingPythoncodeintoexecutableinstructions.1)Theinterpreterreadsthecode,convertingitintobytecode,whichthePythonVirtualMachine(PVM)executes.2)TheGlobalInterpreterLock(GIL)managesthreadexecution,potentiallylimitingmul
 Python: what are the key featuresMay 14, 2025 am 12:02 AM
Key features of Python include: 1. The syntax is concise and easy to understand, suitable for beginners; 2. Dynamic type system, improving development speed; 3. Rich standard library, supporting multiple tasks; 4. Strong community and ecosystem, providing extensive support; 5. Interpretation, suitable for scripting and rapid prototyping; 6. Multi-paradigm support, suitable for various programming styles.
 Python: compiler or Interpreter?May 13, 2025 am 12:10 AM
Python is an interpreted language, but it also includes the compilation process. 1) Python code is first compiled into bytecode. 2) Bytecode is interpreted and executed by Python virtual machine. 3) This hybrid mechanism makes Python both flexible and efficient, but not as fast as a fully compiled language.
 Python For Loop vs While Loop: When to Use Which?May 13, 2025 am 12:07 AM
Useaforloopwheniteratingoverasequenceorforaspecificnumberoftimes;useawhileloopwhencontinuinguntilaconditionismet.Forloopsareidealforknownsequences,whilewhileloopssuitsituationswithundeterminediterations.
 Python loops: The most common errorsMay 13, 2025 am 12:07 AM
Pythonloopscanleadtoerrorslikeinfiniteloops,modifyinglistsduringiteration,off-by-oneerrors,zero-indexingissues,andnestedloopinefficiencies.Toavoidthese:1)Use'i


Hot AI Tools

Undresser.AI Undress
AI-powered app for creating realistic nude photos

AI Clothes Remover
Online AI tool for removing clothes from photos.

Undress AI Tool
Undress images for free

Clothoff.io
AI clothes remover

Video Face Swap
Swap faces in any video effortlessly with our completely free AI face swap tool!

Hot Article
Hot Tools

SublimeText3 Chinese version
Chinese version, very easy to use

WebStorm Mac version
Useful JavaScript development tools

Zend Studio 13.0.1
Powerful PHP integrated development environment

SublimeText3 Linux new version
SublimeText3 Linux latest version

Dreamweaver CS6
Visual web development tools

