Home >Web Front-end >JS Tutorial >Detailed explanation of JavaScript image processing and synthesis technology (detailed tutorial)
Detailed explanation of JavaScript image processing and synthesis technology (detailed tutorial)
- 亚连Original
- 2018-06-01 15:11:572442browse
This article mainly introduces the relevant knowledge points of JavaScript image processing and synthesis as well as related example code analysis. Friends who are interested can learn from it.
Introduction
Image processing has now become a necessity in our lives, and I think everyone often has this need. In actual front-end business, there are often many projects that require image processing and processing. Due to the company's business needs in the past period, I have accumulated some useful information in this area. I will take advantage of this period after the year to summarize it into a series of articles to share with you. I hope it can inspire and help everyone who is working hard on front-end children's shoes
This series is divided into the following 4 parts:
Basic type image processing technology scaling and cropping;
Basic type image processing Technology picture synthesis;
Basic type picture processing technology text synthesis;
Algorithm type picture processing technology;
Through these accumulations, I have encapsulated the functions commonly used in several projects:
Image synthesis: Example Git Image cropping: Example Git Portrait cutout: Example Git
囧After talking about these old routines, we started to take off!
First of all, I will temporarily divide front-end image processing into two types: basic type and algorithm type;
Basic type of image processing technology: image scaling, rotation, adding borders, image synthesis, Businesses such as puzzles are all basic types of image processing. The difference is that there is no need to use pixel-level algorithms, but to transform the image by calculating the size and position of the image. For example, commonly used sticker functions:

#Algorithm type image processing: This type of image processing is more complex and is characterized by processing the pixels of the image through pixel-level algorithmsRGBAChange the channel value, etc., for example, we use photshop or Meitu Xiuxiu and other tools to perform beauty/filter/black and white/cutout/blur operations on the picture. This type of The focus is mainly on the algorithm and performance levels. For example, commonly used makeup functions:

#This series first starts our journey by dealing with basic types. Basic type of image processing has a large number of usage scenarios in actual projects. It is mainly completed by using the canvas capability. There are no performance and compatibility issues and it can meet online operation standards. I will roughly divide the basic types of image processing into the following types. These types can basically cover all daily business scenarios:
Image scaling;
Cropping of pictures;
Composition of pictures;
Composition of pictures and pictures, such as stickers, borders, watermarks, etc.; Add text to the picture; add basic geometric figures to the picture;
Tips: I have encapsulated this type of image processing scenario into a plug-in, which can basically meet the needs of all this type of image processing, GIT address ( Welcome to discuss);
Before introducing the specific functions, since the drawing of pictures completely depends on the loading of pictures, let’s first understand some pre-requisite knowledge.
1. Cross-domain images
First of all, image loading and drawing involve cross-domain issues of images, so if it is an online image, it needs to be included in the image Set the cross-domain header on the server, and set the crossOrigin of the a1f02c36ba31691bcfe87b2722de723b tag to * before loading the image on the front end, otherwise it will be drawn to the canvas. Report cross-domain errors.
Tips: There are some pitfalls here that I can share with you:
crossOriginneeds to be set strictly, both online pictures only When the local path orbase64is set, it must not be set, otherwise an error will be reported under some systems, causing the image to fail to load;When When the project is a local package environment, such as when it is built into
App, thecrossOriginvalue is invalid. The security mechanism ofwebviewwill cause it to fail regardless of whether the value is set or not. Report cross-domain errors. The solution is: all images need to be converted tobase64to draw correctly; the##crossOrigin
value must be set before the image is loaded, that is Set before assigningsrctoa1f02c36ba31691bcfe87b2722de723b, otherwise it will be invalid;
Since the drawing of
canvas requires the loaded image, we need to ensure that the drawn material image has been loaded, so we need to use a1f02c36ba31691bcfe87b2722de723b##onload event, you can use an existing image in html, or use js to create an image object:
function loadImage(image, loader, error){
 // 创建 image 对象加载图片;
 let img = new Image();

 // 当为线上图片时,需要设置 crossOrigin 属性;
 if(image.indexOf('http') == 0)img.crossOrigin = '*';
 img.onload = () => {
 loaded(img);

 // 使用完后清空该对象,释放内存;
 setTimeout(()=>{
  img = null;
 },1000);
 };
 img.onerror = () => {
 error('img load error');
 };
 img.src = image;
}
Introduction to image loading After the prerequisite knowledge, let's first look at the simplest image processing---zooming and cropping! Tips: I believe that if you don’t know much about canvas when reading this article, you can check the corresponding API documentation. This article will not explain the basic canvas API in detail.
一、图片的缩放
图片的缩放最常见的场景是做图片的压缩。在保证图片清晰的前提下通过合理地缩小图片尺寸,能大大的降低图片的大小。在实际应用场景中,有着广泛的用途。例如图片上传时,用户自主上传的图片可能是一张非常大的尺寸,例如现在手机所拍摄的照片尺寸经常能达到1920*2560的尺寸,大小可能超过5M。而在项目中,我们可能并不需要用到这么大的尺寸,此时对图片的压缩能大大的优化加载速度和节省带宽;
1、新建一个canvas画布,将宽高设置为需要压缩到的尺寸;
该画布既为图片缩放后的尺寸,此处有个点是需要保证图片的比例不变, 因此需要通过计算得出画布的宽与高:
let imgRatio = img.naturalWidth / img.naturalHeight;

// 创建一个画布容器;
let cvs = document.createElement('canvas');

// 获取容器中的画板;
let ctx = cvs.getContext('2d');
cvs.width = 1000;
cvs.height = cvs.width / imgRatio;
2、将图片画入后再导出成base64;
这里使用2个最常用的方法:
ctx.drawImage(image, dx, dy, dw, dh): 这个方法其实最多可以接收9个参数, 实现压缩,只需要使用其中的5个参数即可, 其余参数在其它部分使用到时再做详解;
image : 需要绘制的图片源,需要接收已经 加载完成 的HTMLImageElement,HTMLCanvasElement或者HTMLVideoElement; dx / dy : 相对于画布左上角的绘制起始点坐标; dw / dh : 绘制的宽度和高度,宽高比例并不锁定,可使图片变形;
cvs.toDataURL(type, quality): 该方法用于将画布上的内容导出成 base64 格式的图片,可配置2个参数;
type: 图片格式, 一般可以使用 image/png 或者 image/jpeg, 当图片不包含透明时,建议使用jpeg,可使导出的图片大小减小很多; quality: 图片质量,可使用0~1之间的任意值;经过测试,该值设置成0.9时较为合适,可以有效减小图片文件大小且基本不影响图片清晰度,导出后的 base64 既为压缩后的图片;
Tips: 此处有个坑, 想导出jpg格式的图片必须用image/jpeg,不能使用image/jpg;
// 将原图等比例绘制到缩放后的画布上;
ctx.drawImage(image, 0, 0, cvs.width, cvs.height);

// 将绘制后的图导出成 base64 的格式;
let b64 = cvs.toDataURL('image/jpeg', 0.9);
3.多种格式的图片转换成base64;
我们常用的图片上传功能,我们使用的是原生的a2dc5349fb8bb852eaec4b6390c03b14标签,此时获取到的是File格式的图片,图片的格式各异且尺寸很大,我们应该压缩处理后再使用。
使用FileReader:
let file = e.files[0];
if(window.FileReader) {
 let fr = new FileReader();
 fr.onloadend = e => {
 let b64 = e.target.result;

 // b64即为base64格式的用户上传图;
 };
 fr.readAsDataURL(file);
}对base64的图片使用刚才的canvas方式进行压缩的处理;
Tips: 这里有个小坑是,图片的EXIF信息中的方向值会影响图片的展示,在IOS会出现图片的宽高与图片的方向不匹配的问题,因此需要进行特殊处理,矫正图片的方向。方案:
1、可以使用 exif.js 来获取图片信息中的Orientation属性,利用canvas的旋转绘制来矫正;
2、这里有个 canvasResize.js 插件,可以解决从 File 到 base64 的所有问题。
二、图片的裁剪
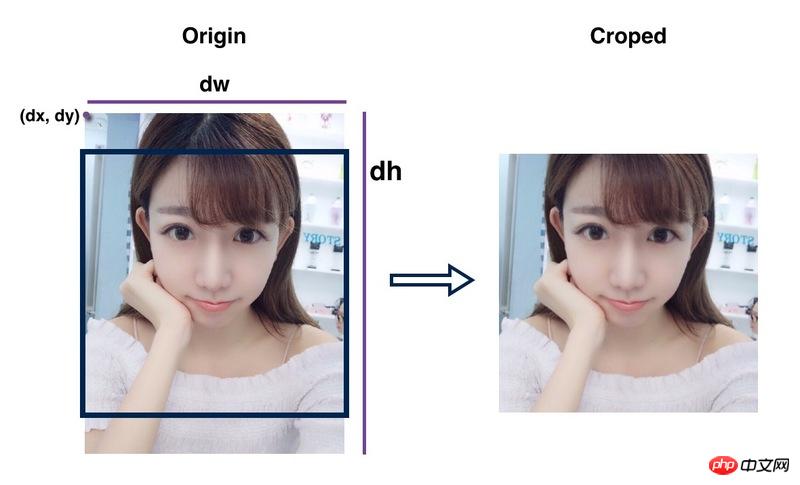
在实际项目中,由于图片的宽高比例各式各样,而展示和使用一般需要一个较为固定的比例,此时便需要将图片裁剪成我们需要的宽高比例,使用到的方式其实和图片的缩放基本一致,主要是通过调整 drawImage 的dx, dy参数来实现。原理其实是,将drawImage的绘制起始点(dx, dy)向上偏移,此时由于canvas已被我们设置成期望裁剪后的尺寸,而超出画布的部分不会绘制,从而达到裁剪的目的;通过灵活的设置值,基本可以完成各种图片裁剪需求,简单示例图(黑色框代表创建的画布的尺寸):

此处以需要将一张600*800的长方形图竖直居中裁剪为600*600的正方形图为例, 简单封装成一个功能函数:
// 使用方式:
let b64 = cropImage(img, {
 width : 600,
 height : 600,
});

// 居中裁剪
function cropImage(img, ops){
 // 图片原始尺寸;
 let imgOriginWidth = img.naturalWidth,
 imgOriginHeight = img.naturalHeight;

 // 图片长宽比,保证图片不变形;
 let imgRatio = imgOriginWidth / imgOriginHeight;

 // 图片裁剪后的宽高, 默认值为原图宽高;
 let imgCropedWidth = ops.width || imgOriginWidth,
 imgCropedHeight = ops.height || imgOriginHeight;

 // 计算得出起始坐标点的偏移量, 由于是居中裁剪,因此等于 前后差值 / 2;
 let dx = (imgCropedWidth - imgOriginWidth) / 2,
 dy = (imgCropedHeight - imgOriginHeight) / 2;

 // 创建画布,并将画布设置为裁剪后的宽高;
 let cvs = document.createElement('canvas');
 let ctx = cvs.getContext('2d');
 cvs.width = imgCropedWidth;
 cvs.height = imgCropedHeight;

 // 绘制并导出图片;
 ctx.drawImage(img, dx, dy, imgCropedWidth, imgCropedWidth / imgRatio);
 return cvs.toDataURL('image/jpeg', 0.9);
}
三、图片的旋转
图片的旋转的原理同样也是将图片绘制到画布上进行旋转后再导出。其实使用到的是canvas的rotate方法;
let cvs = document.createElement('canvas');
let ctx = cvs.getContext('2d');

// 将参照点移动到画板的中心点;
ctx.translate(ctx.width/2, ctx.height/2);
// 旋转画板;
ctx.rotate = 90;
// 绘制图片;
ctx.drawImage(img);
// 导出得到旋转后的图片;
cvs.toDataURL();
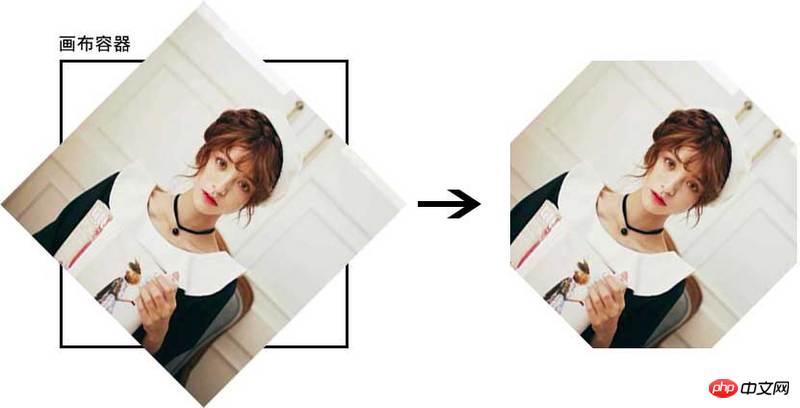
这里有个比较特别的部分,就是这里旋转的是画布的画板部分,并不是整个画布容器,而画布容器外面不会被绘制,因此这里就会出现一个图像四个角被裁剪掉的问题:

解决的方式就是:
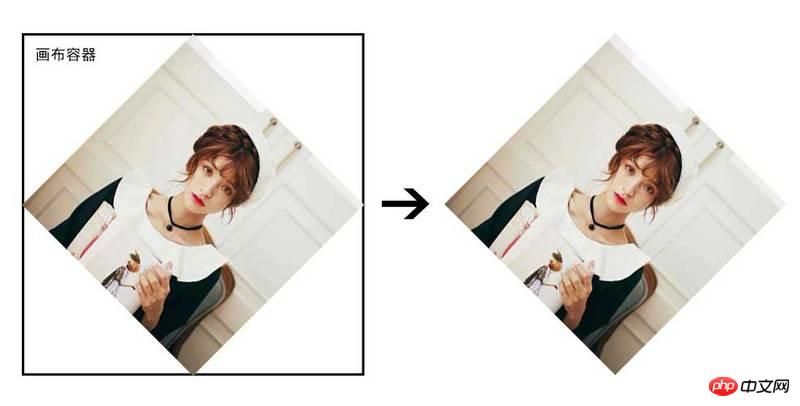
将画布容器放大,变成:

上面这个例子中,由于图片是正方形,因此将容器的宽高放大1.5倍便可保证图片不会被裁剪,而现实中的图片由于宽高比例不定,因此这个放大系数是一个动态的值:
Tips: 由于我们将画板基点移动到画布中心了,因此在绘制的时候,要相对于基点调整 dx 与 dy;
// 创建画布,获取画板;
...

// 放大系数为
let iw = img.width, ih = img.height;
let ir = iw > ih ? iw / ih : ih / iw;

cvs.width = iw * ir * 1.5;
cvs.height = ih * ir * 1.5;
// 将参照点移动到画板的中心点;
ctx.translate(cvs.width/2, cvs.height/2);
// 旋转画板;
ctx.rotate = 90;

// 绘制图片;
ctx.drawImage(img, -cvs.width/2, -cvs.height/2);

// 导出图片;
...
总结
本文主要介绍了一些前端图片处理的前置知识:
图片处理技术分类;
基础类型图片处理技术;算法类型图片处理技术; 图片的跨域;图片的加载;
还有讲解了属于基础类型图片处理中最简单的两类:
图片的缩放;图片的裁剪;图片的旋转;
上面是我整理给大家的,希望今后会对大家有帮助。
相关文章:
The above is the detailed content of Detailed explanation of JavaScript image processing and synthesis technology (detailed tutorial). For more information, please follow other related articles on the PHP Chinese website!
Related articles
See more- An in-depth analysis of the Bootstrap list group component
- Detailed explanation of JavaScript function currying
- Complete example of JS password generation and strength detection (with demo source code download)
- Angularjs integrates WeChat UI (weui)
- How to quickly switch between Traditional Chinese and Simplified Chinese with JavaScript and the trick for websites to support switching between Simplified and Traditional Chinese_javascript skills

