Home >Web Front-end >JS Tutorial >How to operate Angular to implement custom validation functions of template-driven forms
How to operate Angular to implement custom validation functions of template-driven forms
- php中世界最好的语言Original
- 2018-05-29 10:36:311326browse
This time I will show you how to operate Angular to implement the custom verification function of template-driven forms, and how to operate Angular to implement the custom verification function of template-driven forms. What are the precautions?, the following is the actual combat Let’s take a look at the case.
HTML5’s native form validation attributes (required, length limit, value interval, regular expression, etc.) can meet ordinary validation needs, but they must be used in some scenarios Custom verification, such as password confirmation during registration, time/value selection with comparison relationship, request to the server for value verification, etc... Here we take password confirmation as an example.
Command development
The verification status of the form is fed back through the errors attribute of formControl, so the basic idea is to add validation Validation rules, and then add the validation results to the errors attribute of the formControl instance. Then the problem comes, the control of the template-driven form is completed in the HTML template, and the formControl instance cannot be directly accessed. At this time, you need to use instructions to package the inspection rules. Angular provides Validator supplier NG_VALIDATORS for handling form custom validation. Create the directive first.
import { Directive} from '@angular/core';
import { NG_VALIDATORS, Validator, AbstractControl} from '@angular/forms';
@Directive({
 selector: '[appConfirmpsw]',
 providers: [{
  provide : NG_VALIDATORS,
  useExisting : ConfirmpswDirective,
  multi: true
 }]
})
export class ConfirmpswDirective implements Validator {
 constructor() {
  }
 validate(control: AbstractControl): {[key: string]: any} {
   //检验规则
 }
}
1. Specify the provider for the instruction NG_VALIDATORS, and the alias class ConfirmpswDirective, and multi is true (you can use the same token to register different providers). Because it is a directive registered in the NG_VALIDATORS provider, it can be recognized by Angular's verification process. It should be noted that it must be registered with useExisting so that a new instance will not be created.
2. Use the Validator interface to constrain custom instructions. This is the validator class provided by Angular. There is a validate attribute, which will pass in the formControl of the form and return a ValidationErrors object.
Now that the command structure is completed, the verification part begins. First, you need to pass in the entered password, so add @input, and then specify the verification rules to determine whether the value of the bound form is the same as the entered value
@Input('appConfirmpsw') confirmpsw: string;
In order to avoid using instructions, you also need to Additionally pass in the confirmpsw attribute ( <input type="password" appConfirmpsw [confirmpsw]="'xxx'" >), so we use the command name appConfirmpsw as an alias of confirmpsw, so that the passed values will be compared Convenient, simplified to <input type="password" [appConfirmpsw] = "'xxx'">.
Here is a specially written test function to compare values and return results. Remember to call
export function comfirmPswValidator(_confirmpsw: string): ValidatorFn { //传入已输入的密码值 , 返回一个ValidatorFn
 return (control: AbstractControl): {[key: string]: any} => { //传入绑定表单的formControl
  if ( !control.value ) { //如果绑定未输入值,则返回 required错误
   return { 'required' : true };
  }
  //如果两次输入的值不相同,则返回confirmpsw的错误
  return control.value !== _confirmpsw ? {'confirmpsw' : {value: true}} : null;
 };
}
in the validate of the command. The complete command is as follows:
import { Directive, Input } from '@angular/core';
import { NG_VALIDATORS, Validator, AbstractControl, ValidatorFn} from '@angular/forms';
@Directive({
 selector: '[appConfirmpsw]',
 providers: [{
  provide : NG_VALIDATORS,
  useExisting : ConfirmpswDirective,
  multi: true
 }]
})
export class ConfirmpswDirective implements Validator {
 @Input('appConfirmpsw') confirmpsw: string;
 constructor() {
  }
 validate(control: AbstractControl): {[key: string]: any} {
  console.log(this.confirmpsw);
  return this.confirmpsw ? comfirmPswValidator(this.confirmpsw)(control) : null;
 }
}
export function comfirmPswValidator(_confirmpsw: string): ValidatorFn {
 return (control: AbstractControl): {[key: string]: any} => {
  if ( !control.value ) {
   return { 'required' : true };
  }
  return control.value !== _confirmpsw ? {'confirmpsw' : {value: true}} : null;
 };
}
Use
to test the effect of the command Bar
 <p class="input-group">
   <label class="group-label" for="psw-new"> 新密码 :</label>
   <input class="group-input" [(ngModel)]="inputpsw.new" #new="ngModel" type="password" name="psw" id="psw-new" required>
  </p>
  <p class="input-group input-error" *ngIf="new.touched&&new.invalid">
   <p class="group-error-content" *ngIf="new.errors?.required">确认密码为必填项!</p>
  </p>
  <p class="input-group">
   <label class="group-label" for="psw-confirm">确认密码 :</label>
   <input class="group-input" [(ngModel)]="inputpsw.confirm" #confirm="ngModel" type="password" name="confirm" id="psw-confirm"
   [appConfirmpsw] = "new.value" required>
  </p>
  <p class="input-group input-error" *ngIf="confirm.touched&&confirm.invalid">
   <p class="group-error-content" *ngIf="confirm.errors?.required">新密码为必填项!</p>
   <p class="group-error-content" *ngIf="confirm.errors?.confirmpsw">密码输入不一致!</p>
  </p>
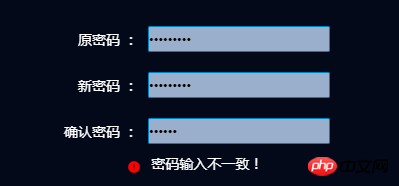
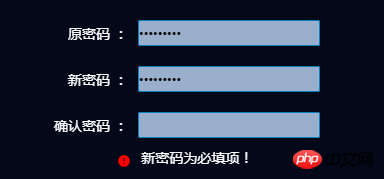
Pass in the value of the new form, and control the prompt feedback through the errors.confirmpsw attribute. The password input is inconsistent and can be correctly verified to

. The prompt when confirming that the password is empty is also correct

believe it After reading the case in this article, you have mastered the method. For more exciting information, please pay attention to other related articles on the PHP Chinese website!
Recommended reading:
How to deal with Mac installation thrift error due to bison
How to use Taobao mirror cnpm to install Vue.js
The above is the detailed content of How to operate Angular to implement custom validation functions of template-driven forms. For more information, please follow other related articles on the PHP Chinese website!
Related articles
See more- An in-depth analysis of the Bootstrap list group component
- Detailed explanation of JavaScript function currying
- Complete example of JS password generation and strength detection (with demo source code download)
- Angularjs integrates WeChat UI (weui)
- How to quickly switch between Traditional Chinese and Simplified Chinese with JavaScript and the trick for websites to support switching between Simplified and Traditional Chinese_javascript skills

