


This article mainly introduces the method of customizing the player based on vue-video-player, mainly the use of vue-video-player developed based on video.js, and how to operate the API in video.js. Friends in need can refer to
to see the effect first.
Figure 1--Show the sidebar

Figure 2-Collapse the sidebar;

Figure 3: Full screen.

Written in front
You need to use vue in this project, vue-video-player , I use the ui framework of iview, but the ui framework does not matter. What I focus on here is the use of vue-video-player developed based on video.js, and how to operate the API in video.js.
vue-video-player Project address: https://github.com/surmon-china/vue-video-player.
video.js document address: http://docs.videojs.com/docs/api/player.html.
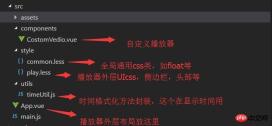
Project directory:
1. Outer ui layout
Figure 1 As you can see, this project uses a two-column adaptive layout. The right side is the playlist with a fixed width of 500px, and the left side is the player box. The playlist box can be expanded or collapsed according to the click of the handle, and the player The box also adapts its width according to the expansion/contraction of the playlist.
(Because the recorded animation is too large to be uploaded, you can clone my program and run it to see it).
The html code structure is as follows:

.transition{
       transition: all 1s ease;
       -moz-transition: all 1s ease;
       -webkit-transition: all 1s ease;
       -o-transition: all 1s ease;
   }
.toLeft{
.transition;
margin-right: 540px !important;
}
.toRight{
.transition;
margin-right: 40px !important;
}
.toHide{
.transition;
right: -500px !important;
}
.toShow{
.transition;
right: 0px !important;
}// 播放区
.player-box{
margin-right: 540px;
height: 100%;
position: relative;
}//侧边信息区
.info-box{
width: 520px;
height: 100%;
background: transparent;
position: relative;
overflow: hidden;
}// 内容区
.content{
background: #292929;
position: relative;
padding: 20px 0 20px 20px;
}
2. Player ui
The entire customized player ui is encapsulated into a component-CostomVedio.vue, and the playback area uses vue -video-player player, but the bottom control bar is customized and does not use the controlBar that comes with the player. Usually these common ones do not meet the requirements of the designer, so we need to customize the player UI. The html structure code is as follows: <template>
<p class="custom-video-outer-box" @mouseover="videoMouseOver">
<video-player class="video-player-box"
ref="videoPlayer"
:options="playerOptions"
:playsinline="true"
customEventName="customstatechangedeventname"
@play="onPlayerPlay($event)"
@pause="onPlayerPause($event)"
@ended="onPlayerEnded($event)"
@waiting="onPlayerWaiting($event)"
@playing="onPlayerPlaying($event)"
@loadeddata="onPlayerLoadeddata($event)"
@timeupdate="onPlayerTimeupdate($event)"
@statechanged="playerStateChanged($event)"
@ready="playerReadied"
>
<!-- @canplay="onPlayerCanplay($event)" -->
<!-- @canplaythrough="onPlayerCanplaythrough($event)" -->
</video-player>
<!-- 底部进度条 start -->
<transition name="fade">
<p class="bottomCtrl" v-show="isBottomCtrlShow" id="bottomCtrl">
<!-- -->
<!-- <p class="bottomCtrl" v-show="false"> -->
<!-- <p class="bottomCtrl" > -->
<Slider v-model="playerCtrl.currentTimeInt" class="progress-slider" :max="playerCtrl.durationInt" :tip-format="progressTipFormat" @on-change="progressChange"></Slider>
<p class="clearfix" >
<p class="left">
<!-- 暂停 -->
<span v-on:click="play" v-if="!playerCtrl.isPlay" class="icon">
<Icon type="play"></Icon>
</span>
<!-- 播放 -->
<span v-else v-on:click="pause" class="icon">
<Icon type="stop"></Icon>
</span>
<!-- 下一曲 -->
<span class="icon" v-on:click="nextClick">
<Icon type="skip-forward"></Icon>
</span>
<span class="time">
{{playerCtrl.currentTime}}/{{playerCtrl.duration}}
</span>
</p>
<p class="right clearfix">
<p class="voice-box clearfix left">
<!-- 音量 -->
<Icon type="volume-medium" class="left icon"></Icon>
<Slider v-model="playerCtrl.voiceSlider" class="voice-slider left " max=100 @on-change="volumeChange"></Slider>
</p>
<!-- 全屏 -->
<span class="icon left" @click="fullScreenHandle">
<Icon type="crop" class="full-screen" ></Icon>
</span>
</p>
</p>
</p>
</transition>
</p>
</template>The specific idea is to use the player to fill the playback area, and use position positioning to fix the custom controlBar at the bottom of the playback area. Pay attention to the z of the controlBar here. -The index must be large enough, otherwise it will not be visible at the top when it is full screen. css style:
<style lang="less">
    .video-player-box{
        height: 100% !important;
        width: 100% !important;
    }
    //底部进度条
    .bottomCtrl{
        line-height: 60px;
        height: 60px;
        overflow: visible;
        position: absolute;
        bottom: 0;
        left: 0;
        background-color: rgba(45, 45, 45, .92);
        width: 100%;
        padding: 0 50px;
        color: #fff;
        z-index: 999999999999999;

        .icon{
            font-size: 16px;
            line-height: 60px;
            cursor: pointer;
        }

        .icon+.icon{
            margin-left: 20px;
        }
    }
    .custom-video-outer-box{
        position: relative;
        height: 100%;
        width: 100%;
    }
    .progress-slider{
        position: absolute;
        width: 100%;
        top: 0;
        left: 0;
        height: 18px;
        line-height: 18px;
        .ivu-slider-wrap{
            margin: 0 !important;
            border-radius: 0 !important;
        }
        .ivu-slider-button-wrap{
             line-height: normal !important;
        }
        .ivu-slider-button{
            height: 8px !important;
            width: 8px !important;

        }
    }
    .voice-box{
        .voice-slider{
            width: 100px;
            margin-left: 20px;
        }
        .ivu-slider-wrap{
            margin: 27px 0 !important;
        }

    }
    .time{
        margin-left: 25px;
    }
    .full-screen{
       margin-left: 25px;
        line-height: 60px;
    }

    .ivu-progress-outer{
        padding: 0 10px !important;
    }

    .vjs-big-play-button{
        height: 80px !important;
        width: 80px !important;
        line-height: 80px !important;
        text-align: center;
        background:rgba(0, 0, 0, 0.8) !important;
        border-radius: 50% !important;
        top: 50% !important;
        left: 50% !important;
        margin-left: -40px !important;
        margin-top: -40px !important;
    }
    #vjs_video_3{
        max-height: 100% !important;
        width: 100% !important;
        height: 100% !important;
    }
    .video-player-box>p{
        height: 100% !important;
        width: 100% !important;
    }
    .video-js .vjs-big-play-button{
        font-size: 5em !important;
    }
    video{
        max-height: 100% !important;

    }

</style>
3. Implement the custom controlBar function
The next step is to implement the custom controlBar function , such as play, pause, next song, play progress, remaining time, full screen, volume adjustment, etc. Here we must first look at the corresponding API of video.js. Although it is in English, it is written very clearly and is easy to understand. video.js api document address: http://docs.videojs.com/docs/api/player.html1. Play, pause, next song, full screen are mainly for monitoring We add a custom button click event, and then call the player API to perform the corresponding operation and change the state. // 播放
play(){
this.player.play();
},
// 暂停
pause(){
this.player.pause();
},
//下一曲
nextClick(){
console.log("自定义","下一曲点击");
},
//全屏
fullScreenHandle(){
console.log("全屏");
if(!this.player.isFullscreen()){
this.player.requestFullscreen();
this.player.isFullscreen(true);
}else{
this.player.exitFullscreen();
this.player.isFullscreen(false);
}
},Of course, the player in vue-video-player will monitor state changes in the callback method: <video-player class="video-player-box"
ref="videoPlayer"
:options="playerOptions"
:playsinline="true"
customEventName="customstatechangedeventname"
@play="onPlayerPlay($event)"
@pause="onPlayerPause($event)"
@ended="onPlayerEnded($event)"
@waiting="onPlayerWaiting($event)"
@playing="onPlayerPlaying($event)"
@loadeddata="onPlayerLoadeddata($event)"
@timeupdate="onPlayerTimeupdate($event)"
@statechanged="playerStateChanged($event)"
@ready="playerReadied"
>
<!-- @canplay="onPlayerCanplay($event)" -->
<!-- @canplaythrough="onPlayerCanplaythrough($event)" -->
</video-player>We can change our behavior accordingly based on these state changes. UI, such as displaying a "pause" button when playing, displaying "play" and other functions when pausing. 2. Playback progress, remaining time, volume adjustmentThe playback progress is based on the currentTime method in the player onPlayerTimeupdate() callback method to obtain the current playback progress time, unit S, because I am using slider here and the progress is calculated by integers, so I need two variables to store here, one is in integer form, and the other is the string form after formatting hours, minutes and seconds for display. //时间更新
onPlayerTimeupdate(player){
this.playerCtrl.currentTime=timeUtil.secondToDate(player.currentTime());
this.playerCtrl.currentTimeInt=Math.floor(player.currentTime());
console.log("当前音量",player.volume());
}, Fixed-point playback, that is, the user clicks somewhere on the progress bar to progress the playback at this point. The slider's @on-change="progressChange"method is used to monitor the slider's fixed point,
//进度条被拉动
           progressChange(val){
               this.player.currentTime(val);
               this.playerCtrl.currentTimeInt=val;
               this.playerCtrl.currentTime=timeUtil.secondToDate(val);
           },
Get the value of the fixed point, and then jump to the fixed point playback through the player's currentTime setting. The volume adjustment method is similar to the playback progress:
muted:false,//开始声音to turn on the sound, otherwise adjusting the sound in the muted state will be invalid.
Quick solution for ajax to return object Object
Introduction to the 4 common request methods of ajax in jQuery
The above is the detailed content of Method to customize player based on vue-video-player. For more information, please follow other related articles on the PHP Chinese website!

 JavaScript in Action: Real-World Examples and ProjectsApr 19, 2025 am 12:13 AM
JavaScript's application in the real world includes front-end and back-end development. 1) Display front-end applications by building a TODO list application, involving DOM operations and event processing. 2) Build RESTfulAPI through Node.js and Express to demonstrate back-end applications.
 JavaScript and the Web: Core Functionality and Use CasesApr 18, 2025 am 12:19 AM
The main uses of JavaScript in web development include client interaction, form verification and asynchronous communication. 1) Dynamic content update and user interaction through DOM operations; 2) Client verification is carried out before the user submits data to improve the user experience; 3) Refreshless communication with the server is achieved through AJAX technology.
 Understanding the JavaScript Engine: Implementation DetailsApr 17, 2025 am 12:05 AM
Understanding how JavaScript engine works internally is important to developers because it helps write more efficient code and understand performance bottlenecks and optimization strategies. 1) The engine's workflow includes three stages: parsing, compiling and execution; 2) During the execution process, the engine will perform dynamic optimization, such as inline cache and hidden classes; 3) Best practices include avoiding global variables, optimizing loops, using const and lets, and avoiding excessive use of closures.
 Python vs. JavaScript: The Learning Curve and Ease of UseApr 16, 2025 am 12:12 AM
Python is more suitable for beginners, with a smooth learning curve and concise syntax; JavaScript is suitable for front-end development, with a steep learning curve and flexible syntax. 1. Python syntax is intuitive and suitable for data science and back-end development. 2. JavaScript is flexible and widely used in front-end and server-side programming.
 Python vs. JavaScript: Community, Libraries, and ResourcesApr 15, 2025 am 12:16 AM
Python and JavaScript have their own advantages and disadvantages in terms of community, libraries and resources. 1) The Python community is friendly and suitable for beginners, but the front-end development resources are not as rich as JavaScript. 2) Python is powerful in data science and machine learning libraries, while JavaScript is better in front-end development libraries and frameworks. 3) Both have rich learning resources, but Python is suitable for starting with official documents, while JavaScript is better with MDNWebDocs. The choice should be based on project needs and personal interests.
 From C/C to JavaScript: How It All WorksApr 14, 2025 am 12:05 AM
The shift from C/C to JavaScript requires adapting to dynamic typing, garbage collection and asynchronous programming. 1) C/C is a statically typed language that requires manual memory management, while JavaScript is dynamically typed and garbage collection is automatically processed. 2) C/C needs to be compiled into machine code, while JavaScript is an interpreted language. 3) JavaScript introduces concepts such as closures, prototype chains and Promise, which enhances flexibility and asynchronous programming capabilities.
 JavaScript Engines: Comparing ImplementationsApr 13, 2025 am 12:05 AM
Different JavaScript engines have different effects when parsing and executing JavaScript code, because the implementation principles and optimization strategies of each engine differ. 1. Lexical analysis: convert source code into lexical unit. 2. Grammar analysis: Generate an abstract syntax tree. 3. Optimization and compilation: Generate machine code through the JIT compiler. 4. Execute: Run the machine code. V8 engine optimizes through instant compilation and hidden class, SpiderMonkey uses a type inference system, resulting in different performance performance on the same code.
 Beyond the Browser: JavaScript in the Real WorldApr 12, 2025 am 12:06 AM
JavaScript's applications in the real world include server-side programming, mobile application development and Internet of Things control: 1. Server-side programming is realized through Node.js, suitable for high concurrent request processing. 2. Mobile application development is carried out through ReactNative and supports cross-platform deployment. 3. Used for IoT device control through Johnny-Five library, suitable for hardware interaction.


Hot AI Tools

Undresser.AI Undress
AI-powered app for creating realistic nude photos

AI Clothes Remover
Online AI tool for removing clothes from photos.

Undress AI Tool
Undress images for free

Clothoff.io
AI clothes remover

Video Face Swap
Swap faces in any video effortlessly with our completely free AI face swap tool!

Hot Article
Hot Tools

MantisBT
Mantis is an easy-to-deploy web-based defect tracking tool designed to aid in product defect tracking. It requires PHP, MySQL and a web server. Check out our demo and hosting services.

WebStorm Mac version
Useful JavaScript development tools

ZendStudio 13.5.1 Mac
Powerful PHP integrated development environment

SAP NetWeaver Server Adapter for Eclipse
Integrate Eclipse with SAP NetWeaver application server.

Notepad++7.3.1
Easy-to-use and free code editor

