
Home >Web Front-end >JS Tutorial >Basic use of React Router (graphic tutorial)
Basic use of React Router (graphic tutorial)
- 亚连Original
- 2018-05-19 13:40:121926browse
This article mainly introduces the basic knowledge of React Router. Friends who are interested should take a look.
React is a technology stack. It is difficult to build complex web applications using React alone. In many cases we need to introduce other related technologies
React Router It is a routing library for React that maintains synchronization between relevant page components and URLs
The following is a brief introduction to its basic use. For a more comprehensive guide, please refer to the guide
1. It looks like this
In the page file
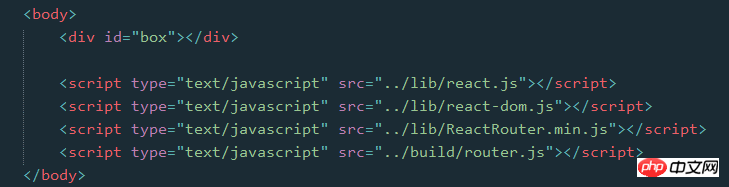
In the external script file

2. Introduction of the library
There are two ways to introduce the React Router library
2.1 The browser can directly import
. You can refer to the browser version here, or import
after downloading and then you can directly use the ReactRouter object. We may Several of the attributes are used
let {Router, Route, IndexRoute, Redirect, IndexRedirect, Link, IndexLink, hashHistory, browserHistory} = ReactRouter;
2.2 npm installation, compiled and introduced through the build tool
npm install --save react-router
After installing the routing library, introduce relevant properties into the script file
import {Router, Route, IndexRoute, Redirect, IndexRedirect, Link, IndexLink, hashHistory, browserHistory} from 'react-router';
Because the browser does not currently support the import and export commands, and the babel tool will not compile the require command, we still need to compile and introduce it with build tools such as Webpack.
After the library is introduced, In the render method of ReactDOM, you can use related components
3. Simple routing
The most basic one is to determine which page (component) to enter through the URL

class First extends Component {
 constructor(props) {
 super(props);
 }
 render() {
 return <p>First</p>
 }
}
class Second extends Component {
 constructor(props) {
 super(props);
 }
 render() {
 return <p>Second</p>
 }
}
class App extends Component {
 constructor(props) {
 super(props);
 }
 render() {
 return <p></p>
 }
}
render((
<Router history={hashHistory}>
<Route path="/" component={App} />
<Route path="first" component={First} />
<Route path="second" component={Second} />
</Router>
),
document.getElementById('box')
);
First, Router is a container, and the history attribute defines how to process the URL of the page.
There are three types:
browserHistory: Changing routing through URL changes is a recommended method, but it requires some configuration on the server side ( I still don’t know how to configure the nest yet)
hashHistory: Through #/, it is actually like the common hashbang method in single-page applications, example.com/#/ path/path.. (Easy to use, this method will be used here for now)
createMemoryHistory: Memory history will not be operated or read from the address bar. It can help us complete server-side rendering. We have to manually create the history object
Then, use the Route component in the container to define each route and specify the path through path (as you can see, is case-insensitive), specify the component used by the path through component
You can also directly use the routes attribute to define each route directly on the Router container, such as
let routes =
<p>
<Route path="/" component={App} />
<Route path="first" component={First} />
<Route path="second" component={Second} />
</p>;
render(<Router routes={routes} history={hashHistory}></Router>, document.getElementById('box'));
It should be noted that there can only be one parent in {routes}, so the e388a4556c0f65e1904146cc1a846bee tag is added here
In addition, routing Route can also be nested, in the above example , nesting may be more in line with the actual situation
It should be noted that the App here is at the parent level. In order to obtain the First and Second components of the child, you need to add to the App component. this.props.children Get
class App extends Component {
constructor(props) {
super(props);
}
render() {
return <p>{this.props.children}</p>
}
}
render((
<Router history={hashHistory}>
<Route path="/" component={App}>
<Route path="first" component={First} />
<Route path="second" component={Second} />
</Route>
</Router>
),
document.getElementById('box')
);
Similarly, you can directly use the routes attribute to define routes in Router
let routes =
<Route path="/" component={App}>
<Route path="first" component={First} />
<Route path="second" component={Second} />
</Route>;
render(<Router routes={routes} history={hashHistory}></Router>, document.getElementById('box'));
#4. Other components of routing
In addition to the basic Route, IndexRoute, Redirect, IndexRedirect, Link, IndexLink, etc., as the name implies
IndexRoute: will be used on the main page. As in the previous example, under the path "/" we see a blank page. You can add a default page. Component is used for navigation
Link: You can think of it as the implementation of the 3499910bf9dac5ae3c52d5ede7383485 tag in React. Use the to attribute to define the path. You can also pass activeClass or activeStyle defines the active style
IndexLink: Similar to Link, it is recommended to define links to the main page. Of course, you can also define it at will

class First extends Component {
constructor(props) {
super(props);
}
render() {
return (
<p>First
<IndexLink to="/" activeStyle={{color: 'red'}}>Basic</IndexLink>
</p>
)
}
}
class Second extends Component {
constructor(props) {
super(props);
}
render() {
return <p>Second</p>
}
}
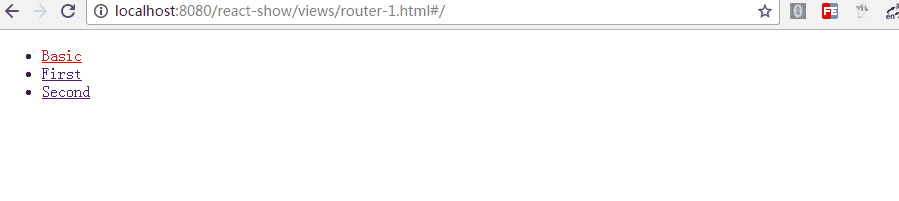
class Basic extends Component {
constructor(props) {
super(props);
}
render() {
return (
<ul role="nav">
<li><IndexLink to="/" activeStyle={{color: 'red'}}>Basic</IndexLink></li>
<li><Link to="/first" activeStyle={{color: 'red'}}>First</Link></li>
<li><Link to="/Second" activeClass="active">Second</Link></li>
</ul>
)
}
}
class App extends Component {
constructor(props) {
super(props);
}
render() {
return <p>
{this.props.children}
</p>
}
}
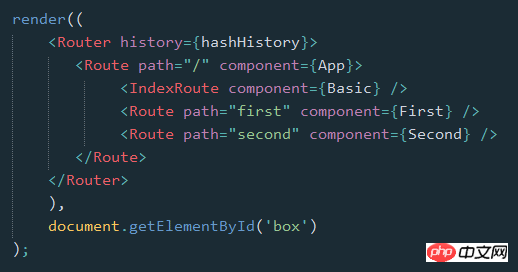
render((
<Router history={hashHistory}>
<Route path="/" component={App}>
<IndexRoute component={Basic} />
<Route path="first" component={First} />
<Route path="second" component={Second} />
</Route>
</Router>
),
document.getElementById('box')
);
Redirect: 从from路径重定向到to路径
IndexRedirect: 在主页面,直接重定向到to路径

render((
<Router history={hashHistory}>
<Route path="/" component={App}>
<IndexRoute component={Basic} />
<IndexRedirect to="first" />
<Redirect from="second" to="first" />
<Route path="first" component={First} />
<Route path="second" component={Second} />
</Route>
</Router>
),
document.getElementById('box')
);
5. 路由的path规则
path定义的路由的路径,在hashHistory中,它的主页路径是 #/
自定义Route路由通过与父Route的path进行合并,在与主页路径合并,得到最终的路径
path的语法:
:paramName 匹配 URL 的一个部分,直到遇到下一个/、?、#
() 表示URL的这个部分是可选的
* 匹配任意字符(非贪婪模式),直到模式里面的下一个字符为止
** 匹配任意字符(贪婪模式),直到下一个/、?、#为止
<Route path="/hello/:name"> // 匹配 /hello/michael 和 /hello/ryan
<Route path="/hello(/:name)"> // 匹配 /hello, /hello/michael, 和 /hello/ryan
<Route path="/files/*.*"> // 匹配 /files/hello.jpg 和 /files/hello.html
<Route path="/**/*.jpg"> // 匹配 /files/hello.jpg 和 /files/path/to/file.jpg
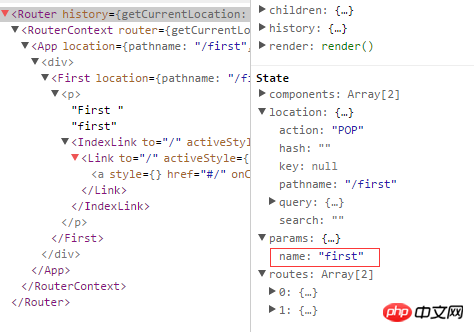
而:name可以通过 this.props.params 中取到
class First extends Component {
constructor(props) {
super(props);
}
render() {
return (
<p>First {this.props.params.name}
<IndexLink to="/" activeStyle={{color: 'red'}}>Basic</IndexLink>
</p>
)
}
}
.
.
<Route path="/:name" component={First} />

通过React Dev Tool也可以看到组件的相关数据
6. 路由的onEnter、onLeave钩子
在路由的跳转中,我们可能需要在进入页面或离开页面的时候做一些特殊操作,Route 通过 onEnter 与 onLeave 定义了这两个行为

<Route path="first" component={First} onEnter={(nextState, replace) => {
console.log(nextState);
alert('onEnter');
// replace('second');
}} onLeave={() => {
alert('onLeave');
}}/>
如上,带两个参数,通过 replace 可以更新路径,把注释去掉后,进入"/first"时立马跳转值"/second",这在检测登录时应该比较有用
上面是我整理给大家的,希望今后会对大家有帮助。
相关文章:
React native ListView在移动端中添加顶部下拉刷新与底部点击刷新案例详解
The above is the detailed content of Basic use of React Router (graphic tutorial). For more information, please follow other related articles on the PHP Chinese website!
Related articles
See more- An in-depth analysis of the Bootstrap list group component
- Detailed explanation of JavaScript function currying
- Complete example of JS password generation and strength detection (with demo source code download)
- Angularjs integrates WeChat UI (weui)
- How to quickly switch between Traditional Chinese and Simplified Chinese with JavaScript and the trick for websites to support switching between Simplified and Traditional Chinese_javascript skills