


This article mainly introduces the use of OpenCV for calibration of Python. It has a certain reference value. Now I share it with you. Friends in need can refer to it.
This article combines the official OpenCV samples and provides an introduction to the official samples. Modify the code in the example so that it can run normally, and conduct experiments and explanations on the data you collected.
1. Preparation
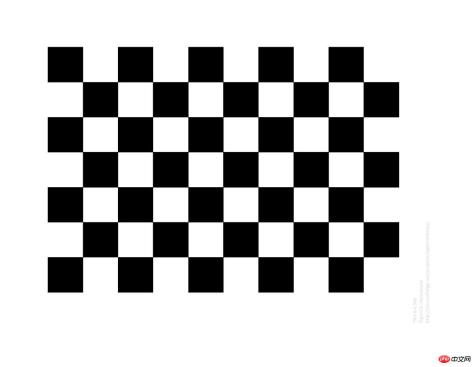
OpenCV uses a checkerboard for calibration, as shown in the figure below. In order to calibrate the camera, we need to input a series of 3D points and their corresponding 2D image points. On a black and white checkerboard, two-dimensional image points are easily found through corner detection. What about three-dimensional points in the real world? During our collection, we placed the camera in one place, moved the checkerboard calibration plate to different positions, and then photographed it. So we need to know the value of (X,Y,Z). But to put it simply, we define the plane where the checkerboard is located as the XY plane, that is, Z=0. For the calibration board, we can know the square size of the checkerboard, such as 30mm, so we can define the corner point coordinates on the checkerboard as (0,0,0), (30,0,0), ( 60,0,0),..., the unit of this result is mm.
3D points are called object points, and 2D image points are called image points.
2. Detect checkerboard corner points
In order to find the checkerboard template, we use openCV The function cv2.findChessboardCorners(). We also need to tell the program what specifications the template we are using is, such as an 8*8 checkerboard or a 5*5 checkerboard. It is recommended to use a checkerboard template with unequal numbers in the x and y directions. In the following experiment, we use a 10*7 checkerboard. Each square has a side length of 20mm, which means it contains 9*6 internal corners. If this function detects the template, it will return the corresponding corner point and return true. Of course, not all images can find the required template, so we can use multiple images for calibration. In addition to using a checkerboard, we can also use a dot matrix, and the corresponding function is cv2.findCirclesGrid().
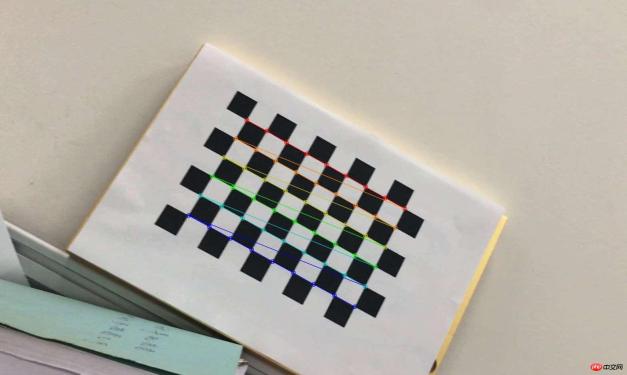
After finding the corner point, we can use cv2.cornerSubPix() to get more accurate corner pixel coordinates. We can also use cv2.drawChessboardCorners() to draw the corners onto the image for display. As shown in the figure below:
3. Calibration
Through the above steps, we The three-dimensional points used for calibration and the corresponding two-dimensional point pairs on the image are obtained. We use cv2.calibrateCamera() for calibration. This function returns the calibration result, the camera's intrinsic parameter matrix, distortion coefficient, rotation matrix and translation vector.
4. De-distortion
#In the third step, we have obtained the camera intrinsic parameters and distortion coefficients. Before de-distorting the image, we also You can use cv.getOptimalNewCameraMatrix() to optimize the internal parameters and distortion coefficients by setting the free scale factor alpha. When alpha is set to 0, a trimmed inner parameter and distortion coefficient that removes unwanted pixels after dedistortion will be returned; when alpha is set to 1, a trimmed inner parameter containing extra black pixels will be returned. parameters and distortion coefficients, and returns an ROI for cropping it out.
Then we can use the newly obtained internal parameter matrix and distortion coefficient to dedistort the image. There are two ways to remove distortion:
(1) Use cv2.undistort()
This is the most direct method, just call the function directly Obtain the dedistorted image, which can be cropped using the ROI above. The code is as follows:
# undistort
dst = cv2.undistort(img, mtx, dist, None, newcameramtx)

# crop the image
x,y,w,h = roi
dst = dst[y:y+h, x:x+w]
cv2.imwrite('calibresult.png',dst)
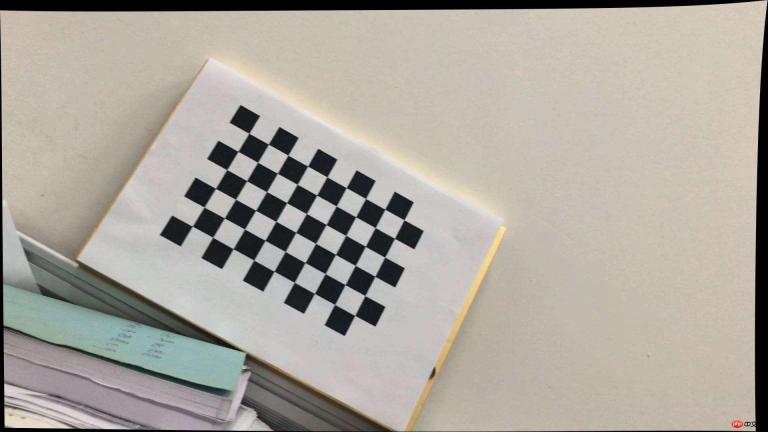
The following picture shows the result of de-distorting a picture and retaining black pixels:
(2) Use remmaping
This is a two-step method, first calculate a mapping from the distorted image to the non-distorted image, and then use this mapping The relationship is used to dedistort the image.
The code is as follows:
# undistort
mapx,mapy = cv2.initUndistortRectifyMap(mtx,dist,None,newcameramtx,(w,h),5)
dst = cv2.remap(img,mapx,mapy,cv2.INTER_LINEAR)

# crop the image
x,y,w,h = roi
dst = dst[y:y+h, x:x+w]
cv2.imwrite('calibresult.png',dst)
5. Back-projection error
Through the reverse projection Projection error, we can evaluate the quality of the results. The closer to 0, the more ideal the result is. Using the previously calculated internal parameter matrix, distortion coefficient, rotation matrix and translation vector, use cv2.projectPoints() to calculate the projection of the three-dimensional point to the two-dimensional image, and then calculate the error between the point obtained by back-projection and the point detected on the image, Finally, calculate an average error for all calibration images, and this value is the back-projection error.
Code
The code for all steps is as follows:
#coding:utf-8
import cv2
import numpy as np
import glob

# 找棋盘格角点
# 阈值
criteria = (cv2.TERM_CRITERIA_EPS + cv2.TERM_CRITERIA_MAX_ITER, 30, 0.001)
#棋盘格模板规格
w = 9
h = 6
# 世界坐标系中的棋盘格点,例如(0,0,0), (1,0,0), (2,0,0) ....,(8,5,0),去掉Z坐标,记为二维矩阵
objp = np.zeros((w*h,3), np.float32)
objp[:,:2] = np.mgrid[0:w,0:h].T.reshape(-1,2)
# 储存棋盘格角点的世界坐标和图像坐标对
objpoints = [] # 在世界坐标系中的三维点
imgpoints = [] # 在图像平面的二维点

images = glob.glob('calib/*.png')
for fname in images:
 img = cv2.imread(fname)
 gray = cv2.cvtColor(img,cv2.COLOR_BGR2GRAY)
 # 找到棋盘格角点
 ret, corners = cv2.findChessboardCorners(gray, (w,h),None)
 # 如果找到足够点对,将其存储起来
 if ret == True:
  cv2.cornerSubPix(gray,corners,(11,11),(-1,-1),criteria)
  objpoints.append(objp)
  imgpoints.append(corners)
  # 将角点在图像上显示
  cv2.drawChessboardCorners(img, (w,h), corners, ret)
  cv2.imshow('findCorners',img)
  cv2.waitKey(1)
cv2.destroyAllWindows()

# 标定
ret, mtx, dist, rvecs, tvecs = cv2.calibrateCamera(objpoints, imgpoints, gray.shape[::-1], None, None)

# 去畸变
img2 = cv2.imread('calib/00169.png')
h, w = img2.shape[:2]
newcameramtx, roi=cv2.getOptimalNewCameraMatrix(mtx,dist,(w,h),0,(w,h)) # 自由比例参数
dst = cv2.undistort(img2, mtx, dist, None, newcameramtx)
# 根据前面ROI区域裁剪图片
#x,y,w,h = roi
#dst = dst[y:y+h, x:x+w]
cv2.imwrite('calibresult.png',dst)

# 反投影误差
total_error = 0
for i in xrange(len(objpoints)):
 imgpoints2, _ = cv2.projectPoints(objpoints[i], rvecs[i], tvecs[i], mtx, dist)
 error = cv2.norm(imgpoints[i],imgpoints2, cv2.NORM_L2)/len(imgpoints2)
 total_error += error
print "total error: ", total_error/len(objpoints)
Related recommendations:
The data in OpenCVcv::Mat is written to the txt file
OpenCV cv.Mat and .txt file data reading and writing operations
The above is the detailed content of Python uses OpenCV for calibration. For more information, please follow other related articles on the PHP Chinese website!

 Python vs. C : Understanding the Key DifferencesApr 21, 2025 am 12:18 AM
Python and C each have their own advantages, and the choice should be based on project requirements. 1) Python is suitable for rapid development and data processing due to its concise syntax and dynamic typing. 2)C is suitable for high performance and system programming due to its static typing and manual memory management.
 Python vs. C : Which Language to Choose for Your Project?Apr 21, 2025 am 12:17 AM
Choosing Python or C depends on project requirements: 1) If you need rapid development, data processing and prototype design, choose Python; 2) If you need high performance, low latency and close hardware control, choose C.
 Reaching Your Python Goals: The Power of 2 Hours DailyApr 20, 2025 am 12:21 AM
By investing 2 hours of Python learning every day, you can effectively improve your programming skills. 1. Learn new knowledge: read documents or watch tutorials. 2. Practice: Write code and complete exercises. 3. Review: Consolidate the content you have learned. 4. Project practice: Apply what you have learned in actual projects. Such a structured learning plan can help you systematically master Python and achieve career goals.
 Maximizing 2 Hours: Effective Python Learning StrategiesApr 20, 2025 am 12:20 AM
Methods to learn Python efficiently within two hours include: 1. Review the basic knowledge and ensure that you are familiar with Python installation and basic syntax; 2. Understand the core concepts of Python, such as variables, lists, functions, etc.; 3. Master basic and advanced usage by using examples; 4. Learn common errors and debugging techniques; 5. Apply performance optimization and best practices, such as using list comprehensions and following the PEP8 style guide.
 Choosing Between Python and C : The Right Language for YouApr 20, 2025 am 12:20 AM
Python is suitable for beginners and data science, and C is suitable for system programming and game development. 1. Python is simple and easy to use, suitable for data science and web development. 2.C provides high performance and control, suitable for game development and system programming. The choice should be based on project needs and personal interests.
 Python vs. C : A Comparative Analysis of Programming LanguagesApr 20, 2025 am 12:14 AM
Python is more suitable for data science and rapid development, while C is more suitable for high performance and system programming. 1. Python syntax is concise and easy to learn, suitable for data processing and scientific computing. 2.C has complex syntax but excellent performance and is often used in game development and system programming.
 2 Hours a Day: The Potential of Python LearningApr 20, 2025 am 12:14 AM
It is feasible to invest two hours a day to learn Python. 1. Learn new knowledge: Learn new concepts in one hour, such as lists and dictionaries. 2. Practice and exercises: Use one hour to perform programming exercises, such as writing small programs. Through reasonable planning and perseverance, you can master the core concepts of Python in a short time.
 Python vs. C : Learning Curves and Ease of UseApr 19, 2025 am 12:20 AM
Python is easier to learn and use, while C is more powerful but complex. 1. Python syntax is concise and suitable for beginners. Dynamic typing and automatic memory management make it easy to use, but may cause runtime errors. 2.C provides low-level control and advanced features, suitable for high-performance applications, but has a high learning threshold and requires manual memory and type safety management.


Hot AI Tools

Undresser.AI Undress
AI-powered app for creating realistic nude photos

AI Clothes Remover
Online AI tool for removing clothes from photos.

Undress AI Tool
Undress images for free

Clothoff.io
AI clothes remover

Video Face Swap
Swap faces in any video effortlessly with our completely free AI face swap tool!

Hot Article
Hot Tools

MantisBT
Mantis is an easy-to-deploy web-based defect tracking tool designed to aid in product defect tracking. It requires PHP, MySQL and a web server. Check out our demo and hosting services.

Dreamweaver Mac version
Visual web development tools

SublimeText3 Mac version
God-level code editing software (SublimeText3)

PhpStorm Mac version
The latest (2018.2.1) professional PHP integrated development tool

WebStorm Mac version
Useful JavaScript development tools

