
Home >Web Front-end >JS Tutorial >Pastate.js responsive react framework modularization
Pastate.js responsive react framework modularization

- 不言Original
- 2018-04-10 16:34:451903browse
The content shared with you in this article is about the modularization of Pastate.js responsive react framework. It has certain reference value. Friends in need can refer to it.
This is Pastate.js responsive React state management framework tutorial series, welcome to pay attention and continue to update.
Pastate.js Github
Modular practical tasks
If the application is more complex, there are many pages, and an interface has many components and operations, we need Manage applicationdivided into modules (Module).
Below we take a class information management system as an example to introduce the modular mechanism of paste application.
Actual experience: https://birdleescut.github.io/pastate-demo
Application source code: https://github.com/BirdLeeSCUT/pastate-demo
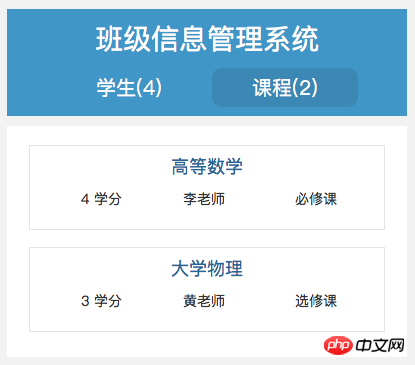
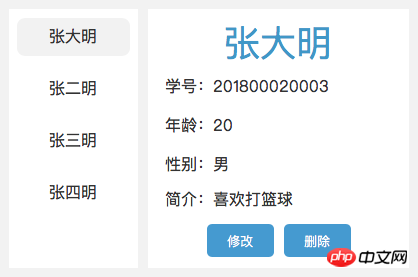
The prototype of the application is as follows:
(1) Student section
Get and display student information
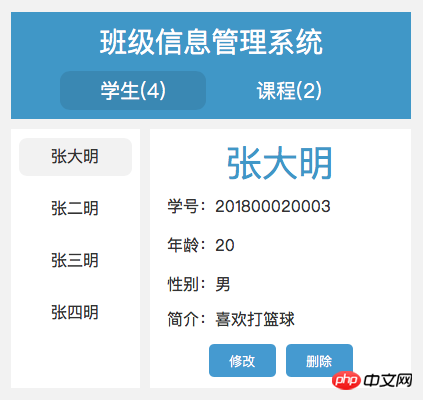
Modify student information
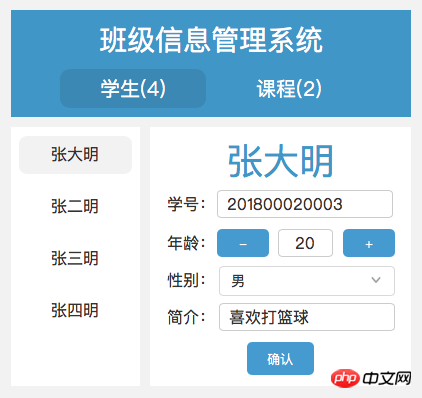
(2) Course Section: Display course information
This application is relatively simple. In actual development, we do not necessarily need to modularize it. Here we It is just used to introduce the modular mechanism of pastate so that you know how to use pastate to handle complex enough applications.
Module Division
The first step in modular design is module division. Let’s first divide our class information management system into modules:
Navigation module: Navigator
- #Student information module: StudentPanel
- ##Course Information Module: ClassPanel
 pastate module composition
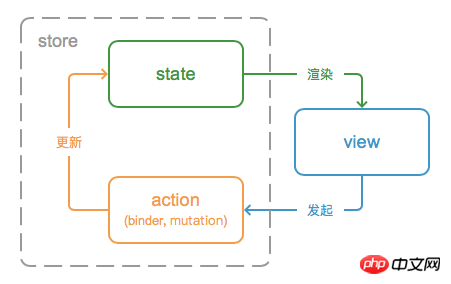
pastate’s module mechanism is a simple flux mode implementation. A pastate module consists of three basic elements:
- State (state): Save the current status of the module
- View (view): Display logic of module status
- Action (action) : Processing logic of module action
- These three module elements follow the following one-way data flow process:
 Module structure
We organize a module through a folder. Taking the "Student Information Module" StudentPanel as an example, create a new StudentPanel folder and create the following files under the folder:
- StudentPanel
Module folder
- Model file: used to define the application State and actions
- View file: used to define view components (component rendering logic)
- Style file: used to define the style used (you can use less or sass instead)
- ##StudentPanel.model.js
const initState = {
initialized: false, // 初始化状态
/** @type { "loading" | "ok" | "error" } */
status: 'loading', // 加载状态
isEditting: false, // 是否在编辑中
selected: 0, // 选中的学生
/** @type {studentType[]} */
students: [] // 学生数组
}
const studentType = {
name: '张小明',
studentNumber: '2018123265323',
age: 22,
isBoy: true,
introduction: '我是简介'
}
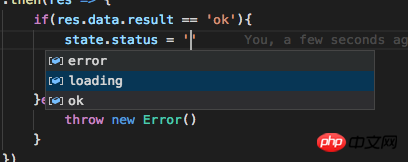
...As before, we combine the definition of the state structure and the definition of the initial value together with the jsDoc annotation. Tips: It is recommended to use the mode defining the status attribute above to define the "enumeration string" type. When assigning such enumeration values, try to use the "selection" method of intelSence instead of directly inputting the string. This It can bring convenience to application development and reduce fearless mistakes: when assigning a value, place the input cursor between the quotation marks after the equal sign and press "Trigger Prompt". The shortcut key will display the options:
 State mock area
const initState = {...}
const studentType ={...}

/***** MOCK AREA *****/
// initState.status = 'ok'
// initState.isEditting = true
// initState.students = [studentType, studentType]
你可以根据开发调试需求新建 mock 行,或通过注释控制某个 mock 行是否生效,以此来使应用处于某个中间 state 状态,方便调试。并在模块开发完成时把 mock 区域全部注释即可,这种模式可以有效地管理 mock 过程。
模块的 initState 是对模块的一种 “定义”,它具有“文档属性”,而 mock state 是对应用进行调试时执行的临时动态操作,如果通过直接修改 initState 来进行 mock,我们会破坏模块的定义,然后又尝试凭记忆对定义进行恢复,这个过程容易出错或遗漏,特别是当 state 变得复杂的时候。所以我们推荐采用 MOCK AREA 对 state 进行 mock 调试。
(2)定义模块的 actions
之前我们是把应用的动作逻辑实现为视图组件的成员函数,在应用简单时这种模式会比较直接方便,而当应用复杂且某些操作逻辑需要在不同组件甚至模块间共享时,原理的模式无法实现。因此我们把模块的相关操作逻辑统一放在 actions 中进行管理:
StudentPanel.model.js
const actions = {
    init(){ },
    loadStudents(){ },
    switchEditting(){ },
    /** @param {number} index 学生数组索引号 */
    selectStudent(index){ },
    increaseAge(){ },
    decreaseAge(){ }
}
在初步的 actions 声明阶段,我们只需把 actions 的名字和参数声明出来,在应用开发过程中再逐渐实现其业务逻辑。你可以考虑使用 jsDoc 对 action 的用途和参数进行注释说明。当模块简单的时候,你可以直接在 actions 中直接实现同步更新 state 的操作和异步从后台获取数据等操作,pastate 不对 actions 的实现的内容做限制,不需要像 redux 或 vuex 一样规定一定要把同步和异步逻辑的分开实现,在 pastate 中,当你认为有必要时才那样做就好了。
多级 actions 管理: 当模块的 actions 比较多的时候,我们可以采用多级属性的模式对 actions 进行分类管理, 具体的分类方法和分类级别根据具体需要自行定义即可,如下:
const actions = {
    init(){ },
    handle:{
        handleBtnClick(){ },
        handleXxx1(){ },
        handleXxx2(){ }
    },
    ajax:{
        getStudentsData(){ },
        getXxx(){ },
        postXxx(data){ }
    }
}
mutations 模式: 如果你的模块比较复杂,想遵循 redux 或 vuex 把对 state 同步操作 和 异步动作两类操作分类管理的模式,那么你可以对 state 的同步操作放在 actions.mutations 分类下,pastate 提供特殊中间件对 mutations 提供而外的开发调试支持,详见 规模化 章节。
const actions = {
    init(){ },
    handleBtnClick(){ },
    getStudentsData(){ },
    mutations:{
        increaseAge(){ },
        decreaseAge(){ }
    }
}
Mutations 其实就是一些同步的 state 更新函数,你可以通过其他普通 actions 调用 mutations, 或直接在视图中调用 mutations。比起 redux dispatch actions to reducers 和 vuex commit mutations 通过字符串 mutations 名称发起(dispatch) 的模式,这种函数调用的方式在开发时更加方便且不易出错:
无需为了调用方便,定义 actions / mutation 的常量名称
可以友好的支持 编辑器/ IDE 的智能提示

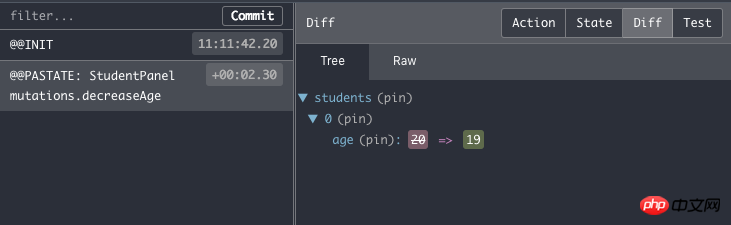
如果你选择使用 pastate 的 mutations 机制, 那么每个 mutation 都要使用同步函数,不要在 mutation 中使用 ajax 请求或 setTimeout 或 Promise 等异步操作。这样相关的浏览器 devtools 才能够显示 有准确意义 的信息:
这种 actions 分类管理的设计体现了 pastate 的精益原则:你能在需要某些高级特性的时候 才去 且 能够 使用这些高级特性。
(3)创建并配置模块的 store
我们可以像之前那样简单地创建 store: StudentPanel.model.js
import { Pastore } from 'pastate'
const initState = {...}
const actions = {...}
...

const store = new Pastore(initState);
/** @type {initState} */
let state = store.state;

export { initState, actions, store}
Pastate 采用一种 可选的 的 actions 注入模式,你可以自愿决定是否把 actions 注入 store。 把 actions 注入 store 后,可利用 pastate 的中间件机制对 actions 进行统一管理控制,具有较强的可扩展性。例如我们可以使用 logActions 中间件对每次 actions 的调用在控制台进行 log,并使用 dispalyActionNamesInReduxTool 中间件 对把 mutations 名称显示出来,以便于调试:
import { ..., logActions, dispalyActionNamesInReduxTool } from 'pastate'

...
const store = new Pastore(initState);
store.name = 'StudentPanel';
store.actionMiddlewares = [logActions(), dispalyActionNamesInReduxTool(true)]
store.actions = actions;

/** @type {initState} */
let state = store.state;

export { initState, actions, store}
如果你觉得上面的定义方式比较琐碎,你可以直接使用 pastate 提供的工厂函数 createStore 来定义一个完整地 store:
import { ..., createStore, logActions, dispalyActionNamesInReduxTool } from 'pastate'

const store = createStore({
    name: 'StudentPanel',
    initState: initState,
    actions: actions,
    middlewares: [logActions(), dispalyActionNamesInReduxTool(true)]
})
const { state } = store // createStore 具有良好的泛型定义,无需额外的 jsdoc 注释即可获取 state 的结构信息
你也可以进一步把中间件配置为仅在开发环境下生效的模式, 生产环境下无效。Pastate 中间件的详细内容请查看规模化章节。
视图部分
我们创建 StudentPanel.view.jsx 文件来保存我们的模块视图, 视图定义和原来的模式类似:StudentPanel.view.jsx
import React from 'react'
import { makeContainer, Input, Select} from 'pastate'
import { initState, actions } from './StudentPanel.model'
import './StudentPanel.css'
const isBoyOptions = [{
value: true,
tag: '男'
},{
value: false,
tag: '女'
}]
class StudentPanel extends React.PureComponent {
componentDidMount(){
actions.init()
}
render() {
let state = this.props.state
return (
<p className="info-panel">
{this['view_' + state.status](state)}
</p>
)
}
view_loading() {
return (
<p className="info-panel-tip-loading">
加载中...
</p>
)
}
view_error() {
return (
<p className="info-panel-tip-error">
加载失败, 请刷新重试
</p>
)
}
/** @param {initState} state */
view_ok(state) {
let selectedStudent = state.students[state.selected];
return (
<p className="info-panel-ok">
...
</p>
)
}
}
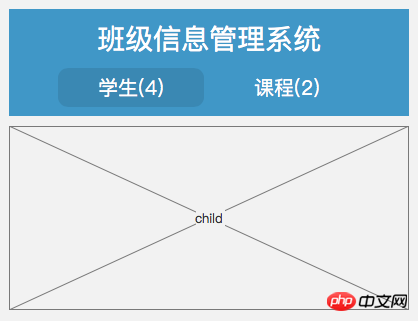
export default makeContainer(StudentPanel)Pastate 模块化需要实现一种多模块可以互相协作的机制。因此我们不再使用 makeOnyContainer 唯一地绑定一个视图组件与对应的 store。首先,我们会用各模块的 store 生成一个全局的 store 树,并使用 makeContainer 把模块的视图封装为引用全局 store 的某些节点的容器。
我们目前只有一个模块,此处简单地调用 makeContainer(StudentPanel) 让 StudentPanel 引用全局的 store 树 的根节点的 state ,我们可以为 makeContainer 指定第二个参数,指明引用 store 树 的哪些子节点,详情会在下一章介绍。
在上面视图组件的代码中,我们引入了 model 中的 actions:
import { store, initState, actions } from './StudentPanel.model'这些 actions 可以直接赋值到组件的 onClick 或 onChange 等位置:
<button className="..." onClick={actions.increaseAge} > + </button>这些 actions 也可以在组件的生命周期函数中调用:
...
componentDidMount(){
    actions.init()
}
...
视图部分还包含样式文件 StudentPanel.css ,在此就不列出了。
如果该模块要需要封装一些当前模块专用的子组件,把子组件定义为独立的文件,并放在与 StudentPanel 模块相同的文件夹下即可。如果需要封装一些多个模块通用的非容器组件,可以考虑把它们放在独立于模块文件夹的其他目录。
导出模块
最后,为了方便调用,我们来为模块做一个封装文件 StudentPanel / index.js,导出模块的元素:
export { default as view } from './StudentPanel.view'
export { store, actions, initState } from './StudentPanel.model'
pastate 模块向外导出 view, initState, actions, store 四个元素。
大功告成!这时我们可以尝试在 src / index.js 中引入该模块并渲染出来:
import ReactDOM from 'react-dom';
import { makeApp } from 'pastate';
import * as StudentPanel from './StudentPanel';
ReactDOM.render(
makeApp(<StudentPanel.view />, StudentPanel.store),
document.getElementById('root')
);
...我们使用 makeApp 函数创建一个 pastate 应用并渲染出来,makeApp 的第一个参数是 根容器,第二个参数是 store 树, 我们现在只有一个模块,所以应用的 store 树只有 StudentPanel 的 store。
自此,我们的第一个模块 StudentPanel 构建完成。
模块的模板文件
我们可以使用模板文件快速创建模块,一个模块的模板文件非常简单,下面以 TemplateModule 模块为例完整给出:
/index.js
export { default as view } from './TemplateModule.view'
export { initState, actions, store } from './TemplateModule.model'
/TemplateModule.model.js
import { createStore } from 'pastate';

const initState = {

}

const actions = {

}

const store = createStore({
    name: 'TemplateModule',
    initState,
    actions
})
const { state } = store
export { initState, actions, store }
/TemplateModule.view.jsx
import React from 'react';
import { makeContainer } from 'pastate';
import { initState, actions } from './ClassPanel.model';
import './TemplateModule.css'
class TemplateModule extends React.PureComponent{
render(){
/** @type {initState} */
const state = this.props.state;
return (
<p>
TemplateModule
</p>
)
}
}
export default makeContainer(TemplateModule, 'template')/.css
// css 样式文件初始为空,你也可以选用 less 或 sass 来定义样式
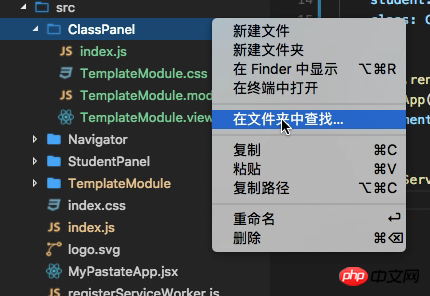
这个例子的 demo 源码已包含该模板模块 src/TemplateModule, 你只需把它复制到你的 src 目录下,并右键点击模块文件夹,选择 “在文件夹中查找”,然后把 TemplateModule 字符串全部替换为你想要的模块名称即可:
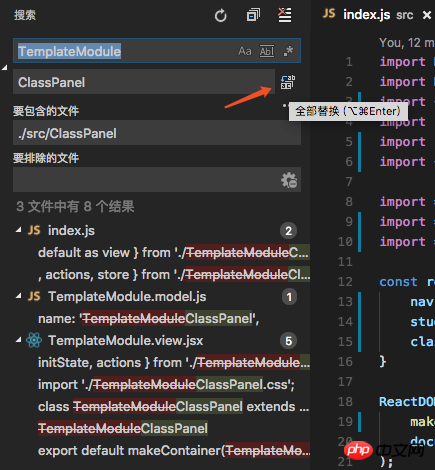
点击替换之后保存文件。不过目前还不能自动替换文件名,需要手动替换一下。
Pastate 以后将会实现相关的命令行工具,实现一行命令创建新模块等功能,加速 pastate 应用的开发。
下一章,我们来创建另外的模块,并介绍不同模块之间如何协作。
相关推荐:
Pastate.js 响应式 react 框架之表单渲染与操作
The above is the detailed content of Pastate.js responsive react framework modularization. For more information, please follow other related articles on the PHP Chinese website!
Related articles
See more- An in-depth analysis of the Bootstrap list group component
- Detailed explanation of JavaScript function currying
- Complete example of JS password generation and strength detection (with demo source code download)
- Angularjs integrates WeChat UI (weui)
- How to quickly switch between Traditional Chinese and Simplified Chinese with JavaScript and the trick for websites to support switching between Simplified and Traditional Chinese_javascript skills