Home >Web Front-end >JS Tutorial >Nodejs form verification and image upload
Nodejs form verification and image upload
- php中世界最好的语言Original
- 2018-03-16 13:52:131544browse
This time I will bring you Nodejs form verification and image upload. Using Nodejs form verification and image uploadWhat are the precautions?The following is a practical case, let's take a look.
1. Form verification
There are three places where MVC form verification can be done. The first level is before the front-end is submitted, and the second level is before the data is saved, that is, in the controller. For verification, the third step is when saving the data. That is, if the submitted data model does not comply with the constraints defined by the entity, the data cannot be saved. This is the last line of defense. The first level mainly relies on js or jquery framework, the more commonly used one is jquery.validate.js. If Asp.net MVC can automatically generate validation rules, I won’t go into details here. There are many articles on the Internet. The second layer is related to the respective business logic. It also needs to do some necessary verification to prevent the front end from banning JavaScript and submitting illegal data. Here we will talk about the third layer of verification based on Mongoose.
1. Review the model definition
Let’s first review the book model previously defined with Mongoose:
var bookSchema = new mongoose.Schema({
    title: { type: String, required: true },
    rating: {
        type: Number,
        required: true,
        min: 0,
        max: 5
    },
    info: { type: String, required: true },
    img: String,
    tags: [String],
    brief: { type: String, required: true },
    ISBN: String,
});
Each attribute defines the type and whether it is required, and you can also add min , max, default value and other constraints. If the submitted model does not meet these constraints, it will not be saved successfully. Equivalent to the role of DataAnnotations in Asp.net MVC. The subsequent form validation is based on this.
2. Add routing
We need to add 4 routing rules, 2 for adding (one get, one post), one for deletion, and one for uploading pictures:
router.get('/book/create', homeController.bookcreateview);
router.post('/book/create', homeController.doBookCreate);
router.delete('/book/:id', homeController.delete);
router.post('/uploadImg', homeController.uploadImg);
Based on Express routing, we can create Restful routing rules. Routes are located under the app_server folder.
3. AddControllerMethod
home.bookcreateview:
module.exports.bookcreateview = function (req, res) {
    res.render('bookCreate', { title: '新增推荐图书' });
};
This is directly a get request, so use render directly to render the view. Of course, this bookCreate view will be created next.
doBookCreate:
module.exports.doBookCreate = function (req, res) {    var requestOptions, path, postdata;
    path = "/api/book";
    postdata = {
        title: req.body.title,
        info: req.body.info,
        ISBN: req.body.ISBN,
        brief: req.body.brief,
        tags: req.body.tags,
        img: req.body.img,
        rating:req.body.rating,
    };
    requestOptions = {
        url: apiOptions.server + path,
        method: "POST",
        json: postdata,
    };
    request(requestOptions, function (err, response, body) {
        console.log("body.name", body.name, response.statusCode);        if (response.statusCode === 201) {
            res.redirect("/detail/"+body._id);
        }
        else if (response.statusCode == 400 && body.name && body.name == "ValidationError") {
            res.render('bookCreate', { title: '新增推荐图书', error:"val"});
        }        else {
            console.log("body.name",body.name);
            info(res, response.statusCode);
        }
    });
};
info:

 ##
##
function info (res, status) {    var title, content;    if (status === 404) {
        title = "404, 页面没有找到";
        content = "亲,页面飞走了...";
    } else if (status === 500) {
        title = "500, 内部错误";
        content = "尴尬...,发生错误";
    } else {
        title = status + ", 有什么不对劲";
        content = "某些地方可能有些错误";
    }
    res.status(status);
    res.render('info', {
        title : title,
        content : content,
        status: status,
    });
};
View CodeIn the previous section, we Created the API part for data operations. The process of the code is to first obtain the data passed from the front end from the req, and then use the request module to call the api. If the addition is successful (delete:
module.exports.delete = function (req, res) {    var requestOptions, path;
    path = "/api/book/" + req.params.id;
    requestOptions = {
        url: apiOptions.server + path,
        method: "delete",
        json: {},
    };
    request(requestOptions, function (err, response, body) {        if (response.statusCode == 204) {
            res.json(1);
        }
        else {
            res.json(0);
        }
    });
};
If the deletion is successful, the returned status code is 204, and then json(1) is returned to let the front end process the interface. 4. Add a view1) First, you need to add a button to the right sidebar of the book list:

   .col-md-3
     .userinfo
       p stoneniqiu
       a(href='/book/create').btn.btn-info 新增推荐
When the user clicks, it will jump to the /book/create page2) Add a new recommended page:
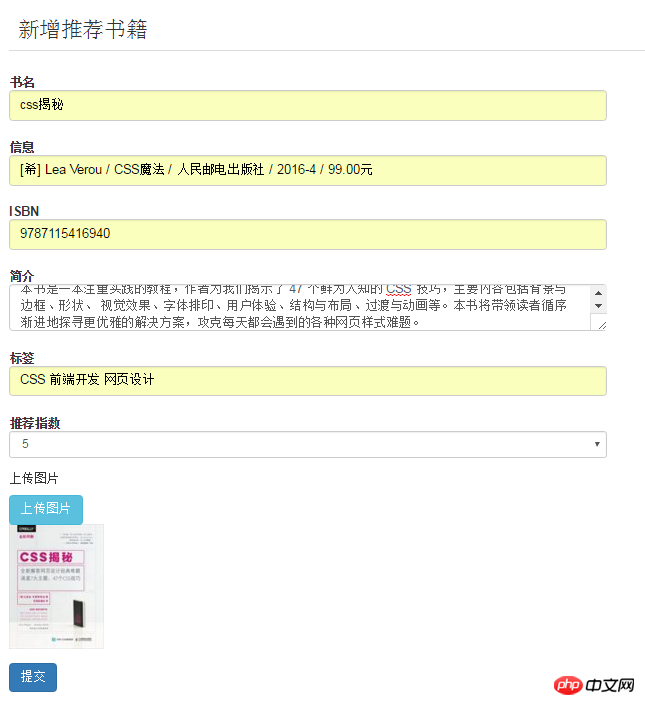
extends layout
include _includes/rating
block content
  .row
   .col-md-12.page.bookdetail
      h3 新增推荐书籍
      .row
        .col-xs-12.col-md-6
         form.form-horizontal(action='',method="post",role="form")          - if (error == "val")
           .alert.alert-danger(role="alert") All fields required, please try again
          .form-group
            label.control-label(for='title') 书名
            input#name.form-control(name='title')
          .form-group
            label.control-label(for='info') 信息
            input#name.form-control(name='info')
          .form-group
            label.control-label(for='ISBN') ISBN
            input#name.form-control(name='ISBN')
          .form-group
            label.control-label(for='brief') 简介
            input#name.form-control(name='brief')
          .form-group
            label.control-label(for='tags') 标签
            input#name.form-control(name='tags')
          .form-group
            label.control-label(for='rating') 推荐指数
            select#rating.form-control.input-sm(name="rating")
              option 5
              option 4
              option 3
              option 2
              option 1
          .form-group
            p 上传图片
            a.btn.btn-info(id="upload", name="upload") 上传图片
            br
            img(id='img')
          .form-group
            button.btn.btn-primary(type='submit') 提交
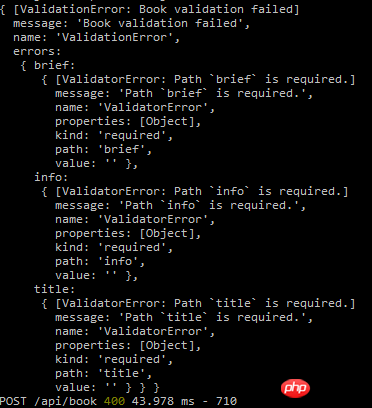
The if statement is used to display errors Tip; Picture upload will be fully introduced later; so the submission page basically looks like this:


  else if (response.statusCode == 400 && body.name && body.name == "ValidationError") {
            res.render('bookCreate', { title: '新增推荐图书', error:"val"});
        }
以上说明了Mongoose会在数据保存的时候验证实体,如果实体不满足path规则,将不能保存。但至此有三个问题,第一个问题是提示信息不明确,当然我们可以遍历输出ValidatorError;第二个就是,验证错误之后,页面原来的数据没有了,需要再输入一遍,这个我们可以参考Asp.net MVC将模型数据填充到视图中可以解决;第三个问题就是页面前端还没有验证,form直接就可以提交了,这个可以通过简单的Jquery脚本就可以做到;这三点先不细究。继续往下看,如果规范输入,这个时候是可以提交的,提交之后在books页面可以看到:

4)删除
在标题的右侧增加了一个删除符号(books视图中):
         .col-md-10
            p
             a(href="/Detail/#{book._id}")=book.title             span.close(data-id='#{book._id}') ×
并添加脚本:
$(".close").click(function() {    if (confirm("确定删除?")) {        var id = $(this).data("id");        var row = $(this).parents(".booklist");
        $.ajax({
            url: "/book/" + id,            method: "delete",
        }).done(function(data) {
            console.log(data);
            row.fadeOut();
        });
    }
});
脚本可以先位于layout视图下方:
script(src='/javascripts/books.js')
这样,删除完成之后会隐藏当前行。下面解决图片上传问题。
二、图片上传
前面我们在路由里面定义了一个uploadimg方法,现在实现它。一般都涉及两个部分,一个是前台图片的提交,一个是后端数据的处理。
1.uploadimg 方法实现
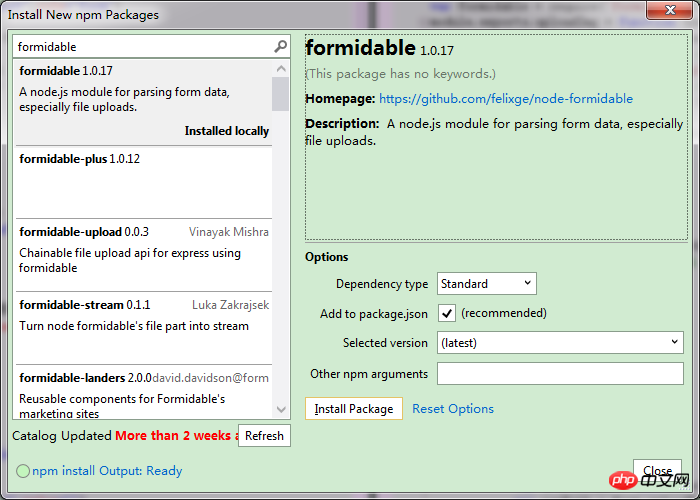
先需要安装formidable模块。

然后在Public文件下创建一个upload/temp文件夹
脚本:
var fs = require('fs');var formidable = require('formidable');
module.exports.uploadImg = function (req, res) {  var form = new formidable.IncomingForm();   //创建上传表单
      form.encoding = 'utf-8';        //设置编辑
      form.uploadDir = './../public/upload/temp/';     //设置上传目录
      form.keepExtensions = true;     //保留后缀
      form.maxFieldsSize = 3 * 1024 * 1024;   //文件大小
    form.parse(req, function(err, fields, files) {
        console.log(files);        if (err) {
            console.log(err);          return res.json(0);
        }        for (var key in files) {
            console.log(files[key].path);            var extName = ''; //后缀名
            switch (key.type) {            case 'image/pjpeg':
                extName = 'jpg';                break;            case 'image/jpeg':
                extName = 'jpg';                break;            case 'image/png':            case 'image/x-png':            default:
                extName = 'png';                break;
            }            var avatarName = (new Date()).getTime() + '.' + extName;            var newPath = form.uploadDir + avatarName;
            fs.renameSync(files[key].path, newPath); //重命名
            return res.json("/upload/temp/"+ avatarName);
        }
    });

};
这个form会自动将文件保存到upLoadDir目录,并以upload_xxxx格式重新命名,所以最后使用fs模块对文件进行重命名。然后返回给前端。
2.前端
我喜欢用插件,前端我用的是plupload-2.1.8,拥有多种上传方式,比较方便。放置在Public文件下。在layout.jade中引用js:
   script(src='/plupload-2.1.8/js/plupload.full.min.js')
   script(src='/javascripts/books.js')
而在bookCreate.jade视图中,修改如下:
            a.btn.btn-info(id="upload", name="upload") 上传图片
            br            img(id='img')
            input#imgvalue(type='hidden',name='img',value='')
a标签用来触发上传,img用来预览,input用来存放路径。在books.js下增加以下代码:
var uploader = new plupload.Uploader({
    runtimes: 'html5,flash,silverlight,html4',    browse_button: "upload",    url: '/uploadImg',
    flash_swf_url: '/plupload-2.1.8/js/Moxie.swf',
    silverlight_xap_url: '/plupload-2.1.8/js/Moxie.xap',
    filters: {
        max_file_size: "3mb",
                mime_types: [
                    { title: "Image files", extensions: "jpg,gif,png" },
                    { title: "Zip files", extensions: "zip" }
                ]
    },
    init: {
        PostInit: function () {
        },
        FilesAdded: function (up, files) {
            plupload.each(files, function (file) {
                uploader.start();
            });
        },
        UploadProgress: function (up, file) {
        },
        Error: function (up, err) {
        }
    }
});
uploader.init();
uploader.bind('FileUploaded', function (upldr, file, object) {    var data = JSON.parse(object.response);
    console.log(data);    $("#img").attr("src", data);
    $("#imgvalue").val(data);});
提交:

上传成功后跳转到detail页面。

相信看了本文案例你已经掌握了方法,更多精彩请关注php中文网其它相关文章!
推荐阅读:
jQuery、Angular、node中的Promise详解
The above is the detailed content of Nodejs form verification and image upload. For more information, please follow other related articles on the PHP Chinese website!
Related articles
See more- An in-depth analysis of the Bootstrap list group component
- Detailed explanation of JavaScript function currying
- Complete example of JS password generation and strength detection (with demo source code download)
- Angularjs integrates WeChat UI (weui)
- How to quickly switch between Traditional Chinese and Simplified Chinese with JavaScript and the trick for websites to support switching between Simplified and Traditional Chinese_javascript skills

