Home >Web Front-end >JS Tutorial >Analysis of how to use ckeditor custom plug-in
Analysis of how to use ckeditor custom plug-in
- 赶牛上岸Original
- 2018-03-06 13:50:352686browse
CKEditor is the famous FCKeditor. Another product of the company is CKFinder (an Ajax file manager). ckeditor is a powerful rich text editing tool. This article mainly introduces in detail how to use the ckeditor custom plug-in. It has certain reference value. Interested friends can refer to it
ckeditor is a very powerful rich text editing tool that provides us with most functions to meet our daily development needs. However, due to special circumstances, the ckeditor plug-in may need to be modified. ckeditor provides us with an interface that makes it easy to extend plug-ins.
Due to the needs of the project, it is necessary to rewrite the image upload function of ckeditor. The following is part of the code for the customized image upload function:
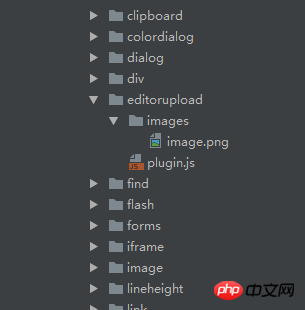
1. In ckeditor/plugins/ Create a new editorupload directory under the directory to store custom plug-ins; create a new directory images under this directory to store custom pictures, and put the plug-in image image.png in the images directory.

2. Create a new plugin.js in the editorupload directory:
(function () {
  var a = {
      exec: function (editor) {
        //调用jsp中的函数弹出上传框,
        var url = '../view/fileupload/upload.jsp';
        openDialog({  //openDialog打开一个新窗口
          title: '插入图片',
          url: url,
          height: 600,
          width: 900,
          callback:function(){
          }
        });
      }
    },
    b = 'editorupload';
  CKEDITOR.plugins.add('editorupload', {
    init: function (editor) {
      editor.addCommand(b, a);
      editor.ui.addButton('editorupload', {
        label: '添加图片', //鼠标悬停在插件上时显示的名字
        icon: 'plugins/editorupload/images/image.png',  //自定义图标的路径
        command: b
      });
    }
  });
})();
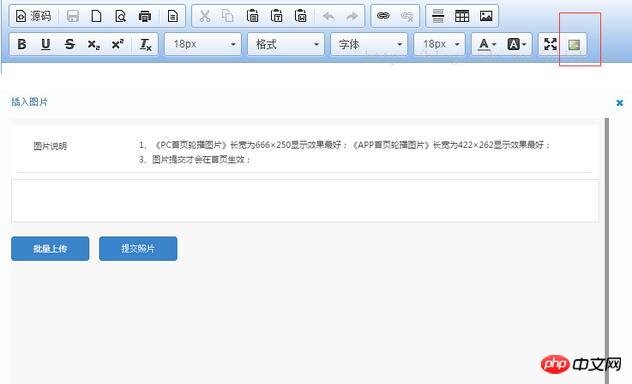
In the above code, a new upload.jsp page is created Used to upload pictures, use openDialog to pop up a new window, and set the height and width of the pop-up box.
CKEDITOR.plugins.add adds the customized editorupload to ckeditor.
The following is part of the upload.jsp page code:
<p id="mainContent">
</p>
<p class=" box">
<table class=" m-table">
<colgroup>
<col width="20%"/>
<col width="80%"/>
</colgroup>
<tr>
<td style="vertical-align:top;"><label class="module-name">图片说明</label></td>
<td>
<ul>
<li>1、《PC首页轮播图片》长宽为666×250显示效果最好;《APP首页轮播图片》长宽为422×262显示效果最好;</li>
<li>3、图片提交才会在首页生效;</li>
</ul>
</td>
</tr>
</table>
</p>
<p id="Pictures" class="detailWraper nopadding" style="display: none;height: auto;">
<input id="hidPicturesStatus" type="hidden" value="0"/>
<input id="hidCurrPictures" type="hidden" value=''/>
<input id="hidDictSuggestion" type="hidden" value=''/>
<table>
<tr>
<td>
<p id="fileQueue"></p>
<p id="picWrapper"></p>
<a id="fake-dlg-bigPic" href="javascript:void(0)" style="display: none;"></a>
<p id="dlg-bigPic" class="popImg" style="display: none;">
<a class="leftBtn" href="javascript:void(0)"></a>
<a class="rightBtn" href="javascript:void(0)"></a>
<a class="closeImgBtn" href="javascript:void(0)"></a>
<p class="imgList">
<ul></ul>
</p>
</p>
<p class="validation-summary-valid">
<ul>
<li style="display: none"></li>
</ul>
</p>
</td>
</tr>
</table>
</p>
<p>
<button id="fileUpload">批量上传</button>
<button id="submit" class="btn btn-primary" style="vertical-align: top;line-height:23px;width:112px;height: 35px;">提交照片
</button>
</p>
</p>
The js of the upload.jps page part Code:
//提交照片
photoTaskDetail.submit = function () {
var pictures = window.picManager._getPictures();
if (pictures.length < 1) {
alert('请至少上传1张图片');
return false;
}
for (var i in pictures) {
var imgPath = "<img src='" + staticFileRoot + pictures[i].URL + "'/>";
var element = window.parent.CKEDITOR.dom.element.createFromHtml(imgPath);
window.parent.CKEDITOR.instances.editorContent.insertElement(element);
}
parent.closeDialog(false);
}
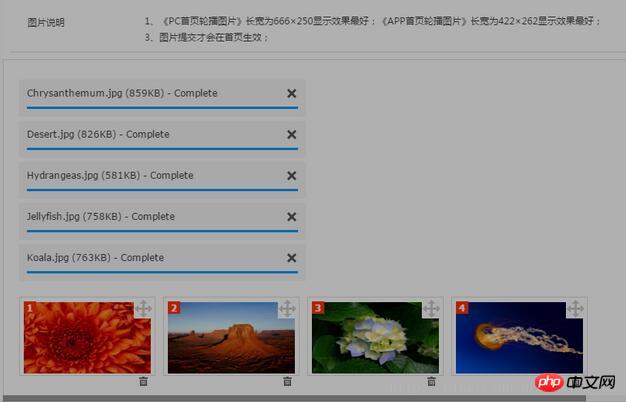
In the above code, you can upload multiple photos and put the photos into ckeditor respectively.
Configure ckeditor's config.js:
config.extraPlugins += (config.extraPlugins ? ',editorupload' : 'editorupload');
CKEDITOR.editorConfig = function( config ) {
  config.font_names= '宋体/宋体;黑体/黑体;仿宋/仿宋_GB2312;楷体/楷体_GB2312;隶书/隶书;幼圆/幼圆;微软雅黑/微软雅黑;'+ config.font_names;
  config.language = 'zh-cn';
  config.extraPlugins += (config.extraPlugins ? ',lineheight' : 'lineheight');
  config.extraPlugins += (config.extraPlugins ? ',editorupload' : 'editorupload');
  CKEDITOR.config.lineheight_sizes = CKEDITOR.config.lineheight_sizes +  '30px';
  config.height = 650;
  config.toolbarCanCollapse = true;
  config.uiColor = '#90B8E9';
  config.toolbar = 'Full';
  config.toolbar_Full = [
   { name: 'document',  items: [ 'Source','-','Save','NewPage','DocProps','Preview','Print','-','Templates' ] },
   { name: 'clipboard',  items: [ 'Cut','Copy','Paste','PasteText','PasteFromWord','-','Undo','Redo' ] },
   { name: 'links',    items:['Link','Unlink']},
   { name: 'insert',   items:['HorizontalRule','Table','Image'] },
   '/',
   { name: 'basicstyles', items: [ 'Bold','Underline','Strike','Subscript','Superscript','-','RemoveFormat'] },
   { name: 'paragraph',  items: [ 'list', 'indent', 'blocks', 'align', 'bidi' ] },
   { name: 'styles',items: ['lineheight','Format','Font','FontSize']},
   { name: 'colors',items: ['TextColor', 'BGColor']},
   { name: 'tools', items : [ 'Maximize','editorupload'] }
];
Add the editorupload plug-in to ckeditor.
The following are some screenshots of the implementation:


## Implementation summary: In the custom plug-in During the process, the image insertion function of the original plug-in must be turned on. The uploaded images will not be put into ckeditor, and the image addresses will be automatically filtered out. This may be caused by a bug in the ckeditor version. Guidance with solutions is welcome.
The above is the entire content of this article. I hope it will be helpful to everyone's study. I also hope that everyone will support the php Chinese website. Related recommendations:django teaches you how to easily use the rich text editor CKEditor
django teaches you How to master the rich text editor CKEditor
Integrate the CKeditor rich text editor into Python's Flask framework
The above is the detailed content of Analysis of how to use ckeditor custom plug-in. For more information, please follow other related articles on the PHP Chinese website!
Related articles
See more- An in-depth analysis of the Bootstrap list group component
- Detailed explanation of JavaScript function currying
- Complete example of JS password generation and strength detection (with demo source code download)
- Angularjs integrates WeChat UI (weui)
- How to quickly switch between Traditional Chinese and Simplified Chinese with JavaScript and the trick for websites to support switching between Simplified and Traditional Chinese_javascript skills

