The first thing to explain is that the tables used in our project are roughly divided into two categories. One is an ordinary table with an unfixed header, and the other is a fixed header. tbody Parts are scrollable. It should be noted that the fixed table header requires two table to be implemented, and anyone who has done it should also understand. The former seems relatively simple, because the width is affected by the th in thead, while the latter seems difficult to handle, because if you use two tables, the following situation will occur :

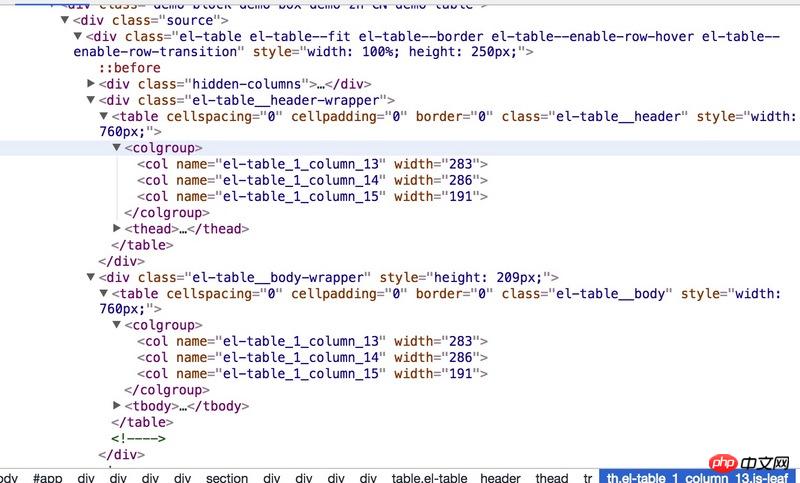
emmm, this should be different from what we imagined. How can this be fixed? It feels like it is very troublesome to deal with. I remembered that I had seen the table in element-ui. It seems that there is an implementation of dragging the table header. Let’s open the console and take a look at the structure:

Uh , I have never used the tags <colgroup> and <col> all my life, but if you look closely, there is a width on it, When you see this, you probably know what's going on. Open MDN and look at the description of the related properties. As expected, width can control the width of the current column.
We have solved the width control, but there is another problem, that is, how to change the width of other columns after dragging, as follows:
##a | b | c | d |
If I drag column a, how should the changed width be distributed to b, c, and d? This is how I handle it here. B, c, and d have attributes to indicate whether the column has been dragged. , if b, c, and d have not been dragged, then the changed width of a is divided equally into the width of the three columns b, c, and d. If b, c, and d are all changed, then only the last column d is changed. width. Okay, the idea is there, we can implement it.
It turns out that it would be too stupid to follow the above design. It has been changed to only change the columns behind the dragged column and the width of these columns has not changed.
Implementation
First of all, the html structure is probably like this:
<table>
  <thead>
    <tr>
      <th>a<th>
      <th>b<th>
    </tr>
  </thead>
  <tbody>
    <tr>
      <th>1<th>
      <th>2<th>
    </tr>
  </tbody>
</table>
js aspect
  constructor (id, options) {
    this._el = document.querySelector(`#${id}`);
    // 实际使用中需要对dom结构进行判断,这里就不做了
    this._tables = Array.from(this._el.querySelectorAll('table'));
    setTimeout(() => this._resolveDom());

    this.store = {
      dragging: false,                 //是否拖动
      draggingColumn: null,            //拖动的对象
      miniWidth: 30,                   //拖动的最小宽度
      startMouseLeft: undefined,       //鼠标点击时的clientX
      startLeft: undefined,            //th右离table的距离
      startColumnLeft: undefined,      //th左离table的距离
      tableLeft: undefined,            //table离页面左边的距离,
      HColumns: [],
      BColumns: [],
    };
  };
Add dom:
const [ THeader ] = this._tables;
let TBody;
const Tr = THeader.tHead.rows[0];
const columns = Array.from(Tr.cells);
const Bcolgroup = document.createElement('colgroup');
const cols = columns.map((item, index) => {
  const col = document.createElement('col');
  item.dataset.index = index;
  col.width = +item.offsetWidth;
  return col;
});
cols.reduce((newDom, item) => {
  newDom.appendChild(item);
  return newDom;
}, Bcolgroup);
const HColgroup = Bcolgroup.cloneNode(true);
THeader.appendChild(HColgroup);

//不管是一个table还是两个,都把header和body提出来
if (this._tables.length === 1) {
  const [ , tbody ] = Array.from(THeader.children);
  tbody.remove();
  TBody = THeader.cloneNode();
  TBody.appendChild(Bcolgroup);
  TBody.appendChild(tbody);
  this._el.appendChild(TBody);
} else {
  [ , TBody ] = this._tables;
  TBody.appendChild(Bcolgroup);
}

//拖动时的占位线
const hold = document.createElement('p');
hold.classList.add('resizable-hold');
this._el.appendChild(hold);
The above piece It is to add nodes and process dom. For reuse, here we split it into two table, regardless of whether the header is fixed or not. This way It is also much easier to handle.
Then the process is to move the finger to the right side of the column cursorThe value is set to col-resize:
handleMouseMove(evt) {
//...
if (!this.store.dragging) {
const rect = target.getBoundingClientRect();
const bodyStyle = document.body.style;
if (rect.width > 12 && rect.right - event.pageX < 8) {
bodyStyle.cursor = 'col-resize';
target.style.cursor = 'col-resize';
this.store.draggingColumn = target;
} else {
bodyStyle.cursor = '';
target.style.cursor = 'pointer';
this.store.draggingColumn = null;
}
}
};It should be noted that getBoundingClientRect( )The rigth obtained is the distance between the right side of the element and the left edge of the page, not the distance from the right edge of the page. Here is the mousemove event added to thead's tr. When the mouse pointer is less than 8 from the right edge, change the pointer shape and then change store# The status in ## means that you can click and drag at this time. Then there is
mousedown+mousemove+mouseup to handle the drag:
const handleMouseDown = (evt) => {
if (this.store.draggingColumn) {
This.store.dragging = true;
Let { target } = evt;
If (!target) return;
const tableEle = THeader;
const tableLeft = tableEle.getBoundingClientRect().left;
const columnRect = target.getBoundingClientRect();
const minLeft = columnRect.left - tableLeft + 30;
Target.classList.add('noclick');
This.store.startMouseLeft = evt.clientX;
This.store.startLeft = columnRect.right - tableLeft;
This.store.startColumnLeft = columnRect.left - tableLeft;
This.store.tableLeft = tableLeft;
Document.onselectstart = () => false;
Document.ondragstart = () => false;
Hold.style.display = 'block';
Hold.style.left = this.store.startLeft + 'px';
const handleOnMouseMove = (event) => {
Const deltaLeft = event.clientX - this.store.startMouseLeft;
Const proxyLeft = this.store.startLeft + deltaLeft;
Hold.style.left = Math.max(minLeft, proxyLeft) + 'px';
};
//The width is allocated like this, for example
The above is the detailed content of How to implement draggable table header. For more information, please follow other related articles on the PHP Chinese website!


