Home >Web Front-end >JS Tutorial >vue builds a custom tree instance method based on Element
vue builds a custom tree instance method based on Element
- 小云云Original
- 2018-02-05 14:08:412197browse
When doing a project, I need to use a custom tree control to build a table tree. I searched on github and found no suitable (good-looking) one that can be used directly. I found it when I checked the component description of Element. The Tree control can use render to customize the node style, so based on it, a tree component that can be added, deleted, and modified is encapsulated. Now I will share its use and implementation. This article mainly introduces the sample code of Vue to build a custom tree based on Element. It has certain reference value. Interested friends can refer to it. I hope it can help you.
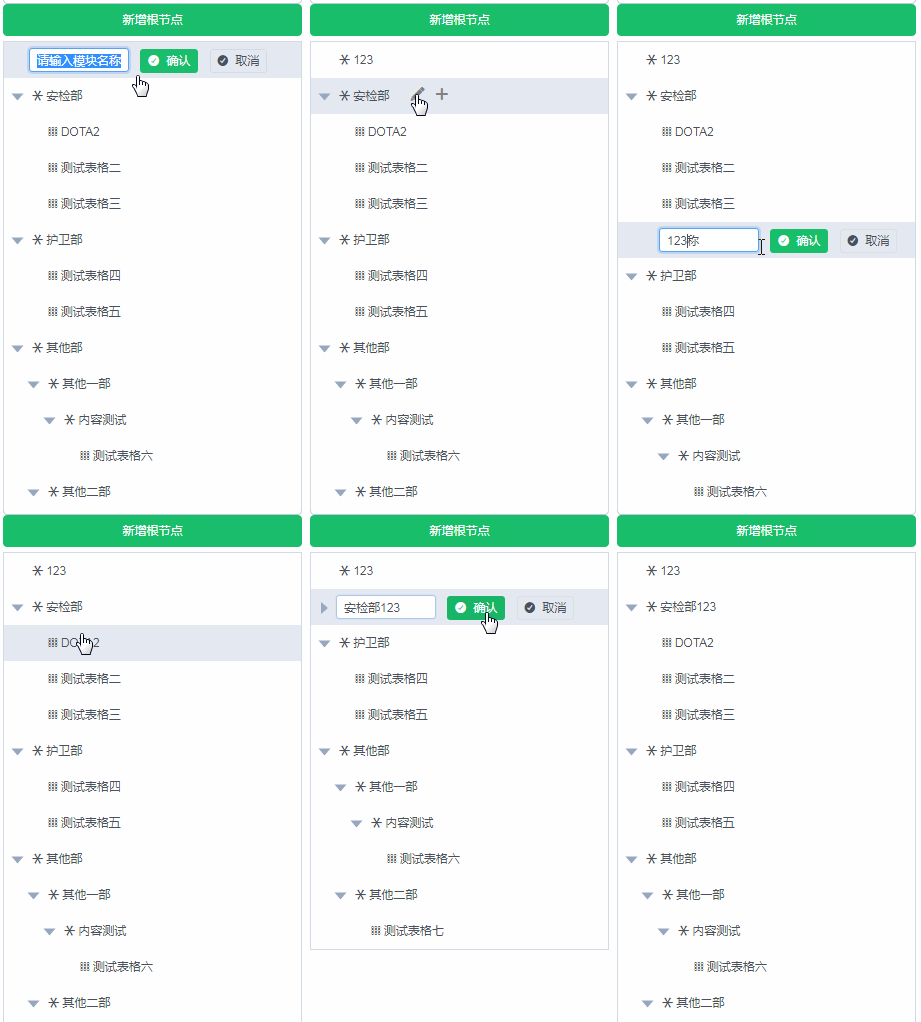
Control Demonstration
The gif posted on github may be stuck. Does anyone know where else I can hang static resources? Thank you. . !

Control usage
Summary
Based on element-ui tree Secondary encapsulation of shape controls
Provides an interface for editing and deleting nodes
Provides a next hook, which can be used when business processing fails (false) Rollback operation
Control source code, see github
Documentation
props
| Attribute | Description | Type |
|---|---|---|
| Source data, You can use v-model two-way binding | Array |
| Description | Parameters | |
|---|---|---|
| Save event after clicking edit or adding tree node | (parent node data, current node data, next) | |
| Delete node event | (parent node data, current node data , next) | |
| Node click event | (current node data) |
| Description | |
|---|---|
| The unique identifier of the tree node | |
| The display name of the tree node | |
| (1: Editing state) (0: Displaying state) (-1 non-editable state) | |
| Child node data |
Call example
 <m-tree
  v-model="tableTree"
  @SaveEdit="SaveEdit"
  @DelNode="DelNode"
  @NodeClick="handleNodeClick"></m-tree>

SaveEdit(parentNode,data,next){
  var param = {
   parentNode:parentNode,
   node:data
  }
  this.$http.post(URL,param).then((response) => {
   if(response.status == 200){
    next(true,response.body.data.nodeId)
   }else{
    next(false)
   }
  })
}
Implementation method
 <span class="span_item">
  <span @click="Expanded">
   <Input v-if="node.status == 1" style="width: 100px;" v-model="node.label" size="small" ></Input>
   <Icon v-if="node.status == 0" type="asterisk"></Icon>
   <Icon v-if="node.status == -1" type="ios-keypad-outline"></Icon>
   <span v-if="node.status != 1">{{node.label}}</span>
  </span>
  <span v-if="node.status == 1">
   <Button style="margin-left: 8px;" size="small" type="success" icon="checkmark-circled" @click="SaveEdit">确认</Button>
   <Button style="margin-left: 8px;" size="small" type="ghost" icon="checkmark-circled" @click="CancelEdit">取消</Button>
  </span>
  <span class="span_icon">
    <Icon v-if="node.status == 0" style="margin-left: 8px" color="gray" type="edit" size="16" @click.native="OpenEdit"></Icon>
    <Icon v-if="node.status == 0" style="margin-left: 8px" type="plus-round" color="gray" size="16" @click.native="Append"></Icon>
    <Icon v-if="node.status == 0&&node.children.length < 1" style="margin-left: 8px" type="ios-trash" color="red" size="18" @click.native="Delete"></Icon>
  </span>
 </span>
The child node notifies the parent node event through $emit##
SaveEdit(){
  //保存节点事件
  this.$emit('SaveEdit',this.nodeData)
},
Core implementation of the parent node, use the renderContent function to load the child node template, and when you click to save the node, the business parameters are saved in runParam for data rollback when the business operation fails (network request failure, server exception, etc.)
<el-tree
class="filter-tree"
style="overflow:auto;"
:data="treeData"
:filter-node-method="filterNode"
@node-click="handleNodeClick"
ref="tree"
node-key="value"
:expand-on-click-node="false"
:render-content="renderContent"
default-expand-all>
</el-tree>
//子节点模板
renderContent(h, { node, data, store }) {
return h(TreeItem,{
props:{
value:data,
treeNode:node
},
on:{
input:(node)=>{
data = node
},
Append: () => {
node.expanded = true
data.children.push({ value: this.$utilHelper.generateUUID(), label: '请输入模块名称', children: [],status:1,isAdd:true })
},
//保存节点
SaveEdit:(nodeData)=> {
//递归查找父节点
var parentNode = this.$utilHelper.getNode(this.treeData,data.value).parentNode
this.runParam.parentNode = parentNode
this.runParam.data = data
this.runParam.nodeData = nodeData
this.$emit('SaveEdit',parentNode,data,this.CanSaveNext)
}
}
})
}Operation result hook, if the next function passes false, the operation will be judged to have failed, and the parameters in runParam will be used to roll back, and the editing and saving operation of the node will be invalid.
Related recommendations:
vuejs uses recursive components to implement a tree directoryPHP method to print a binary tree from top to bottomJavaScript implementation of tree traversal algorithm exampleThe above is the detailed content of vue builds a custom tree instance method based on Element. For more information, please follow other related articles on the PHP Chinese website!
Related articles
See more- An in-depth analysis of the Bootstrap list group component
- Detailed explanation of JavaScript function currying
- Complete example of JS password generation and strength detection (with demo source code download)
- Angularjs integrates WeChat UI (weui)
- How to quickly switch between Traditional Chinese and Simplified Chinese with JavaScript and the trick for websites to support switching between Simplified and Traditional Chinese_javascript skills

