
Home >Web Front-end >JS Tutorial >Vue-cli method example code for creating single page to multiple pages
Vue-cli method example code for creating single page to multiple pages

- 小云云Original
- 2018-05-21 11:08:132058browse
For some projects, a single page cannot meet the needs well, so the single-page project created by vue-cli needs to be changed to a multi-page project. This article mainly introduces you to the method of creating a project from single page to multi-page with Vue-cli. The editor thinks it is quite good, so I will share it with you now and give it as a reference. Let’s follow the editor to take a look, I hope it can help everyone.
You need to modify the following files:
1. Download the dependent glob
$npm install glob --save-dev
2. Modify the files under build
(1) Modify webpack.base.conf.js
Add the following code:
var glob = require('glob');
var entries = getEntry('./src/pages/**/*.js')
Change # in module.exports ##
entry: {
   app: './src/main.js'
  },
Comment it out and then add this line of code: entry: entries,As for what entries are, don’t worry, look below: Add a method:
//获取入口js文件
function getEntry(globPath) {
 var entries = {},
  basename, tmp, pathname;

 glob.sync(globPath).forEach(function (entry) {
  basename = path.basename(entry, path.extname(entry));
  pathname = basename.split("_")[0]; //index_main.js得到index
  entries[pathname] = entry;
 });
 return entries;
}
Just modify this file to look like this.
(2) Modify webpack.dev.conf.js
Add the following code://引入 var glob = require('glob') var path = require('path')Change # in plugins in module.exports ##
new HtmlWebpackPlugin({
  filename: 'index.html',
  template: 'index.html',
  inject: true
}),
Comment it out, and then add the following code:
function getEntry(globPath) {

 var entries = {},basename;

 glob.sync(globPath).forEach(function (entry) {
  basename = path.basename(entry, path.extname(entry));
  entries[basename] = entry;
 });
 return entries;
}

var pages = getEntry('src/pages/**/*.html');

for (var pathname in pages) {
 // 配置生成的html文件,定义路径等
 var conf = {
  filename: pathname + '.html',
  template: pages[pathname],  // 模板路径
  inject: true,       // js插入位置
  chunks:[pathname]
 };
 module.exports.plugins.push(new HtmlWebpackPlugin(conf));
}
This is enough to modify this file.
(3) webpack.prod.conf.jsThe routine of modifying this file is similar to the previous file
Add the following code: var glob = require( 'glob') Because when the project was created, yes was directly selected for all optional dependencies when generating the project, so the env declaration in the project is defined as follows:The code is as follows:
var env = process.env.NODE_ENV === 'testing ? require('../config/test.env') : config.build.env ;
But since the webpack.test.conf.js file has not yet been modified, you need to replace this line of declaration with the following line:
var env = config.build.env
Replace ## in the plugins in webpackConfig #
new HtmlWebpackPlugin({
  filename: config.build.index,
  template: 'index.html',
  inject: true,
  minify: {
   removeComments: true,
   collapseWhitespace: true,
   removeAttributeQuotes: true
  },
  chunksSortMode: 'dependency'
}),
Comment out and add the following code after the declaration definition webpackConfig: function getEntry(globPath) {
var entries = {},
basename;
glob.sync(globPath).forEach(function (entry) {
basename = path.basename(entry, path.extname(entry));
entries[basename] = entry;
});
return entries;
}
var pages = getEntry('src/pages/**/*.html');
for (var pathname in pages) {
var conf = {
filename: process.env.NODE_ENV === 'testing'
? pathname + '.html'
: config.build[pathname],
template: pages[pathname],
inject: true,
minify: {
removeComments: true,
collapseWhitespace: true,
removeAttributeQuotes: true
},
chunks:[pathname]
}
webpackConfig.plugins.push(new HtmlWebpackPlugin(conf));
}At this time, this file has also been modified.
3. Modify the file under config
In this folder, you only need to modify one file: index.js. The function of this file is to find the file path, and then According to the directory level set by this file, the packaged file and the corresponding hierarchical file structure are generated. Add the following code:
var build = {
 env: require('./prod.env'),
 assetsRoot: path.resolve(__dirname, '../dist'),
 assetsSubDirectory: 'static',
 assetsPublicPath: '/',
 productionSourceMap: true,
 productionGzip: false,
 productionGzipExtensions: ['js', 'css']
}

function getEntry(globPath) {
 var entries = {},basename;

 glob.sync(globPath).forEach(function(entry) {
  basename = path.basename(entry, path.extname(entry));
  entries[basename] = entry;
 });
 return entries;
}

var pages = getEntry('src/pages/**/*.html');

//入口 index: path.resolve(__dirname, '../dist/index.html')
for (var pathname in pages) {
 build[pathname] = path.resolve(__dirname, '../dist/' + pathname + '.html')
}
Then replace the value of build in module.exports with the variable build we just added and declared. If you want to modify the packaged directory hierarchy, you can modify it in the build; you can also add the variables we need to define in the build. For example, we need to copy fabfile.py and favicon.ico to the a directory in the dist directory, just You can define a property in build, distA:path.resolve(__dirname, '../dist/a),Then because 'copy-webpack-plugin' has been introduced in webpack.prod.conf.js (var CopyWebpackPlugin = require('copy-webpack-plugin') ), we can add the following code under webpackConfig.plugins:
new CopyWebpackPlugin([
{
from: path.resolve(__dirname, '../fabfile.py'),
to: config.build.distA,
template: 'fabfile.py'
}
])
new CopyWebpackPlugin([
{
from: path.resolve(__dirname, '../favicon.ico'),
to: config.build.distA,
template: 'favicon.ico'
}
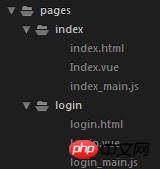
])Add the pages folder under the src directory The hierarchical structure of the directory is arranged similar to this form:
 5. Packaging
After making the above modifications, although there is no problem running locally, there will still be problems and errors will appear after packaging. :webpackJsonp is not definedThe solution is as follows: In the conf defined in the for (var pathname in pages) loop under the webpack.prod.conf.js file, add two lines of code:
chunksSortMode: 'dependency', // dependency 页面中引入的js按照依赖关系排序;manual 页面中引入的js按照下面的chunks的数组中的顺序排序;

chunks: ['manifest', 'vender', pathname] // 生成的页面中引入的js,'manifest', 'vender'这两个js是webpack在打包过程中抽取出的一些公共方法依赖,其中,'manifest'又是从'vender'中抽取得到的,所以这三个js文件的依赖关系是 pathname依赖 'vender','vender'依赖'manifest'.
Comprehensive The above is the transformation process of this project from a single page to a multi-page project. Regarding the modification of the webpack.test.conf.js file, additional additions will be made after subsequent modifications are successful.
vue builds multi-page application example code sharing
vue cli reconstruction multi-page scaffolding example sharing
How to transform Vue-cli into a history mode that supports multiple pages
The above is the detailed content of Vue-cli method example code for creating single page to multiple pages. For more information, please follow other related articles on the PHP Chinese website!
Related articles
See more- An in-depth analysis of the Bootstrap list group component
- Detailed explanation of JavaScript function currying
- Complete example of JS password generation and strength detection (with demo source code download)
- Angularjs integrates WeChat UI (weui)
- How to quickly switch between Traditional Chinese and Simplified Chinese with JavaScript and the trick for websites to support switching between Simplified and Traditional Chinese_javascript skills