
Home >Web Front-end >H5 Tutorial >Basic detailed explanation of HTML5 canvas drawing
Basic detailed explanation of HTML5 canvas drawing

- 小云云Original
- 2018-01-31 11:00:423946browse
This article mainly introduces to you the relevant information on the basic usage of HTML5 canvas drawing. The editor thinks it is quite good, so I will share it with you now and give it as a reference. Let’s follow the editor to take a look, I hope it can help everyone.
5ba626b379994d53f7acf72a64f9b697c2caaf3fc160dd2513ce82f021917f8b is a new tag in HTML5, used to draw graphics. In fact, this tag is the same as other tags. Its special feature is This tag can obtain a CanvasRenderingContext2D object, which we can control through JavaScript scripts for drawing.
5ba626b379994d53f7acf72a64f9b697c2caaf3fc160dd2513ce82f021917f8b is just a container for drawing graphics. In addition to attributes such as id, class, and style, it also has height and width attributes. There are three main steps for drawing on the 5ba626b379994d53f7acf72a64f9b697> element:
Get the DOM object corresponding to the
5ba626b379994d53f7acf72a64f9b697element, here It is a Canvas object;Call the getContext() method of the Canvas object to get a CanvasRenderingContext2D object;
Call the CanvasRenderingContext2D object for drawing.
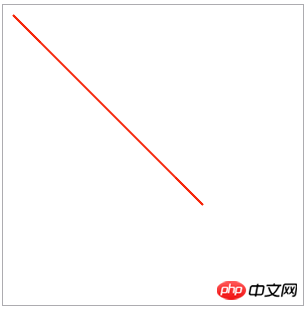
##Draw line segments moveTo() and lineTo()
The following is a simple5ba626b379994d53f7acf72a64f9b697 drawing example :
<!DOCTYPE html>
<html lang="en">
<head>
    <meta charset="UTF-8">
    <title>canvas绘图演示</title>
    <style type="text/css">
        #canvas{
            border: 1px solid #ADACB0;
            display: block;
            margin: 20px auto;
        }
    </style>
</head>
<body>
    <canvas id="canvas" width="300" height="300">
        你的浏览器还不支持canvas
    </canvas>
</body>
<script type="text/javascript">
    var canvas = document.getElementById("canvas");
    var context = canvas.getContext("2d");
    //设置对象起始点和终点
    context.moveTo(10,10);
    context.lineTo(200,200);
    //设置样式
    context.lineWidth = 2;
    context.strokeStyle = "#F5270B";
    //绘制
    context.stroke();
</script>
</html>
<script type="text/javascript">
var canvas = document.getElementById("canvas");
var context = canvas.getContext("2d");
//设置对象起始点和终点
context.beginPath();
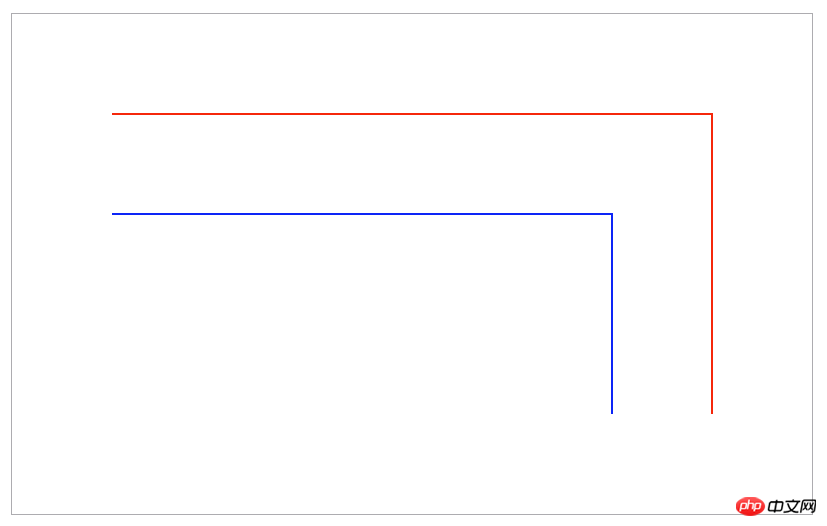
context.moveTo(100,100);
context.lineTo(700,100);
context.lineTo(700,400);
context.lineWidth = 2;
context.strokeStyle = "#F5270B";
//绘制
context.stroke();
context.beginPath();
context.moveTo(100,200);//这里的moveTo换成lineTo效果是一样的
context.lineTo(600,200);
context.lineTo(600,400);
//strokeStyle的颜色有新的值,则覆盖上面设置的值
//lineWidth没有新的值,则按上面设置的值显示
context.strokeStyle = "#0D25F6";
//绘制
context.stroke();
</script>
- context.rect(x, y, width, height): only define the path of the rectangle;
- context.fillRect( x , y , width , height ): Draw a filled rectangle directly; ##context.strokeRect( x , y , width , height ): Draw a rectangular border directly;
<script type="text/javascript">
var canvas = document.getElementById("canvas");
var context = canvas.getContext("2d");
//使用rect方法
context.rect(10,10,190,190);
context.lineWidth = 2;
context.fillStyle = "#3EE4CB";
context.strokeStyle = "#F5270B";
context.fill();
context.stroke();
//使用fillRect方法
context.fillStyle = "#1424DE";
context.fillRect(210,10,190,190);
//使用strokeRect方法
context.strokeStyle = "#F5270B";
context.strokeRect(410,10,190,190);
//同时使用strokeRect方法和fillRect方法
context.fillStyle = "#1424DE";
context.strokeStyle = "#F5270B";
context.strokeRect(610,10,190,190);
context.fillRect(610,10,190,190);
</script>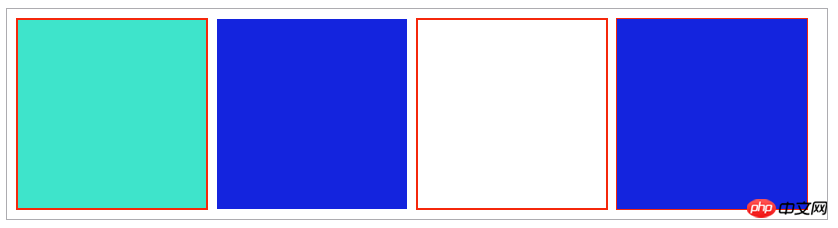 Two points need to be explained here: the first point is The order before and after stroke() and fill() are drawn. If fill() is drawn later, then when the stroke border is larger, it will obviously cover half of the border drawn by stroke(); second point: set fillStyle or strokeStyle Attributes can be set through the "rgba(255,0,0,0.2)" setting method. The last parameter of this setting is transparency.
There is another one related to rectangular drawing: clearing the rectangular area: context.clearRect(x,y,width,height).
The received parameters are: clear the starting position of the rectangle and the width and length of the rectangle.
In the above code, add at the end of drawing the graphics:
context.clearRect(100,60,600,100);
to get the following effect:

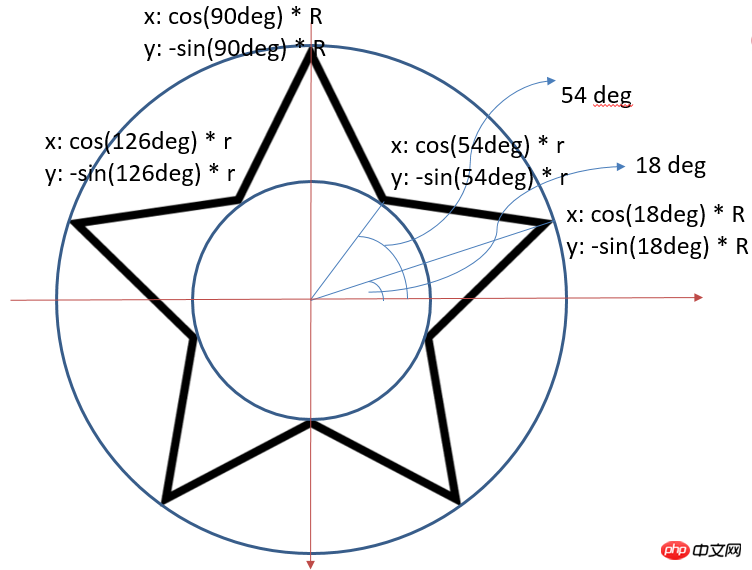
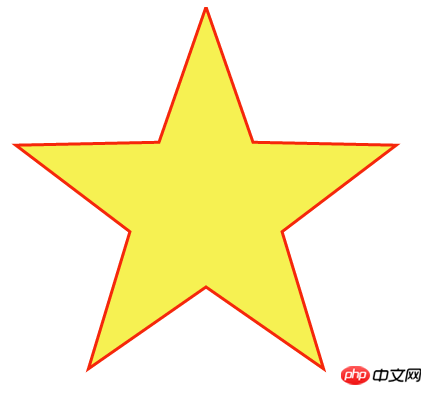
By analyzing the five-pointed star, we can determine the rules of the coordinates of each vertex. One thing to note here is: in canvas, the direction of the Y-axis is downwards.
 The corresponding code is as follows:
var canvas = document.getElementById("canvas");
    var context = canvas.getContext("2d");
    context.beginPath();
    //设置是个顶点的坐标,根据顶点制定路径
    for (var i = 0; i < 5; i++) {
        context.lineTo(Math.cos((18+i*72)/180*Math.PI)*200+200,
                        -Math.sin((18+i*72)/180*Math.PI)*200+200);
        context.lineTo(Math.cos((54+i*72)/180*Math.PI)*80+200,
                        -Math.sin((54+i*72)/180*Math.PI)*80+200);
    }
    context.closePath();
    //设置边框样式以及填充颜色
    context.lineWidth="3";
    context.fillStyle = "#F6F152";
    context.strokeStyle = "#F5270B";
    context.fill();
    context.stroke();
Final effect:
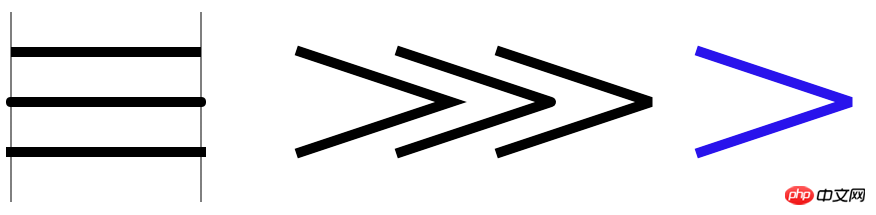
In addition to the lineWidth attribute used above, lines also have the following attributes:
The lineCap attribute sets or returns the style of the line cap at the end of the line. , can take on the following values:
- "butt" adds a straight edge to each end of the line (default);
- "round" adds a round cap to each end of the line;
- "square" adds a square cap to each end of the line.
- The lineJoin property sets or returns the type of corner created when two lines intersect. It can take the following values:
- " miter" creates sharp corners (default);
- "bevel" creates beveled corners;
- "round" creates rounded corners.
- miterLimit property sets or returns the maximum miter length (default is 10). Miter length refers to the distance between the inside and outside corners where two lines meet. miterLimit is only valid when the lineJoin attribute is "miter".
var canvas = document.getElementById("canvas");
    var context = canvas.getContext("2d");
    //测试lineCap属性
    //设置基准线便于观察
    context.moveTo(10,10);
    context.lineTo(10,200);
    context.moveTo(200,10);
    context.lineTo(200,200);
    context.lineWidth="1";
    context.stroke();
    //butt
    context.beginPath();
    context.moveTo(10,50);
    context.lineTo(200,50);
    context.lineCap="butt";
    context.lineWidth="10";
    context.stroke();
    //round
    context.beginPath();
    context.moveTo(10,100);
    context.lineTo(200,100);
    context.lineCap="round";
    context.lineWidth="10";
    context.stroke();
    //square
    context.beginPath();
    context.moveTo(10,150);
    context.lineTo(200,150);
    context.lineCap="square";
    context.lineWidth="10";
    context.stroke();

    //测试linJoin属性
    //miter
    context.beginPath();
    context.moveTo(300,50);
    context.lineTo(450,100);
    context.lineTo(300,150);
    context.lineJoin="miter";
    context.lineWidth="10";
    context.stroke();
    //round
    context.beginPath();
    context.moveTo(400,50);
    context.lineTo(550,100);
    context.lineTo(400,150);
    context.lineJoin="round";
    context.lineWidth="10";
    context.stroke();
    //square
    context.beginPath();
    context.moveTo(500,50);
    context.lineTo(650,100);
    context.lineTo(500,150);
    context.lineJoin="bevel";
    context.lineWidth="10";
    context.stroke();

    //测试miterLimit属性
    context.beginPath();
    context.moveTo(700,50);
    context.lineTo(850,100);
    context.lineTo(700,150);
    context.lineJoin="miter";
    context.miterLimit="2";
    context.lineWidth="10";
    context.strokeStyle="#2913EC";
    context.stroke();
The effects of different values of each attribute are as follows:
填充样式
前面用到的fillStyle和strokeStyle除了设置颜色外,还能设置其他填充样式,这里以fillStyle为例:
线性渐变
使用步骤
(1)var grd = context.createLinearGradient( xstart , ystart, xend , yend )创建一个线性渐变,设置起始坐标和终点坐标;
(2)grd.addColorStop( stop , color )为线性渐变添加颜色,stop为0~1的值;
(3)context.fillStyle=grd将赋值给context。
径向渐变
该方法与线性渐变使用方法类似,只是第一步接收的参数不一样
var grd = context.createRadialGradient(x0 , y0, r0 , x1 , y1 , r1 );接收起始圆心的坐标和圆半径以及终点圆心的坐标和圆的半径。
位图填充
createPattern( img , repeat-style )使用图片填充,repeat-style可以取repeat、repeat-x、repeat-y、no-repeat。
var canvas = document.getElementById("canvas");
    var context = canvas.getContext("2d");

    //线性渐变
    var grd = context.createLinearGradient( 10 , 10, 100 , 350 );
    grd.addColorStop(0,"#1EF9F7");
    grd.addColorStop(0.25,"#FC0F31");
    grd.addColorStop(0.5,"#ECF811");
    grd.addColorStop(0.75,"#2F0AF1");
    grd.addColorStop(1,"#160303");
    context.fillStyle = grd;
    context.fillRect(10,10,100,350);

    //径向渐变
    var grd = context.createRadialGradient(325 , 200, 0 , 325 , 200 , 200 );
    grd.addColorStop(0,"#1EF9F7");
    grd.addColorStop(0.25,"#FC0F31");
    grd.addColorStop(0.5,"#ECF811");
    grd.addColorStop(0.75,"#2F0AF1");
    grd.addColorStop(1,"#160303");
    context.fillStyle = grd;
    context.fillRect(150,10,350,350);

    //位图填充
    var bgimg = new Image();
    bgimg.src = "background.jpg";
    bgimg.onload=function(){
        var pattern = context.createPattern(bgimg, "repeat");
        context.fillStyle = pattern;
        context.strokeStyle="#F20B0B";
        context.fillRect(600, 100, 200,200);
        context.strokeRect(600, 100, 200,200);
    };
效果如下:

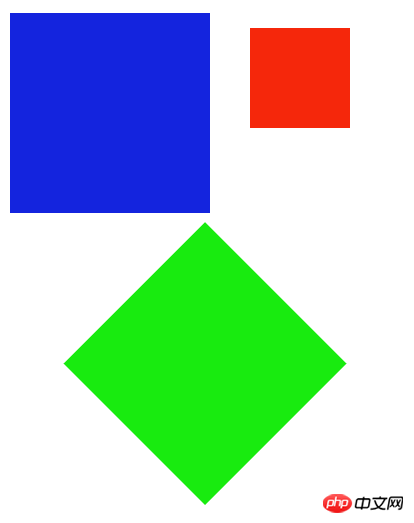
图形变换
平移:context.translate(x,y),接收参数分别为原点在x轴方向平移x,在y轴方向平移y。
缩放:context.scale(x,y),接收参数分别为x坐标轴按x比例缩放,y坐标轴按y比例缩放。
旋转:context.rotate(angle),接收参数是坐标轴旋转的角度。
需要说明的是,对图形进行变化后,接下来的一次绘图是紧接着上一次的状态的,所以如果需要回到初始状态,要用到context.save();和context.restore();来保存和恢复当前状态:
 var canvas = document.getElementById("canvas");
    var context = canvas.getContext("2d");

    //translate()
    context.save();
    context.fillStyle = "#1424DE";
    context.translate(10,10);
    context.fillRect(0,0,200,200);
    context.restore();

    //scale()
    context.save();
    context.fillStyle = "#F5270B";
    context.scale(0.5,0.5);
    context.fillRect(500,50,200,200);
    context.restore();
    //rotate()

    context.save();
    context.fillStyle = "#18EB0F";
    context.rotate(Math.PI / 4);
    context.fillRect(300,10,200,200);
    context.restore();
效果如下:
另外一个跟图形变换相关的是:矩阵变换 :context.transform(a, b, c, d, e, f, g)。参数的含义如下:
a 水平缩放 ( 默认为1 )
b 水平倾斜 ( 默认为 0 )
c 垂直倾斜 ( 默认为 0 )
d 垂直缩放 ( 默认为1 )
e 水平位移 ( 默认为 0 )
f 垂直位移 ( 默认为 0 )
读者可以自行验证其各个参数的效果,这里就不一一介绍了。
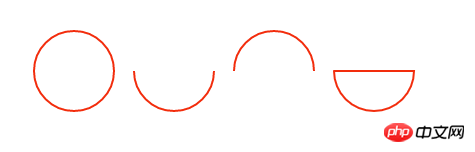
绘制曲线
跟绘制曲线的有四个函数,分别是:
context.arc(x,y,r,sAngle,eAngle,counterclockwise);用于创建弧/曲线(用于创建圆或部分圆)。接收的参数含义:
| 参数 | 含义 |
| :————- |:————-|
| x | 圆的中心的 x 坐标 |
|y|圆的中心的 y 坐标|
|r|圆的半径|
|sAngle|起始角,以弧度计(弧的圆形的三点钟位置是 0 度)|
|eAngle|结束角,以弧度计|
|counterclockwise|可选。规定应该逆时针还是顺时针绘图。False = 顺时针,true = 逆时针|
下面是几个arc()函数的几个示例:
    var canvas = document.getElementById("canvas");
    var context = canvas.getContext("2d");

    context.strokeStyle = "#F22D0D";
    context.lineWidth = "2";
    //绘制圆
    context.beginPath();
    context.arc(100,100,40,0,2*Math.PI);
    context.stroke();

    //绘制半圆
    context.beginPath();
    context.arc(200,100,40,0,Math.PI);
    context.stroke();

    //绘制半圆,逆时针
    context.beginPath();
    context.arc(300,100,40,0,Math.PI,true);
    context.stroke();

    //绘制封闭半圆
    context.beginPath();
    context.arc(400,100,40,0,Math.PI);
    context.closePath();
    context.stroke();
效果如下:
context.arcTo(x1,y1,x2,y2,r); 在画布上创建介于两个切线之间的弧/曲线。接收的参数含义:
| 参数 | 含义 |
|---|---|
| x1 | 弧的控制点的 x 坐标 |
| y1 | 弧的控制点的 y 坐标 |
| x2 | 弧的终点的 x 坐标 |
| y2 | 弧的终点的 y 坐标 |
| r | 弧的半径 |
这里需要注意的是arcTo函数绘制的曲线的起始点需要通过moveTo()函数来设置,下面利用arcTo函数绘制一个圆角矩形:
function createRoundRect(context , x1 , y1 , width , height , radius)
    {
        // 移动到左上角
        context.moveTo(x1 + radius , y1);
        // 添加一条连接到右上角的线段
        context.lineTo(x1 + width - radius, y1);
        // 添加一段圆弧
        context.arcTo(x1 + width , y1, x1 + width, y1 + radius, radius);
        // 添加一条连接到右下角的线段
        context.lineTo(x1 + width, y1 + height - radius);
        // 添加一段圆弧
        context.arcTo(x1 + width, y1 + height , x1 + width - radius, y1 + height , radius);
        // 添加一条连接到左下角的线段
        context.lineTo(x1 + radius, y1 + height);
        // 添加一段圆弧
        context.arcTo(x1, y1 + height , x1 , y1 + height - radius , radius);
        // 添加一条连接到左上角的线段
        context.lineTo(x1 , y1 + radius);
        // 添加一段圆弧
        context.arcTo(x1 , y1 , x1 + radius , y1 , radius);
        context.closePath();
    }
    // 获取canvas元素对应的DOM对象
    var canvas = document.getElementById('mc');
    // 获取在canvas上绘图的CanvasRenderingContext2D对象
    var context = canvas.getContext('2d');
    context.lineWidth = 3;
    context.strokeStyle = "#F9230B";
    createRoundRect(context , 30 , 30 , 400 , 200 , 50);
    context.stroke();
效果如下:

context.quadraticCurveTo(cpx,cpy,x,y);绘制二次贝塞曲线,参数含义如下:
| 参数 | 含义 |
|---|---|
| cpx | 贝塞尔控制点的 x 坐标 |
| cpy | 贝塞尔控制点的 y 坐标 |
| x | 结束点的 x 坐标 |
| y | 结束点的 y 坐标 |
曲线的开始点是当前路径中最后一个点。如果路径不存在,那么请使用 beginPath() 和 moveTo() 方法来定义开始点。
context.bezierCurveTo(cp1x,cp1y,cp2x,cp2y,x,y); 绘制三次贝塞尔曲线,参数如下:
| 参数 | 含义 |
|---|---|
| cp1x | 第一个贝塞尔控制点的 x 坐标 |
| cp1y | 第一个贝塞尔控制点的 y 坐标 |
| cp2x | 第二个贝塞尔控制点的 x 坐标 |
| cp2y | 第二个贝塞尔控制点的 y 坐标 |
| x | 结束点的 x 坐标 |
| y | 结束点的 y 坐标 |
文字渲染
与文本渲染有关的主要有三个属性以及三个方法:
| 属性 | 描述 |
|---|---|
| font | 设置或返回文本内容的当前字体属性 |
| textAlign | 设置或返回文本内容的当前对齐方式 |
| textBaseline | 设置或返回在绘制文本时使用的当前文本基线 |
| 方法 | 描述 |
|---|---|
| fillText() | 在画布上绘制”被填充的”文本 |
| strokeText() | 在画布上绘制文本(无填充) |
| measureText() | 返回包含指定文本宽度的对象 |
上述的属性和方法的基本用法如下:
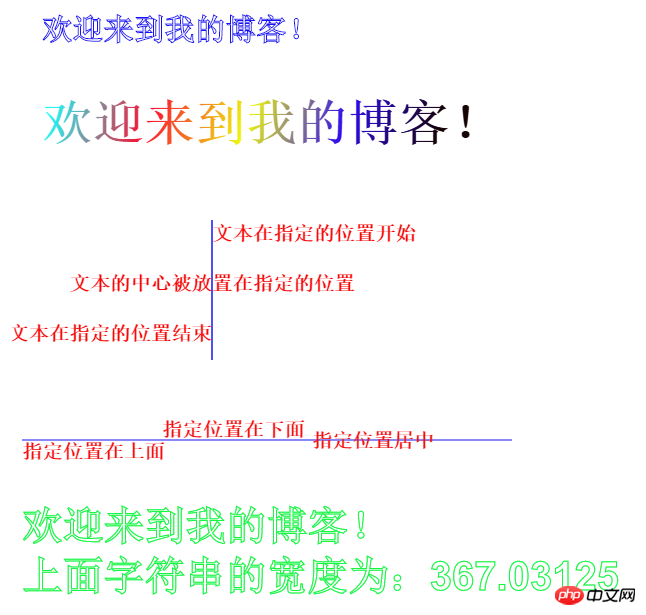
var canvas = document.getElementById("canvas");
    var context = canvas.getContext("2d");

    context.font="bold 30px Arial"; //设置样式
    context.strokeStyle = "#1712F4";
    context.strokeText("欢迎来到我的博客!",30,100);

    context.font="bold 50px Arial";
    var grd = context.createLinearGradient( 30 , 200, 400 , 300 );//设置渐变填充样式
    grd.addColorStop(0,"#1EF9F7");
    grd.addColorStop(0.25,"#FC0F31");
    grd.addColorStop(0.5,"#ECF811");
    grd.addColorStop(0.75,"#2F0AF1");
    grd.addColorStop(1,"#160303");
    context.fillStyle = grd;
    context.fillText("欢迎来到我的博客!",30,200);

    context.save();
    context.moveTo(200,280);
    context.lineTo(200,420);
    context.stroke();
    context.font="bold 20px Arial";
    context.fillStyle = "#F80707";
    context.textAlign="left";
    context.fillText("文本在指定的位置开始",200,300);
    context.textAlign="center";
    context.fillText("文本的中心被放置在指定的位置",200,350);
    context.textAlign="right";
    context.fillText("文本在指定的位置结束",200,400);
    context.restore();

    context.save();
    context.moveTo(10,500);
    context.lineTo(500,500);
    context.stroke();
    context.fillStyle="#F60D0D";
    context.font="bold 20px Arial";
    context.textBaseline="top";
    context.fillText("指定位置在上面",10,500);
    context.textBaseline="bottom";
    context.fillText("指定位置在下面",150,500);
    context.textBaseline="middle";
    context.fillText("指定位置居中",300,500);
    context.restore();


    context.font="bold 40px Arial";
    context.strokeStyle = "#16F643";
    var text = "欢迎来到我的博客!";
    context.strokeText("欢迎来到我的博客!",10,600);
    context.strokeText("上面字符串的宽度为:"+context.measureText(text).width,10,650);
效果如下:
其他属性和方法
阴影绘制:
shadowColor 设置或返回用于阴影的颜色。
shadowBlur 设置或返回用于阴影的模糊级别(数值越大越模糊)。
shadowOffsetX 设置或返回阴影与形状的水平距离。
shadowOffsetY 设置或返回阴影与形状的垂直距离。
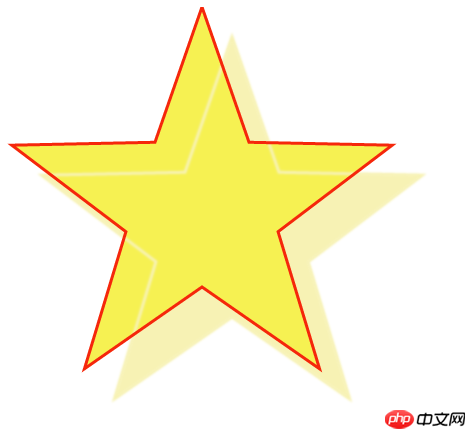
我们为之前绘制的五角星添加一下阴影
var canvas = document.getElementById("canvas");
    var context = canvas.getContext("2d");
    context.beginPath();
    //设置是个顶点的坐标,根据顶点制定路径
    for (var i = 0; i < 5; i++) {
        context.lineTo(Math.cos((18+i*72)/180*Math.PI)*200+200,
                        -Math.sin((18+i*72)/180*Math.PI)*200+200);
        context.lineTo(Math.cos((54+i*72)/180*Math.PI)*80+200,
                        -Math.sin((54+i*72)/180*Math.PI)*80+200);
    }
    context.closePath();
    //设置边框样式以及填充颜色
    context.lineWidth="3";
    context.fillStyle = "#F6F152";
    context.strokeStyle = "#F5270B";
    context.shadowColor = "#F7F2B4";
    context.shadowOffsetX = 30;
    context.shadowOffsetY = 30;
    context.shadowBlur = 2;
    context.fill();
    context.stroke();
效果如下:
图形组合:
globalAlpha: 设置或返回绘图的当前 alpha 或透明值
该方法主要是设置图形的透明度,这里就不具体介绍。
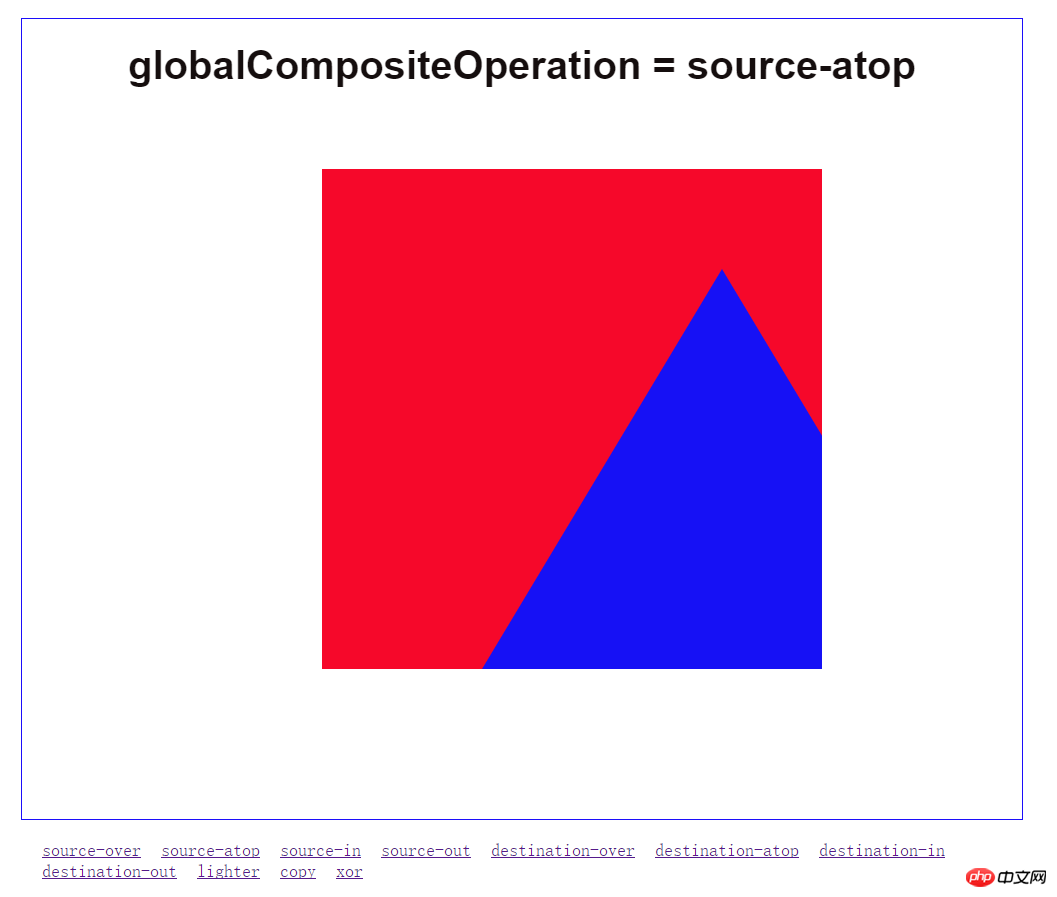
globalCompositeOperation: 设置或返回新图像如何绘制到已有的图像上,该方法有以下属性值:
| 值 | 描述 |
|---|---|
| source-over | 在目标图像上显示源图像(默认) |
| source-atop | 在目标图像顶部显示源图像。源图像位于目标图像之外的部分是不可见的 |
| source-in | 在目标图像中显示源图像。只有目标图像之内的源图像部分会显示,目标图像是透明的 |
| source-out | 在目标图像之外显示源图像。只有目标图像之外的源图像部分会显示,目标图像是透明的 |
| destination-over | 在源图像上显示目标图像 |
| destination-atop | 在源图像顶部显示目标图像。目标图像位于源图像之外的部分是不可见的 |
| destination-in | 在源图像中显示目标图像。只有源图像之内的目标图像部分会被显示,源图像是透明的 |
| destination-out | 在源图像之外显示目标图像。只有源图像之外的目标图像部分会被显示,源图像是透明的 |
| lighter | 显示源图像 + 目标图像 |
| copy | 显示源图像。忽略目标图像 |
| xor | 使用异或操作对源图像与目标图像进行组合 |
下面是一个小示例,可以通过点击改变组合效果:
<!DOCTYPE html>
<html lang="en">
<head>
    <meta charset="UTF-8">
    <title>图形组合</title>
    <style type="text/css">
        #canvas{
            border: 1px solid #1C0EFA;
            display: block;
            margin: 20px auto;
        }
        #buttons{
            width: 1000px;
            margin: 5px auto;
            clear:both;
        }
        #buttons a{
            font-size: 18px;
            display: block;
            float: left;
            margin-left: 20px;
        }
    </style>
</head>
<body>
    <canvas id="canvas" width="1000" height="800">
            你的浏览器还不支持canvas
    </canvas>
    <p id="buttons">
        <a href="#">source-over</a>
        <a href="#">source-atop</a>
        <a href="#">source-in</a>
        <a href="#">source-out</a>
        <a href="#">destination-over</a>
        <a href="#">destination-atop</a>
        <a href="#">destination-in</a>
        <a href="#">destination-out</a>
        <a href="#">lighter</a>
        <a href="#">copy</a>
        <a href="#">xor</a>
    </p>
</body>
<script type="text/javascript">

window.onload = function(){
    draw("source-over");

    var buttons = document.getElementById("buttons").getElementsByTagName("a");
    for (var i = 0; i < buttons.length; i++) {
        buttons[i].onclick = function(){
            draw(this.text);
            return false;
        };
    }
};

    function draw(compositeStyle){
        var canvas = document.getElementById("canvas");
        var context = canvas.getContext("2d");

        context.clearRect(0, 0, canvas.width, canvas.height);

        //draw title
        context.font = "bold 40px Arial";
        context.textAlign = "center";
        context.textBasedline = "middle";
        context.fillStyle = "#150E0E";
        context.fillText("globalCompositeOperation = "+compositeStyle, canvas.width/2, 60);

        //draw a rect
        context.fillStyle = "#F6082A";
        context.fillRect(300, 150, 500, 500);

        //draw a triangle
        context.globalCompositeOperation = compositeStyle;
        context.fillStyle = "#1611F5";
        context.beginPath();
        context.moveTo(700, 250);
        context.lineTo(1000,750);
        context.lineTo(400, 750);
        context.closePath();
        context.fill();
    }

</script>
</html>
读者可以点击标签来观察不同的组合效果,效果如下:
剪辑区域:
clip()方法从原始画布中剪切任意形状和尺寸。
提示:一旦剪切了某个区域,则所有之后的绘图都会被限制在被剪切的区域内(不能访问画布上的其他区域)。您也可以在使用 clip() 方法前通过使用 save() 方法对当前画布区域进行保存,并在以后的任意时间对其进行恢复(通过 restore() 方法)
以下是用一个圆去截取一个矩形的示例:
var canvas = document.getElementById("canvas");
    var context = canvas.getContext("2d");

    context.beginPath();
    context.fillStyle = "#0C0101";
    context.fillRect(0,0,canvas.width,canvas.height);

    context.beginPath();
    context.fillStyle = "#FFFDFD";
    context.arc(400,400,100,0,2*Math.PI);
    context.fill();
    context.clip();

    context.beginPath();
    context.fillStyle = "#F60825";
    context.fillRect(200, 350, 400,50);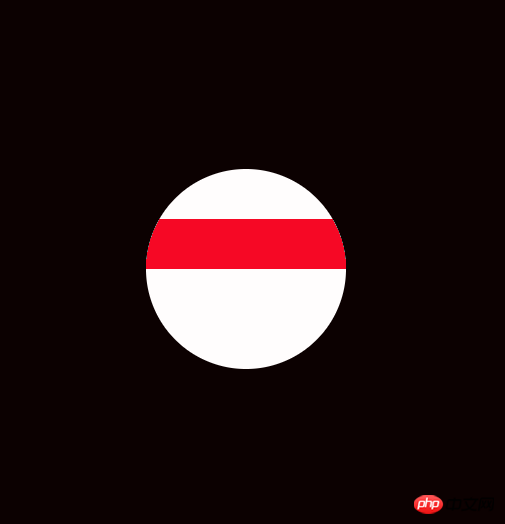
除了上述的属性的和方法,还有以下等方法:
drawImage(): 向画布上绘制图像、画布或视频。
toDataURL() :保存图形
isPointInPath(): 如果指定的点位于当前路径中,则返回 true,否则返回 false。
这里就不逐个举例说明了。
相关推荐:
The above is the detailed content of Basic detailed explanation of HTML5 canvas drawing. For more information, please follow other related articles on the PHP Chinese website!
Related articles
See more- AlloyTouch full-screen scrolling plug-in creates a smooth H5 page in 30 seconds
- HTML5 actual combat and analysis of touch events (touchstart, touchmove and touchend)
- Detailed explanation of image drawing examples in HTML5 canvas 9
- Regular expressions and new HTML5 elements
- How to combine NodeJS and HTML5 to drag and drop multiple files to upload to the server