
 Web Front-endJS TutorialAngular combines with zTree to asynchronously load node data instance sharing
Angular combines with zTree to asynchronously load node data instance sharing

This article mainly shares with you the difficulties and methods of asynchronously loading node data using Angular combined with zTree. Friends who have needs in this regard can refer to it. I hope it can help everyone.
1 Prerequisite preparation
1.1 Create a new angular4 project

1.2 Go to zTree official website to download zTree
zTree official website: Click to go to
Version used by Sanshao: Click to go to


nbsp;html>


 <meta>
 <title>TestZtree</title>
 <base>

 <meta>
 <link>

 <link>
 <link>
 <script></script>
 <script></script>


 <app-root></app-root>
View Code2.2 Declare the jquery object in the TS file
declare var $ : any;2.3 Write code in TS file

##
import { Component, OnInit } from '@angular/core';
declare var $ : any;
@Component({
 selector: 'app-root',
 templateUrl: './app.component.html',
 styleUrls: ['./app.component.scss']
})
export class AppComponent implements OnInit {

 // setting = {
 // view: {
 // showLine: true,
 // showIcon: true,
 // fontCss: this.getFont
 // },
 // data: {
 // simpleData: {
 // enable: true,
 // idKey: 'id',
 // pIdKey: 'pId'
 // }
 // },
 // callback: {
 // onClick: this.onCzTreeOnClick
 // }
 // };
 // zNodes = [
 // {id: 1, pId: 0, name: '1 一级标题', open: true, iconOpen:"assets/zTree/css/zTreeStyle/img/diy/1_open.png", iconClose:"assets/zTree/css/zTreeStyle/img/diy/1_close.png"},
 // {id: 11, pId: 1, name: '1.1 二级标题', open: true, font:{'background-color':'skyblue', 'color':'white'}},
 // {id: 111, pId: 11, name: '1.1.1 三级标题 -> 博客园', url: 'http://www.cnblogs.com/NeverCtrl-C/'},
 // {id: 112, pId: 11, name: '1.1.2 三级标题 -> 单击', click: "alert('你单击了')"},
 // {id: 12, pId: 1, name: '1.2 二级标题'},
 // {id: 2, pId: 0, name: '2 一级标题'}
 // ]
 // getFont(treeId, node) {
 // return node.font ? node.font : {};
 // }
 // onCzTreeOnClick(event, treeId, treeNode, clickFlag) {
 // alert(treeNode.name);
 // }
 setting = {
 data: {
 simpleData: {
 enable: true
 }
 }
 };
 zNodes = [
 {id: 1, pId: 0, name: '1 一级标题'},
 {id: 11, pId: 1, name: '1.1 二级标题'},
 {id: 111, pId: 11, name: '1.1.1 三级标题'},
 {id: 112, pId: 11, name: '1.1.2 三级标题'},
 {id: 12, pId: 1, name: '1.2 二级标题'},
 {id: 2, pId: 0, name: '2 一级标题'}
 ];
 constructor() { }
 ngOnInit() {
 console.log($);
 console.log($.fn.zTree);
 $.fn.zTree.init($("#ztree"),this.setting,this.zNodes);
 }
}
View Code
2.4 In component HTML Write code in
2.5 Effect display
 3 zTree basic functions
3.1 Not displayed Connecting lines
3.1.1 Official documentation
Does not display connecting lines between titles
 3.1.2 Programming steps
Just specify the value of showLine attribute as false in the basic configuration object
 setting = {
 data: {
 simpleData: {
 enable: true
 }
 },
 view: {
 showLine: false
 }
 };
3.2 Do not display the node icon
3.2.1 Official document
Remove the icon in front of the node
#3.2.2 Programming steps

##
setting = {
 data: {
 simpleData: {
 enable: true
 }
 },
 view: {
 showLine: false,
 showIcon: false
 }
 };
View Code
3.3 Custom node icon
3.3.1 Official document
Change the icon of the node
3.3.2 Programming steps Set icon/iconOpen for treeNode node data /iconClose attribute
 3.4.1 Official document
Change the style of node font
3.4.2 Programming steps Just set the font attribute for the treeNode node data. The value of the font attribute is an object, and the content of the object is the same as the style data

##3.5 Hyperlink
3.5.1 Official document
3.5.2 Programming steps
Set the url and click attributes for the treeNode node data
_self -> Open in the original window

 zNodes = [
 {id: 1, pId: 0, name: '1 一级标题', open: true, iconOpen:"assets/zTree/css/zTreeStyle/img/diy/1_open.png", iconClose:"assets/zTree/css/zTreeStyle/img/diy/1_close.png"},
 {id: 11, pId: 1, name: '1.1 二级标题', open: true, font:{'background-color':'skyblue', 'color':'white'}},
 {id: 111, pId: 11, name: '1.1.1 三级标题 -> 博客园1', url: 'http://www.cnblogs.com/NeverCtrl-C/', target: '_blank'},
 {id: 113, pId: 11, name: '1.1.1 三级标题 -> 博客园2', url: 'http://www.cnblogs.com/NeverCtrl-C/', target: '_self'},
 {id: 112, pId: 11, name: '1.1.2 三级标题 -> 单击', click: "alert('你单击了')"},
 {id: 12, pId: 1, name: '1.2 二级标题'},
 {id: 2, pId: 0, name: '2 一级标题'}
 ]
View Code
3.6.1 Official document
The corresponding method is triggered when the node title is clicked
Tips 01: You can use this usage in angular Implement route jump

3.6.2 编程步骤
设置基本配置对象的onClick属性
技巧01:onClick属性值是一个方法的引用,我们需要自己编写这个方法

 setting = {
 view: {
 showLine: true,
 showIcon: true,
 fontCss: this.getFont
 },
 data: {
 simpleData: {
 enable: true,
 idKey: 'id',
 pIdKey: 'pId'
 }
 },
 callback: {
 onClick: this.onCzTreeOnClick
 }
 };
View Code
编写onClick触发方法

 onCzTreeOnClick(event, treeId, treeNode, clickFlag) {
 alert(treeNode.name);
 }
View Code
3.6.3 代码汇总
import { Component, OnInit } from '@angular/core';
declare var $ : any;
@Component({
selector: 'app-root',
templateUrl: './app.component.html',
styleUrls: ['./app.component.scss']
})
export class AppComponent implements OnInit {
setting = {
view: {
showLine: true,
showIcon: true,
fontCss: this.getFont
},
data: {
simpleData: {
enable: true,
idKey: 'id',
pIdKey: 'pId'
}
},
callback: {
onClick: this.onCzTreeOnClick
},
// async: {
// enable: true,
// url:"http://localhost:3000/data",
// type: "get",
// // autoParam:["id", "name=n", "level=lv"],
// // otherParam:{"otherParam":"zTreeAsyncTest"},
// dataFilter: this.filter
// }
};
zNodes = [
{id: 1, pId: 0, name: '1 一级标题', open: true, iconOpen:"assets/zTree/css/zTreeStyle/img/diy/1_open.png", iconClose:"assets/zTree/css/zTreeStyle/img/diy/1_close.png"},
{id: 11, pId: 1, name: '1.1 二级标题', open: true, font:{'background-color':'skyblue', 'color':'white'}},
{id: 111, pId: 11, name: '1.1.1 三级标题 -> 博客园1', url: 'http://www.cnblogs.com/NeverCtrl-C/', target: '_blank'},
{id: 113, pId: 11, name: '1.1.1 三级标题 -> 博客园2', url: 'http://www.cnblogs.com/NeverCtrl-C/', target: '_self'},
{id: 112, pId: 11, name: '1.1.2 三级标题 -> 单击', click: "alert('你单击了')"},
{id: 12, pId: 1, name: '1.2 二级标题'},
{id: 2, pId: 0, name: '2 一级标题'}
]
getFont(treeId, node) {
return node.font ? node.font : {};
}
// filter(treeId, parentNode,responseData) {
// console.log(responseData);
// if (responseData) {
// for(var i =0; i View Code
3.7 异步加载节点数据
3.7.1 官方文档
节点的数据是从后台进行获取的

3.7.2 编程步骤
技巧01:异步加载节点数据时init方法不用传递第三个参数
> 准备一个后台用于返回JSON格式的数据
技巧01:返回的JSON数据是一个列表,格式为
[
{
"id": 1,
"pId": 0,
"name": "1 one"
},
{
"id": 2,
"pId": 0,
"name": "2 two"
}
]技巧02:三少偷懒,是利用json-server模拟的后台数据,哈哈;json-server
> 设置基本配置对象的async属性
setting = {
view: {
showLine: true,
showIcon: true,
fontCss: this.getFont
},
data: {
simpleData: {
enable: true,
idKey: 'id',
pIdKey: 'pId'
}
},
callback: {
onClick: this.onCzTreeOnClick
},
async: {
enable: true,
url:"http://localhost:3000/data",
type: "get",
// autoParam:["id", "name=n", "level=lv"],
// otherParam:{"otherParam":"zTreeAsyncTest"},
dataFilter: this.filter
}
};View Code
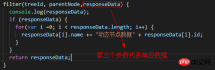
> 编写响应数据处理方法
filter(treeId, parentNode,responseData) {
console.log(responseData);
if (responseData) {
for(var i =0; i <p>View Code</p><p>3.7.3 代码总汇</p><p class="cnblogs_code"><br></p><p class="cnblogs_code_hide"><br></p><pre class="brush:php;toolbar:false">{
"data":
[
{
"id": 1,
"pId": 0,
"name": "1 one"
},
{
"id": 11,
"pId": 1,
"name": "1.1 oneToOne"
},
{
"id": 12,
"pId": 1,
"name": "1.2 oneToTwo"
},
{
"id": 2,
"pId": 0,
"name": "2 two"
}
]
}模拟后台响应数据


HTML
import { Component, OnInit } from '@angular/core';
declare var $ : any;
@Component({
selector: 'app-root',
templateUrl: './app.component.html',
styleUrls: ['./app.component.scss']
})
export class AppComponent implements OnInit {
setting = {
view: {
showLine: true,
showIcon: true,
fontCss: this.getFont
},
data: {
simpleData: {
enable: true,
idKey: 'id',
pIdKey: 'pId'
}
},
callback: {
onClick: this.onCzTreeOnClick
},
async: {
enable: true,
url:"http://localhost:3000/data",
type: "get",
// autoParam:["id", "name=n", "level=lv"],
// otherParam:{"otherParam":"zTreeAsyncTest"},
dataFilter: this.filter
}
};
// zNodes = [
// {id: 1, pId: 0, name: '1 一级标题', open: true, iconOpen:"assets/zTree/css/zTreeStyle/img/diy/1_open.png", iconClose:"assets/zTree/css/zTreeStyle/img/diy/1_close.png"},
// {id: 11, pId: 1, name: '1.1 二级标题', open: true, font:{'background-color':'skyblue', 'color':'white'}},
// {id: 111, pId: 11, name: '1.1.1 三级标题 -> 博客园1', url: 'http://www.cnblogs.com/NeverCtrl-C/', target: '_blank'},
// {id: 113, pId: 11, name: '1.1.1 三级标题 -> 博客园2', url: 'http://www.cnblogs.com/NeverCtrl-C/', target: '_self'},
// {id: 112, pId: 11, name: '1.1.2 三级标题 -> 单击', click: "alert('你单击了')"},
// {id: 12, pId: 1, name: '1.2 二级标题'},
// {id: 2, pId: 0, name: '2 一级标题'}
// ]
getFont(treeId, node) {
return node.font ? node.font : {};
}
filter(treeId, parentNode,responseData) {
console.log(responseData);
if (responseData) {
for(var i =0; i TS
3.7.4 效果展示
相关推荐:

The above is the detailed content of Angular combines with zTree to asynchronously load node data instance sharing. For more information, please follow other related articles on the PHP Chinese website!

 Java vs JavaScript: A Detailed Comparison for DevelopersMay 16, 2025 am 12:01 AM
JavaandJavaScriptaredistinctlanguages:Javaisusedforenterpriseandmobileapps,whileJavaScriptisforinteractivewebpages.1)Javaiscompiled,staticallytyped,andrunsonJVM.2)JavaScriptisinterpreted,dynamicallytyped,andrunsinbrowsersorNode.js.3)JavausesOOPwithcl
 Javascript Data Types : Is there any difference between Browser and NodeJs?May 14, 2025 am 12:15 AM
JavaScript core data types are consistent in browsers and Node.js, but are handled differently from the extra types. 1) The global object is window in the browser and global in Node.js. 2) Node.js' unique Buffer object, used to process binary data. 3) There are also differences in performance and time processing, and the code needs to be adjusted according to the environment.
 JavaScript Comments: A Guide to Using // and /* */May 13, 2025 pm 03:49 PM
JavaScriptusestwotypesofcomments:single-line(//)andmulti-line(//).1)Use//forquicknotesorsingle-lineexplanations.2)Use//forlongerexplanationsorcommentingoutblocksofcode.Commentsshouldexplainthe'why',notthe'what',andbeplacedabovetherelevantcodeforclari
 Python vs. JavaScript: A Comparative Analysis for DevelopersMay 09, 2025 am 12:22 AM
The main difference between Python and JavaScript is the type system and application scenarios. 1. Python uses dynamic types, suitable for scientific computing and data analysis. 2. JavaScript adopts weak types and is widely used in front-end and full-stack development. The two have their own advantages in asynchronous programming and performance optimization, and should be decided according to project requirements when choosing.
 Python vs. JavaScript: Choosing the Right Tool for the JobMay 08, 2025 am 12:10 AM
Whether to choose Python or JavaScript depends on the project type: 1) Choose Python for data science and automation tasks; 2) Choose JavaScript for front-end and full-stack development. Python is favored for its powerful library in data processing and automation, while JavaScript is indispensable for its advantages in web interaction and full-stack development.
 Python and JavaScript: Understanding the Strengths of EachMay 06, 2025 am 12:15 AM
Python and JavaScript each have their own advantages, and the choice depends on project needs and personal preferences. 1. Python is easy to learn, with concise syntax, suitable for data science and back-end development, but has a slow execution speed. 2. JavaScript is everywhere in front-end development and has strong asynchronous programming capabilities. Node.js makes it suitable for full-stack development, but the syntax may be complex and error-prone.
 JavaScript's Core: Is It Built on C or C ?May 05, 2025 am 12:07 AM
JavaScriptisnotbuiltonCorC ;it'saninterpretedlanguagethatrunsonenginesoftenwritteninC .1)JavaScriptwasdesignedasalightweight,interpretedlanguageforwebbrowsers.2)EnginesevolvedfromsimpleinterpreterstoJITcompilers,typicallyinC ,improvingperformance.
 JavaScript Applications: From Front-End to Back-EndMay 04, 2025 am 12:12 AM
JavaScript can be used for front-end and back-end development. The front-end enhances the user experience through DOM operations, and the back-end handles server tasks through Node.js. 1. Front-end example: Change the content of the web page text. 2. Backend example: Create a Node.js server.


Hot AI Tools

Undresser.AI Undress
AI-powered app for creating realistic nude photos

AI Clothes Remover
Online AI tool for removing clothes from photos.

Undress AI Tool
Undress images for free

Clothoff.io
AI clothes remover

Video Face Swap
Swap faces in any video effortlessly with our completely free AI face swap tool!

Hot Article
Hot Tools

Zend Studio 13.0.1
Powerful PHP integrated development environment

WebStorm Mac version
Useful JavaScript development tools

SublimeText3 English version
Recommended: Win version, supports code prompts!

SublimeText3 Chinese version
Chinese version, very easy to use

PhpStorm Mac version
The latest (2018.2.1) professional PHP integrated development tool

