
Home >Web Front-end >JS Tutorial >Example of jQuery implementation of Snake game method
Example of jQuery implementation of Snake game method

- 小云云Original
- 2018-01-23 14:16:052641browse
There are many articles about implementing Snake in JS. In this article, we mainly use jQury to implement the Snake game. The following implementation of this article mainly introduces the method of using jQuery to implement the Snake game. The following is given in the article It is to absorb ideas and sample code. Friends who need it can refer to it.
Preface
I believe everyone has played the Snake game. In that era when fruit machines were not yet popular and everyone had a Nokia, Snake was a must-have game on mobile phones. When the author is bored, I take out my mobile phone to play a few games and challenge my own record.
Later I went to college and made a snake game in C language, but it was mainly controlled through functions (PS: I can’t understand the code now (⊙﹏⊙)) . Now after learning the front-end framework, I use jQuery to implement a snake-eating game effect. Although the game interface is relatively (bu) relatively (ren) simple (zhi) (shi), I mainly learn about the object-oriented and local-to-local aspects of the game. Holistic thinking.
Design Idea
Before we start writing code, let us first conceive the implementation process of the overall game:

Need The object
First of all, since it is a greedy snake, there must be two objects involved in the game, one is the snake object, and the other is the food object. The food object must have an attribute that is the coordinate point of the food. The snake object has an attribute that is an array to store all the coordinate points of the snake's body.
How to move
In addition, there needs to be a timer globally to move the snake's body periodically. Since the snake's body is curved and has various shapes, we only deal with the head and tail of the snake. Each time we move, we add a new head according to the direction of movement, and then erase the tail. It looks like Like a snake crawling forward.
Direction Control
Since the snake has a moving direction, we also need to define a direction object globally, with values represented by up, down, left, and right in the object. At the same time, we also need to define a direction attribute in the properties of the snake object to indicate the direction in which the snake is currently moving.
Collision Detection
In the process of the snake crawling forward, it will encounter three different situations, which require different judgment and detection. The first situation is when food is eaten. At this time, the coordinate points of the food need to be added to the snake's array; the second situation is when one touches one's own body, and the third situation is when one touches the boundary. Both situations cause the game to End; if it is not the above three situations, the snake can move normally.
Start programming
With the overall idea in mind, let’s start writing code.
Building the Curtain
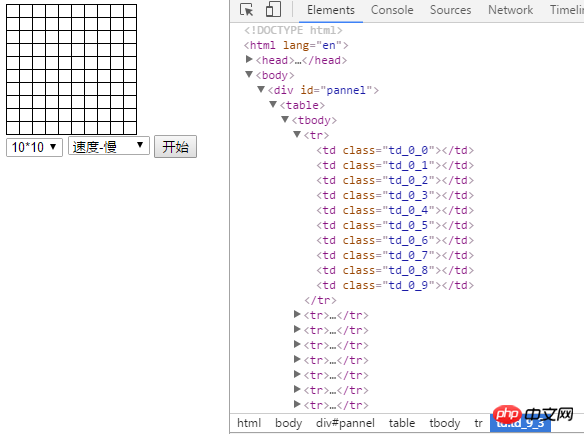
First of all, the entire game needs a scene to build activities. We use a table layout as the background of the entire game.
<style type="text/css">
#pannel table{
 border-collapse:collapse;
}
#pannel td{
 width: 10px;
 height: 10px;
 border: 1px solid #000;
}
#pannel td.food{
 background: green;
}
#pannel td.body{
 background: #f60;
}
</style>
<p id="pannel">
</p>
<select name="" id="palSize">
 <option value="10">10*10</option>
 <option value="20">20*20</option>
 <option value="40">30*30</option>
</select>
<select name="" id="palSpeed">
 <option value="500">速度-慢</option>
 <option value="250">速度-正常</option>
 <option value="100">速度-快</option>
</select>
<button id="startBtn">开始</button>
The panel is our curtain. We use the td tag to draw "pixels" one by one in it. We use two styles to represent different objects, .body represents the style of the snake's body, and .food represents the style of food.
var settings = {
// pannel面板的长度
pannelSize: 10,
// 贪吃蛇移动的速度
speed: 500,
// 贪吃蛇工作线程
workThread: null,
};
function setPannel(size){
var content = [];
content.push('<table>');
for(let i=0;i<size;i++){
content.push('<tr>');
for(let j=0;j<size;j++){
content.push('<td class="td_'+i+'_'+j+'"></td>');
}
content.push('</tr>');
}
content.push('</table>');
$('#pannel').html(content.join(''));
}
setPannel(settings.pannelSize);
We define a global settings to store global variables, such as the size of the curtain, the speed of the snake movement, and the working thread. Then the curtain is drawn through a function, and the final effect is like this:
Direction and positioning
Now that our "stage" has After the construction is completed, how to define the position and movement direction of our "actor". First define a global direction variable, the corresponding value is the keyCode represented by our up, down, left, and right direction keys.
var Direction = {
 UP: 38,
 DOWN: 40,
 LEFT: 37,
 RIGHT: 39,
};
When we drew the curtain above, we drew a coordinate system similar to the one learned in middle school through two traversals, with X-axis and Y-axis. If it would be very (mei) troublesome (bi) troublesome (ge) to use {x:x,y:y} every time, we can define a coordinate point object.
function Position(x,y){
 // 距离X轴长度,取值范围0~pannelSize-1
 this.X = x || 0;
 // 距离Y轴长度,取值范围0~pannelSize-1
 this.Y = y || 0;
}
Vice Coffee – Food
Now that the coordinate point object has been defined, we can first look at a simple object, which is our Food (Food) object. As mentioned above, it has An important attribute is its coordinate point.
function Food(){
 this.pos = null;
 // 随机产生Food坐标点,避开蛇身
 this.Create = function(){
 if(this.pos){
 this.handleDot(false, this.pos, 'food');
 }
 let isOk = true;
 while(isOk){
 let x = parseInt(Math.random()*settings.pannelSize),
 y = parseInt(Math.random()*settings.pannelSize);
 if(!$('.td_'+x+'_'+y).hasClass('body')){
 isOk = false;
 let pos = new Position(x, y);
 this.handleDot(true, pos, 'food');
 this.pos = pos;
 }
 }
 };
 // 画点
 this.handleDot = function(flag, dot, className){
 if(flag){
 $('.td_'+dot.X+'_'+dot.Y).addClass(className);
 } else {
 $('.td_'+dot.X+'_'+dot.Y).removeClass(className);
 }
 };
}
Since food has the attribute of coordinate points, when do we assign a value to it? We know that Food is generated randomly, so we define a Create function to generate the coordinate points of Food. However, the generated coordinate points cannot be on the snake's body, so a while loop is used to generate the coordinate points. If the coordinate points are correct, the loop is terminated. In addition, in order to facilitate our unified processing of coordinate point styles, a handleDot function is defined.
Main Coffee – Snake
Finally we arrived at our main coffee, Snake. First define the basic attributes of the snake. The most important thing is definitely the body attribute of the snake. Every time it moves, some operations need to be performed on this array. Next is the direction of the snake, we give it a default downward direction. Then there is food. In the snake's constructor, we pass in the food object, and we need to determine whether we have eaten food during subsequent movements.
function Snake(myFood){
 // 蛇的身体
 this.body = [];
 // 蛇的方向
 this.dir = Direction.DOWN;
 // 蛇的食物
 this.food = myFood;
 // 创造蛇身
 this.Create = function(){
 let isOk = true;
 while(isOk){
 let x = parseInt(Math.random()*(settings.pannelSize-2))+1,
 y = parseInt(Math.random()*(settings.pannelSize-2))+1;
 console.log(x,y)
 if(!$('.td_'+x+'_'+y).hasClass('food')){
 isOk = false;
 let pos = new Position(x, y);
 this.handleDot(true, pos, 'body')
 this.body.push(pos);
 }
 }
 };
 this.handleDot = function(flag, dot, className){
 if(flag){
 $('.td_'+dot.X+'_'+dot.Y).addClass(className);
 } else {
 $('.td_'+dot.X+'_'+dot.Y).removeClass(className);
 }
 };
}
Move function processing
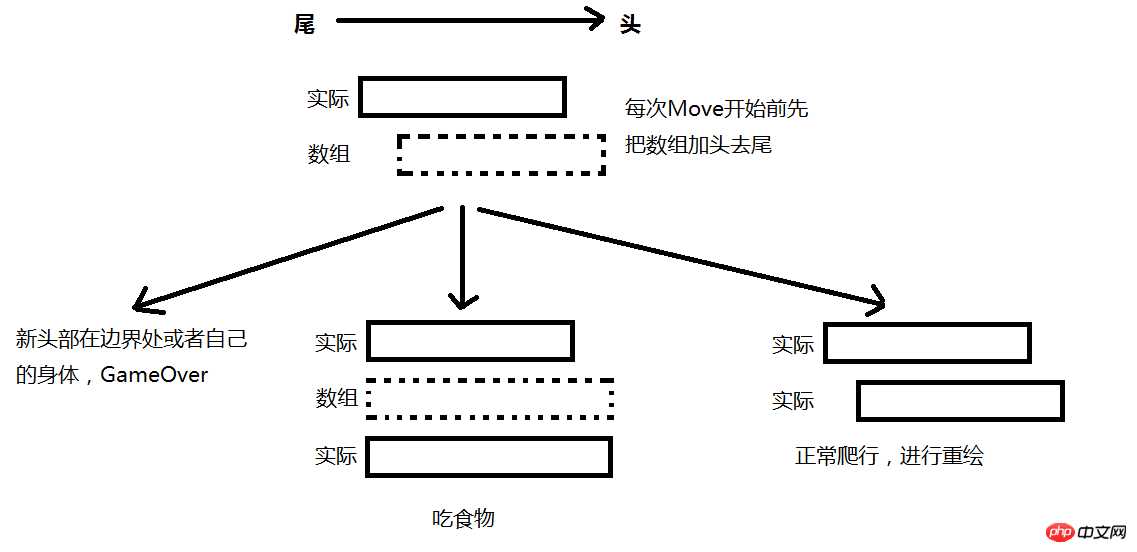
下面对蛇移动的过程进行处理,由于我们每次都采用添头去尾的方式移动,因此我们每次只需要关注蛇的头和尾。我们约定数组的第一个元素是头,最后一个元素是尾。
this.Move = function(){
 let oldHead = Object.assign(new Position(), this.body[0]),
 oldTail = Object.assign(new Position(), this.body[this.body.length - 1]),
 newHead = Object.assign(new Position(), oldHead);
 switch(this.dir){
 case Direction.UP:
 newHead.X = newHead.X - 1;
 break;
 case Direction.DOWN:
 newHead.X = newHead.X + 1;
 break;
 case Direction.LEFT:
 newHead.Y = newHead.Y - 1;
 break;
 case Direction.RIGHT:
 newHead.Y = newHead.Y + 1;
 break;
 default:
 break;
 }
 // 数组添头
 this.body.unshift(newHead);
 // 数组去尾
 this.body.pop();
};
检测函数处理
这样我们对蛇身数组就处理完了。但是我们还需要对新的头(newHead)进行一些碰撞检测,判断新头部的位置上是否有其他东西(碰撞检测)。
// 食物检测
this.eatFood = function(){
 let newHead = this.body[0];
 if(newHead.X == this.food.pos.X&&newHead.Y == this.food.pos.Y){
 return true;
 } else {
 return false;
 }
};
// 边界检测
this.konckWall = function(){
 let newHead = this.body[0];
 if(newHead.X == -1 ||
 newHead.Y == -1 ||
 newHead.X == settings.pannelSize ||
 newHead.Y == settings.pannelSize ){
 return true;
 } else {
 return false;
 }
};
// 蛇身检测
this.konckBody = function(){
 let newHead = this.body[0],
 flag = false;
 this.body.map(function(elem, index){
 if(index == 0)
 return;
 if(elem.X == newHead.X && elem.Y == newHead.Y){
 flag = true;
 }
 });
 return flag;
};
重新绘制
因此我们需要对Move函数进行一些扩充:
this.Move = function(){
 // ...数组操作
 if(this.eatFood()){
 this.body.push(oldTail);
 this.food.Create();
 this.rePaint(true, newHead, oldTail);
 } else if(this.konckWall() || this.konckBody()) {
 this.Over();
 } else {
 this.rePaint(false, newHead, oldTail);
 }
};
this.Over = function(){
 clearInterval(settings.workThread);
 console.log('Game Over');
};
this.rePaint = function(isEatFood, newHead, oldTail){
 if(isEatFood){
 // 加头
 this.handleDot(true, newHead, 'body');
 } else {
 // 加头
 this.handleDot(true, newHead, 'body');
 // 去尾
 this.handleDot(false, oldTail, 'body');
 }
};
因为在Move函数处理数组的后我们的蛇身还没有重新绘制,因此我们很巧妙地判断如果是吃到食物的情况,在数组中就把原来的尾部添加上,这样就达到了吃食物的效果。同时我们定义一个rePaint函数进行页面的重绘。
游戏控制器
我们的“幕布”、“演员”和“动作指导”都已经到位,那么,我们现在就需要一个“摄影机”进行拍摄,让它们都开始“干活”。
function Control(){
 this.snake = null;
 // 按钮的事件绑定
 this.bindClick = function(){
 var that = this;
 $(document).on('keydown', function(e){
 if(!that.snake)
 return;
 var canChangrDir = true;
 switch(e.keyCode){
 case Direction.DOWN:
 if(that.snake.dir == Direction.UP){
 canChangrDir = false;
 }
 break;
 case Direction.UP:
 if(that.snake.dir == Direction.DOWN){
 canChangrDir = false;
 }
 break;
 case Direction.LEFT:
 if(that.snake.dir == Direction.RIGHT){
 canChangrDir = false;
 }
 break;
 case Direction.RIGHT:
 if(that.snake.dir == Direction.LEFT){
 canChangrDir = false;
 }
 break;
 default:
 canChangrDir = false;
 break;
 }
 if(canChangrDir){
 that.snake.dir = e.keyCode;
 }
 });
 $('#palSize').on('change',function(){
 settings.pannelSize = $(this).val();
 setPannel(settings.pannelSize);
 });
 $('#palSpeed').on('change',function(){
 settings.speed = $(this).val();
 });
 $('#startBtn').on('click',function(){
 $('.food').removeClass('food');
 $('.body').removeClass('body');
 that.startGame();
 });
 };
 // 初始化
 this.init = function(){
 this.bindClick();
 setPannel(settings.pannelSize);
 };
 // 开始游戏
 this.startGame = function(){
 var food = new Food();
 food.Create();
 var snake = new Snake(food);
 snake.Create();
 this.snake =snake;
 settings.workThread = setInterval(function(){
 snake.Move();
 },settings.speed);
 }
 this.init();
}
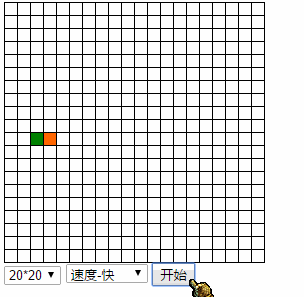
我们给document绑定一个keydown事件,当触发按键时改变蛇的移动方向,但是如果和当前蛇移动方向相反时就直接return。最后的效果如下:
可以戳这里查看实现效果
点击这里下载源码
总结
实现了贪吃蛇的一些基本功能,比如移动、吃点、控制速度等,页面也比较的简单,就一个table、select和button。后期可以添加一些其他的功能,比如有计分、关卡等,也可以添加多个点,有的点吃完直接GameOver等等。
相关推荐;
The above is the detailed content of Example of jQuery implementation of Snake game method. For more information, please follow other related articles on the PHP Chinese website!
Related articles
See more- An in-depth analysis of the Bootstrap list group component
- Detailed explanation of JavaScript function currying
- Complete example of JS password generation and strength detection (with demo source code download)
- Angularjs integrates WeChat UI (weui)
- How to quickly switch between Traditional Chinese and Simplified Chinese with JavaScript and the trick for websites to support switching between Simplified and Traditional Chinese_javascript skills