
Home >Web Front-end >JS Tutorial >ThreeJS implements starry sky particle movement effect example sharing
ThreeJS implements starry sky particle movement effect example sharing

- 小云云Original
- 2018-01-18 14:00:164408browse
This article mainly introduces the use of 3D engine threeJS to realize the starry sky particle movement effect in detail for Hejia. It has certain reference value. Interested friends can refer to it. I hope it can help everyone.
three.js is a third-party WebGL library written in JavaScript. Provides a lot of 3D display functions. Three.js is a 3D engine that runs in the browser. You can use it to create various three-dimensional scenes, including cameras, light and shadow, materials and other objects.
Download address: http://threejs.org/
First create an HTML file and introduce the three.js engine package.
<!DOCTYPE HTML>
<html>
 <head>
  <meta charset="utf-8">
  <title>Three.js实现3D空间粒子效果</title>
  <style type="text/css">
   body{
    background-color:#000000;
    margin:0px;
    overflow:hidden;
   }
  </style>
  <script src="scripts/three.js"></script>
 </head>
 <body >
 </body>
</html>
Declare global variables
//定义应用所需的组件:相机,场景,渲染器
 var camera, scene, renderer;
 //跟踪鼠标的位置
 var mouseX = 0, mouseY = 0;
 //定义存储粒子的数组
 var particles = [];
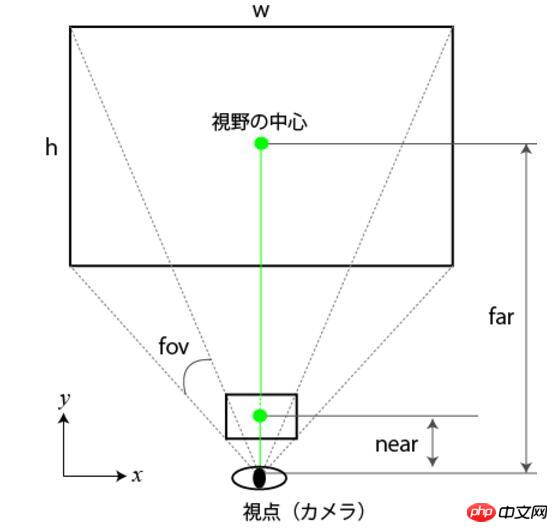
Camera:
In OpenGL (WebGL), there are two cameras, perspective projection and orthographic projection, in the way objects in three-dimensional space are projected into two-dimensional space.
Perspective projection is a method in which objects closer to the viewpoint are larger and objects farther away are drawn smaller. This is consistent with the way we see objects in daily life.
Orthographic projection is to draw objects in a uniform size regardless of the distance between them and the viewpoint. In fields such as architecture and design, objects need to be drawn from all angles, so this kind of projection is widely used.
In Three.js, you can also specify cameras in perspective projection and orthographic projection.
Scene:
A scene is a three-dimensional space. Use the [Scene] class to declare an object called [scene].
Renderer:
The process of mapping objects in three-dimensional space to a two-dimensional plane is called three-dimensional rendering. Generally speaking, we call the rendering operation a renderer.
Data initialization
//数据初始化
 function init(){
  //相机参数:
  //四个参数值分别代表:视野角:fov 纵横比:aspect 相机离视体最近的距离:near 相机离视体最远的距离:far
  camera = new THREE.PerspectiveCamera(80, window.innerWidth / window.innerHeight, 1, 4000 );
  //设置相机位置,默认位置为:0,0,0.
  camera.position.z = 1000;

  //声明场景
  scene = new THREE.Scene();
  //将相机装加载到场景
  scene.add(camera);

   //生成渲染器的对象
   renderer = new THREE.CanvasRenderer();
  //设置渲染器的大小
  renderer.setSize( window.innerWidth, window.innerHeight );
  //追加元素
  document.body.appendChild(renderer.domElement);
  //调用自定义的生成粒子的方法
  makeParticles();
  //添加鼠标移动监听
  document.addEventListener('mousemove',onMouseMove,false);
  //设置间隔调用update函数,间隔次数为每秒30次
  setInterval(update,1000/30);
 }
Camera initialization instructions:
Perspective projection is used in the example. var camera = new THREE.PerspectiveCamera( fov , aspect , near , far );
In perspective projection, objects in the field called the visual volume will be made into a projection map. The apparent volume is specified through the following 4 parameters.
View angle: fov
Aspect ratio: aspect
The closest distance between the camera and the view volume: near
The furthest distance between the camera and the view volume: far
Set the camera position:
To set the camera position coordinates and the center coordinates of the field of view, press
 //设置相机的位置坐标
    camera.position.x = 100;
    camera.position.y = 20;
    camera.position.z = 50;
Method to set. Like this method, the following method can also be used
camera.position.set(100,20,50);
In addition, you can also set the upward direction of the camera, the center of the field of view, etc.
Set the upward direction of the camera to the positive direction:
camera.up.x = 0;
camera.up.y = 0;
camera.up.z = 1;
Set the center of the camera's field of view
Use the [lookAt] method to set the center of the camera's field of view. The parameter of "lookAt()" is an object whose attributes include center coordinates "x", "y" and "z".
The "lookAt()" method is not only used to set the center coordinates of the viewpoint. For the camera attributes set before to have actual effect, the [lookAt] method also needs to be called.
Other projection methods
In Three.js, there are various The class is used to implement cameras such as perspective projection, orthographic projection or compound projection (perspective projection and orthographic projection).
var camera = THREE.OrthographicCamera = function ( left, right, top, bottom, near, far ) //正投影
var camera = THREE.CombinedCamera = function ( width, height, fov, near, far, orthonear, orthofar ) //複合投影
Renderer
Create a CanvasRenderer object. This is an ordinary 2D canvas object. In the example, we add it to the body tag . Otherwise we wouldn't see it. We want it to fill the entire browser window, so we set its size to window.innerwidth and window.innerheight.
Mouse monitoring
Use the custom function makeParticles() to create particles and add a mousemove listener to them to track the position of the mouse. Finally we create an interval to call the update function 30 times a second.
The definition in the update function is as follows:
function update() {
    updateParticles();
    renderer.render( scene, camera );
  }
Function that generates particles
//定义粒子生成的方法
  function makeParticles(){

    var particle,material;
    //粒子从Z轴产生区间在-1000到1000
    for(var zpos=-1000;zpos<1000;zpos+=20){
      //we make a particle material and pass through the colour and custom particle render function we defined.
      material = new THREE.ParticleCanvasMaterial( { color: 0xffffff, program: particleRender } );
      //生成粒子
      particle = new THREE.Particle(material);
      //随即产生x轴,y轴,区间值为-500-500
      particle.position.x = Math.random()*1000-500;
      particle.position.y = Math.random()*1000-500;
      //设置z轴
      particle.position.z = zpos;
      //scale it up a bit
      particle.scale.x = particle.scale.y = 10;
      //将产生的粒子添加到场景,否则我们将不会看到它
      scene.add(particle);
      //将粒子位置的值保存到数组
      particles.push(particle);
    }
  }
math .random() returns a floating point number between 0 and 1, which we multiply by 1000, giving us a number between 0 and 1000. We then subtract 500, which gives us a number between -500 and 500. We can also define a function that generates a random value within the range like this
function randomRange(min, max) {
  return Math.random()*(max-min) + min;
}
Function to draw particles
 //定义粒子绘制函数
  function particleRender( context ) {
    //获取canvas上下文的引用
    context.beginPath();
    // and we just have to draw our shape at 0,0 - in this
    // case an arc from 0 to 2Pi radians or 360º - a full circle!
    context.arc( 0, 0, 1, 0, Math.PI * 2, true );
    //设置原型填充
    context.fill();
  }
The function that defines particle movement, here is set to the movement speed as the mouse distance from the Y axis is 0 The larger the value of the point, the faster the particles move.
 //移动粒子的函数
  function updateParticles(){

    //遍历每个粒子
    for(var i=0; i<particles.length; i++){
      particle = particles[i];
      //设置粒子向前移动的速度依赖于鼠标在平面Y轴上的距离
      particle.position.z += mouseY * 0.1;
      //如果粒子Z轴位置到1000,将z轴位置设置到-1000,即移动到原点,这样就会出现无穷尽的星域效果.
      if(particle.position.z>1000){
         particle.position.z-=2000;
      }
    }
  }
The function monitors when the mouse moves
 //鼠标移动时调用
  function onMouseMove(event){
    mouseX = event.clientX;
    mouseY = event.clientY;
  }
At this point, the simple effect of space particles has been learned.
The integration code is as follows:
<!DOCTYPE HTML>
<html>
<head>
<meta charset="utf-8">
<title>Three.js实现3D空间粒子效果</title>
<style type="text/css">
body{
background-color:#000000;
margin:0px;
overflow:hidden;
}
</style>
<script src="scripts/three.js"></script>
<script>
//定义应用所需的组件:相机,场景,渲染器
var camera, scene, renderer;
//跟踪鼠标的位置
var mouseX = 0, mouseY = 0;
//定义存储粒子的数组
var particles = [];
//数据初始化
function init(){
//相机参数:
//四个参数值分别代表:视野角:fov 纵横比:aspect 相机离视体最近的距离:near 相机离视体最远的距离:far
camera = new THREE.PerspectiveCamera(80, window.innerWidth / window.innerHeight, 1, 4000 );
//设置相机位置,默认位置为:0,0,0.
camera.position.z = 1000;
//声明场景
scene = new THREE.Scene();
//将相机装加载到场景
scene.add(camera);
//生成渲染器的对象
renderer = new THREE.CanvasRenderer();
//设置渲染器的大小
renderer.setSize( window.innerWidth, window.innerHeight );
//追加元素
document.body.appendChild(renderer.domElement);
//调用自定义的生成粒子的方法
makeParticles();
//添加鼠标移动监听
document.addEventListener('mousemove',onMouseMove,false);
//设置间隔调用update函数,间隔次数为每秒30次
setInterval(update,1000/30);
}
function update() {
//调用移动粒子的函数
updateParticles();
//重新渲染
renderer.render( scene, camera );
}
//定义粒子生成的方法
function makeParticles(){
var particle,material;
//粒子从Z轴产生区间在-1000到1000
for(var zpos=-1000;zpos<1000;zpos+=20){
//we make a particle material and pass through the colour and custom particle render function we defined.
material = new THREE.ParticleCanvasMaterial( { color: 0xffffff, program: particleRender } );
//生成粒子
particle = new THREE.Particle(material);
//随即产生x轴,y轴,区间值为-500-500
particle.position.x = Math.random()*1000-500; //math . random()返回一个浮点数在0和1之间
particle.position.y = Math.random()*1000-500;
//设置z轴
particle.position.z = zpos;
//scale it up a bit
particle.scale.x = particle.scale.y = 10;
//将产生的粒子添加到场景
scene.add(particle);
//将粒子位置的值保存到数组
particles.push(particle);
}
}
//定义粒子渲染器
function particleRender( context ) {
//获取canvas上下文的引用
context.beginPath();
// and we just have to draw our shape at 0,0 - in this
// case an arc from 0 to 2Pi radians or 360º - a full circle!
context.arc( 0, 0, 1, 0, Math.PI * 2, true );
//设置原型填充
context.fill();
}
//移动粒子的函数
function updateParticles(){
//遍历每个粒子
for(var i=0; i<particles.length; i++){
particle = particles[i];
//设置粒子向前移动的速度依赖于鼠标在平面Y轴上的距离
particle.position.z += mouseY * 0.1;
//如果粒子Z轴位置到1000,将z轴位置设置到-1000
if(particle.position.z>1000){
particle.position.z-=2000;
}
}
}
//鼠标移动时调用
function onMouseMove(event){
mouseX = event.clientX;
mouseY = event.clientY;
}
</script>
</head>
<body onload="init()">
</body>
</html>Related recommendations:
three.js drawing a 3D cube tutorial
Three.js implements 3D map instance sharing
The above is the detailed content of ThreeJS implements starry sky particle movement effect example sharing. For more information, please follow other related articles on the PHP Chinese website!
Related articles
See more- An in-depth analysis of the Bootstrap list group component
- Detailed explanation of JavaScript function currying
- Complete example of JS password generation and strength detection (with demo source code download)
- Angularjs integrates WeChat UI (weui)
- How to quickly switch between Traditional Chinese and Simplified Chinese with JavaScript and the trick for websites to support switching between Simplified and Traditional Chinese_javascript skills