Home >Web Front-end >JS Tutorial >How to implement interactive special effects between vue and css3
How to implement interactive special effects between vue and css3
- 小云云Original
- 2018-01-18 09:51:061494browse
This article mainly introduces the detailed method of using vue+css3 to create interactive special effects. The editor thinks it is quite good, so I will share it with you now and give it as a reference. Let’s follow the editor to take a look, I hope it can help everyone.
1. Preface
When doing projects, it is inevitable to develop interactive effects or special effects, and the projects I have recently developed have been using vue to develop In terms of technology stack, of course I used vue+css3 for development. During the process, I found that vue+css3 was used to develop special effects, and javascript/jquery+css3’s way of thinking is different, but better than javascript/jquery+css3A little simpler. Today I will share three simple examples, hoping to expand your thinking and let everyone understand how vue+css3 should develop interactive effects! If you have any good suggestions or think I made a mistake, please point it out!
1. Although the code in the article is very simple and not difficult to understand, it is recommended that you read it while writing to avoid confusion.
2. The small examples mentioned in the article are very basic. You can expand or modify them based on your own ideas, which may have unexpected effects. When I write this type of article, I also want to teach people how to fish, not teach them how to fish!
3. These examples are taken from my own daily practice projects, and the code has been mentioned on github (vue-demos). Welcome everyone to star.
2. The running effect of the opening animation
The blur effect of the gif image looks different from the actual effect! Attention everyone!

Principle Analysis
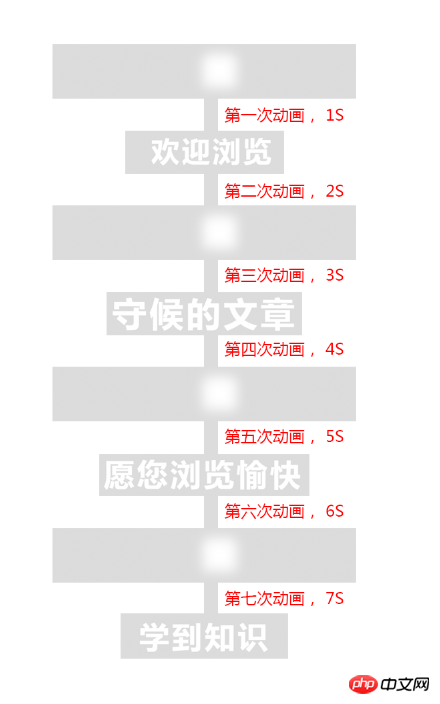
Speaking of principle analysis, there is actually nothing to analyze, that is, when the page is in the following state , replace the text. As for seeing the font shrinking into a ball, it is the control effect of the letter-spacingcss attribute. Font blur is the control effect of filter: blur()this css attribute! Seeing a gradual change, it is the effect of css3 animation (animation)

Let’s briefly analyze the steps of this animation, from the following See, this animation has a total of 8 steps.

Now it’s clear. We want to start changing the text at the moment in the picture below, that is, two seconds after the page is loaded, the animation starts to change after two executions. Word. Then change the text every two seconds until the end!

The codes for two methods, vue and javascript, are given below to see which method is simpler!
vue way
<!DOCTYPE html>
<html lang="en">
<head>
<meta charset="UTF-8">
<title>Title</title>
</head>
<style>
body{
background: #ccc;
}
h1 {
color: white;
text-transform: uppercase;
margin-top: 100px;
text-align: center;
font-size: 6rem;
line-height: 1;
animation: letterspacing 1s 7 alternate ease-in-out;
display: block;
letter-spacing: .5rem;
}
@keyframes letterspacing {
0% {
letter-spacing: -72px;
filter: blur(20px);
}
40% {
filter: blur(6px);
}
80% {
letter-spacing: 8px;
filter: blur(0);
}
}
</style>
<body>
<p id="text">
<h1>{{testText}}</h1>
</p>
</body>
<script src="vue.min.js"></script>
<script type="text/javascript">
new Vue({
el:'#text',
data:{
nowIndex:0,
testText:'欢迎浏览'
},
mounted(){
let _this=this;
let timer = setInterval(function(){
_this.nowIndex++;
switch (_this.nowIndex) {
case 1:
_this.testText = '守候的文章';
break;
case 2:
_this.testText = '愿您浏览愉快';
break;
case 3:
_this.testText = '学到知识';
break;
}
if (_this.nowIndex > 3) {
setTimeout(() => {
clearInterval(timer);
}, 2000)
}
}, 2000)
}
})
</script>
</html>javascript way
<!DOCTYPE html>
<html lang="en">
<head>
<meta charset="UTF-8">
<title>Title</title>
</head>
<style>
body{
background: #ccc;
}
h1 {
color: white;
text-transform: uppercase;
margin-top: 100px;
text-align: center;
font-size: 6rem;
line-height: 1;
animation: letterspacing 1s 7 alternate ease-in-out;
display: block;
letter-spacing: .5rem;
}
@keyframes letterspacing {
0% {
letter-spacing: -6rem;
filter: blur(1rem);
}
40% {
filter: blur(.3rem);
}
80% {
letter-spacing: .5rem;
filter: blur(0rem);
}
}
</style>
<body>
<p id="text">
<h1>欢迎浏览</h1>
</p>
</body>
<script>
var oH1=document.querySelector('h1'),nowIndex=0;
console.log(oH1)
var timer = setInterval(function () {
nowIndex++;
switch (nowIndex) {
case 1:
oH1.innerHTML = '守候的文章';
break;
case 2:
oH1.innerHTML = '愿您浏览愉快';
break;
case 3:
oH1.innerHTML = '学到知识';
break;
}
if (nowIndex > 3) {
setTimeout(() => {
clearInterval(timer);
}, 2000)
}
}, 2000)
</script>
</html>3. Navigation slider Running effect

Principle analysis
First, the following is the position of the orange slider when the page is initialized

Put the mouse on the second tab, and you can see that the orange slider is offset to the right by a tab distance

Put the mouse on the third tab, and you can see that the orange slider is offset to the right by the distance of two tabs

If you start from The indexes from the first tab to the sixth tab are 0,1,2,3,4,5.
Then the formula of the slider is (index * width of tab). As you can see, the effect that gradually passes is actually the effect of css3 transition (transition). Just look at the code below, you will understand it at a glance! The code is as follows:
vue method
<!DOCTYPE html>
<html lang="en">
<head>
<meta charset="UTF-8">
<title>Title</title>
</head>
<link rel="stylesheet" href="reset.css" rel="external nofollow" rel="external nofollow" rel="external nofollow" rel="external nofollow" >
<style>
.nav{
margin: 40px;
position: relative;
}
.nav li{
float: left;
width: 100px;
height: 40px;
line-height: 40px;
color: #fff;
text-align: center;
background: #09f;
cursor: pointer;
}
.nav span{
position: relative;
z-index: 2;
}
.nav .slider{
position: absolute;
transition: all .5s cubic-bezier(0.4, -0.3, 0.57, 1.38);
width: 100px;
height: 40px;
background: #f90;
top: 0;
left: 0;
z-index: 1;
}
</style>
<body>
<p class="nav clear" id="nav" @mouseleave="nowIndex=0">
<ul>
<li @mouseenter.stop="nowIndex=0"><span>Tab One</span></li>
<li @mouseenter.stop="nowIndex=1"><span>Tab Two</span></li>
<li @mouseenter.stop="nowIndex=2"><span>Tab Three</span></li>
<li @mouseenter.stop="nowIndex=3"><span>Tab four</span></li>
<li @mouseenter.stop="nowIndex=4"><span>Tab five</span></li>
<li @mouseenter.stop="nowIndex=5"><span>Tab six</span></li>
</ul>
<p class="slider" :style="{'transform':'translate3d('+nowIndex*100+'px,0,0)'}"></p>
</p>
</body>
<script src="vue.min.js"></script>
<script type="text/javascript">
new Vue({
el:'#nav',
data:{
nowIndex:0
}
})
</script>
</html>javascript method
##
<!DOCTYPE html>
<html lang="en">
<head>
<meta charset="UTF-8">
<title>Title</title>
</head>
<link rel="stylesheet" href="reset.css" rel="external nofollow" rel="external nofollow" rel="external nofollow" rel="external nofollow" >
<style>
.nav{
position: relative;
}
.nav li{
float: left;
width: 100px;
height: 40px;
line-height: 40px;
color: #fff;
text-align: center;
background: #09f;
cursor: pointer;
}
.nav span{
position: relative;
z-index: 2;
}
.nav .slider{
position: absolute;
transition: all .5s cubic-bezier(0.4, -0.3, 0.57, 1.38);
width: 100px;
height: 40px;
background: #f90;
top: 0;
left: 0;
z-index: 1;
}
</style>
<body>
<p class="nav clear" id="nav">
<ul>
<li><span>Tab One</span></li>
<li><span>Tab Two</span></li>
<li><span>Tab Three</span></li>
<li><span>Tab four</span></li>
<li><span>Tab five</span></li>
<li><span>Tab six</span></li>
</ul>
<p class="slider"></p>
</p>
</body>
<script type="text/javascript">
var op=document.querySelector("#nav"),oLi=op.querySelectorAll("li"),oSlider=document.querySelector(".slider");
op.addEventListener("mouseleave",function () {
oSlider.style.transform='translate3d(0,0,0)';
})
for(var i=0;i<oLi.length;i++){
oLi[i].index=i;
oLi[i].addEventListener("mouseenter",function (e) {
oSlider.style.transform='translate3d('+this.index*100+'px,0,0)';
})
}
</script>
</html>4. Carousel chart Running effect

Principle analysis
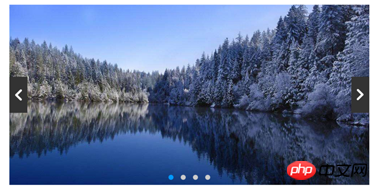
The blue box is li, the black box is pInitialization state

看到上面,其实也就是控制ul的偏移量(transform:translate3d)。计算公式和上面的滑块相似,索引(0|1|2|3)*li的宽度。不同的就是,ul的偏移量是取负数,因为ul是想左偏,上面的滑块是向右偏!
当第一张图片的时候,ul偏移量设置(transform: translate3d(0px, 0px, 0px))。
当第二张图片的时候,ul偏移量设置(transform: translate3d(-1000px, 0px, 0px))。
当第二张图片的时候,ul偏移量设置(transform: translate3d(-2000px, 0px, 0px))。以此类推,偏移量很简单的就能计算出来!
可能我说的大家有点懵,但是,看下面的代码,就不会懵了,因为代码也很简单!
vue方式
<!DOCTYPE html>
<html lang="en">
<head>
<meta charset="UTF-8">
<title>Title</title>
<link rel="stylesheet" href="reset.css" rel="external nofollow" rel="external nofollow" rel="external nofollow" rel="external nofollow" >
<style>
.slide-img {
width: 1000px;
height: 500px;
overflow: hidden;
position: relative;
margin: 20px auto;
}
ul {
transition: all .5s ease;
}
li {
float: left;
}
.slide-arrow p {
width: 50px;
height: 100px;
position: absolute;
margin: auto;
top: 0;
bottom: 0;
background: url("http://i1.bvimg.com/1949/4d860a3067fab23b.jpg") no-repeat;
}
.arrow-right {
transform: rotate(180deg);
right: 0;
}
.arrow-left {
left: 0;
}
.slide-option{
position: absolute;
bottom: 10px;
width: 100%;
left: 0;
text-align: center;
}
.slide-option span{
display: inline-block;
width: 14px;
height: 14px;
border-radius: 100%;
background: #ccc;
margin: 0 10px;
}
.slide-option .active{
background: #09f;
}
</style>
</head>
<body>
<p class="slide-img clear" id="slide-img">
<!--用tran这个class控制ul是否含有过渡效果,样式已经写好-->
<ul :style="{'width':(listWidth*list.length)+'px','transform':'translate3d(-'+(listWidth*nowIndex)+'px,0,0)'}">
<!--遍历出来的图片-->
<li v-for="(li,index) in list" :style="{'width':listWidth+'px'}">
<a href="javascript:;" rel="external nofollow" rel="external nofollow" rel="external nofollow" rel="external nofollow" rel="external nofollow" >
<img :src="li" class="slider-img"/>
</a>
</li>
</ul>
<p class="slide-option">
<span v-for="(li,index) in list" :class="{'active':index===nowIndex}"></span>
</p>
<p class="slide-arrow">
<p class="arrow-left" @click.stop="switchDo('reduce')"></p>
<p class="arrow-right" @click.stop="switchDo"></p>
</p>
</p>
</body>
<script src="vue.min.js"></script>
<script type="text/javascript">
new Vue({
el: '#slide-img',
data: {
nowIndex: 0,
listWidth: '1000',
list: ['./images/timg1.jpg', './images/timg2.jpg', './images/timg3.jpg', './images/timg4.jpg'],
timer:null
},
methods: {
//滑动操作
switchDo(reduce){
clearInterval(this.timer);
//根据reduce判断this.nowIndex的增加或者减少!
if(reduce==='reduce'){
//如果是第一张,就返回最后一张
if(this.nowIndex===0){
this.nowIndex=this.list.length-1;
}
else{
this.nowIndex--;
}
}
else{
//如果是最后一张,就返回第一张
if(this.nowIndex===this.list.length-1){
this.nowIndex=0;
}
else{
this.nowIndex++;
}
}
var _this=this;
this.timer=setInterval(function () {
_this.switchDo();
},4000)
},
},
mounted(){
var _this=this;
this.timer=setInterval(function () {
_this.switchDo();
},4000)
}
})
</script>
</html>javascript方式
<!DOCTYPE html>
<html lang="en">
<head>
<meta charset="UTF-8">
<title>Title</title>
<link rel="stylesheet" href="reset.css" rel="external nofollow" rel="external nofollow" rel="external nofollow" rel="external nofollow" >
<style>
.slide-img {
width: 1000px;
height: 500px;
overflow: hidden;
position: relative;
margin: 20px auto;
}
ul {
transition: all .5s ease;
}
li {
float: left;
}
.slide-arrow p {
width: 50px;
height: 100px;
position: absolute;
margin: auto;
top: 0;
bottom: 0;
background: url("http://i1.bvimg.com/1949/4d860a3067fab23b.jpg") no-repeat;
}
.arrow-right {
transform: rotate(180deg);
right: 0;
}
.arrow-left {
left: 0;
}
.slide-option{
position: absolute;
bottom: 10px;
width: 100%;
left: 0;
text-align: center;
}
.slide-option span{
display: inline-block;
width: 14px;
height: 14px;
border-radius: 100%;
background: #ccc;
margin: 0 10px;
}
.slide-option .active{
background: #09f;
}
</style>
</head>
<body>
<p class="slide-img clear" id="slide-img">
<!--用tran这个class控制ul是否含有过渡效果,样式已经写好-->
<ul id="slide-img-ul">
<!--遍历出来的图片-->
<li style="width: 1000px;"><a href="javascript:;" rel="external nofollow" rel="external nofollow" rel="external nofollow" rel="external nofollow" rel="external nofollow" ><img src="images/timg1.jpg" class="slider-img"/></a></li>
<li style="width: 1000px;"><a href="javascript:;" rel="external nofollow" rel="external nofollow" rel="external nofollow" rel="external nofollow" rel="external nofollow" ><img src="images/timg2.jpg" class="slider-img"/></a></li>
<li style="width: 1000px;"><a href="javascript:;" rel="external nofollow" rel="external nofollow" rel="external nofollow" rel="external nofollow" rel="external nofollow" ><img src="images/timg3.jpg" class="slider-img"/></a></li>
<li style="width: 1000px;"><a href="javascript:;" rel="external nofollow" rel="external nofollow" rel="external nofollow" rel="external nofollow" rel="external nofollow" ><img src="images/timg4.jpg" class="slider-img"/></a></li>
</ul>
<p class="slide-option">
<span></span>
<span></span>
<span></span>
<span></span>
</p>
<p class="slide-arrow">
<p class="arrow-left"></p>
<p class="arrow-right"></p>
</p>
</p>
</body>
<script type="text/javascript">
window.onload=function () {
var oUl=document.querySelector('#slide-img-ul');
var oLi=oUl.querySelectorAll('li');
var oSpan=document.querySelector('.slide-option').querySelectorAll('span');
var oArrowLeft=document.querySelector('.arrow-left');
var oArrowRight=document.querySelector('.arrow-right');
oUl.style.width='4000px';
oArrowLeft.addEventListener('click',function () {
switchDo('reduce');
})
oArrowRight.addEventListener('click',function () {
switchDo();
})
var timer=null,nowIndex=0;
function switchDo(reduce){
clearInterval(timer);
//设置样式
oUl.style.transform='translate3d(-'+(1000*nowIndex)+'px,0,0)';
for (var i=0;i<oSpan.length;i++){
if(i===nowIndex){
oSpan[i].className='active';
}
else{
oSpan[i].className='';
}
}
//根据reduce判断this.nowIndex的增加或者减少!
if(reduce==='reduce'){
//如果是第一张,就返回最后一张
if(nowIndex===0){
nowIndex=oLi.length-1;
}
else{
nowIndex--;
}
}
else{
//如果是最后一张,就返回第一张
if(nowIndex===oLi.length-1){
nowIndex=0;
}
else{
nowIndex++;
}
}
timer=setInterval(function () {
switchDo();
},4000)
}
switchDo();
}
</script>
</html>5.小结
好了,关于vue+css3开发的特效,以及和javascript+css3的对比,就说到这里了,希望这三个小实例,能帮到大家了解下应该怎么使用vue+css3开发特效的。今天讲这三个小实例不是说给大家代码,让大家复制粘贴使用,而是希望能起到一个抛砖引玉的作用,拓展思维的作用!
相关推荐:
The above is the detailed content of How to implement interactive special effects between vue and css3. For more information, please follow other related articles on the PHP Chinese website!
Related articles
See more- An in-depth analysis of the Bootstrap list group component
- Detailed explanation of JavaScript function currying
- Complete example of JS password generation and strength detection (with demo source code download)
- Angularjs integrates WeChat UI (weui)
- How to quickly switch between Traditional Chinese and Simplified Chinese with JavaScript and the trick for websites to support switching between Simplified and Traditional Chinese_javascript skills

