


This article mainly introduces the detailed explanation of building the vue2 vue-router2 webpack3 project from scratch. The editor thinks it is quite good, so I will share it with you now and give it as a reference. Let’s follow the editor to have a look. Hope it helps everyone.
From the perspective of a novice, I will introduce the content of each step in detail. I will not go into the principles involved in the steps in depth, but mainly introduce how to operate.
Initialize the project
Create a new project directory vue2practice, execute npm init -y in the directory to create a package.json, and add the following necessary modules to package.json first:
{

 "name": "vue2-vue-router2-webpack3",

 "version": "1.0.0",

 "devDependencies": {

  "vue": "^2.4.2",

  "vue-loader": "^13.0.2",

  "vue-router": "^2.7.0",

  "vue-template-compiler": "^2.4.2",

  "webpack": "^3.4.1",

  "webpack-dev-server": "^2.6.1"

 }

}
Among them, vue-template-compiler is the peerDependencies of vue-loader. npm3 will not automatically install peerDependencies. However, vue-template-compiler is necessary, so why doesn't the author put it in dependencies? Someone asked this question on github. I will roughly translate the author's answer (for reference only): The reason for this is because there is no reliable way to fix the relationship of nested dependencies. How do you understand this sentence? First of all, the version numbers of vue-template-compiler and vue are consistent (currently updated synchronously). Specifying vue-template-compiler as the dependencies of vue-loader does not guarantee that the version numbers of vue-template-compiler and vue are the same. , allowing users to specify the version themselves can ensure this. View the author's answer (in English). If the two versions are inconsistent, the error message shown in the figure below will appear when running.

#The new directory structure is as follows. Leave the newly added directories and files empty first. The following steps will explain what to add.
vue2pratice

  |-- package.json

  |-- index.html     // 启动页面

  |-- webpack.config.js // webpack配置文件

  |-- src

    |-- views    // vue页面组件目录

    |-- main.js   // 入口文件

    |-- router.js  // vue-router配置

    |-- app.vue   // 工程首页组件
Configuring Webpack
Webpack reads webpack.config.js by default. The file name cannot be changed casually, and entry must be configured.
module.exports = {

  entry: './src/main.js',

  output: {

    path: __dirname + '/dist',

    publicPath: '/static/',

    filename: 'build.js'

  }

}
Webpack 2+ requires output.path to be an absolute path.
To configure webpack-dev-server, just add the following startup command to package.json.
"scripts": {

 "dev": "webpack-dev-server --hot --open"

}
webpack-dev-server 2 defaults to inline mode, hot module replacement still needs to be set up by yourself.
Verification configuration
Add test code in index.html and introduce the packaged JS file.
  Hello, Webpack 3.

  <br>

  <script></script>
Add test code in main.js.
// main.js

document.write('来自main.js的问候!')
Execute the following commands to install the module and start the server.
// 安装依赖

npm install


// 运行

npm run dev
After startup, the browser will automatically open http://localhost:8080. If no error is reported in the console, the page will correctly display the contents of main.js and index.html. The browser will not refresh after changing main.js. If you can see the effect, it means there is no problem with the configuration.

Vue
New page
Create a new index.vue in the views directory.
<template>
<p>
这是{{page}}页面
</p>
</template>
<script>
export default {
data: function () {
return {
page: 'index'
}
}
}
</script>
webpack 1 requires a specific loader to convert ES 2015 import/export, webpack 2 onwards can use it out of the box. However, the new syntax of ES6 still requires loader to convert. Do not use the new syntax without configuration. No errors are reported after using it (such as let, const, etc.), that's because your browser already supports ES6 syntax (new versions of browsers already support it).
Configuring routing
Extract the parameter new VueRouter (parameter) passed in by vue-router instantiation to router.js to form a routing configuration file.
import index from './views/index.vue'

export default {

  routes: [

    {

      path: '/index',

      component: index

    }

  ]

}
From vue-loader@13.0.0, you cannot use require to introduce .vue files, because .vue files will eventually be compiled into ES6 modules.
Homepage
The homepage introduces the JS configured by ouput and adds the mounting target of the Vue instance.
<p></p>

<script></script>
The entry JS completes the routing configuration and initializes the Vue instance.
import Vue from 'vue';

import VueRouter from 'vue-router';

import App from './app.vue';

import routerConfig from './router';

Vue.use(VueRouter);

var router = new VueRouter(routerConfig)

new Vue({

  el: '#app',

  router: router,

  render: h => h(App)

});
Starting from Vue 2.2.0, using require('vue') will report an error. You should use ES6 module (import). For specific reasons, please refer to the Vue update instructions https://github.com/vuejs/vue/ releases, the screenshot is as follows:

#Add routing links and routing view components to the homepage component app.vue.
<template>

  <p>

    </p>
<p>

      <router-link>Home</router-link>

    </p>

    <p>

      <router-view></router-view>

    </p>


</template>
Configure loader
Configure the loader corresponding to the vue file.
module: {

  rules: [

    {

      test: /\.vue$/,

      use: ["vue-loader"]

    }

  ]

}
Webpack2 must configure loader under module.rules. '-loader' cannot be omitted, the loader name must be written in full. You can use Rule.use or Rule.loader to configure the loader (Rule.loader is the abbreviation of Rule.use: [ { loader } ]). It is recommended to use use.
The above has completed the configuration required to add a new page and access the page. Now let’s test whether /index can be accessed normally. Execute npm run dev, and the browser will display the interface as shown in the figure.

Support CSS
After installing css-loader, you can use it in vue files
npm i css-loader -D
If you want to support import/require to introduce CSS file, you need to configure the corresponding Rule.
{

  test: /\.css$/,

  use: ["vue-style-loader", "css-loader"]

}
<script>

import "../style/style.css"

</script>
Support CSS preprocessing language
Take stylus as an example, install stylus and stylus-loader.
npm install stylus stylus-loader -D
Add the loader configuration corresponding to the .styl file.
{

  test: /\.styl$/,

  use: ["vue-style-loader", "css-loader", "stylus-loader"]

}
Usage example:
<style>

  .stylus

    .red

      color red

</style>

<script>

  import "../css/stylus-example.styl"

</script>
node-sass slow installation solution

Use Taobao mirror:
npm set disturl https://npm.taobao.org/dist
You can also set the node-sass image separately:
npm set sass_binary_site http://cdn.npm.taobao.org/dist/node-sass
Supports pictures and icon fonts
安装图片及图标字体依赖的loader。
npm install url-loader file-loader -D
增加图片及图标字体的loader配置。
{

  test: /\.(png|jpe?g|gif|svg)(\?.*)?$/,

  use: [{

    loader: "url-loader",

    options: {

      limit: 10000,

      name: 'images/[name].[hash:7].[ext]'  // 将图片都放入images文件夹下,[hash:7]防缓存

    }

  }]

},

{

  test: /\.(woff2?|eot|ttf|otf)(\?.*)?$/,

  use: [{

    loader: "url-loader",

    options: {

      limit: 10000,

      name: 'fonts/[name].[hash:7].[ext]'  // 将字体放入fonts文件夹下

    }

  }]

}
构建
添加打包命令如下:
"build":"webpack --progress --colors"
执行npm run build开始构建,完成后,可以看到工程目录下多了dist目录以及 dist/build.js。
使用 Webpack 插件
压缩JS
在之前的文章提到过,打开未压缩版的build.js,你会发现ES6的语法没有被转化为ES5,因此需要安装babel 套件来完成语法的转化,否则压缩的时候就会报错。之前广泛使用的转码规则为 babel-preset-es2015,但 Babel 的官网上在9月宣布 ES2015 / ES2016/ ES2017 等等 ES20xx 时代的 presets 通通被废弃(deprecated),取而代之的是 babel-preset-env,并且承诺它将成为“未来不会过时的(future-proof)”解决方案。
npm i babel-loader babel-core babel-preset-env -D
增加babel的配置文件.babelrc。
{

  "presets": [

    ["env", { "modules": false }]

  ],

  "comments": false

}
将 modules 设置为 false,即交由 Webpack 来处理模块化,通过其 TreeShaking 特性将有效减少打包出来的 JS 文件大小,可以自行对比下前后打包出来的文件的大小,效果还是不错的。
comments 即是否保留注释。
接着配置 JS 文件的 loader。
{

  test: /\.js$/,

  use: "babel-loader",

  include: [path.resolve(__dirname, 'src')]

}
注意:Webpack2建议尽量避免exclude,更倾向于使用include。
压缩 JS 采用webpack.optimize.UglifyJsPlugin,配置如下:
new webpack.optimize.UglifyJsPlugin()
官网称warnings默认为false,你可能会遇到即使没有配置warnings: true,控制台仍显示警告,看下面这段源码就知道了。查看源码

只有当options.compress !== false时 warnings 才会被设置默认值 false,所以一旦配置了 compress 其它选项,那就需同时配置warnings: false。
warnings作用是当插件在压缩过程中移除的无效代码或定义是显示警告信息(display warnings when dropping unreachable code or unused declarations etc.)。
提取CSS
使用extract-text-webpack-plugin插件提取CSS。更改 css 及 less 的 loader 配置如下。
// 安装插件

npm i extract-text-webpack-plugin -D
// var ExtractTextPlugin = require("extract-text-webpack-plugin")

{

  test: /\.css$/,

  use: ExtractTextPlugin.extract({

    use: "css-loader"

  })

},

{

  test: /\.styl$/,

  use: ExtractTextPlugin.extract({

    use: ["css-loader", "stylus-loader"]

  })

}
上述配置并不能提取 vue 文件中的 style,需要设置 vue-loader 参数才可以。
{

  test: /\.vue$/,

  use: {

    loader: "vue-loader",

    options: {

      loaders: {

        css: ExtractTextPlugin.extract({

          use: 'css-loader'

        }),

        stylus: ExtractTextPlugin.extract({

          use: ["css-loader", "stylus-loader"]

        })

      }

    }

  }

}
初始化插件,filename 可以指定 CSS 文件的目录。
new ExtractTextPlugin({

  filename: "css/style.css"

})
PostCSS
安装 postcss-loader 及 postcss 插件。
npm i postcss-loader cssnano -D
配置 loader 如下:
// css-loader配置改为

use: ['css-loader', "postcss-loader"]

// stylus-loader配置改为

use: ["css-loader", "postcss-loader", "stylus-loader"]
postcss-loader 要放在 css-loader 和 style-loader 之后,CSS 预处理语言 loader 之前(stylus-loader)。
新增 postcss.config.js 来配置postcss插件,这样就不用给每个 postcss-loader 去配置。更多 postcss-loader 的配置方式请参考 postcss-load-config。
module.exports = {

  plugins: [

    require('cssnano')

  ]

}
cssnano 使用了一系列 postcss 插件,包含了常用的 autoprefixer 等,如何传入 autoprefixer 的配置?
require('cssnano')({

  autoprefixer: {

    add: true,

    browsers: ['> 5%']

  }

})
其中有一个插件 postcss-zindex 使用中发现有些问题。如果想禁用这个插件的话,配置如下:
require('cssnano')({

  zindex: {

    disable:true

  }

})
附:postcss插件分类搜索网站:http://postcss.parts/
生成首页
安装 html-webpack-plugin 插件。
npm i html-webpack-plugin -D
初始化插件。
// var HtmlWebpackPlugin = require('html-webpack-plugin');

new HtmlWebpackPlugin({

  filename: 'index.html',

  template: 'index.tpl.html'

})
其它插件
Webpack3 新增的作用域提升。
new webpack.optimize.ModuleConcatenationPlugin()
指定生产环境,以便在压缩时可以让 UglifyJS 自动删除代码块内的警告语句。
new webpack.DefinePlugin({

  'process.env.NODE_ENV': JSON.stringify('production')

})
因为这个插件直接做的文本替换,给定的值必须包含字符串本身内的实际引号。通常,有两种方式来达到这个效果,使用 '"production"', 或者使用 JSON.stringify('production')。
你完全可以在自己的代码中使用process.env.NODE_ENV来区分开发和生产,从而针对不同的环境做一些事情。不用担心这部分代码会被保留,最终会被 UglifyJS 删除。例如:
if (process.env.NODE_ENV != "production") {

  // 开发环境

}

// webpack.DefinePlugin插件替换后,上述代码会变成

if ("production" != "production") {

  // 开发环境

}

// 输出

if (false) {

  // 开发环境

}

// UglifyJS 会删除这段无效代码
使用上述插件后再次构建,会发现生成的JS相比原来的体积小了不少。
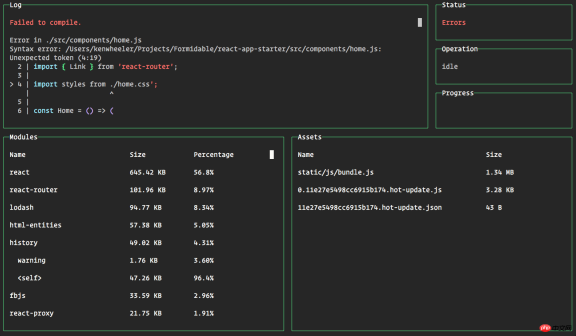
friendly-errors-webpack-plugin 是一个更友好显示 webpack 错误信息的插件。插件 github 地址:https://github.com/geowarin/friendly-errors-webpack-plugin
一般在开发环境下使用。
var FriendlyErrorsWebpackPlugin = require('friendly-errors-webpack-plugin');


var webpackConfig = {

 // ...

 plugins: [

  new FriendlyErrorsWebpackPlugin(),

 ],

 // ...

}
效果如下图:

显示构建进度插件:webpack.ProgressPlugin
{

 // ...

 plugins: [

  new webpack.ProgressPlugin(),

 ],

 // ...

}
效果如下图:

美化 webpack 编译控制台打印的信息的插件webpack-dashboard
分离Webpack配置
将开发和生产配置文件分离,方便增加各个环境下的个性配置。Webpack2文档中也详细阐述了如何为多环境配置webpack。基本思路如下:
编写一个基本配置文件(webpack.base.config.js)
使用webpack-merge合并这个基础配置和针对环境的特定的配置(webpack.dev.config.js,webpack.prod.config.js)
webpack.base.config.js 内容如下:
var webpack = require('webpack');

var path = require('path');

var utils = require('./utils');

function resolve(relPath) {

  return path.resolve(__dirname, relPath);

}

module.exports = {

  entry: { app: resolve('../src/main.js') },

  output: {

    filename: 'js/[name].js'

  },

  module: {

    rules: [{

        test: /\.js$/,

        use: "babel-loader",

        include: [resolve('../src')]

      },

      {

        test: /\.vue$/,

        use: {

          loader: "vue-loader",

          options: utils.vueLoaderOptions()

        }

      },

      {

        test: /\.(png|jpe?g|gif|svg)(\?.*)?$/,

        use: {

          loader: "url-loader",

          options: {

            limit: 10000,

            name: 'images/[name].[hash:7].[ext]'

          }

        }

      },

      {

        test: /\.(woff2?|eot|ttf|otf)(\?.*)?$/,

        use: [{

          loader: "url-loader",

          options: {

            limit: 10000,

            name: 'fonts/[name].[hash:7].[ext]'

          }

        }]

      }

    ]

  }

}
为什么要将vue-loader的options提取出来?其主要是用来配置CSS及CSS预处理语言的loader,开发环境可以不用配置,但是生产环境需要提取CSS、增加postcss-loader等,因此需要提取出来针对不同环境返回相应的options。后面会列出utils.vueLoaderOptions的内容。
为什么没有配置CSS的loader?理由和上面的vue-loader一样。
为什么没有配置path和publicPath?一方面是个性化参数,另外开发和生产可能不相同,因此在webpack.dev.config和webpack.prod.config中分别配置更为合适。
webpack.dev.config.js 内容如下:
var webpack = require('webpack');

var merge = require('webpack-merge');

var HtmlWebpackPlugin = require('html-webpack-plugin');

var baseWebpackConfig = require('./webpack.base.config');

var utils = require('./utils');

var config = require('./config');

Object.keys(baseWebpackConfig.entry).forEach(function(name) {

  baseWebpackConfig.entry[name] = [

    `webpack-dev-server/client?http://localhost:${config.dev.port}/`,

    "webpack/hot/dev-server"

  ].concat(baseWebpackConfig.entry[name])

});

module.exports = merge(baseWebpackConfig, {

  output: {

    path: config.dev.outputPath,

    publicPath: config.dev.outputPublicPath

  },

  module: {

    rules: utils.styleLoaders()

  },

  plugins: [

    new webpack.HotModuleReplacementPlugin(),

    new HtmlWebpackPlugin({

      filename: 'index.html',

      template: 'index.html',

      inject: true

    })

  ]

})
添加了HtmlWebpackPlugin后,index.html中就不需要在自己去引用打包的JS了,会自动根据打包的JS添加引用,这样更加方便,关于HtmlWebpackPlugin的配置,需要说明两点:
1.template的路径是相对于webpack编译时的上下文目录,说白了就是项目根目录,因此上面可以直接配置index.html,其指向的就是根目录下的index.html;
2.filename则是相对于webpack配置项output.path(打包资源存储路径)。
html-webpack-plugin关于template和filename路径源码如下:
// https://github.com/jantimon/html-webpack-plugin/blob/master/index.js

// template

this.options.template = this.getFullTemplatePath(this.options.template, compiler.context);

// filename

this.options.filename = path.relative(compiler.options.output.path, filename);
config.js内容如下:
module.exports = {

  dev: {

    outputPath: path.resolve(__dirname, '../static'),

    outputPublicPath: '/',

    port: 8000

  },

  prod: {

    outputPath: path.resolve(__dirname, '../static'),

    outputPublicPath: '/static/'

  }

}
utils.js内容如下:
var ExtractTextPlugin = require('extract-text-webpack-plugin');

var isProd = process.env.NODE_ENV === "production";

// 根据项目需求添加CSS预处理语言并安装相应的loader,以stylus-loader为例

var cssLang = [{

  name: 'css',

  reg: /\.css$/,

  loader: 'css-loader'

}, {

  name: 'stylus',

  reg: /\.styl$/,

  loader: "stylus-loader"

}];

function genLoaders(lang) {

  var loaders = ['css-loader', 'postcss-loader'];

  if (lang.name !== 'css') {

    loaders.push(lang.loader);

  }

  if (isProd) {

    // 生产环境需要提取CSS

    loaders = ExtractTextPlugin.extract({

      use: loaders

    });

  } else {

    // 开发环境需要vue-style-loader将CSS提取到页面头部

    loaders.unshift('vue-style-loader');

  }

  return loaders;

}

// 各种CSS的loader

exports.styleLoaders = function() {

  var output = [];

  cssLang.forEach(lang => {

    output.push({

      test: lang.reg,

      use: genLoaders(lang)

    })

  })

  return output;

};

// vue-loader的options

exports.vueLoaderOptions = function() {

  var options = {

    loaders: {}

  };

  cssLang.forEach(lang => {

    options.loaders[lang.name] = genLoaders(lang);

  });

  return options;

}
接下来就是如何启动webpack-dev-server,vue-cli的webpack模板工程用的express及webpack中间件做开发服务器,其实用webpack-dev-server就能满足需求,当然用express能够做更多的事情,毕竟webpack-dev-server是一个轻量级的express。dev.js内容如下:
var webpack = require('webpack');

var webpackDevServer = require('webpack-dev-server');

var devConfig = require("./webpack.dev.config");

var config = require("./config");

var compiler = webpack(devConfig);

var server = new webpackDevServer(compiler, {

  hot: true,

  noInfo: true,

  publicPath: config.dev.outputPublicPath,

  stats: { colors: true }

});

server.listen(config.dev.port, "0.0.0.0");

var url = `http://localhost:${config.dev.port}/`;

// 需先安装 opn 模块 npm i opn -D

var opn = require('opn');

// 打包完毕后启动浏览器

server.middleware.waitUntilValid(function() {

  console.log(`> Listening at ${url}`);

  opn(`${url}`);

})
生产配置文件(webpack.prod.config.js)内容如下:
// 设定为生产环境

process.env.NODE_ENV = 'production';

var webpack = require('webpack');

var merge = require('webpack-merge');

var HtmlWebpackPlugin = require('html-webpack-plugin');

var ExtractTextPlugin = require('extract-text-webpack-plugin');

var baseWebpackConfig = require('./webpack.base.config');

var utils = require('./utils');

var config = require('./config');


module.exports = merge(baseWebpackConfig, {

  output: {

    path: config.prod.outputPath,

    publicPath: config.prod.outputPublicPath

  },

  module: {

    rules: utils.styleLoaders()

  },

  plugins: [

    new webpack.DefinePlugin({

      'process.env.NODE_ENV': '"production"'

    }),

    new webpack.optimize.UglifyJsPlugin(),

    new ExtractTextPlugin({

      filename: "css/style.css?[contenthash:8]"

    }),

    new HtmlWebpackPlugin({

      filename: 'index.html',

      template: 'index.html',

      inject: true

    })

  ]

})
生产构建(prod.js)内容如下:
var webpack = require("webpack");

var webpackProdConfig = require('./webpack.prod.config');

webpack(webpackProdConfig, function(err, stats) {

  process.stdout.write(stats.toString());

});
对应在package.json中添加开发和生产构建的命令如下:
"scripts": {

  "dev": "node build/dev.js",

  "build": "node build/prod.js"

}
代码分割
参照vue-cli及webpack文档的提取公共代码的方式,利用插件webpack.optimize.CommonsChunkPlugin将来自node_modules下的模块提取到vendor.js(一般来讲都是外部库,短时间不会发生变化)。于是有如下代码:
new webpack.optimize.CommonsChunkPlugin({

  name: 'vendor',

  minChunks: function(module, count) {

    return module.resource && /\.js$/.test(module.resource) && module.resource.indexOf(path.join(__dirname, '../node_modules')) === 0

  }

})
如果你查看未压缩版的vendor.js,会发现不仅包含vue的代码,还包含了webpackBootstrap(webpack模块加载器)的代码,按理说放在vendor里面也没啥问题,毕竟后面的模块都需要依赖于此,但是如果你的chunk使用了hash,一旦app代码发生了改变,相应的hash值会发生变化,webpackBootstrap的代码也会发生变化(如图),而我们提取vendor的初心就是这部分代码改变频率不大,显然这不符合我们的目标,那么应当将webpackBootstrap再提取到一个文件中,代码如下:
new webpack.optimize.CommonsChunkPlugin({

  name: 'manifest',

  chunks: ['vendor']

})

用 import 还是 require
vue 2.2.0 后不能直接使用 require 来加载 vue,那么到底改是该使用 ES6 Module 还是 CommonJS 呢?,先看一个对比图:
全部使用 ES6 Module,即import、export default,最终打包的app.js为1.20KB。

全部使用 CommonJS(除了vue),即require、module.exports,最终打包的app.js为1.12KB。

虽然两者大小相差不大,但是这不禁让人觉得用 CommonJS 似乎是一条优化措施,那么代码层面到底是怎么回事呢?
为了一探究竟,注释了压缩插件,以about.vue最终构建的代码来看,使用 CommonJS 的代码如下:
 (function (module, exports, __webpack_require__) {

 "use strict";

 module.exports = {

  data: function data() {

   return {

    page: 'about'

   };

  }

 };

}),
这基本上和 about.vue 中的代码相差无几,而使用 ES6 Module 构建的代码如下:
(function (module, exports, __webpack_require__) {

 "use strict";

 Object.defineProperty(exports, "__esModule", {

  value: true

 });

 exports.default = {

  data: function data() {

   return {

    page: 'about'

   };

  }

 };

}),
对比两种规范下构建后的代码,使用 ES6 Module 主要是多了 Object.defineProperty 那一部分,从而导致了最终打包的文件大一点儿。那是不是为了最终文件体积能小些就全部使用 CommonJS 呢?这个需要你充分理解 CommonJS 和 ES6 Module 的区别,引用《ECMAScript 6入门》这本书的解释如下:
ES6模块加载的机制,与CommonJS模块完全不同。CommonJS模块输出的是一个值的拷贝,而ES6模块输出的是值的引用。
为了更清楚的理解这段话,我们稍微做一下测试,在 src 下增加一个test.js,内容如下(分别将两种写法列出):
// CommonJS

var counter = 1;

function incCounter() {

  counter++;

}

module.exports = {

  counter: counter,

  incCounter: incCounter,

};

// ES6 Module

export let counter = 1;

export function incCounter() {

  counter++;

}
在about.vue中测试如下:
 // CommonJS

var test = require('../test');

export default {

  created() {

    console.log(test.counter); // 1

    test.incCounter();

    console.log(test.counter); // 1

  }

}

// ES6 Module

import { counter, incCounter } from '../test';

export default {

  created() {

    console.log(counter); // 1

    incCounter();

    console.log(counter); // 2

  }

}
最终的输出值也印证了前面的解释,更详细的解读请查阅相关资料或书籍。只有深入理解了两者的区别,自然就能明白何时该使用何种规范。当然 ES6 作为未来的趋势,我们应该去做更多的尝试。
异步组件(懒加载)
之前用懒加载的方式是:require.ensure,在 webpack2 中引入了 Code Splitting-Async 的新方法 import(),用于动态引入 ES Module。require.ensure 可以指定 chunkFilename,但是 import 没有很好的途径去指定,webpack3 为了解决这个问题,提出了用魔法注释的方式来指定模块名。
结合 vue-router 可以轻松实现懒加载,配置路由指向异步组件即可实现懒加载,比如:
{

    path: '/async',

    component: () => import(/* webpackChunkName: "async" */'./views/async.vue')

}
如果你发现使用 import() 运行时报错,有几种情况:
1.babel presets 配置为 es2015,则不支持动态导入功能,因此需要安装支持动态导入的 presets(npm i babel-preset-stage-2 -D),或者 babel 插件(npm i babel-plugin-syntax-dynamic-import -D);
2.babel presets 配置为 env,但是 modules 配置为 false,babel 则不会解析 import,可以安装插件 (npm i babel-plugin-syntax-dynamic-import -D)解决。
魔法注释虽然指定了块名,但是 webpack 默认的块名配置为 [id].js,即用的模块的 id 作为块名,因此需要我们手动改下配置。
修改 webpack.base.config.js 的 output:
output: {

  filename: 'js/[name].js',

  chunkFilename: "js/[name].[chunkhash].js"

}
效果如下图:

如果发现魔法注释没有生效,要检查下 .babelrc 的配置项 comments 是否设为 true。或者不配置 comments(默认为true)
extract-text-webpack-plugin 默认不会提取异步模块中的 CSS,需要加上配置:
new ExtractTextPlugin({

  allChunks:true,

  filename: "css/style.css?[contenthash:8]"

})
相关推荐:
关于vue2.0设置proxyTable使用axios进行跨域请求
The above is the detailed content of Building vue2 vue-router2 webpack3 project tutorial. For more information, please follow other related articles on the PHP Chinese website!

 Javascript Data Types : Is there any difference between Browser and NodeJs?May 14, 2025 am 12:15 AM
JavaScript core data types are consistent in browsers and Node.js, but are handled differently from the extra types. 1) The global object is window in the browser and global in Node.js. 2) Node.js' unique Buffer object, used to process binary data. 3) There are also differences in performance and time processing, and the code needs to be adjusted according to the environment.
 JavaScript Comments: A Guide to Using // and /* */May 13, 2025 pm 03:49 PM
JavaScriptusestwotypesofcomments:single-line(//)andmulti-line(//).1)Use//forquicknotesorsingle-lineexplanations.2)Use//forlongerexplanationsorcommentingoutblocksofcode.Commentsshouldexplainthe'why',notthe'what',andbeplacedabovetherelevantcodeforclari
 Python vs. JavaScript: A Comparative Analysis for DevelopersMay 09, 2025 am 12:22 AM
The main difference between Python and JavaScript is the type system and application scenarios. 1. Python uses dynamic types, suitable for scientific computing and data analysis. 2. JavaScript adopts weak types and is widely used in front-end and full-stack development. The two have their own advantages in asynchronous programming and performance optimization, and should be decided according to project requirements when choosing.
 Python vs. JavaScript: Choosing the Right Tool for the JobMay 08, 2025 am 12:10 AM
Whether to choose Python or JavaScript depends on the project type: 1) Choose Python for data science and automation tasks; 2) Choose JavaScript for front-end and full-stack development. Python is favored for its powerful library in data processing and automation, while JavaScript is indispensable for its advantages in web interaction and full-stack development.
 Python and JavaScript: Understanding the Strengths of EachMay 06, 2025 am 12:15 AM
Python and JavaScript each have their own advantages, and the choice depends on project needs and personal preferences. 1. Python is easy to learn, with concise syntax, suitable for data science and back-end development, but has a slow execution speed. 2. JavaScript is everywhere in front-end development and has strong asynchronous programming capabilities. Node.js makes it suitable for full-stack development, but the syntax may be complex and error-prone.
 JavaScript's Core: Is It Built on C or C ?May 05, 2025 am 12:07 AM
JavaScriptisnotbuiltonCorC ;it'saninterpretedlanguagethatrunsonenginesoftenwritteninC .1)JavaScriptwasdesignedasalightweight,interpretedlanguageforwebbrowsers.2)EnginesevolvedfromsimpleinterpreterstoJITcompilers,typicallyinC ,improvingperformance.
 JavaScript Applications: From Front-End to Back-EndMay 04, 2025 am 12:12 AM
JavaScript can be used for front-end and back-end development. The front-end enhances the user experience through DOM operations, and the back-end handles server tasks through Node.js. 1. Front-end example: Change the content of the web page text. 2. Backend example: Create a Node.js server.
 Python vs. JavaScript: Which Language Should You Learn?May 03, 2025 am 12:10 AM
Choosing Python or JavaScript should be based on career development, learning curve and ecosystem: 1) Career development: Python is suitable for data science and back-end development, while JavaScript is suitable for front-end and full-stack development. 2) Learning curve: Python syntax is concise and suitable for beginners; JavaScript syntax is flexible. 3) Ecosystem: Python has rich scientific computing libraries, and JavaScript has a powerful front-end framework.


Hot AI Tools

Undresser.AI Undress
AI-powered app for creating realistic nude photos

AI Clothes Remover
Online AI tool for removing clothes from photos.

Undress AI Tool
Undress images for free

Clothoff.io
AI clothes remover

Video Face Swap
Swap faces in any video effortlessly with our completely free AI face swap tool!

Hot Article
Hot Tools

Atom editor mac version download
The most popular open source editor

WebStorm Mac version
Useful JavaScript development tools

SublimeText3 English version
Recommended: Win version, supports code prompts!

Dreamweaver Mac version
Visual web development tools

Safe Exam Browser
Safe Exam Browser is a secure browser environment for taking online exams securely. This software turns any computer into a secure workstation. It controls access to any utility and prevents students from using unauthorized resources.

