Home >Web Front-end >JS Tutorial >jquery and css to implement side navigation bar effect sample code
jquery and css to implement side navigation bar effect sample code
- 小云云Original
- 2018-01-10 09:18:413696browse
This article mainly introduces jquery+css to achieve the side navigation bar effect in detail. It has certain reference value. Interested friends can refer to it. I hope it can help everyone.
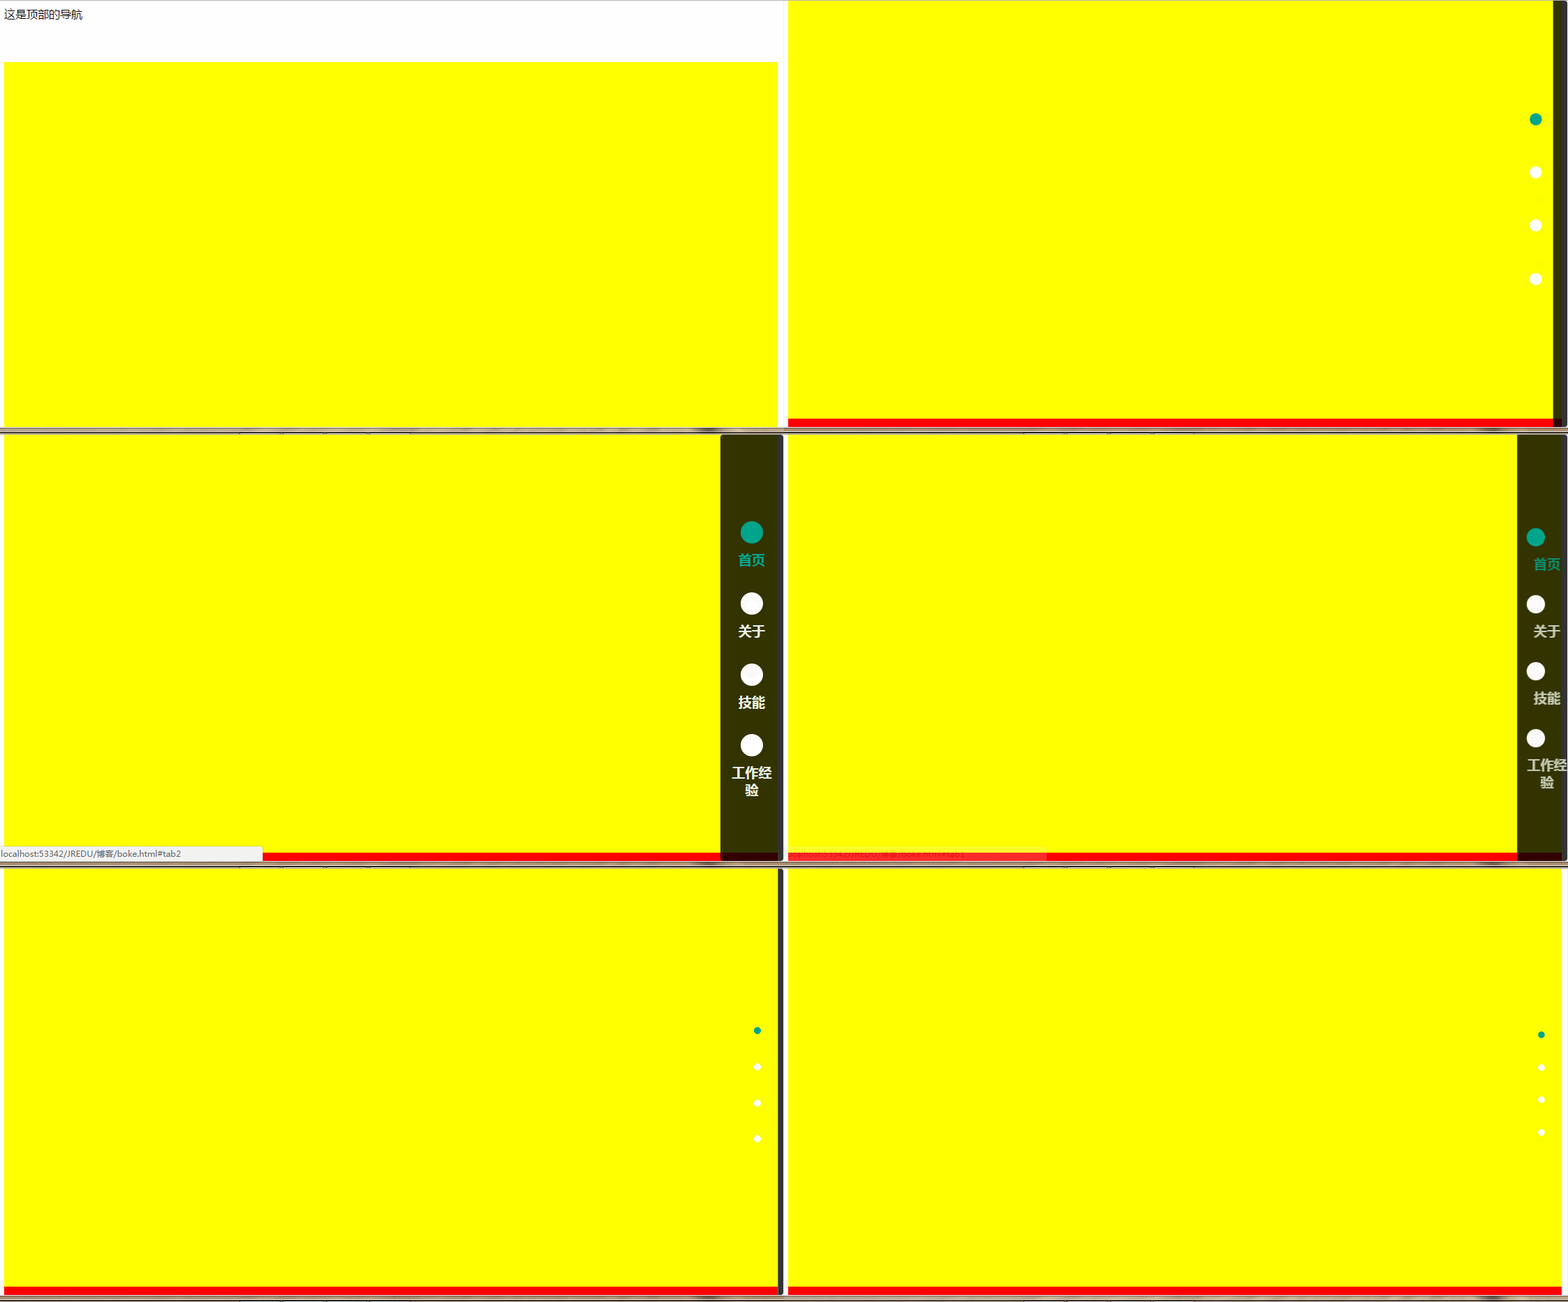
When I was working on a project recently, I suddenly wanted to use a side navigation bar. I found several plug-ins online, but some were too ugly and did not meet my expectations. Instead of modifying other people's code, it's better to write one yourself. Without further ado, here are the pictures. If you are interested, please continue reading.
1. Rendering

When there is a top navigation bar, the side navigation bar will disappear.

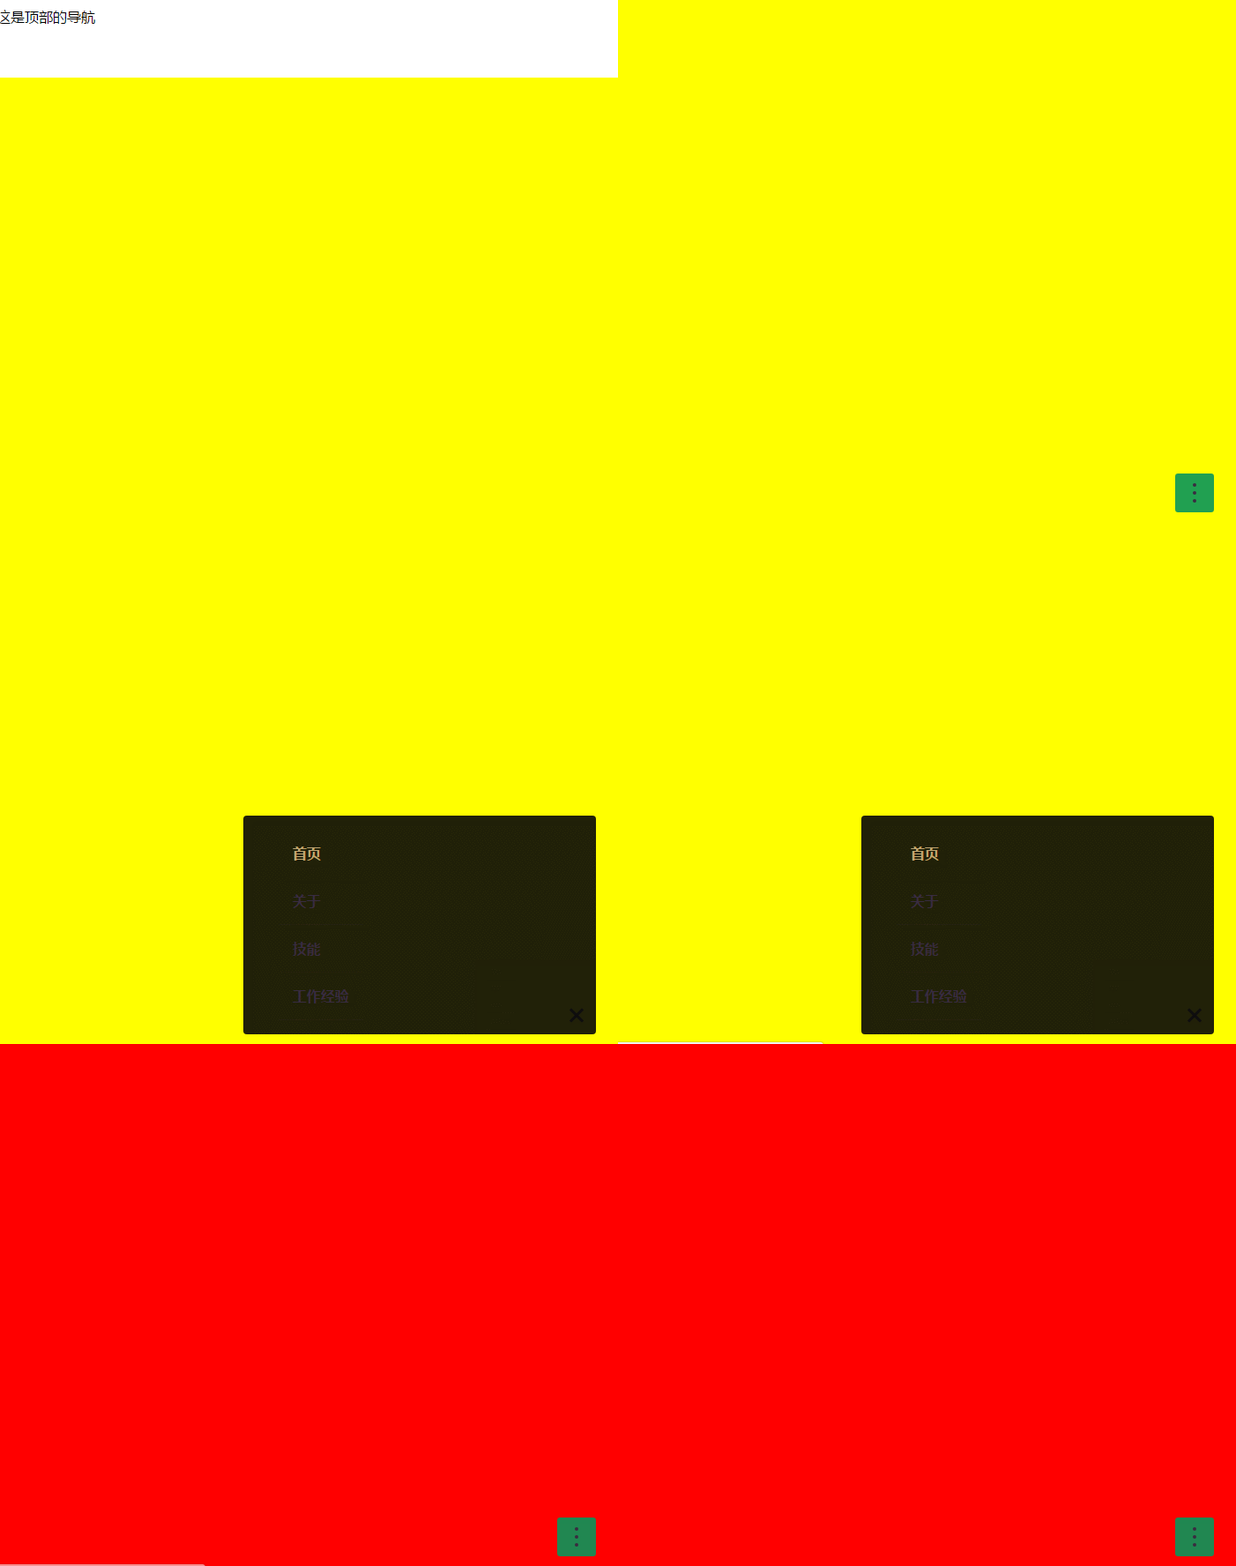
#In terms of responsiveness, the icon in the lower right corner appears only after the same top navigation bar disappears. Click to display the navigation, which disappears after selection;
This is a demo without smooth scrolling. You can add it yourself if needed.
That’s all for the introduction, below is the code.
2, css code
Here is the css code, please see the comments for details
<style>
/*重置一些样式*/
*, *::after, *::before {
box-sizing: border-box;
/*padding: 0;*/
margin: 0;
font-size: 14px;
}
.cd-vertical-nav ul{
list-style: none;
}
a {
color: #c0a672;
text-decoration: none;
}
.nav{
height: 80px;
}
.cd-image-replace {
/* 小屏显示的图标 */
display: inline-block;
overflow: hidden;
text-indent: 100%;
white-space: nowrap;
color: transparent;
}
/* --------------------------------
小屏时的图标样式,和小图标响应式的显示与隐藏
-------------------------------- */
.cd-nav-trigger {
display: block;
position: fixed;
z-index: 2;
bottom: 30px;
right: 5%;
height: 44px;
width: 44px;
border-radius: 0.25em;
background: rgba(9, 150,90, 0.9);
/* reset button style */
cursor: pointer;
-webkit-appearance: none;
-moz-appearance: none;
-ms-appearance: none;
-o-appearance: none;
appearance: none;
border: none;
outline: none;
}
.cd-nav-trigger span {
position: absolute;
height: 4px;
width: 4px;
background-color: #3a2c41;
border-radius: 50%;
left: 50%;
top: 50%;
bottom: auto;
right: auto;
transform: translateX(-50%) translateY(-50%);
}
.cd-nav-trigger span::before, .cd-nav-trigger span::after {
content: '';
position: absolute;
left: 0;
height: 100%;
width: 100%;
background-color: #3a2c41;
border-radius: inherit;
}
.cd-nav-trigger span::before {
top: -9px;
}
.cd-nav-trigger span::after {
bottom: -9px;
}
@media only screen and (min-width: 768px) {
.cd-nav-trigger {
display: none;
}
}
/* --------------------------------
导航条的背景等属性
-------------------------------- */
/*移动优先原则 这里是小屏时的导航*/
.cd-vertical-nav {
position: fixed;
z-index: 1;
right: 5%;
bottom: 30px;
width: 90%;
max-width: 400px;
max-height: 90%;
overflow-y: auto;
transform: scale(0);
transform-origin: right bottom;
transition: transform 0.2s;
border-radius: 0.25em;
background-color: rgba(9, 9, 9, 0.9);
}
.cd-vertical-nav li{
height:auto;
}
.cd-vertical-nav a {
display: block;
padding: 1em;
color: #3a2c41;
font-weight: bold;
border-bottom: 1px solid rgba(58, 44, 65, 0.1);
}
.cd-vertical-nav a.active {
color: #c0a672;
}
.cd-vertical-nav.open {
transform: scale(1);
z-index: 10;
-webkit-overflow-scrolling: touch;
}
.cd-vertical-nav.open + .cd-nav-trigger {
background-color: transparent;
}
.cd-vertical-nav.open + .cd-nav-trigger span {
background-color: rgba(58, 44, 65, 0);
}
.cd-vertical-nav.open + .cd-nav-trigger span::before, .cd-vertical-nav.open + .cd-nav-trigger span::after {
/* 给点击后的按钮做叉号(×)样式 */
height: 3px;
width: 20px;
border-radius: 0;
left: -8px;
}
.cd-vertical-nav.open + .cd-nav-trigger span::before {
-webkit-transform: rotate(45deg);
-moz-transform: rotate(45deg);
-ms-transform: rotate(45deg);
-o-transform: rotate(45deg);
transform: rotate(45deg);
top: 1px;
}
.cd-vertical-nav.open + .cd-nav-trigger span::after {
-webkit-transform: rotate(135deg);
-moz-transform: rotate(135deg);
-ms-transform: rotate(135deg);
-o-transform: rotate(135deg);
transform: rotate(135deg);
bottom: 0;
}
@media only screen and (min-width: 768px) {
.cd-vertical-nav {
/* pc端展示的效果,首先重置一下样式 */
right: 0;
top: 0;
bottom: auto;
text-align: center;
/*这里的vh是相对可视屏幕的高度,100vh表示高度始终等于浏览器可是高度*/
height: 100vh;
width: 90px;
max-width: none;
max-height: none;
transform: scale(1);
background-color: transparent;
overflow: hidden;
/* 下面通过flex弹性盒子,让内容的主轴线编程垂直的。
然后通过修改主轴的元素排列方式让他们居中*/
display: flex;
flex-direction: column;
justify-content: center;
}
/*下面通过调节内容的缩放比和padding,margin等属性来调节个选项间的距离,实现动画效果*/
.cd-vertical-nav::before {
/* 背景色 */
content: '';
position: absolute;
top: 0;
left: 0;
width: 100%;
height: 100%;
background: rgba(0, 0, 0, 0.8);
transform: translateX(100%);
transition: transform 0.4s;
}
.cd-vertical-nav:hover::before {
-webkit-transform: translateX(0);
-moz-transform: translateX(0);
-ms-transform: translateX(0);
-o-transform: translateX(0);
transform: translateX(0);
}
.cd-vertical-nav ul {
vertical-align: middle;
text-align: center;
padding-left: 15px;
}
.cd-vertical-nav a {
position: relative;
padding: 0.5em 0 0;
margin:0 auto;
border-bottom: none;
font-size: 1.2rem;
color: #eaf2e3;
transition: all .5s;
}
.cd-vertical-nav a.active i{
background-color: #00a58c;
color: #ffffff;
}
.cd-vertical-nav a.active span{
color: #00a58c;
}
.cd-vertical-nav a.active::before, .cd-vertical-nav a:hover::before {
background-color: #c0a672;
}
.cd-vertical-nav .label {
display: block;
opacity: 0;
transform: translateX(150%);
height: 0;
transition: all 0.5s;
}
.cd-vertical-nav:hover .label {
height:auto;
opacity: 1;
transform: translateX(0);
padding-top: 5px;
}
.cd-vertical-nav:hover a {
padding: 1em 0 0;
margin-top: 0.8em;
margin-right: 15px;
}
.cd-vertical-nav i{
display: inline-block;
width: 32px;
height: 32px;
font-size: 18px;
line-height: 30px;
-webkit-border-radius: 50%;
-moz-border-radius: 50%;
border-radius: 50%;
color: #0a9dc7;
background-color: #fff;
transform: scale(0.3);
transition: all 0.3s;
}
.cd-vertical-nav:hover i{
transform: scale(1);
}
}
/*配合页面css*/
section{
height: 100vh;
}
section:nth-of-type(2n){
background-color: #ff0000;
}
section:nth-of-type(2n+1){
background-color: #ffff00;
}
</style> 3. html code
Here is the html code, it is very simple and there is nothing to say.
<p class="nav">这是顶部的导航</p>

<nav class="cd-vertical-nav navbar collapse">
 <ul>
  <li><a data-scroll href="#tab1" class="active"><i class="iconfont icon-shouyeshouye"></i><span class="label">首页</span></a></li>
  <li><a data-scroll href="#tab2"><i class="iconfont icon-guanyu"></i><span class="label">关于</span></a></li>
  <li><a data-scroll href="#tab3"><i class="iconfont icon-jineng"></i><span class="label">技能</span></a></li>
  <li><a data-scroll href="#tab4"><i class="iconfont icon-gongzuojingyan"></i><span class="label">工作经验</span></a></li>
 </ul>
</nav>
<button class="cd-nav-trigger cd-image-replace">Open navigation<span aria-hidden="true"></span></button>

<section id="tab1"></section>
<section id="tab2"></section>
<section id="tab3"></section>
<section id="tab4"></section>
4. js code
Let’s take a look at the js code. The notes are very detailed, so I won’t go into details.
<script src="js/jquery-1.10.2.min.js"></script><!--导入jquery库-->
<script>
$(function(){
var a =$("section"); //获取每个大块的元素
var b = [];
for (i=0;i< a.length;i++){
b[i]=a[i].offsetTop; //把每个大块距离页面最顶部的距离,赋给b数组
}
var c = $(window).scrollTop();//页面刷新是获取滚动条的位置
if(c>=80){ //顶部导航栏高80;顶部导航消失的时候让侧边导航出来
$(".cd-vertical-nav").show();
if(window.innerWidth<768){ //小屏的情况下让按钮隐藏/出现
$(".cd-nav-trigger").show();}
}else { //否则让它隐藏
$(".cd-vertical-nav").hide();
if(window.innerWidth<768) {
$(".cd-nav-trigger").hide();
}
}
$(window).scroll(function(){ //监听滚动条的滚动事件
c = $(window).scrollTop(); //实时监听滚动条位置
if(c>=80){ //页面滚动时,判断滚动条位置,控制侧边导航的隐显
$(".cd-vertical-nav").show();
if(window.innerWidth<768){
$(".cd-nav-trigger").show();}
}else {
$(".cd-vertical-nav").hide();
$(".cd-nav-trigger").hide();
}
//下面是判断页面所处位置,实时更新导航条,是导航栏选项跟页面同步
for (i=0;i< a.length;i++){
var d =c-b[i]; //c是滚动条位置,b是元素到页面顶部的距离,d表示当前浏览器顶部所处的位置。
var e = a[i].offsetHeight; //获取元素的高度
var f = a[i].id; //获取元素的id
var g = $(".cd-vertical-nav a[href='#"+f+"']"); //拼接字符串,通过属性选择器找到当前所处页面对应的超链接
if (d>=0&&d<e){
if(g.hasClass("active")){ //如果当前元素本就处于激活状态直接break
break;
}
//如果当前页面没有处于激活状态,就将正在激活的移出激活的样式表
$(".cd-vertical-nav .active").removeClass("active");
g.addClass("active"); //给当前需要激活的属性添加激活样式表
break;
}
}
});
})
//下面为小屏时通过点击按钮开关导航栏,
$(".cd-nav-trigger").on("click",function(){
//处于open状态,就关闭
if($(".cd-vertical-nav").hasClass("open")) $(".cd-vertical-nav").removeClass("open");
//反之打开
else $(".cd-vertical-nav").addClass("open");
})
//选中导航某一项后,关闭导航栏
$(".cd-vertical-nav a").on("click",function(){
$(".cd-vertical-nav").removeClass("open");
})
</script>How has everyone learned? Hurry up and try it out.
Related recommendations:
vue router imitates Tmall bottom navigation bar example sharing
jQuery implemented sticky scrolling navigation bar Effect
The above is the detailed content of jquery and css to implement side navigation bar effect sample code. For more information, please follow other related articles on the PHP Chinese website!
Related articles
See more- An in-depth analysis of the Bootstrap list group component
- Detailed explanation of JavaScript function currying
- Complete example of JS password generation and strength detection (with demo source code download)
- Angularjs integrates WeChat UI (weui)
- How to quickly switch between Traditional Chinese and Simplified Chinese with JavaScript and the trick for websites to support switching between Simplified and Traditional Chinese_javascript skills

