
Home >Web Front-end >JS Tutorial >Using Javascript to develop a two-dimensional weekly view calendar_javascript skills
Using Javascript to develop a two-dimensional weekly view calendar_javascript skills

- 韦小宝Original
- 2017-12-15 14:12:051709browse
This article mainly introduces you to the relevant information on how to develop a two-dimensional weekly view calendar using Javascript. The article introduces it in great detail through sample code, which is helpful for everyone to learn JavaScriptOr the work has certain reference and learning value, JavaScript Interested friends, please follow the editor to learn together.
Preface
This article introduces to you the relevant content of Javascript development of two-dimensional weekly view calendar, that is, a month view calendar was previously implemented. Today we will implement a two-dimensional week view calendar.
The key parts are analyzed below.
Structure preparation
The difference is that it also has a classification axis based on the calendar to display different Category, mainly used for schedules, meeting arrangements, etc. within a week.
The two-dimensional calendar is different from the previous single one. When switching dates, the two-dimensional calendar does not need to be re-rendered. The classification does not need to be changed, only the displayed date is changed.
And because it is two-dimensional, the inserted content must belong to a category and a time period at the same time. The content can definitely span time (that is, the date axis), so the inserted content cannot be directly inserted like the beginning The calendar is placed directly in the calendar grid. But to be processed separately.
In addition, as long as the classification remains unchanged, the grid composed of dates and categories does not need to be redrawn.
Considering the above situation, the insertion of content and the grid need to be separated. I made the ready-made calendar into a 3D effect:
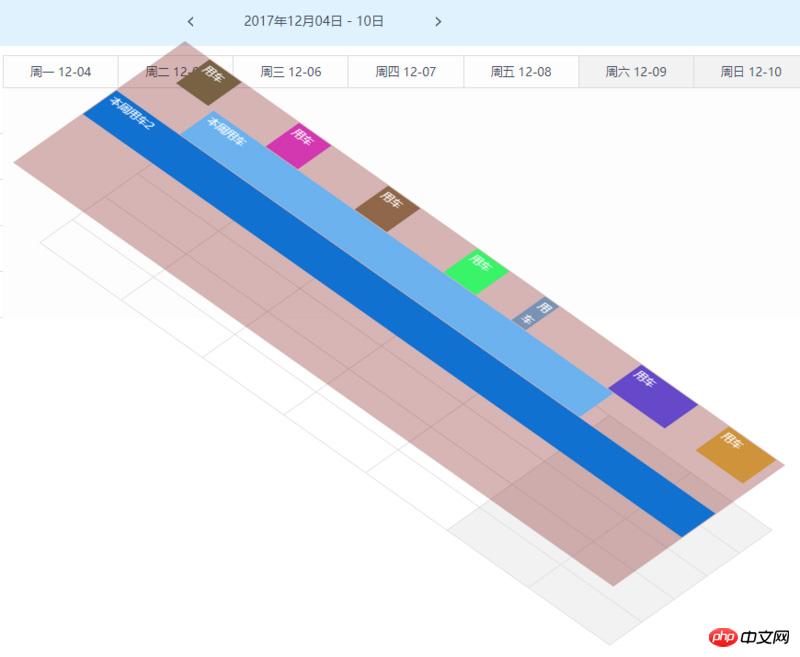
That is, the layer for inserting content is placed separately above the grid composed of time and category.
Based on the above analysis, first build the following basic structure:
<p class="ep-weekcalendar border">
 <!-- 头部 -->
 <p class="ep-weekcalendar-header">
 <p class="ep-weekcalendar-header-left"></p>
 <p class="ep-weekcalendar-header-center">
 <span class="ep-weekcalendar-header-btn ep-weekcalendar-header-btn-prev"></span>
 <span class="ep-weekcalendar-title">2017年12月04日 - 10日</span>
 <span class="ep-weekcalendar-header-btn ep-weekcalendar-header-btn-next"></span>
 </p>
 <p class="ep-weekcalendar-header-right"></p>
 </p>
 <!-- 主体 -->
 <p class="ep-weekcalendar-body">
 <!-- 分类区域 -->
 <p class="ep-weekcalendar-category-area">
 <p class="ep-weekcalendar-category-header">
 <span class="ep-weekcalendar-category-title">车辆</span>
 </p>
 <ul class="ep-weekcalendar-category-list">
 </ul>
 </p>
 <!-- 内容区域 -->
 <p class="ep-weekcalendar-time-area">
 <!-- 每周日期渲染区域。切换日期时重新绘制内容 -->
 <p class="ep-weekcalendar-weeks"></p>
 <p class="ep-weekcalendar-main">
 <!-- 分类和内容构建的网格区域,仅在分类改变时进行调整 -->
 <p class="ep-weekcalendar-grid"> </p>
 <!-- 可插入任意内容的区域,日期切换时清空,根据使用需求插入内容 -->
 <p class="ep-weekcalendar-content"></p>
 </p>
 </p>
 </p>
 <!-- 底部 -->
 <p class="ep-weekcalendar-body"></p>
</p>
The structure is as above, and the implementation code does not need to be shown.
Drawing implementation
# After the necessary structure is initially completed, we proceed with the calendar drawing work.
Classification drawing
The first thing to deal with is classification. In the weekly view, the number of days in a week is fixed. Only when the classification is determined can the main part be drawn. grid.
For classification, temporarily consider the following necessary data format:
{
 id: 'cate-1', // 分类ID
 name: '法拉利', // 分类名称
 content: '苏E00000' // 分类的具体描述
}
The implementation is as follows:
{
// 设置分类数据
setCategory: function (data) {
if (!(data instanceof Array)) {
this.throwError('分类数据必须是一个数组');
return;
}
this._categoryData = data;
// 绘制分类
this._renderCatagories();
// 绘制其他需要改变的部分
this._renderChanged();
},
// 左侧分类渲染
_renderCatagories: function () {
this._categoryListEl.innerHTML = '';
var i = 0,
data = this._categoryData,
node = document.createElement('li'),
cataEl;
node.className = 'ep-weekcalendar-category';
// 用行作为下标记录当前分类id集合
this._categoryIndexs = [];
// id为键记录索引
this._categoryReocrds = {};
while (i < data.length) {
this._categoryIndexs.push(data[i].id);
this._categoryReocrds[data[i].id] = i;
cataEl = node.cloneNode(true);
this._rendercategory(data[i], cataEl);
i++;
}
},
_rendercategory: function (cate, cateEl) {
cateEl.setAttribute('data-cateid', cate.id);
var titleEl = document.createElement('span'),
contentEl = document.createElement('span');
titleEl.className = 'title';
contentEl.className = 'content';
titleEl.innerHTML = cate.name;
contentEl.innerHTML = cate.content;
cateEl.appendChild(titleEl);
cateEl.appendChild(contentEl);
this.fire('categoryRender', {
categoryEl: cateEl,
titleEl: titleEl,
contentEl: contentEl
});
this._categoryListEl.appendChild(cateEl);
this.fire('agterCategoryRender', {
categoryEl: cateEl,
titleEl: titleEl,
contentEl: contentEl
});
}
}
The above set the category data setCategory as the entry point to call the drawing classification method, which also calls _renderChanged. This method is used to redraw the variable parts of the calendar, such as the title, date and the contents, which will be Introduction follows.
Date drawing
The category axis has been prepared above, and the date axis needs to be drawn. For the week view, The implementation of a week is very simple, just render 7 days in sequence according to the start date of the week. Pay attention to providing the necessary information of the date to the corresponding event during the drawing process, so that the user can personalize the event.
{
// 渲染日历的星期
_renderWeeks: function () {
this._weeksEl.innerHTML = '';
var i = 0,
currDate = this._startDate.clone(),
node = document.createElement('p'),
week;
node.className = 'ep-weekcalendar-week';
// 单元格列作为下标记录日期
this._dateRecords = [];
while (i++ < 7) {
// 更新记录日期
this._dateRecords.push(currDate.clone());
week = node.cloneNode(true);
this._renderWeek(currDate, week);
currDate.add(1, 'day');
}
// 切换日期 需要重绘内容区域
this._rednerContent();
},
_renderWeek: function (date, node) {
var dateText = date.format('YYYY-MM-DD'),
day = date.isoWeekday();
if (day > 5) {
node.className += ' weekend';
}
if (date.isSame(this.today, 'day')) {
node.className += ' today';
}
node.setAttribute('data-date', dateText);
node.setAttribute('date-isoweekday', day);
var ev = this.fire('dateRender', {
// 当前完整日期
date: dateText,
// iso星期
isoWeekday: day,
// 显示的文本
dateText: '周' + this._WEEKSNAME[day - 1] + ' ' + date.format('MM-DD'),
// classname
dateCls: node.className,
// 日历el
el: this.el,
// 当前el
dateEl: node
});
// 处理事件的修改
node.innerHTML = ev.dateText;
node.className = ev.dateCls;
this._weeksEl.appendChild(node);
this.fire('afterDateRender', {
// 当前完整日期
date: dateText,
// iso星期
isoWeekday: day,
// 显示的文本
dateText: node.innerHTML,
// classname
dateCls: node.className,
// 日历el
el: this.el,
// 当前el
dateEl: node
});
}
}
Grid and content
The above is ready 2 Just adjust the two axes in the dimensional view, and then draw the grid and content layer.
Grid
Here the categories are drawn in the Y direction (rows) and the dates are drawn in the X direction (columns):
{
// 右侧网格
_renderGrid: function () {
this._gridEl.innerHTML = '';
var rowNode = document.createElement('p'),
itemNode = document.createElement('span'),
rowsNum = this._categoryData.length,
i = 0,
j = 0,
row, item;
rowNode.className = 'ep-weekcalendar-grid-row';
itemNode.className = 'ep-weekcalendar-grid-item';
while (i < rowsNum) {
row = rowNode.cloneNode();
row.setAttribute('data-i', i);
j = 0;
while (j < 7) {
item = itemNode.cloneNode();
// 周末标识
if (this.dayStartFromSunday) {
if (j === 0 || j === 6) {
item.className += ' weekend';
}
} else {
if (j > 4) {
item.className += ' weekend';
}
}
item.setAttribute('data-i', i);
item.setAttribute('data-j', j);
row.appendChild(item);
j++;
}
this._gridEl.appendChild(row);
i++;
}
rowNode = itemNode = row = item = null;
}
}
Content
Theoretically, two dimensions should support both cross-row and cross-column situations, that is, the content area should be a whole block of elements. But when combined with actual situations, cross-time requirements are common (one thing is used continuously over a period of time). Cross-classification does not have much practical significance. It must be managed separately by classification, and then cross-classification becomes complicated again. And even if it is necessary to use multiple things at the same time for a period of time, it can be implemented directly (category A is used in the XX time period, and B is used in the XX time period, but the XX is exactly the same at this time).
Therefore, only cross-time situations are dealt with here. The content can be drawn by rows or categories, which can simplify many calculations when inserting content components.
{
// 右侧内容
_rednerContent: function () {
this._contentEl.innerHTML = '';
var i = 0,
node = document.createElement('p'),
row;
node.className = 'ep-weekcalendar-content-row';
while (i < this._categoryData.length) {
row = node.cloneNode();
row.setAttribute('data-i', i);
this._contentEl.appendChild(row);
++i;
}
row = node = null;
},
// 日期切换时清空内容
_clearContent: function () {
var rows = this._contentEl.childNodes,
i = 0;
while (i < rows.length) {
rows[i].innerHTML && (rows[i].innerHTML = '');
++i;
}
// 部件数据清空
this._widgetData = {};
}
}
If you must achieve cross-row and cross-column situations, you can directly draw the content into a whole element, but when clicking on the event and inserting the content component, The corresponding classification and date and time need to be calculated at the same time.
Difficulty to achieve
Content component insertion
We implement this The main purpose of the two-dimensional weekly view calendar is to support the insertion of arbitrary content. The DOM element for inserting content has been prepared above. What needs to be done here is to draw the data into DOM and place it in the appropriate location.
Consider the necessary content component data structure as follows:
{
 id: '数据标识',
 categoryId: '所属分类标识',
 title: '名称',
 content: '内容',
 start: '开始日期时间'
 end: '结束日期时间'
 bgColor: '展示的背景色'
}
由于上面在内容区域是直接按照分类作为绘制的,因此拿到数据后,对应的分类就已经存在了。重点要根据指定的开始和结束时间计算出开始和结束位置。
考虑如下:
考虑响应式,位置计算按照百分比计算
一周的总时间是固定的,开始日期时间和这周开始日期时间的差额占总时间的百分比即开始位置的百分比
结束日期时间和开始时间的差额占总时间的百分比即为结束时间距离最左侧的百分比
注意处理开始和结束时间溢出本周的情况
因此关于位置计算可以用如下代码处理:
{
// 日期时间分隔符 默认为空 对应格式为 '2017-11-11 20:00'
// 对于'2017-11-11T20:00' 这样的格式务必指定正确的日期和时间之间的分隔符T
_dateTimeSplit:' ',
// 一周分钟数
_WEEKMINUTES: 7 * 24 * 60,
// 一周秒数
_WEEKSECONDS: 7 * 24 * 3600,
// 一天的分钟数秒数
_DAYMINUTES: 24 * 60,
_DAYSCONDS: 24 * 3600,
// 计算位置的精度 取值second 或 minute
posUnit: 'second',
// 计算指定日期的分钟或秒数
_getNumByUnits: function (dateStr) {
var temp = dateStr.split(this._dateTimeSplit),
date = temp[0];
// 处理左侧溢出
if (this._startDate.isAfter(date, 'day')) {
// 指定日期在开始日期之前
return 0;
}
// 右侧溢出直接算作第7天即可
var times = (temp[1] || '').split(':'),
days = (function (startDate) {
var currDate = startDate.clone(),
i = 0,
d = moment(date, 'YYYY-MM-DD');
while (i < 7) {
if (currDate.isSame(d, 'day')) {
return i;
} else {
currDate.add(1, 'day');
++i;
}
}
console && console.error && console.error('计算天数时出错!');
return i;
}(this._startDate)),
hours = parseInt(times[0], 10) || 0,
minutes = parseInt(times[1], 10) || 0,
seconds = parseInt(times[2], 10) || 0,
// 对应分钟数
result = days * this._DAYMINUTES + hours * 60 + minutes;
return this.posUnit == 'minute' ? result : (result * 60 + seconds);
},
// 计算日期时间的百分比位置
_getPos: function (dateStr) {
var p = this._getNumByUnits(dateStr) / (this.posUnit == 'minute' ? this._WEEKMINUTES : this._WEEKSECONDS);
return p > 1 ? 1 : p;
}
}
上面就拿到了一个数据所对应的开始位置和结束位置。基本上是已经完成了,但是还需要再处理一个情况:相同分类下的时间冲突问题。
考虑以如下方式进行:
没添加一个就记录下其数据
新增的如果和当前分类下已有的存在时间重叠,则认为冲突。
实现如下:
{
 /**
 * 检查是否发生重叠
 *
 * @param {Object} data 当前要加入的数据
 * @returns false 或 和当前部件重叠的元素数组
 */
 _checkOccupied: function (data) {
 if (!this._widgetData[data.categoryId]) {
  return false;
 }
 var i = 0,
  cate = this._widgetData[data.categoryId],
  len = cate.length,
  result = false,
  occupied = [];
 for (; i < len; ++i) {
  // 判断时间是否存在重叠
  if (data.start < cate[i].end && data.end > cate[i].start) {
  occupied.push(cate[i]);
  result = true;
  }
 }
 return result ? occupied : false;
 }
}
完成以上两步就可以往我们的内容区域中插入了
{
// 缓存widget数据
_cacheWidgetData: function (data) {
if (!this._widgetData[data.categoryId]) {
this._widgetData[data.categoryId] = [];
}
// 记录当前的
this._widgetData[data.categoryId].push(data);
},
// 新增一个小部件
addWidget: function (data) {
var row = this._contentEl.childNodes[this._categoryReocrds[data.categoryId]];
if (!row) {
this.throwError('对应分类不存在,添加失败');
return false;
}
// 先查找是否含有
var $aim = jQuery('.ep-weekcalendar-content-widget[data-id="' + data.id + '"]', row);
if ($aim.length) {
// 已经存在则不添加
return $aim[0];
}
// 创建部件
var widget = document.createElement('p'),
title = document.createElement('span'),
content = document.createElement('p'),
startPos = this._getPos(data.start),
endPos = this._getPos(data.end),
_data = {
categoryId: data.categoryId,
id: data.id,
start: startPos,
end: endPos,
el: widget,
data: data
};
widget.className = 'ep-weekcalendar-content-widget';
title.className = 'ep-weekcalendar-content-widget-title';
content.className = 'ep-weekcalendar-content-widget-content';
widget.appendChild(title);
widget.appendChild(content);
// 通过绝对定位,指定其left和right来拉开宽度的方式来处理响应式
// 可以通过样式设置一个最小宽度,来避免时间段过小时其中文本无法显示的问题
widget.style.left = startPos * 100 + '%';
widget.style.right = (1 - endPos) * 100 + '%';
data.bgColor && (widget.style.backgroundColor = data.bgColor);
data.id && widget.setAttribute('data-id', data.id);
widget.setAttribute('data-start', data.start);
widget.setAttribute('data-end', data.end);
title.innerHTML = data.title;
data.content && (content.innerHTML = data.content);
widget.title = data.title;
// 检查是否发生重叠
var isoccupied = this._checkOccupied(_data);
if (isoccupied) {
// 触发重叠事件
var occupiedEv = this.fire('widgetoccupied', {
occupiedWidgets: (function () {
var arr = [];
for (var i = 0, l = isoccupied.length; i < l; ++i) {
arr.push(isoccupied[i].el);
}
return arr;
})(),
currWidget: widget,
widgetData: data
});
// 取消后续执行
if (occupiedEv.cancel) {
return false;
}
}
// 缓存数据
this._cacheWidgetData(_data);
var addEv = this.fire('widgetAdd', {
widgetId: data.id,
categoryId: data.categoryId,
start: data.start,
end: data.end,
startPos: startPos,
endPos: endPos,
widgetEl: widget
});
if (addEv.cancel) {
return false;
}
row.appendChild(widget);
this.fire('afterWidgetAdd', {
widgetId: data.id,
categoryId: data.categoryId,
start: data.start,
end: data.end,
startPos: startPos,
endPos: endPos,
widgetEl: widget
});
return widget;
},
}
点击事件和范围选择
此控件不仅用于结果展示,还要可用于点击进行添加,需要处理其点击事件,但是由于要展示内容,内容是覆盖在分类和日期构成的网格之上的,用户的点击是点击不到网格元素的,必须要根据点击的位置进行计算来获取所点击的日期和所在分类。
同时,由于展示的部件都是时间范围的,因此点击返回某天和某个分类是不够的,还需要能够支持鼠标按下拖动再松开,来直接选的一段时间。
考虑到以上需求,点击事件不能直接使用 click 来实现,考虑使用 mousedown 和 mouseup 来处理点击事件,同时需要在 mousemove 中实时给出用户响应。
{
_initEvent: function () {
var me = this;
// 点击的行索引
var row,
// 开始列索引
columnStart,
// 结束列索引
columnEnd,
// 是否在按下、移动、松开的click中
isDurringClick = false,
// 是否移动过 用于处理按下没有移动直接松开的过程
isMoveing = false,
$columns,
// 网格左侧宽度
gridLeft,
// 每列的宽度
columnWidth
jQuery(this.el)
// 按下鼠标 记录分类和开始列
.on('mousedown.weekcalendar', '.ep-weekcalendar-content-row', function (e) {
isDurringClick = true;
gridLeft = jQuery(me._gridEl).offset().left;
columnWidth = jQuery(me._gridEl).width() / 7;
jQuery(me._gridEl).find('.ep-weekcalendar-grid-item').removeClass(me._selectedCls);
row = this.getAttribute('data-i');
$columns = jQuery(me._gridEl).find('.ep-weekcalendar-grid-row').eq(row).children();
columnStart = (e.pageX - gridLeft) / columnWidth >> 0;
});
// 移动和松开 松开鼠标 记录结束列 触发点击事件
// 不能直接绑定在日期容器上 否则鼠标移出日历后,松开鼠标,实际点击已经结束,但是日历上处理不到。
jQuery('body')
// 点击移动过程中 实时响应选中状态
.on('mousemove.weekcalendar', function (e) {
if (!isDurringClick) {
return;
}
isMoveing = true;
// 当前列索引
var currColumn;
// mousemoveTimer = setTimeout(function () {
currColumn = (e.pageX - gridLeft) / columnWidth >> 0;
// 修正溢出
currColumn = currColumn > 6 ? 6 : currColumn;
currColumn = currColumn < 0 ? 0 : currColumn;
$columns.removeClass(me._selectedCls);
// 起止依次选中
var start = Math.min(columnStart, currColumn),
end = Math.max(columnStart, currColumn);
do {
$columns.eq(start).addClass(me._selectedCls);
} while (++start <= end);
})
// 鼠标松开
.on('mouseup.weekcalendar', function (e) {
if (!isDurringClick) {
return;
}
var startIndex = -1,
endIndex = -1;
columnEnd = (e.pageX - gridLeft) / columnWidth >> 0;
columnEnd = columnEnd > 6 ? 6 : columnEnd;
// 没有移动过时
if (!isMoveing) {
startIndex = endIndex = columnEnd;
// 直接down up 没有move的过程则只会有一个选中的,直接以结束的作为处理即可
$columns.eq(columnEnd).addClass(me._selectedCls)
.siblings().removeClass(me._selectedCls);
} else {
startIndex = Math.min(columnStart, columnEnd);
endIndex = Math.max(columnStart, columnEnd);
}
// 触发点击事件
me.fire('cellClick', {
// 分类id
categoryId: me._categoryIndexs[row],
// 时间1
startDate: me._dateRecords[startIndex].format('YYYY-MM-DD'),
// 日期2
endDate: me._dateRecords[endIndex].format('YYYY-MM-DD'),
// 行索引
rowIndex: row,
// 列范围
columnIndexs: (function (i, j) {
var arr = [];
while (i <= j) {
arr.push(i++);
}
return arr;
}(startIndex, endIndex))
});
row = columnStart = columnEnd = isMoveing = isDurringClick = false;
});
}
}
此过程要注意的问题是:mousedown 必须绑定在日历上,而 mouseup 和 mousemove 则不能绑定在日历上,具体原因已经写在上面代码注释中了。
另外需要注意,由于范围点击选择使用了 mousedown 和 mouseup 来模拟,那么日历内容区域中插入的数据部件的点击事件也要用 mousedown 和 mouseup 来模拟,因为 mouseup 触发比 click 早,如果使用 click ,会导致先触发日历上的日期点击或日期范围点击。
使用
此日历实现基于一个控件基类扩展而来,其必要功能仅为一套事件机制,可参考实现一套自定义事件机制
实测一下效果吧:
<p id="week-calendar" style="width:100%;height:80vh"></p>
<script>
var calendar = epctrl.init('WeekCalendar', {
el: '#week-calendar',
categoryTitle: '车辆',
category: [{
id: 'cate-1',
name: '法拉利',
content: '苏E00000'
}, {
id: 'cate-2',
name: 'Lamborghini',
content: '苏E00001'
}, {
id: 'cate-3',
name: '捷豹',
content: '苏E00002'
}, {
id: 'cate-4',
name: '宾利',
content: '苏E00003'
}, {
id: 'cate-5',
name: 'SSC',
content: '苏E00004'
}],
events: {
// 日期变化时触发
dateChanged: function (e) {
var data = {
start: e.startDate,
end: e.endDate,
};
// 获取数据并逐个添加到日历上
getData(data).done(function (data) {
$.each(data, function (i, item) {
calendar.addWidget(item);
});
});
},
// 部件重叠时触发
widgetOccupied: function (e) {
// 冲突时禁止继续添加
console.error(e.widgetData.categoryId + '分类下id为' + e.widgetData.id + '的部件和现有部件有重叠,取消添加');
e.cancel = true;
}
}
});
calendar.on('dateClick', function (e) {
alert(JSON.stringify({
'开始时间': e.startDate,
'结束时间': e.endDate,
'分类id': e.categoryId,
'行索引': e.rowIndex,
'列索引范围': e.columnIndexs
}, 0, 4));
});
</script>
以上就是本篇文章的所有内容,希望会给大家带来帮助!!
相关推荐:
The above is the detailed content of Using Javascript to develop a two-dimensional weekly view calendar_javascript skills. For more information, please follow other related articles on the PHP Chinese website!
Related articles
See more- An in-depth analysis of the Bootstrap list group component
- Detailed explanation of JavaScript function currying
- Complete example of JS password generation and strength detection (with demo source code download)
- Angularjs integrates WeChat UI (weui)
- How to quickly switch between Traditional Chinese and Simplified Chinese with JavaScript and the trick for websites to support switching between Simplified and Traditional Chinese_javascript skills