Home >Web Front-end >JS Tutorial >Example code for implementing Snake widget in JavaScript
Example code for implementing Snake widget in JavaScript
- 黄舟Original
- 2017-08-20 09:48:232147browse
1 Written before
It seems that "JavsScript Advanced Programming", I want to make a small demo to practice my skills, so I chose the Snake game. Since it was all written in C# before, Snake was written into a class, and then split into small methods one by one, and only the methods that needed to be provided were provided. In this way, Snake can be used as a module and can be reused anywhere. However, when writing in js, because the characteristics of the js language cannot be well utilized for modular programming, the first version of the implementation completely adopts a process-oriented approach and declares all variables required in the function as global variables. Although this can also achieve functions, it cannot be reused, and many top-level variables are defined, polluting global variables. After writing, I always want to re-encapsulate what I wrote so that only the variables or functional function interfaces that must be provided are provided to the outside world. After checking a lot of information, it turns out that js encapsulation can be implemented using closures. By declaring local variables and closure functions inside the function as private variables and functions of the type, the object is then provided with the interface that needs to be developed through this.
2 How to use the Snake component
2.1 Elementary example
Sample code 1 is as follows :
<!DOCTYPE html>
<html lang="en">
<head>
 <meta charset="UTF-8">
 <title>贪吃蛇组件</title>
</head>
<body>
 <canvas width="600" height="600" id="gameScense"></canvas>
</body>
<script src="SnakeGame.js"></script>
<script>
 var snakeGame = new SnakeGame("gameScense",{
 });
 snakeGame.startGame();
</script>
</html>
First introduce the SnakeGame.js component, then instantiate the SnakeGame object and pass in two parameters to the SnakeGame constructor. The first parameter is the id of the canvas, and the second parameter is the game configuration object. If it is empty, the default configuration will be used. Finally, call the object's startGame() method to implement the snake's logic. The default direction control keys are up, down, left and right keys, and pause is space. The effect is as follows:

We can update the game by changing the configuration object passed in during instantiation. Multiple controls.
Sample code 2:
<!DOCTYPE html>
<html lang="en">
<head>
 <meta charset="UTF-8">
 <title>贪吃蛇组件</title>
</head>
<body>
 <canvas width="600" height="600" id="gameScense"></canvas>
</body>
<script src="SnakeGame.js"></script>
<script>
 var snakeGame = new SnakeGame("gameScense",{
  snakeColor:"red",
  foodColor:"green",
  scenseColor:"blue",
  directionKey:[68,83,65,87],
 });
 snakeGame.startGame();
</script>
</html>
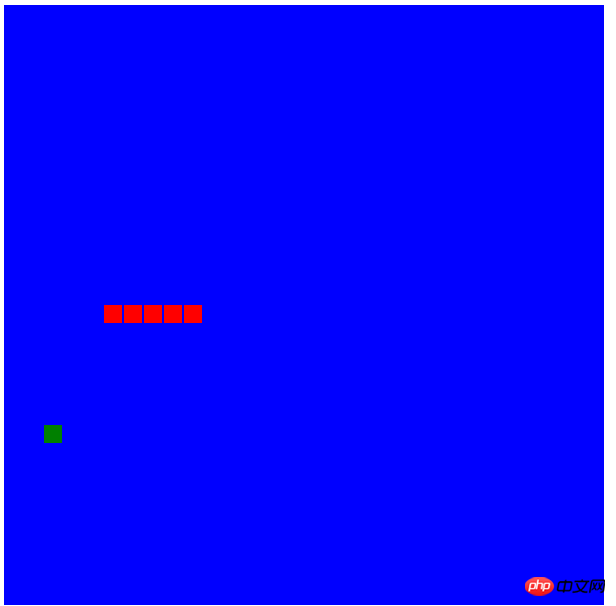
You can know by the name of the parameters, configure the color of the snake, food, game background, and the direction keys to control the game. The configuration direction sequence is [left, down, right, up]. The effect is as follows:

#Of course there are more configurations. You can also define callback functions for score changes, callback functions at the end of the game, etc. The following introduces the configuration parameters and methods common to SnakeGame objects.
2.2 Public methods
•startGame(): Start the game. Within this method, various settings are initialized. For example, reset the score, snake body, speed, etc.
•changeGameStatus(): Change the game status, that is, pause and start. There is a private variable in the SnakeGame object as the game status variable.
2.3 The gameConfigObj property and
gameConfigObj object that configures game parameters should have a total of 10 properties and 3 callback functions
Properties
•size: The size of the snake block and food, the default is 20
•rowCount: Row, the default is 30 rows
•colCount: The column, the default is 30 columns
•snakeColor: The color of the snake body, the default is green
•foodColor: food color, default yellow
•scenseColor: game scene background color, default black
•directionKey: direction key, default [39, 40, 37, 38] up, down, left and right
•pasueKey: Pause key, default 32, space key
•levelCount: speed level control, default 10.
•curSpeed: initial speed, default 200 milliseconds
Callback function
•onCountChange: Event, every food, score changes, and this method is called, with a parameter (count)
•onGamePause: event, when the game state changes, this method is called, with a parameter 1, representing pause, 0 means the game is in progress.
•onGameOver: event, this method is called when the game ends.
2.4 Using advanced
With the above properties we can design a more interactive program. code show as below.
Example 3
<!DOCTYPE html>
<html lang="en">
<head>
 <meta charset="UTF-8">
 <title>贪吃蛇组件</title>
 <style type="text/css">
  *{
   margin:0px;
   padding:0px;
  }
  #gamebd{
   width:850px;
   margin:50px auto;
  }
  #gameScense{
   background-color:green;
   float:left;
  }
  #gameSet{
   margin-left:10px;
   float:left;
  }
  .gameBoxStyle{
   margin-bottom:7px;
   padding:5px 10px;
  }
  .gameBoxStyle h3{
   margin-bottom:7px;
  }
  .gameBoxStyle p{
   line-height: 1.7em;
  }
  .gameBoxStyle input{
   margin-top:7px;
   background-color: white;
   border:1px gray solid;
   padding:3px 9px;
   margin-right:9px;
  }
  .gameBoxStyle input[type=text]{
   width:90px;
  }
  .gameBoxStyle input:hover{
   background-color: #e2fff2;
  }
  .gameBoxStyle #txtValue{
   color:red;
  }
 </style>
</head>
<body>
<p id="gamebd">
 <canvas id="gameScense" width="600" height="600">
 </canvas>
 <p id="gameSet">
  <p id="gameControl" class="gameBoxStyle">
   <h3>游戏控制</h3>
   <p>方向键:上,下,左,右</p>
   <p>开始/暂停:空格</p>
  </p>
  <p id="gameStatus" class="gameBoxStyle">
   <h3>游戏状态</h3>
   <p>用户名:<input type="text" placeholder="输入用户名:" id="txtUserName" value="游客123"/> </p>
   <p>当前用户1得分:<span id="txtValue">0</span></p>
   <input type="button" value="开始游戏" id="btnStart"/>
   <input type="button" value="暂停" id="btnPause"/>
  </p>
  <p id="game" class="gameBoxStyle">
   <h3>游戏记录</h3>
   <a href="#" rel="external nofollow" rel="external nofollow" >查看历史记录</a>
  </p>
 </p>
</p>
<script src="js/SnakeGame.js"></script>
</body>
<script src="SnakeGame.js"></script>
<script>
 var btnStart=document.getElementById("btnStart");
 var btnPasue=document.getElementById("btnPause");
 var gameSnake = new SnakeGame("gameScense",{
  snakeColor:"red",
  onCountChange:function(count){
   var txtScore=document.getElementById("txtValue");
   txtScore.innerText=count.toString( );
   txtScore=null;
  },
  onGamePause:function(status){
   if(status){
    btnPasue.value = "开始";
   }else {
    btnPasue.value = "暂停"
   }
  },
  onGameOver:function (status) {
   alert("游戏结束");
  }
 });
 btnStart.onclick=function(event){
  if(checkUserName()){
   gameSnake.startGame();
   btnStart.blur();
  }
 }
 btnPasue.onclick=function(event) {
  gameSnake.changeGameStatus();
  btnStart.blur();
 }
 function checkUserName(){
  var txtUserName = document.getElementById("txtUserName");
  if(txtUserName.value.length==0){
   alert("用户名不能为空");
   return false;
  }else {
   return true;
  }
 }
</script>
</html>
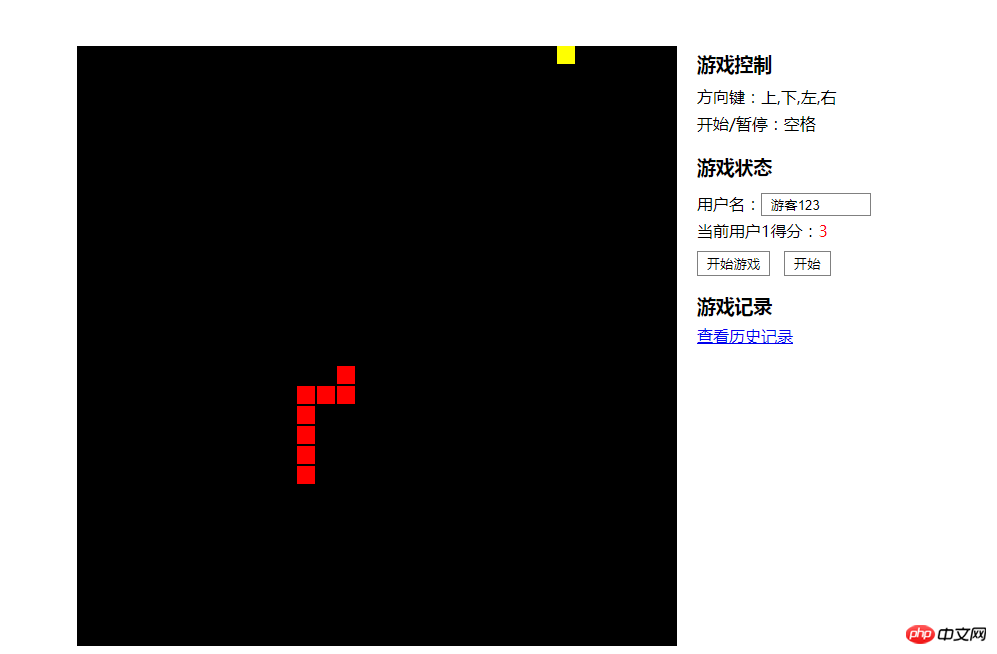
The above code realizes the interaction between the interface and the component by setting three callback functions: OnChangeCount, onGamePause, and onGameOver. The effect is as follows:

In the book "JavaScript Advanced Programming", a module mode is mentioned, but this mode is a singleton mode, that is, the closure finally returns a literal Quantity object. But I need to be able to open two Snake windows at the same time on one page. The two games can be played by two people at the same time by configuring different direction keys and button operations. Therefore, when implementing the SnakeGame component, the module model mentioned by Douglas was not used. Let's demonstrate how to let two people play games at the same time on one page. The code is as follows:
Example 4
First create an html file
<!DOCTYPE html> <html lang="en"> <head> <meta charset="UTF-8"> <title>Jaume's贪吃蛇</title> <link rel="stylesheet" href="css/gameStyle.css" rel="external nofollow" > </head> <body> <p id="gamebd"> <canvas id="gameScense" width="600" height="600"> </canvas> <canvas id="gameScense1" width="600" height="600" style="background-color: black"> </canvas> <p id="gameSet"> <p id="gameControl" class="gameBoxStyle"> <h3>游戏控制</h3> <p>方向键:上,下,左,右</p> <p>开始/暂停:空格</p> </p> <p id="gameStatus" class="gameBoxStyle"> <h3>游戏状态</h3> <p>当前用户1得分:<span id="txtValue">0</span></p> <p>当前用户2得分:<span id="txtValue1">0</span></p> <input type="button" value="开始游戏" id="btnStart"/> </p> <p id="game" class="gameBoxStyle"> <h3>游戏记录</h3> <a href="#" rel="external nofollow" rel="external nofollow" >查看历史记录</a> </p> </p> </p> <script src="js/SnakeGame.js"></script> <script src="js/UIScript.js"></script> </body> </html>
样式文件如下:
*{
 margin:0px;
 padding:0px;
}
#gamebd{
 /*width:850px;*/
 /*margin:50px auto;*/
 width:100%;
}
#gameScense{
 background-color:green;
 float:left;
}
#gameSet{
 margin-left:10px;
 float:left;
}
.gameBoxStyle{
 margin-bottom:7px;
 padding:5px 10px;
}
.gameBoxStyle h3{
 margin-bottom:7px;
}
.gameBoxStyle p{
 line-height: 1.7em;
}
.gameBoxStyle input{
 margin-top:7px;
 background-color: white;
 border:1px gray solid;
 padding:3px 9px;
 margin-right:9px;
}
.gameBoxStyle input[type=text]{
 width:90px;
}
.gameBoxStyle input:hover{
 background-color: #e2fff2;
}
.gameBoxStyle #txtValue{
 color:red;
}
在html中拖入了两个文件,一个是贪吃蛇组件,另一个是UIScript.js,其中的代码如下:
/**
 * Created by tjm on 8/16/2017.
 */
var btnStart=document.getElementById("btnStart");
var gameSnake = new SnakeGame("gameScense",{
 snakeColor:"red",
 directionKey:[68,83,65,87],
 pauseKey:81,
 onCountChange:function(count){
  var txtScore=document.getElementById("txtValue");
  txtScore.innerText=count.toString( );
  txtScore=null;
 },
 onGameOver:function (status) {
  alert("游戏结束");
 }
});
var gameSnake1 = new SnakeGame("gameScense1",{
 snakeColor:"green",
 size:20,
 onCountChange:function(count){
  var txtScore=document.getElementById("txtValue1");
  txtScore.innerText=count.toString();
  txtScore=null;
 },
 onGameOver:function (status) {
  alert("游戏结束");
 }
});
btnStart.onclick=function(event){
  gameSnake.startGame();
  gameSnake1.startGame();
  btnStart.blur();
}
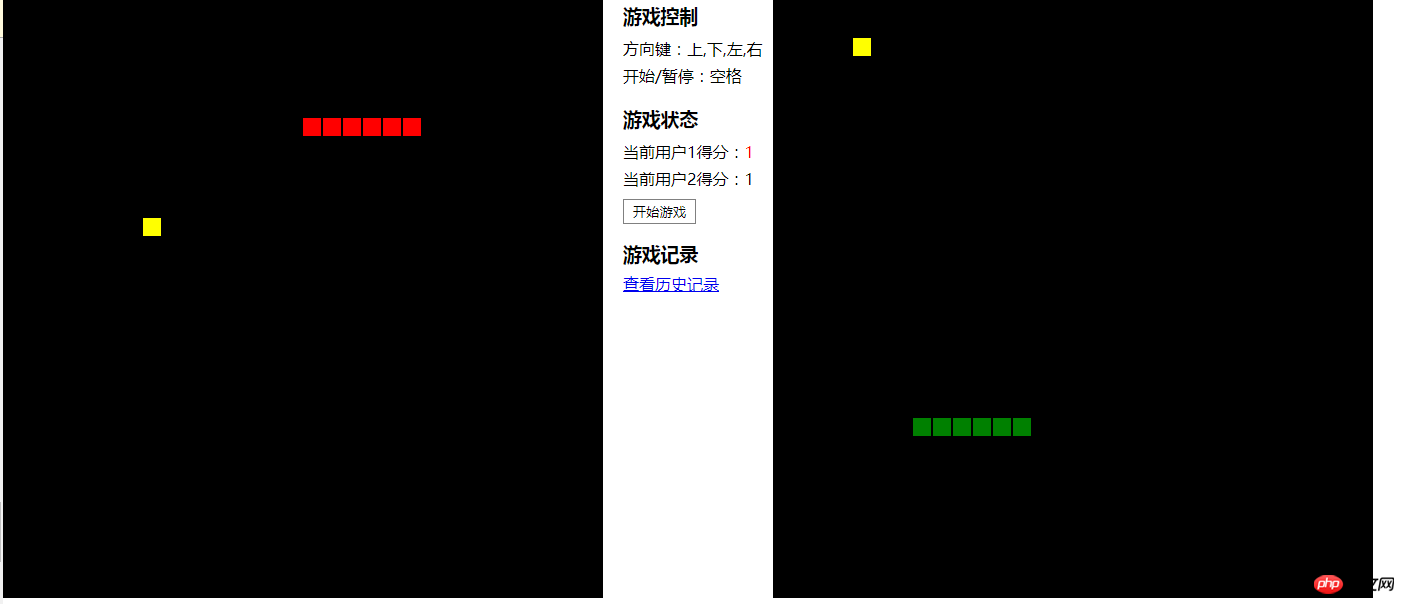
实例化两个SnakeGame对象,一个对象使用默认的上下左右键和空格键作为方向键和暂停键,而另一个使用了,W、A、S、D 以及 Q 作为方向键和暂停键。效果如下:

嗯哼,没错,完美实现了。使用SnakeGame这个组件,创建贪吃蛇游戏就是如此的简单。下面简单介绍一下,组件的实现方式。
3贪吃蛇组件实现方式
在上一节中就提到过,没有采用过道哥拉斯的设计模式,下面给出贪吃蛇设计结构。具体的源代码,可以在后面的链接中进行下载。代码如下:
/**
 * Created by tjm on 8/18/2017.
 */
var SnakeGame = function () {
 /*蛇块和食物组件类*/
 function SnakeBlock(row,col){
  this.row=row;
  this.col=col;
 }
 SnakeBlock.prototype.draw = function(graphic,color,size){
  graphic.fillStyle=color;
  graphic.fillRect(size*this.col,size*this.row,size-2,size-2);
 }
 SnakeBlock.prototype.clearDraw = function(graphic,color,size){
  graphic.fillStyle=color;
  graphic.fillRect(size*this.col,size*this.row,size,size);
 }
 SnakeBlock.prototype.equal = function(snakeBlock){
  if(snakeBlock.row==this.row && snakeBlock.col==this.col){
   return true;
  }else{
   return false;
  }
 }
 /*贪吃蛇组件类*/
 function SnakeGame(gameScenseId, gameConfigObj) {
  // 私有属性
  var gameScense = document.getElementById(gameScenseId);
  var graphic = gameScense.getContext("2d");
  var count = 0;
  var snake;
  var curFood;
  var runId;
  var isMoved = false;//方向改变后,如果没有移动则方向键暂时失效。
  var gameStatus = false;
  var curDirection = 1;
  var size = gameConfigObj.size || 20;
  var rowCount = gameConfigObj.rowCount || 30;
  var colCount = gameConfigObj.colCount || 30;
  var snakeColor = gameConfigObj.snakeColor || "green";
  var foodColor = gameConfigObj.foodColor || "yellow";
  var scenseColor = gameConfigObj.scenseColor || "black";
  var directionKey = gameConfigObj.directionKey || [39, 40, 37, 38];
  var pauseKey = gameConfigObj.pauseKey || 32;
  var levelCount = gameConfigObj.levelCount || 10;
  var curSpeed = gameConfigObj.curSpeed || 200;
  //公开事件
  var onCountChange = gameConfigObj.onCountChange || null; //带有一个参数
  var onGamePause = gameConfigObj.onGamePause || null; //带有一个参数
  var onGameOver = gameConfigObj.onGameOver || null;
  //判断
  if(gameScense.width != size*rowCount || gameScense.height != size*colCount){
   throw "场景大小不等于行列大小*蛇块大小";
  }
  //特权方法
  this.startGame = startGame;
  this.changeGameStatus = changeGameStatus;
  //注册 dom 键盘事件
  var preFunc = document.onkeydown;
  document.onkeydown = function (e) {
   var key = (e || event).keyCode;
   handleKeyInput(key);
   if (typeof preFunc == "function") {
    preFunc(e);
   }
  }
  //私有方法
  /*初始化蛇身*/
  function initSnake(){
   ···
  }
  /*绘制场景背景色*/
  function initScense(){
   ···
  }
  /*产生食物*/
  function genFood(){
   ···
  }
  /*吃食物*/
  function eatFood(snakeHead){
   ···
  }
  /*判断游戏是否结束*/
  function gameOver(){
   ···
  }
  /*蛇移动*/
  function snakeMove(){
   ···
  }
  function changeSpeed(){
   ···
  }
  function handleKeyInput(key){
   ···
  }
  function initGame(){
   ···
  }
  function triggerEvent(callback,argument){
   ···
  }
  function runGame(){
   ···
  }
  function pauseGame() {
   ···
  }
  function changeGameStatus(){
   ···
  }
  function startGame(){
   ···
  }
 }
 return SnakeGame; //最后返回一个组件构造函数
}();
上面有一个很重要的地方,就是键盘注册的代码,单独列出来分析一下。
var preFunc = document.onkeydown;
  document.onkeydown = function (e) {
   var key = (e || event).keyCode;
   handleKeyInput(key);
   if (typeof preFunc == "function") {
    preFunc(e);
   }
  }
该段代码的逻辑是,首先判断在 document 上是否注册了onkeydown 事件,如果注册了该事件,则保存所引用的事件处理程序,然后重置onkeydown事件程序,然后在新的事件处理程序中,调用先前的事件处理程序,这样就实现了事件触发后,调用所有监听该事件处理程序,而不是直接覆盖。
另外关于贪吃蛇的设计逻辑,可以参看我另外一篇文章,个人觉得讲的非常详细了,文章:基于控制台实现贪吃蛇游戏
3 小结
通过这次贪吃蛇组件的设计,对 js 的模块化设计稍微了解了一下,但是,我也不知道上文所实现的贪吃蛇模块有哪些缺陷,希望有大神看到这篇文章,能给一些指导。当然了,该组件还可以进行进一步的扩展,比如将游戏的方块,替换成图片。
The above is the detailed content of Example code for implementing Snake widget in JavaScript. For more information, please follow other related articles on the PHP Chinese website!
Related articles
See more- An in-depth analysis of the Bootstrap list group component
- Detailed explanation of JavaScript function currying
- Complete example of JS password generation and strength detection (with demo source code download)
- Angularjs integrates WeChat UI (weui)
- How to quickly switch between Traditional Chinese and Simplified Chinese with JavaScript and the trick for websites to support switching between Simplified and Traditional Chinese_javascript skills

