
Home >Web Front-end >JS Tutorial >JavaScript Tutorial: Implementation of Carousel Chart Effect on Mobile Terminal
JavaScript Tutorial: Implementation of Carousel Chart Effect on Mobile Terminal
- 巴扎黑Original
- 2017-08-17 16:08:321449browse
This article mainly introduces the js implementation of the carousel effect on the mobile terminal in detail. It has a certain reference value. Interested friends can refer to it.
The example of this article is to share with you the mobile terminal. The specific code for the carousel effect display is for your reference. The specific content is as follows
<!DOCTYPE html>
<html lang="en">
<head>
<meta charset="UTF-8">
<meta name="viewport" content="width=device-width, user-scalable=no, initial-scale=1.0, maximum-scale=1.0, minimum-scale=1.0">
<title>Document</title>
<link rel="stylesheet" href="reset.css" rel="external nofollow" >
<style>
html,body{
width:100%;
overflow-x:hidden;
}
html{
font-size:100px;
}
.banner{
position:relative;
height:3rem;
overflow:hidden;
}
.banner .wrapper{
position:absolute;
top:0;
left:-100%;
height:100%;
}
.banner .wrapper .slide{
float:left;
height:100%;
background:#eee;
}
.banner .wrapper .slide img{
display:none;
width:100%;
height:100%;
}
.tip{
position:absolute;
left:0;
bottom:.1rem;
width:100%;
height:.16rem;
text-align:center;
}
.tip li{
display:inline-block;
margin:0 .03rem;
width:.16rem;
height:.16rem;
background:rgba(0,0,0,0.2);
border-radius:50%;
vertical-align:top;
}
.tip li.bg{
background:#007aff;
}
</style>
</head>
<body>
<section class='banner'>
<p class='wrapper'>
<!--实现无缝滚动:把第一张放末尾 最后一张放开头-->
<p class='slide'><img src="img/banner5.jpg" alt=""></p>
<p class='slide'><img src="img/banner1.jpg" alt=""></p>
<p class='slide'><img src="img/banner2.jpg" alt=""></p>
<p class='slide'><img src="img/banner3.jpg" alt=""></p>
<p class='slide'><img src="img/banner4.jpg" alt=""></p>
<p class='slide'><img src="img/banner5.jpg" alt=""></p>
<p class='slide'><img src="img/banner1.jpg" alt=""></p>
</p>
<ul class='tip'>
<li class='bg'></li>
<li></li>
<li></li>
<li></li>
<li></li>
</ul>
</section>
<script charset='utf-8' src='zepto.min.js'></script>
<script charset='utf-8'>
//REM
~function(){
document.documentElement.style.fontSize = document.documentElement.clientWidth/640*100 + 'px';
}()
//页面中如果自己使用了TOUCH MOVE等原生事件,需要把浏览器的默认行为阻止掉
$(document).on('touchmove touchstart touchend',function(ev){
ev.preventDefault();
})
//BANNER
var bannerRender = (function(){
var winW = document.documentElement.clientWidth,
maxL = 0,
minL = 0;
var $banner = $('.banner'),
$wrapper = $banner.children('.wrapper'),
$slideList = $wrapper.children('.slide'),
$imgList = $wrapper.find('img');
var step = 1,
count = 0,
followTimer = null;
//public fn
function isSwipe(strX,strY,endX,endY){
return Math.abs(endX - strX)>30 || Math.abs(endY - strY) > 30)
}
function swipeDir(strX,strY,endX,endY){
return Math.abs(endX - strX)>=Math.abs(endY - strY)?(endX - strX>0?'right':'left'):(endY - strY>0?'down':'up');
}
//touch start
function dragStart(ev){
var point = ev.touches[0];
$wrapper.attr({
strL:parseFloat($wrapper.css('left')),
strX:point.clientX,
strY:point.clientY,
isMove:false,
dir:null,
changeX:null
})
}
//touch move
function dragIng(ev){
var point = ev.touches[0];
var endX = point.clientX,
endY = point.clientY,
strX = parseFloat($wrapper.attr('strX')),
strY = parseFloat($wrapper.attr('strY')),
strL = parseFloat($wrapper.attr('strL')),
changeX = endX - strX;
//计算出是否滑动以及滑动的方向:只有是左右滑动才进行处理
var isMove = isSwipe(strX,strY,endX,endY),
dir = swipeDir(strX,strY,endX,endY);
if(isMove && /(left|right)/i.test(dir)){
$wrapper.attr({
isMove:true,
dir:dir,
changeX:changeX
});
var curL = strL+changeX;
curL = curL>maxL?maxL:(curL<minL?minL:curL);
$wrapper[0].style.webkitTransitionDuration = '0s';
$wrapper.css('left',curL);
}
}
//touch end
function dragEnd(){
var isMove = $wrapper.attr('isMove'),
dir = $wrapper.attr('dir'),
changeX = parseFloat($wrapper.attr('changeX'));
if(isMove && /(left|right)/i.test(dir)){
if(Math.abs(changeX)>=winW/2){
if(dir==='left'){
step++;
}else{
step--;
}
}
}
$wrapper[0].style.webkitTransitionDuration = '.2s';
$wrapper.css('left',-step*winW);
lazyImg();
//动画运动过程中,我们监听一个定时器:动画运动完成判断当前是否运动到边界,如果运动到达了边界,我们让其立马回到自己的真实位置
window.clearTimeout(followTimer)
followTimer = window.setTimeout(function(){
if(step===0){
$wrapper[0].style.webkitTransitionDuration = '0s';
$wrapper.css('left',-(count-2)*winW);
step = count-2;
lazyImg();
}
if(step===count-1){
$wrapper[0].style.webkitTransitionDuration = '0s';
$wrapper.css('left',-winW);
step = 1;
lazyImg();
}
window.clearTimeout(followTimer)
},200)
}
//图片延迟加载,让当前的活动块及相邻的两个活动块进行加载
function lazyImg(){
var $cur = $slideList.eq(step),
$tar = $cur.add($cur.prev()).add($cur.next());
$tar.each(function(index,item){
var $img = $(item).children('img');
if($img.attr('isLoad')==='true'){
//ATTR存储或者获取的属性值都是一个字符串,如果当前的图片已经加载过了,我们就不需要重新的加载了
return;
}
var oImg = new Image;
oImg.src = $img.attr('src');
oImg.onload = function(){
$img.attr({
src:this.src,
isLoad:true
}).css('display','block')
oImg = null;
}
})
}
return{
init:function(){
//init css style
count = $slideList.length;
minL = -($slideList.length-1)*winW;
$wrapper.css('width',$slideList.length*winW);
$slideList.css('width',winW);
//lazy img
lazyImg();
$banner.on('touchstart',dragStart).on('touchmove',dragIng).on('touchend',dragEnd)
}
}
})()
bannerRender.init();
</script>
</body>
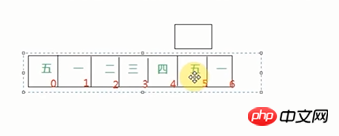
</html>The boundary judgment logic can refer to the figure below
The above is the detailed content of JavaScript Tutorial: Implementation of Carousel Chart Effect on Mobile Terminal. For more information, please follow other related articles on the PHP Chinese website!
Statement:
The content of this article is voluntarily contributed by netizens, and the copyright belongs to the original author. This site does not assume corresponding legal responsibility. If you find any content suspected of plagiarism or infringement, please contact admin@php.cn
Previous article:Detailed introduction to the basics of JavaScript mobile events and a summary of commonly used event librariesNext article:Detailed introduction to the basics of JavaScript mobile events and a summary of commonly used event libraries
Related articles
See more- An in-depth analysis of the Bootstrap list group component
- Detailed explanation of JavaScript function currying
- Complete example of JS password generation and strength detection (with demo source code download)
- Angularjs integrates WeChat UI (weui)
- How to quickly switch between Traditional Chinese and Simplified Chinese with JavaScript and the trick for websites to support switching between Simplified and Traditional Chinese_javascript skills