Home >Web Front-end >JS Tutorial >Detailed explanation of ListView usage
Detailed explanation of ListView usage
- 巴扎黑Original
- 2017-08-06 15:39:583317browse
This article mainly introduces the usage of ReactNative ListView. The editor thinks it is quite good. Now I will share it with you and give it as a reference. Let’s follow the editor and take a look.
I’ve been learning ReactNative recently. This article introduces the usage of ReactNative ListView. Share it with everyone and leave a note for yourself
ListView
In Android, if we need to display a ListView, two items are indispensable. The first is the data source of the ListView, and the second is the style of each item in the ListView. Same as in ReactNative. First, let's look at a simple example:
  constructor(props) {
   super(props);
   var ds = new ListView.DataSource({rowHasChanged: (r1, r2) => r1 !== r2});
   this.state = {
    dataSource: ds.cloneWithRows(['row 1', 'row 2']),
   };
  },

  render() {
   return (
    <ListView
     dataSource={this.state.dataSource}
     renderRow={(rowData) => <Text>{rowData}</Text>}
    />
   );
  },
In render(), we render a ListView. In the properties of ListView, we specify dataSource and renderRow. This The two properties represent the ListView's data source and each row rendered.
dataSource
If we want to create a data source, the most basic method is to create a ListView.DataSource data source and then pass it an array through the cloneWithRows method.
The rowHasChanged function provided to the data source can tell the ListView whether it needs to redraw a row of data, that is, whether the data has changed, that is, when the interface needs to be redrawn, it will be judged. If the row in the previous page is changed If the data has not changed, it will not be redrawn, otherwise it will be redrawn.
As shown in the above code, when we set the data to the data source, we directly pass in an array. Of course, we can also use a method to obtain the data and call the method when setting the data:
  constructor(props){
    super(props);
    var ds = new ListView.DataSource({rowHasChanged: (r1, r2) => r1 !== r2});
    this.state = {
      dataSource: ds.cloneWithRows(this._genRows()),
    };
  }

  _genRows(){
    const dataBlob = [];
    for(let i = 0 ; i< 200 ; i ++ ){
      dataBlob.push("aa"+i);
    }
    return dataBlob;
  }
Obtaining data through methods makes it easier for us to perform some logical processing.
renderRow
(rowData, sectionID, rowID, highlightRow) => renderable
This attribute needs to be passed in a method, which is as shown above, it will accept it from the data source A piece of data, as well as the ID of it and the section it is in, returns a renderable component to render this row of data. By default, the data in the parameter is the data itself put into the data source, but some conversions can also be provided. device.
If a row is being highlighted (by calling the highlightRow function), the ListView will be notified accordingly. When a row is highlighted, the dividing lines on either side of it are hidden. The highlighted state of a row can be reset by calling highlightRow(null).
  _renderRow(rowData, sectionID, rowID){
    return (
        <View>
          <Text>{"rowData:"+rowData+"  rowId:"+rowID}</Text>
        </View>
      );
  }

  render() {
   return (
    <ListView
     dataSource={this.state.dataSource}
     renderRow={this._renderRow}
    />
   );
  },
Because the method in renderRow will automatically accept a piece of data from the data source, we can implement it by calling external methods, and only need Just pass in the data we need to get from the data source in the parameters of the external method, as shown in the above code.
When we need to implement a more complex layout, we can also import external components as the style of each row of the ListView.
For example, if we have customized a component Item_MyListView, we need to import it into the current component through import at the beginning of the file:
import Item_MyListView from './Item_MyListView';
Then we can directly use the component we imported through the imported name:
  _renderRow(rowData, sectionID, rowID){
    return (
      <TouchableOpacity onPress={this._pressRow}>
        <View>
          <Text>{"rowData:"+rowData+"  rowId:"+rowID}</Text>
          <Item_MyListView></Item_MyListView>
        </View>
      </TouchableOpacity>
      );
  }
Click on ListView
When we need to When adding a click event to each row of the ListView, you only need to wrap it with a layer of TouchableOpacity or TouchableHighlight and define the onPress method.
The following code is shown:
  _pressRow(rowID){
    alert("hellow"+rowID);
  }

  _renderRow(rowData, sectionID, rowID){
    return (
      <TouchableOpacity onPress={()=>this._pressRow(rowID)}>
        <View>
          <Text>{"rowData:"+rowData+"  rowId:"+rowID}</Text>
          <Item_MyListView info={rowData}></Item_MyListView>
        </View>
      </TouchableOpacity>
      );
  }
It should be noted that when calling _renderRow in the renderRow attribute of ListView, you must bind this, otherwise in onPress The this will point to the error, as shown below:
Copy code The code is as follows:
1661fd8da8487d9518b296f770e6a5bc
The complete code is as follows:
import React,{
  View,
  Text,
  TouchableOpacity,
  ListView,
} from 'react-native';

import Item_MyListView from './Item_MyListView';

export default class SecondPageComponent extends React.Component{

  constructor(props){
    super(props);
    var ds = new ListView.DataSource({rowHasChanged: (r1, r2) => r1 !== r2});
    this.state = {
      dataSource: ds.cloneWithRows(this._genRows()),
    };


  }

  _genRows(){
    const dataBlob = [];
    for(let i = 0 ; i< 200 ; i ++ ){
      dataBlob.push("aa"+i);
    }
    return dataBlob;
  }

  _pressRow(rowID){
    alert("hellow"+rowID);
  }

  _renderRow(rowData, sectionID, rowID){
    return (
      <TouchableOpacity onPress={()=>this._pressRow(rowID)}>
        <View>
        <Text>{"rowData:"+rowData+"  rowId:"+rowID}</Text>
        <Item_MyListView info={rowData}></Item_MyListView>
        </View>
      </TouchableOpacity>
      );
  }


  render(){
    return (
      <View style={{flex:1,}}>
        <ListView dataSource={this.state.dataSource} renderRow={this._renderRow.bind(this)}/>
      </View>
      );
  }
}
Where Item_MyListView It's just a component defined arbitrarily. It has no practical significance and will not be displayed again.
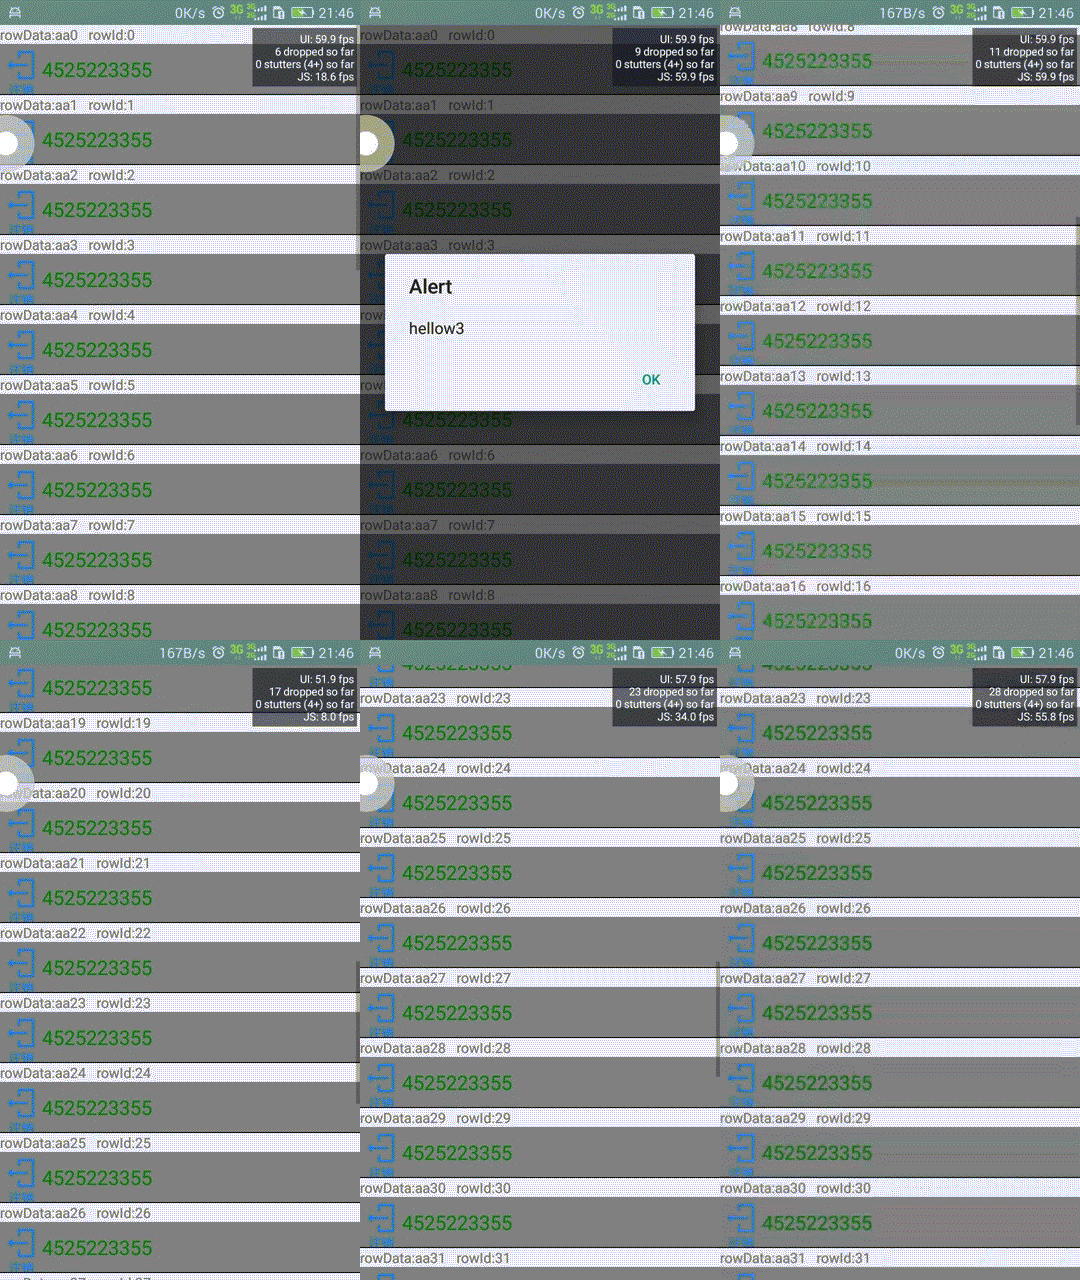
The final effect is as shown below:

The above is the detailed content of Detailed explanation of ListView usage. For more information, please follow other related articles on the PHP Chinese website!
Related articles
See more- An in-depth analysis of the Bootstrap list group component
- Detailed explanation of JavaScript function currying
- Complete example of JS password generation and strength detection (with demo source code download)
- Angularjs integrates WeChat UI (weui)
- How to quickly switch between Traditional Chinese and Simplified Chinese with JavaScript and the trick for websites to support switching between Simplified and Traditional Chinese_javascript skills

