Home >Operation and Maintenance >Linux Operation and Maintenance >Basic introduction to ssh and SSH service (including tunnel content)
Basic introduction to ssh and SSH service (including tunnel content)
- 零下一度Original
- 2017-07-21 13:47:225806browse
1.1 Basic knowledge of asymmetric encryption
Symmetric encryption: Encryption and decryption use the same algorithm, as long as decryption and encryption are provided Decryption can be completed with a consistent password. For example, QQ login password, bank card password, just make sure the password is correct.
Asymmetric encryption: Encrypt and decrypt using public key and private key. Content encrypted with the public key can be decrypted using the private key, and content encrypted with the private key can be decrypted using the public key. Generally, public key encryption and private key decryption are used, but this is not absolutely the case. For example, when a CA signs a certificate, it uses its own private key for encryption. In the SSH service introduced next, although it is always recommended to distribute public keys, private keys can also be distributed.
So, if A generates (private key A, public key A), and B generates (private key B, public key B), then the asymmetric encryption session between A and B includes:
(1).A distributes his public key A to B. B uses public key A to encrypt the data and sends the encrypted data to A. A will use his private key A to decrypt the data. .
(2).A distributes its public key A to B, and uses its own private key A to encrypt the data, and then B uses the public key A to decrypt the data.
(3).B distributes its public key B to A. A takes the public key B to encrypt the data and sends the encrypted data to B. B will use its own private key B to decrypt it. data.
(4).B distributes its public key B to A, and uses its own private key B to encrypt data, and then A uses public key B to decrypt the data.
Although theoretically supports 4 scenarios, during the authentication phase of SSH, SSH only supports the server retaining the public key and the client retaining the private key, So there are only two ways: the client generates a key pair and distributes the public key to the server; the server generates a key pair and distributes the private key to the client. However, for security and convenience, the client generally generates the key pair and distributes the public key. Examples of these two distribution methods are given below.
1.2 SSH Overview
(1).SSH is a security protocol on the transport layer and application layer. It can only ensure the security of the connection by encrypting the sessions between both parties. When the ssh connection is successful, a session between the client and the server will be established. The session is encrypted, and all subsequent communications between the client and the server will be transmitted through the session.
(2). The daemon process of the SSH service is sshd, which listens on port 22 by default.
(3). All ssh client tools, including ssh commands, scp, sftp, ssh-copy-id and other commands, rely on ssh connections to complete tasks. That is to say, they are all connected to port 22 of the server, but after being connected, the relevant commands to be executed are converted and transmitted to the remote host for execution by the remote host.
(4) The .ssh client command (ssh, scp, sftp, etc.) reads two configuration files: the global configuration file /etc/ssh/ssh_config and the user configuration file ~/.ssh/config. In fact, configuration options can also be passed on the command line. The priority they take effect is: command line configuration options > ~/.ssh/config > /etc/ssh/ssh_config.
(5).ssh involves two verifications: host verification and user authentication. Through host authentication, and then through user authentication on the host, the user's identity can be uniquely determined. There can be many users on a host, so each host only needs to be authenticated once, but each user on the host needs to be authenticated individually.
(6).ssh supports multiple authentications, the most commonly used ones are password authentication mechanism and public key authentication mechanism. The public key authentication mechanism is almost necessary to achieve mutual trust between two machines in some scenarios. Although the above two authentication mechanisms are commonly used, the default order during authentication is gssapi-with-mic, hostbased, publickey, keyboard-interactive, password. Note that the host authentication mechanism hostbased is not host authentication. Since host authentication is rarely used (the authentication file it reads is /etc/hosts.equiv or /etc/shosts.equiv), it is rarely seen on the network. Related introduction. In general, changing the authentication order by using the PreferredAuthentications command in the ssh configuration file (note that it is not the sshd configuration file) can be regarded as a way to improve the efficiency of verification.
(7). The ssh client actually has many very powerful functions, such as port forwarding (tunnel mode), proxy authentication, connection sharing (connection multiplexing), etc.
(8). The ssh server configuration file is /etc/ssh/sshd_config. Note that it is distinguished from the client’s global configuration file /etc/ssh/ssh_config.
(9). The most important point is that when ssh logs in, it will request the allocation of a pseudo terminal . However, some authentication programs such as sudo can prohibit this type of terminal allocation, causing the ssh connection to fail. For example, when you use ssh to execute the sudo command, sudo will verify whether you want to assign a terminal to ssh.
1.3 SSH authentication process analysis
If you connect from client A (172.16.10.5) to server B (172.16.10.6), it will include The two processes of host authentication and user identity authentication take the RSA asymmetric encryption algorithm as an example.
[root@xuexi ~]# ssh 172.16.10.6
The sshd service program is first started on server B, that is, the ssh service is enabled and port 22 is opened (default).
1.3.1 Host verification process
When client A wants to connect to B, it will first perform the host verification process, that is, determine whether host B has ever Connected.
The way to determine is to read the ~/.ssh/known_hosts file and the /etc/ssh/known_hosts file, and search for the host information of 172.16.10.6 (the host information is called the host key , indicating the host identity). If the host key corresponding to the address is not found, ask whether to save the host key sent by host B. If the host key of the address is found, compare the host key with the host key sent by host B. If If they are exactly the same, it means that host A has saved the host key of host B before. There is no need to save it again and it will go directly to the next process - authentication. If it is not exactly the same, it will prompt whether to save the host key currently used by host B.
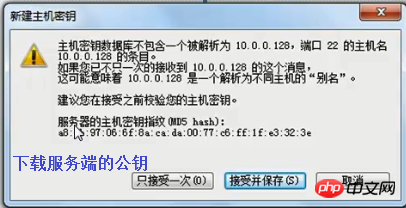
The process of asking whether to save the host key is as follows:
[root@xuexi ~]# ssh 172.16.10.6 The authenticity of host '172.16.10.6 (172.16.10.6)' can't be established.RSA key fingerprint is f3:f8:e2:33:b4:b1:92:0d:5b:95:3b:97:d9:3a:f0:cf.
Are you sure you want to continue connecting (yes/no)? yes
Or use the graphical interface ssh client on the windows side When using the terminal tool:
#Before explaining the authentication process, let’s take a look at the format of the known_hosts file. Take ~/.ssh/known_hosts as an example.
[root@xuexi ~]# cat ~/.ssh/known_hosts172.16.10.6 ssh-rsa AAAAB3NzaC1yc2EAAAADAQABAAABAQC675dv1w+GDYViXxqlTspUHsQjargFPSnR9nEqCyUgm5/32jXAA3XTJ4LUGcDHBuQ3p3spW/eO5hAP9eeTv5HQzTSlykwsu9He9w3ee+TV0JjBFulfBR0weLE4ut0PurPMbthE7jIn7FVDoLqc6o64WvN8LXssPDr8WcwvARmwE7pYudmhnBIMPV/q8iLMKfquREbhdtGLzJRL9DrnO9NNKB/EeEC56GY2t76p9ThOB6ES6e/87co2HjswLGTWmPpiqY8K/LA0LbVvqRrQ05+vNoNIdEfk4MXRn/IhwAh6j46oGelMxeTaXYC+r2kVELV0EvYV/wMa8QHbFPSM6nLz
In this file, each line has a host key, and the beginning of the line is the host name, which is the index when searching for host key, the content after the host name is the host key part. Taking this file as an example, it indicates that client A once tried to connect to host B at 172.16.10.6 and saved the host key of host B. The next time it connects to host B, it will search for the host key of host B and match it with 172.16. Compare the host key sent by 10.6. If it matches, it means that the host key is indeed the host key currently used by 172.16.10.6. If it cannot match, it means that 172.16.10.6 has modified the host key, or the host key in this file has been modified. The host key has been modified.
So where is the host key currently used by host B stored? In the /etc/ssh/ssh_host* file, these files are rebuilt when the sshd service program of the server (here, host B) starts. Taking the rsa algorithm as an example, it is stored in /etc/ssh/ssh_host_rsa_key and /etc/ssh/ssh_host_rsa_key.pub. The public key file /etc/ssh/ssh_host_rsa_key.pub stores the host key.
[root@xuexi ~]# cat /etc/ssh/ssh_host_rsa_key.pub # 在主机B上查看ssh-rsa AAAAB3NzaC1yc2EAAAADAQABAAABAQC675dv1w+GDYViXxqlTspUHsQjargFPSnR9nEqCyUgm5/32jXAA3XTJ4LUGcDHBuQ3p3spW/eO5hAP9eeTv5HQzTSlykwsu9He9w3ee+TV0JjBFulfBR0weLE4ut0PurPMbthE7jIn7FVDoLqc6o64WvN8LXssPDr8WcwvARmwE7pYudmhnBIMPV/q8iLMKfquREbhdtGLzJRL9DrnO9NNKB/EeEC56GY2t76p9ThOB6ES6e/87co2HjswLGTWmPpiqY8K/LA0LbVvqRrQ05+vNoNIdEfk4MXRn/IhwAh6j46oGelMxeTaXYC+r2kVELV0EvYV/wMa8QHbFPSM6nLz
Found that the content of the /etc/ssh/ssh_host_rsa_key.pub file is exactly the same as the host key part of the host in ~/.ssh/known_hosts, except ~ In addition to the host key part, there is an additional host name in /.ssh/known_hosts, which is the index when searching for the host.
To sum up, In the host verification phase, the server holds the private key, and the client holds the public key from the server. Note that this is the opposite of who holds the key during the authentication phase.
Actually, ssh does not directly compare the host key, because the host key is too long and the comparison efficiency is low. So ssh converts the host key into a host key fingerprint, and then compares the host key fingerprints on both sides. The fingerprint format is as follows:
[root@xuexi ~]# ssh 172.16.10.6 The authenticity of host '172.16.10.6 (172.16.10.6)' can't be established.RSA key fingerprint is f3:f8:e2:33:b4:b1:92:0d:5b:95:3b:97:d9:3a:f0:cf.
Are you sure you want to continue connecting (yes/no)? yes
The fingerprint of the host key can be calculated by ssh-kegen. For example, the following are the host key fingerprints saved by host A (172.16.10.5), and the fingerprints of the host key currently used by host B (172.16.10.6). It can be seen that they are exactly the same.
[root@xuexi ~]# ssh-keygen -l -f ~/.ssh/known_hosts2048 f3:f8:e2:33:b4:b1:92:0d:5b:95:3b:97:d9:3a:f0:cf 172.16.10.6 (RSA)

[root@xuexi ~]# ssh-keygen -l -f /etc/ssh/ssh_host_rsa_key2048 f3:f8:e2:33:b4:b1:92:0d:5b:95:3b:97:d9:3a:f0:cf   (RSA)
In fact, ssh also supports host key fuzzy comparison, which converts the host key into a graphical fingerprint. In this way, graphic results that differ greatly can be easily compared. The reason why it is called a fuzzy comparison is that ssh may misjudge very similar graphical fingerprints. The graphical fingerprint is generated as follows: Just add a "-v" option to the above command to enter verbose mode.
[root@xuexi ~]# ssh-keygen -lv -f ~/.ssh/known_hosts2048 f3:f8:e2:33:b4:b1:92:0d:5b:95:3b:97:d9:3a:f0:cf 172.16.10.6 (RSA)+--[ RSA 2048]----+
|                 |
|                 |
|           .     |
|          o      |
|        S. . +   |
|      . +++ + .  |
|       B.+.= .   |
|      + B.  +.   |
|       o.+.  oE  |
+-----------------+
1.3.2 身份验证过程
主机验证通过后,将进入身份验证阶段。SSH支持多种身份验证机制,它们的验证顺序如下:gssapi-with-mic,hostbased,publickey,keyboard-interactive,password,但常见的是密码认证机制(password)和公钥认证机制(public key)。当公钥认证机制未通过时,再进行密码认证机制的验证。这些认证顺序可以通过ssh配置文件(注意,不是sshd的配置文件)中的指令PreferredAuthentications改变。
如果使用公钥认证机制,客户端A需要将自己生成的公钥(~/.ssh/id_rsa.pub)发送到服务端B的~/.ssh/authorized_keys文件中。当进行公钥认证时,客户端将告诉服务端要使用哪个密钥对,并告诉服务端它已经访问过密钥对的私钥部分~/.ssh/id_rsa(不能直接提供给服务端匹配检测,因为私钥不能泄露),然后服务端将检测密钥对的公钥部分,判断该客户端是否允许通过认证。如果认证不通过,则进入下一个认证机制,以密码认证机制为例。
当使用密码认证时,将提示输入要连接的远程用户的密码,输入正确则验证通过。
1.3.3 验证通过
当主机验证和身份验证都通过后,分两种情况:直接登录或执行ssh命令行中给定某个命令。如:
[root@xuexi ~]# ssh 172.16.10.6 [root@xuexi ~]# ssh 172.16.10.6 'echo "haha"'
(1). The former ssh command line does not contain any command parameters, which means that a user on the remote host (here the root user) is used to log in to the remote host 172.16.10.6, so the remote host will allocate a Pseudo terminal and enter the bash environment.
(2). The latter ssh command line has command parameters, which means executing the given command [echo "haha"] on the remote host. Remote commands on the ssh command line are executed through the child process obtained by fork ssh-agent. When the command is executed, the child process disappears, ssh will also exit, and the established sessions and connections will also be closed. (The reason why we need to clearly explain the execution process of remote commands here is to explain the precautions when implementing port forwarding with ssh that will be introduced later)
In fact, after the ssh connection is successful, log in or execute the command line Before entering the command, you can specify the command to be executed remotely. These commands are placed in the ~/.ssh/rc or /etc/ssh/rc file. In other words, the first thing to do after the ssh connection is established is to execute the command remotely. Execute the commands in these two files on the host.
1.4 Distribution of various files
Take host A connecting to host B as an example. Host A is the SSH client and host B is the SSH server.
On the server, host B:
- ##/etc/ssh/sshd_config: ssh service program sshd configuration file.
- /etc/ssh/ssh_host_* : The server public key and private key files generated when the service program sshd is started. Such as ssh_host_rsa_key and ssh_host_rsa_key.pub.
- : The .pub file is the host key when the host verification, which will be written to the client's ~/.ssh/known_hosts file.
- :
, the strict requirements of the private key file are 600. If it is not, the SSHD service may refuse to start.
- ~/.ssh/authorized_keys: Saves the public key from the client based on the public key authentication mechanism. When authenticating based on the public key authentication mechanism, the server will read this file.
On the client, host A:
- ##/etc/ssh/ssh_config : The global configuration file of the client.
- ~/.ssh/config : The client’s user configuration file has a higher priority than the global configuration file. Generally this file does not exist by default. This file has strict permissions
- #: The grid requires only reading/writing permissions to the owner, and completely refuses to write permissions to others.
- ~/.ssh/known_hosts: Save the file of the server host host key during host verification. The file content comes from the ssh_host_rsa_key.pub file on the server side.
- /etc/ssh/known_hosts: Global host key save file. The function is equivalent to ~/.ssh/known_hosts.
- ~/.ssh/id_rsa : Private key generated by the client. Generated by ssh-keygen.
This file strictly requires permissions. When other users have readable permissions for this file,
- ## The file will simply be ignored.
~/.ssh/id_rsa.pub : The paired public key of the private key id_rsa. Not sensitive to permissions. When using the public key authentication mechanism, the content of this file needs to be copied to the
- : ~/.ssh/authorized_keys file on the server.
# This ~/.ssh/RC: The command list is saved. These commands will be executed as soon as the SSH connection to the remote host is successful. After the execution of these commands
- : Start the command in the SSH command line.
- /etc/ssh/rc : The function is equivalent to ~/.ssh/rc.
- 1.5 Brief introduction of configuration files
It is divided into server configuration file/etc/ssh/sshd_config and client configuration file/ etc/ssh/ssh_config (global) or ~/.ssh/config (user).
虽然服务端和客户端配置文件默认已配置项虽然非常少非常简单,但它们可配置项非常多。sshd_config完整配置项参见金步国翻译的sshd_config中文手册,ssh_config也可以参考sshd_config的配置,它们大部分配置项所描述的内容是相同的。
1.5.1 sshd_config
简单介绍下该文件中比较常见的指令。
[root@xuexi ~]# /etc//. # 监听的IP地址。. protocol version /etc//ssh_host_key # SSH 1保存位置/etc// protocol version /etc//ssh_host_rsa_key # SSH 2保存RSA位置/etc///etc//ssh_host_dsa_key # SSH 2保存DSA位置/etc///var/run//var/log//
一般来说,如非有特殊需求,只需修改下监听端口和UseDNS为no以加快主机验证阶段的速度即可。
配置好后直接重启启动sshd服务即可。
[root@xuexi ~]# service sshd restart
1.5.2 ssh_config
需要说明的是,客户端配置文件有很多配置项和服务端配置项名称相同,但它们一个是在连接时采取的配置(客户端配置文件),一个是sshd启动时开关性的设置(服务端配置文件)。例如,两配置文件都有GSSAPIAuthentication项,在客户端将其设置为no,表示连接时将直接跳过该身份验证机制,而在服务端设置为no则表示sshd启动时不开启GSSAPI身份验证的机制。即使客户端使用了GSSAPI认证机制,只要服务端没有开启,就绝对不可能认证通过。
下面也简单介绍该文件。
# Host *                              # Host指令是ssh_config中最重要的指令,只有ssh连接的目标主机名能匹配此处给定模式时,
                                      # 下面一系列配置项直到出现下一个Host指令才对此次连接生效
#   ForwardAgent no
#   ForwardX11 no
#   RhostsRSAAuthentication no
#   RSAAuthentication yes
#   PasswordAuthentication yes     # 是否启用基于密码的身份认证机制
#   HostbasedAuthentication no     # 是否启用基于主机的身份认证机制
#   GSSAPIAuthentication no        # 是否启用基于GSSAPI的身份认证机制
#   GSSAPIDelegateCredentials no
#   GSSAPIKeyExchange no
#   GSSAPITrustDNS no
#   BatchMode no                   # 如果设置为"yes",将禁止passphrase/password询问。比较适用于在那些不需要询问提供密
                                   # 码的脚本或批处理任务任务中。默认为"no"。
#   CheckHostIP yes
#   AddressFamily any
#   ConnectTimeout 0#   StrictHostKeyChecking ask        # 设置为"yes",ssh将从不自动添加host key到~/.ssh/known_hosts文件,
                                     # 且拒绝连接那些未知的主机(即未保存host key的主机或host key已改变的主机)。
                                     # 它将强制用户手动添加host key到~/.ssh/known_hosts中。
                                     # 设置为ask将询问是否保存到~/.ssh/known_hosts文件。
                                     # 设置为no将自动添加到~/.ssh/known_hosts文件。
#   IdentityFile ~/.ssh/identity     # ssh v1版使用的私钥文件
#   IdentityFile ~/.ssh/id_rsa       # ssh v2使用的rsa算法的私钥文件
#   IdentityFile ~/.ssh/id_dsa       # ssh v2使用的dsa算法的私钥文件
#   Port 22                          # 当命令行中不指定端口时,默认连接的远程主机上的端口
#   Protocol 2,1#   Cipher 3des                      # 指定ssh v1版本中加密会话时使用的加密协议
#   Ciphers aes128-ctr,aes192-ctr,aes256-ctr,arcfour256,arcfour128,aes128-cbc,3des-cbc  # 指定ssh v1版本中加密会话时使用的加密协议
#   MACs hmac-md5,hmac-sha1,umac-64@openssh.com,hmac-ripemd160
#   EscapeChar ~#   Tunnel no
#   TunnelDevice any:any
#   PermitLocalCommand no    # 功能等价于~/.ssh/rc,表示是否允许ssh连接成功后在本地执行LocalCommand指令指定的命令。
#   LocalCommand             # 指定连接成功后要在本地执行的命令列表,当PermitLocalCommand设置为no时将自动忽略该配置
                             # %d表本地用户家目录,%h表示远程主机名,%l表示本地主机名,%n表示命令行上提供的主机名,
                             # p%表示远程ssh端口,r%表示远程用户名,u%表示本地用户名。
#   VisualHostKey no         # 是否开启主机验证阶段时host key的图形化指纹
Host *GSSAPIAuthentication yes
如非有特殊需求,ssh客户端配置文件一般只需修改下GSSAPIAuthentication的值为no来改善下用户验证的速度即可,另外在有非交互需求时,将StrictHostKeyChecking设置为no以让主机自动添加host key。
1.6 ssh命令简单功能
此处先介绍ssh命令的部分功能,其他包括端口转发的在后文相关内容中解释,关于连接复用的选项本文不做解释。
语法:
ssh [options] [user@]hostname [command]

参数说明:-b bind_address :在本地主机上绑定用于ssh连接的地址,当系统有多个ip时才生效。-E log_file     :将debug日志写入到log_file中,而不是默认的标准错误输出stderr。-F configfile   :指定用户配置文件,默认为~/.ssh/config。-f              :请求ssh在工作在后台模式。该选项隐含了"-n"选项,所以标准输入将变为/dev/null。-i identity_file:指定公钥认证时要读取的私钥文件。默认为~/.ssh/id_rsa。-l login_name   :指定登录在远程机器上的用户名。也可以在全局配置文件中设置。-N              :显式指明ssh不执行远程命令。一般用于端口转发,见后文端口转发的示例分析。-n              :将/dev/null作为标准输入stdin,可以防止从标准输入中读取内容。ssh在后台运行时默认该项。-p port         :指定要连接远程主机上哪个端口,也可在全局配置文件中指定默认的连接端口。-q              :静默模式。大多数警告信息将不输出。-T              :禁止为ssh分配伪终端。-t              :强制分配伪终端,重复使用该选项"-tt"将进一步强制。-v              :详细模式,将输出debug消息,可用于调试。"-vvv"可更详细。-V              :显示版本号并退出。-o              :指定额外选项,选项非常多。
user@hostname   :指定ssh以远程主机hostname上的用户user连接到的远程主机上,若省略user部分,则表示使用本地当前用户。
                :如果在hostname上不存在user用户,则连接将失败(将不断进行身份验证)。
command         :要在远程主机上执行的命令。指定该参数时,ssh的行为将不再是登录,而是执行命令,命令执行完毕时ssh连接就关闭。
例如,以172.16.10.6主机上的longshuai用户登录172.16.10.6。
[root@xuexi ~]# ssh longshuai@172.16.10.6The authenticity of host '172.16.10.6 (172.16.10.6)' can't be established.ECDSA key fingerprint is 18:d1:28:1b:99:3b:db:20:c7:68:0a:f8:9e:43:e8:b4.Are you sure you want to continue connecting (yes/no)? yes # 主机验证Warning: Permanently added '172.16.10.6' (ECDSA) to the list of known hosts.longshuai@172.16.10.6's password: # 用户验证Last login: Wed Jul 5 12:27:29 2017 from 172.16.10.6
此时已经登录到了172.16.10.6主机上。
[longshuai@xuexi ~]$ hostname -I172.16.10.6
要退出ssh登录,使用logout命令或exit命令即可返回到原主机环境。
使用ssh还可以实现主机跳转,即跳板功能。例如主机B能和A、C通信,但A、C之间不同通信,即A71fb34173e4ee87dab1f85dc1c283a44B71fb34173e4ee87dab1f85dc1c283a44Cfe36de6936ad20bec13da33b00c99495A的情形。如果要从A登陆到C,则可以借助B这个跳板登录到C。此处一个简单示例为:从172.16.10.5登录到172.16.10.6,再以此为基础登录到172.16.100.3上。
[root@xuexi ~]# ssh 172.16.10.6The authenticity of host '172.16.10.6 (172.16.10.6)' can't be established.RSA key fingerprint is f3:f8:e2:33:b4:b1:92:0d:5b:95:3b:97:d9:3a:f0:cf.
Are you sure you want to continue connecting (yes/no)? yes
Warning: Permanently added '172.16.10.6' (RSA) to the list of known hosts.
Last login: Wed Jul  5 12:36:51 2017 from 172.16.10.6
[root@xuexi ~]# ssh 172.16.10.3The authenticity of host '172.16.10.3 (172.16.10.3)' can't be established.ECDSA key fingerprint is 18:d1:28:1b:99:3b:db:20:c7:68:0a:f8:9e:43:e8:b4.
Are you sure you want to continue connecting (yes/no)? yes
Warning: Permanently added '172.16.10.3' (ECDSA) to the list of known hosts.
root@172.16.10.3's password:Last login: Thu Jun 29 12:38:56 2017 from 172.16.10.6
[root@xuexi ~]# hostname -I172.16.10.3 172.16.10.4
同样,在退出时,也是一层一层退出的。
[root@xuexi ~]# exit
logout
Connection to 172.16.10.3 closed.

[root@xuexi ~]# hostname -I
172.16.10.6[root@xuexi ~]# exit
logout
Connection to 172.16.10.6 closed.
注意,由于在借助172.16.10.6当跳板连接到172.16.10.3,所以172.16.10.3的host key是添加到172.16.10.3上而非172.16.10.5上的。
如果在命令行给出了要执行的命令,默认ssh将工作在前台,如果同时给定了"-f"选项,则ssh工作在后台。但尽管是工作在后台,当远程执行的命令如果有消息返回时,将随时可能显示在本地。当远程命令执行完毕后,ssh连接也将立即关闭。
[root@xuexi ~]# ssh 172.16.10.6 'sleep 5'     # 在前台睡眠5秒钟

[root@xuexi ~]# ssh 172.16.10.6 -f 'sleep 5;echo over'   # 在后台睡眠5秒,睡眠完成后echo一段信息
由于第二条命令是放在后台执行的,所以该ssh一建立完成ssh会话就立即返回本地bash环境,但当5秒之后,将在本地突然显示"over"。
ssh执行远程命令默认允许从标准输入中读取数据然后传输到远程。可以使用"-n"选项,使得标准输入重定向为/dev/null。例如:
[root@xuexi ~]# echo haha | ssh 172.16.10.6 'cat'haha

[root@xuexi ~]# ssh 172.16.10.6 'cat' c63e8327f4334772e0cd0645af928a6f> ~/.ssh/authorized_keys"
该命令首先建立ssh连接,并在远程执行"umask 077"临时修改远程的umask值,使得远程创建的目录权限为700,然后判断远程主机上是否有~/.ssh目录,如果没有则创建,最后从标准输入中读取本地公钥文件~/.ssh/id_rsa.pub的内容并将其追加到~/.ssh/authorized_keys文件中。
如果将此命令改为如下命令,使用ssh的"-n"选项,并将追加重定向改为覆盖重定向符号。
[root@xuexi ~]# cat ~/.ssh/id_rsa.pub | ssh -n 172.16.10.6 "umask 077; test -d ~/.ssh || mkdir ~/.ssh ; cat > ~/.ssh/authorized_keys"
该命令的结果是清空远程主机172.16.10.6上的~/.ssh/authorized_keys文件,因为ssh的"-n"选项强行改变了ssh读取的标准输入为/dev/null。
1.7 scp命令及过程分析
scp是基于ssh的远程拷贝命令,也支持本地拷贝,甚至支持远程到远程的拷贝。
scp由于基于ssh,所以其端口也是使用ssh的端口。其实,scp拷贝的实质是使用ssh连接到远程,并使用该连接来传输数据。下文有scp执行过程的分析。
另外,scp还非常不占资源,不会提高多少系统负荷,在这一点上,rsync远不及它。虽然 rsync比scp会快一点,但rsync是增量拷贝,要判断每个文件是否修改过,在小文件众多的情况下,判断次数非常多,导致rsync效率较差,而scp基本不影响系统正常使用。
scp每次都是全量拷贝,在某些情况下,肯定是不及rsync的。
scp [-12BCpqrv] [-l limit] [-o ssh_option] [-P port] [[user@]host1:]src_file ... [[user@]host2:]dest_file

选项说明:-1:使用ssh v1版本,这是默认使用协议版本-2:使用ssh v2版本-C:拷贝时先压缩,节省带宽-l limit:限制拷贝速度,Kbit/s,1Byte=8bit,所以"-l 800"表示的速率是100K/S-o ssh_option:指定ssh连接时的特殊选项,一般用不上。-P port:指定目标主机上ssh端口,大写的字母P,默认是22端口-p:拷贝时保持源文件的mtime,atime,owner,group,privileges-r:递归拷贝,用于拷贝目录。注意,scp拷贝遇到链接文件时,会拷贝链接的源文件内容填充到目标文件中(scp的本质就是填充而非拷贝)-v:输出详细信息,可以用来调试或查看scp的详细过程,分析scp的机制
src_file是源位置,dest_file是目标位置,即将src_file复制到dest_file,其中src_file可以指定多个。由于源位置和目标位置都可以使用本地路径和远程路径,所以scp能实现本地拷贝到远程、本地拷贝到本地、远程拷贝到本地、远程拷贝到另一个远程。其中远程路径的指定格式为"user@hostname:/path",可以省略user,也可以省略":/path",省略":/path"时表示拷贝到目的用户的家目录下。
注意:scp拷贝是强制覆盖型拷贝,当有重名文件时,不会进行任何询问。
例如:
(1).本地拷贝到本地:/etc/fstab-->/tmp/a.txt。
[root@xuexi ~]# scp /etc/fstab /tmp/a.txt
(2).本地到远程:/etc/fstab-->172.16.10.6:/tmp/a.txt。
[root@xuexi ~]# scp /etc/fstab 172.16.10.6:/tmp
fstab                                          100%  805     0.8KB/s   00:00
(3).远程到本地:172.16.10.6:/etc/fstab-->/tmp/a.txt。
[root@xuexi ~]# scp 172.16.10.6:/etc/fstab /tmp/a.txt
fstab                                          100%  501     0.5KB/s   00:00
(4).远程路径1到远程路径2:172.16.10.6:/etc/fstab-->/172.16.10.3:/tmp/a.txt。
[root@xuexi ~]# scp 172.16.10.6:/etc/fstab 172.16.10.3:/tmp/a.txt
fstab                                          100%  501     0.5KB/s   00:00   Connection to 172.16.10.6 closed.
1.7.1 scp拷贝机制分析
scp的拷贝实质是建立ssh连接,然后通过此连接来传输数据。如果是远程1拷贝到远程2,则是将scp命令转换后发送到远程1上执行,在远程1上建立和远程2的ssh连接,并通过此连接来传输数据。
在远程复制到远程的过程中,例如在本地(172.16.10.5)执行scp命令将A主机(172.16.10.6)上的/tmp/copy.txt复制到B主机(172.16.10.3)上的/tmp目录下,如果使用-v选项查看调试信息的话,会发现它的步骤类似是这样的。
# 以下是从结果中提取的过程
# 首先输出本地要执行的命令
Executing: /usr/bin/ssh -v -x -oClearAllForwardings yes -t -l root 172.16.10.6 scp -v /tmp/copy.txt root@172.16.10.3:/tmp

# 从本地连接到A主机
debug1: Connecting to 172.16.10.6 [172.16.10.6] port 22.
debug1: Connection established.

# 要求验证本地和A主机之间的连接
debug1: Next authentication method: password
root@172.16.10.6's password: # 将scp命令行修改后发送到A主机上
debug1: Sending command: scp -v /tmp/copy.txt root@172.16.10.3:/tmp

# 在A主机上执行scp命令
Executing: program /usr/bin/ssh host 172.16.10.3, user root, command scp -v -t /tmp

# 验证A主机和B主机之间的连接
debug1: Next authentication method: password
root@172.16.10.3's password: # 从A主机上拷贝源文件到最终的B主机上
debug1: Sending command: scp -v -t /tmp
Sending file modes: C0770 24 copy.txt
Sink: C0770 24 copy.txt
copy.txt                                                           100%   24     0.0KB/s

# 关闭本地主机和A主机的连接
Connection to 172.16.10.6 closed.
也就是说,远程主机A到远程主机B的复制,实际上是将scp命令行从本地传输到主机A上,由A自己去执行scp命令。也就是说,本地主机不会和主机B有任何交互行为,本地主机就像是一个代理执行者一样,只是帮助传送scp命令行以及帮助显示信息。
其实从本地主机和主机A上的~/.ssh/know_hosts文件中可以看出,本地主机只是添加了主机A的host key,并没有添加主机B的host key,而在主机A上则添加了主机B的host key。

1.8 基于公钥认证机制实现双机互信
在身份验证阶段,由于默认情况下基于公钥认证的机制顺序优先于基于密码认证的机制,所以基于公钥认证身份,就可以免输入密码,即实现双机互信(实际上只是单方向的信任)。
基于公钥认证机制的认证过程在前文已经详细说明过了,如还不清楚,请跳回上文。
1.8.1 实现步骤
以下是实现基于公钥认证的实现步骤:
(1).在客户端使用ssh-keygen生成密钥对,存放路径按照配置文件的指示,默认是在~/.ssh/目录下。
[root@xuexi ~]# ssh-keygen -t rsa    # -t参数指定算法,可以是rsa或dsa
Generating public/private rsa key pair.
Enter file in which to save the key (/root/.ssh/id_rsa):  # 询问私钥保存路径
Enter passphrase (empty for no passphrase):               # 询问是否加密私钥文件
Enter same passphrase again:
Your identification has been saved in /root/.ssh/id_rsa.
Your public key has been saved in /root/.ssh/id_rsa.pub.
如果不想被询问,则可以使用下面一条命令完成:"-f"指定私钥文件,"-P"指定passphrase,或者"-N"也一样。
[root@xuexi ~]# ssh-keygen -t rsa -f ~/.ssh/id_rsa -P ''   # 指定加密私钥文件的密码为空密码,即不加密

[root@xuexi ~]# ssh-keygen -t rsa -f ~/.ssh/id_rsa -N ''   # 同上
查看~/.ssh/目录下私钥的权限。私钥文件有严格的权限要求,当私钥文件的非所有者有可读权限时,将直接忽略该私钥文件导致公钥认证失败。
[root@xuexi ~]# ls -l ~/.sshtotal 12-rw------- 1 root root 1671 Jun 29 00:18 id_rsa # 私钥权限必须600,属主为自己-rw-r--r-- 1 root root 406 Jun 29 00:18 id_rsa.pub-rw-r--r-- 1 root root 393 Jun 29 05:56 known_hosts
(2).将上面生成的公钥使用ssh-copy-id分发(即复制)到远程待信任主机上。
ssh-copy-id用法很简单,只需指定待信任主机及目标用户即可。如果生成的公钥文件,路径不是~/.ssh/id_rsa.pub,则使用"-i"选项指定要分发的公钥。
ssh-copy-id [-i [identity_file]] [user@]machine
例如,将公钥分发到172.16.10.6上的root用户家目录下:
[root@xuexi ~]# ssh-copy-id 172.16.10.6
ssh-copy-id唯一需要注意的是,如果ssh服务端的端口不是22,则需要给ssh-copy-id传递端口号,传递方式为"-p port_num [user@]hostname",例如"-p 22222 root@172.16.10.6"。之所以要如此传递,见下面摘自ssh-copy-id中公钥分发的命令部分。
{ eval "$GET_ID" ; } | ssh $1 "umask 077; test -d ~/.ssh || mkdir ~/.ssh ; cat >> ~/.ssh/authorized_keys && (test -x /sbin/restorecon && /sbin/restorecon ~/.ssh ~/.ssh/authorized_keys >/dev/null 2>&1 || true)" || exit 1
其中"{ eval "$GET_ID" ; }"可理解为待分发的本地公钥内容,"(test -x /sbin/restorecon && /sbin/restorecon ~/.ssh ~/.ssh/authorized_keys >/dev/null 2>&1 || true)"和selinux有关,不用管,所以上述命令简化为:
cat ~/.ssh/id_rsa.pub | ssh $1 "umask 077; test -d ~/.ssh || mkdir ~/.ssh ; cat >> ~/.ssh/authorized_keys || exit 1
可见,ssh-copy-id的所有参数都是存储在位置变量$1中传递给ssh,所以应该将ssh的端口选项"-p port_num"和user@hostname放在一起传递。
通过分析上面的命令,也即知道了ssh-copy-id的作用:在目标主机的指定用户的家目录下,检测是否有~/.ssh目录,如果没有,则以700权限创建该目录,然后将本地的公钥追加到目标主机指定用户家目录下的~/.ssh/authorized_keys文件中。
1.8.2 一键shell脚本
就这样简单的两步就实现了基于公钥的身份认证。当然,不使用ssh-copy-id,也一样能实现上述过程。更便捷地,可以写一个简单的脚本,简化上述两个步骤为1个步骤。
#!/bin/bash

###########################################################
#  description: public key authentication in one step     #
#  author     : 骏马金龙                                   #
#  blog       : http://www.cnblogs.com/f-ck-need-u/       ############################################################

privkey="$HOME/.ssh/id_rsa"publickey="$HOME/.ssh/id_rsa.pub"
 # Usage helpif [ $# -ne 1 ];then
   echo "Usage:$0 [user@]hostname"
   exit 1fi
 # test private/publick key exist or not, and the privilege 600 or notif [ -f "$privkey" -a -f "$publickey" ];then
   privkey_priv=`stat -c %a $privkey`   if [ "$privkey_priv" -ne 600 ];then   echo "The privilege of private key ~/.ssh/id_rsa is not 600, exit now."   exit 1
   fielse
   echo "private/public key is not exist, it will create it"
   ssh-keygen -t rsa -f $privkey -N ''
   echo "keys created over, it located on $HOME/.ssh/"fi
 ssh-copy-id "-o StrictHostKeyChecking=no $1"
 if [ $? -eq 0 ];then
   echo -e "\e[31m publickey copy over \e[0m"else
   echo "ssh can't to the remote host"
   exit 1fi
该脚本将检查本地密钥对~/.ssh/{id_rsa,id_rsa.pub}文件是否存在,还检查私钥文件的权限是否为600。如果缺少某个文件,将自动新创建密钥对文件,最后分发公钥到目标主机。
1.8.3 公钥认证之——服务端分发私钥
对于基于公钥认证的身份验证机制,除了上面客户端分发公钥到服务端的方法,还可以通过分发服务端私钥到客户端来实现。
先理清下公钥认证的原理:客户端要连接服务端,并告诉服务端要使用那对密钥对,然后客户端访问自己的私钥,服务端检测对应的公钥来决定该公钥所对应的客户端是否允许连接。所以对于基于公钥认证的身份验证,无论是客户端分发公钥,还是服务端分发私钥,最终客户端保存的一定是私钥,服务端保存的一定是公钥。
那么服务端分发私钥实现公钥认证是如何实现的呢?步骤如下:假如客户端为172.16.10.5,服务端为172.16.10.6。
(1).在服务端使用ssh-keygen生成密钥对。
[root@xuexi ~]# ssh-keygen -f ~/.ssh/id_rsa -P ''
(2).将上面生成的公钥追加到自己的authorized_keys文件中。
[root@xuexi ~]# ssh-copy-id 172.16.10.6
(3).将私钥拷贝到客户端,且路径和文件名为~/.ssh/id_rsa。
[root@xuexi ~]# scp -p ~/.ssh/id_rsa* 172.16.10.5:/root/.ssh/
注意,第三步中也拷贝了公钥,原因是客户端连接服务端时会比较自己的公钥和私钥是否配对,如果不配对将直接忽略公钥认证机制,所以会要求输入密码。可以将客户端的公钥删除掉,或者将服务端生成的公钥覆盖到客户端的公钥上,都能完成公钥认证。
虽说,服务端分发私钥的方式很少用,但通过上面的步骤,想必对ssh基于公钥认证的身份验证过程有了更深入的理解。
1.9 expect实现ssh/scp完全非交互(批量)
expect工具可以在程序发出交互式询问时按条件传递所需的字符串,例如询问yes/no自动传递y或yes,询问密码时自动传递指定的密码等,这样就能让脚本完全实现非交互。
显然,ssh等客户端命令基于密码认证时总是会询问密码,即使是基于公钥认证,在建立公钥认证时也要询问一次密码。另外,在ssh主机验证时还会询问是否保存host key。这一切都可以通过expect自动回答。
关于expect工具,它使用的是tcl语言,虽说应用在expect上的tcl语言并非太复杂,但这并非本文内容,如有兴趣,可网上搜索或直接阅读man文档。
首先安装expect工具。
[root@xuexi ~]# yum -y install expect
1.9.1 scp自动应答脚本
以下是scp自动问答的脚本。
[root@xuexi ~]# !/usr/bin/ { send用法:autoscp.exp [user@]hostname src_file dest_file [password]
该自动回答脚本可以自动完成主机验证和密码认证,即使已经是实现公钥认证的机器也没问题,因为公钥认证机制默认优先于密码认证,且此脚本的password项是可选的,当然,在没有实现公钥认证的情况下,password是必须项,否则expect实现非交互的目的就失去意义了。
以下是几个示例:
[root@xuexi ~]# ./autoscp.exp 172.16.10.6 /etc/fstab /tmp 123456spawn scp /etc/fstab 172.16.10.6:/tmp
The authenticity of host '172.16.10.6 (172.16.10.6)' can't be established.RSA key fingerprint is f3:f8:e2:33:b4:b1:92:0d:5b:95:3b:97:d9:3a:f0:cf.
Are you sure you want to continue connecting (yes/no)? yes          # 主机验证时询问是否保存host key,自动回答yes
Warning: Permanently added '172.16.10.6' (RSA) to the list of known hosts.
root@172.16.10.6's password:                                        # 密码认证过程,自动回答指定的密码"123456"fstab                                                        100%  805     0.8KB/s   00:00
也可以指定完成的用户名和主机名。
[root@xuexi ~]# ./autoscp.exp root@172.16.10.6 /etc/fstab /tmp 123456spawn scp /etc/fstab root@172.16.10.6:/tmp
root@172.16.10.6's password:         fstab                                 100%  805     0.8KB/s   00:00
1.9.2 ssh-copy-id自动应答脚本
以下是在建立公钥认证机制时,ssh-copy-id拷贝公钥到服务端的自动应答脚本。
[root@xuexi ~]# cat /tmp/autocopy.exp
#!/usr/bin/expect

###########################################################
#  description: scp without interactive                   #
#  author     : 骏马金龙                                   #
#  blog       : http://www.cnblogs.com/f-ck-need-u/       ############################################################

set timeout 10set user_hostname [lindex $argv 0]
set password [lindex $argv 1]
spawn ssh-copy-id $user_hostname
    expect {"(yes/no)?"{
            send "yes\n"expect "*assword:" { send "$password\n"}
        }"*assword:"{
            send "$password\n"}
    }
expect eof
用法:autocopy.exp [user@]hostname password
以下是一个示例,
[root@xuexi ~]# /tmp/autocopy.exp root@172.16.10.6 123456spawn ssh-copy-id root@172.16.10.6The authenticity of host '172.16.10.6 (172.16.10.6)' can't be established.RSA key fingerprint is f3:f8:e2:33:b4:b1:92:0d:5b:95:3b:97:d9:3a:f0:cf.
Are you sure you want to continue connecting (yes/no)? yes      # 主机认证时,自动应答yes
Warning: Permanently added '172.16.10.6' (RSA) to the list of known hosts.
root@172.16.10.6's password:                                    # 密码认证时自动输入密码"123456"Now try logging into the machine, with "ssh 'root@172.16.10.6'", and check in:

  .ssh/authorized_keys

to make sure we haven't added extra keys that you weren't expecting.
如果要实现批量非交互,则可以写一个shell脚本调用该expect脚本。例如:
[root@xuexi ~]# cat /tmp/sci.sh#!/bin/bash

###########################################################
#  description: scp without interactive                   #
#  author     : 骏马金龙                                   #
#  blog       : http://www.cnblogs.com/f-ck-need-u/       ############################################################
passwd=123456               # 指定要传递的密码为123456
user_host=`awk '{print $3}' ~/.ssh/id_rsa.pub`   # 此变量用于判断远程主机中是否已添加本机信息成功
for i in $@
do/tmp/autocopy.exp $i $passwd >&/dev/nullssh $i "grep "$user_host" ~/.ssh/authorized_keys" >&/dev/null  # 判断是否添加本机信息成功if [ $? -eq 0 ];thenecho "$i is ok"elseecho "$i is not ok"fidone
用法:/tmp/sci.sh [user@]hostname
其中hostname部分可以使用花括号展开方式枚举。但有个bug,最好ssh-copy-id的目标不要是脚本所在的本机,可能会强制输入本机密码,但批量脚本autocopy.exp则没有此bug。
例如:
[root@xuexi tmp]# /tmp/sci.sh 172.16.10.3 172.16.10.6172.16.10.3 is ok172.16.10.6 is ok
[root@xuexi tmp]# /tmp/sci.sh 172.16.10.{3,6}172.16.10.3 is ok172.16.10.6 is ok[root@xuexi tmp]# /tmp/sci.sh root@172.16.10.3 172.16.10.6root@172.16.10.3 is ok172.16.10.6 is ok
1.10 ssh连接速度慢的几个原因和解决办法
ssh连接包括两个阶段:主机验证阶段和身份验证阶段。这两个阶段都可能导致连接速度慢。
具体是哪个阶段的速度慢,完全可以通过肉眼看出来:
(1).卡着很久才提示保存host key肯定是主机验证过程慢。
(2).主机验证完成后卡着很久才提示输入密码,肯定是身份验证过程慢。
其中主机验证过程慢的原因,可能是网络连接慢、DNS解析慢等原因。网络连接慢,ssh对此毫无办法,而DNS解析慢,ssh是可以解决的,解决方法是将ssh服务端的配置文件中UseDNS设置为no(默认为yes)。
而身份验证慢的原因,则考虑ssh的身份验证顺序:gssapi,host-based,publickey,keyboard-interactive,password。其中gssapi认证顺序是比较慢的,所以解决方法一是在ssh客户端配置文件中将GSSAPI认证机制给关掉,解决方法二是在ssh客户端配置文件中使用PreferredAuthentications指令修改身份验证顺序。
方法一修改:GSSAPIAuthentication yes
方法二修改:PreferredAuthentications publickey,password,gssapi,host-based,keyboard-interactive
如果感受不到哪个阶段导致速度变慢,可以使用ssh或scp等客户端工具的"-vvv"选项进行调试,看看是卡在哪个地方,不过,想看懂"-vvv"的过程,还是比较考验耐心的。
1.11 SSH安全隧道(ssh跃墙之术)
1.11.1 ssh安全隧道(一):本地端口转发
如下图,假如host3和host1、host2都同互相通信,但是host1和host2之间不能通信,如何从host1连接上host2?
对于实现ssh连接来说,实现方式很简单,从host1 ssh到host3,再ssh到host2,也就是将host3作为跳板的方式。但是如果不是ssh,而是http的80端口呢?如何让host1能访问host2的80端口?

ssh支持本地端口转发,语法格式为:
ssh -L [bind_addr:]local_port:remote:remote_port middle_host
以上图为例,实现方式是在host1上执行:
[root@xuexi ~]# ssh -g -L 2222:host2:80 host3
其中"-L"选项表示本地端口转发,其工作方式为:在本地指定一个由ssh监听的转发端口(2222),将远程主机的端口(host2:80)映射为本地端口(2222),当有主机连接本地映射端口(2222)时,本地ssh就将此端口的数据包转发给中间主机(host3),然后host3再与远程主机的端口(host2:80)通信。
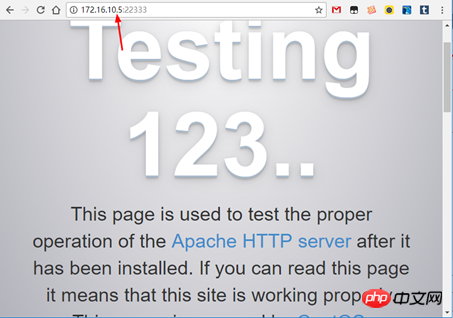
现在就可以通过访问host1的2222端口来达到访问host2:80的目的了。例如:
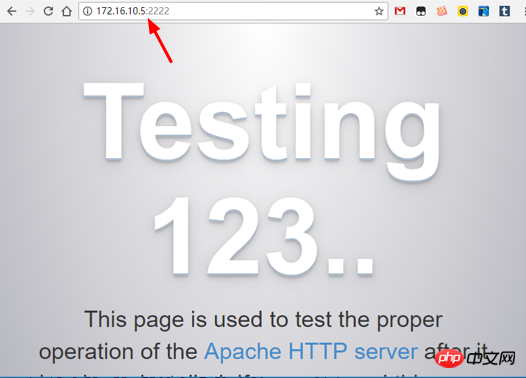
再来解释下"-g"选项,指定该选项表示允许外界主机连接本地转发端口(2222),如果不指定"-g",则host4将无法通过访问host1:2222达到访问host2:80的目的。甚至,host1自身也不能使用172.16.10.5:2222,而只能使用localhost:2222或127.0.0.1:2222这样的方式达到访问host2:80的目的,之所以如此,是因为本地转发端口默认绑定在回环地址上。可以使用bind_addr来改变转发端口的绑定地址,例如:
[root@xuexi ~]# ssh -L 172.16.10.5:2222:host2:80 host3
这样,host1自身就能通过访问172.16.10.5:2222的方式达到访问host2:80的目的。
一般来说,使用转发端口,都建议同时使用"-g"选项,否则将只有自身能访问转发端口。
再来分析下转发端口通信的过程。
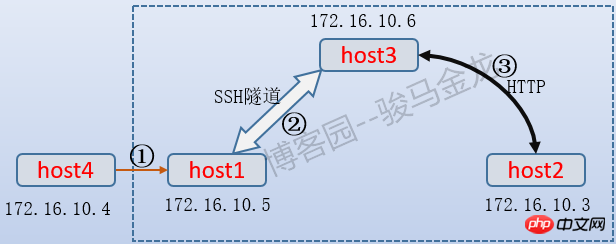
当host4发起172.16.10.5:2222的连接时(即步骤①),数据包的目标地址和端口为"172.16.10.5:2222"。由于host1上ssh已经监听了2222端口,并且知道该端口映射自哪台主机哪个端口,所以将会把该数据包目标地址和端口替换为"172.16.10.3:80",并将此数据包通过转发给host3。当host3收到该数据包时,发现是host1转发过来请求访问host2:80的数据包,所以host3将代为访问host2的80端口。
所以,host1和host3之间的通信方式是SSH协议,这段连接是安全加密的,因此称为"安全隧道",而host3和host2之间通信协议则是HTTP而不是ssh。
现在再来考虑下,通过本地端口转发的方式如何实现ssh跳板的功能呢?仍以上图为例:
[root@xuexi ~]# ssh -g -L 22333:host2:22 host3
这样只需使用ssh连上host1的22333端口就等于连接了host2的22端口。
甚至还可以在host3上执行:
[root@xuexi ~]# ssh -L 172.16.10.5:22333:host2:80 host2

或:

[root@xuexi ~]# ssh -L 172.16.10.5:22333:host2:80 host3
这样在host3就开启了一个转发端口22333供host1连接。当host1连接到host3:22333时,host3将转发给host2或host3自身,再由host2或host3自身与host2通信。
最后,关于端口转发有一个需要注意的问题:ssh命令中带有要执行的命令。考虑了下面的三条在host1上执行的命令的区别。
[root@xuexi ~]# ssh -g -L 22333:host2:22 host3

[root@xuexi ~]# ssh -g -L 22333:host2:22 host3 "ifconfig"[root@xuexi ~]# ssh -g -L 22333:host2:22 host3 "sleep 10"
第一条命令开启了本地端口转发,且是以登录到host3的方式开启的,所以执行完该命令后,将跳到host3主机上,当退出host3时,端口转发功能将被关闭。另外,host1上之所以要开启端口转发,目的是为了与host2进行通信,而不是跳到host3上,所以应该在ssh命令行上加上"-f"选项让ssh在本机host1上以后台方式提供端口转发功能,而不是跳到host3上来提供端口转发功能。
第二条命令在开启本地转发的时候还指定了要在host3上执行"ifconfig"命令,但是ssh的工作机制是远程命令执行完毕的那一刻,ssh关闭连接,所以此命令开启的本地端口转发功能有效期只有执行ifconfig命令的一瞬间。
第三条命令和第二条命令类似,只不过指定的是睡眠10秒命令,所以此命令开启的本地转发功能有效期只有10秒。
结合上面的分析,开启端口转发功能时,建议让ssh以后台方式提供端口转发功能,且明确指示不要执行任何ssh命令行上的远程命令。即最佳开启方式为:
[root@xuexi ~]# ssh -f -N -g -L 22333:host2:22 host3
1.11.2 ssh安全隧道(二):远程端口转发
ssh除了支持本地端口转发,还支持远程端口转发。顾名思义,远程端口转发表示的是将远程端口的数据转发到本地。
如下图:假如host3是内网主机,它能和host2互相通信,也能和host1通信,但反过来,host1不能和host3通信。这时要让host1访问host3或host2就没办法通过本地端口转发了,因为要在host1上开启本地端口转发,必须要和host3通信请求建立隧道。
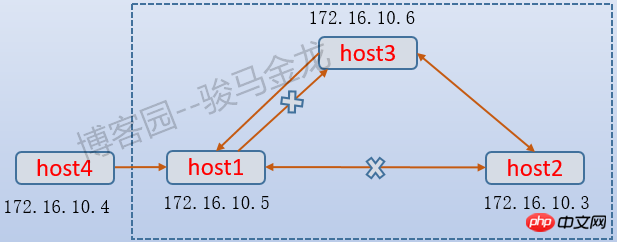
可以通过在host3上发起远程端口转发来实现,因为host3能和host1通信,host3可以请求在host1和host3之间建立隧道。
语法如下:
ssh -R [bind_addr:]remote1_port:host:port remote1
以上图为例,实现方式是在host3上执行:
[root@xuexi ~]# ssh -R 22333:host2:80 host1
这表示host3请求host1上的sshd服务,在host1上建立一个套接字监听22333端口,它是host2端口的映射,当有主机连接host1:22333时,此连接中的数据全部都通过host1和host3之间的安全隧道转发给host3,再由host3向host2的80端口发起访问。由于host3请求开启的转发端口是在远程主机host1上的,所以称为"远程端口转发"。
再考虑下面这条命令所开启的远程转发端口,它是在host3上执行的。
[root@xuexi ~]# ssh -R 22333:host3:80 host1
该命令将自身的host3:80映射到host1:22333上,这也能让host1和host2、host3通信,因为隧道是建立在host1:2233371fb34173e4ee87dab1f85dc1c283a44host3:80上的。
但是,远程端口转发和本地端口转发最大的一个区别是,远程转发端口是由host1上的sshd服务控制的,默认配置情况下,sshd服务只允许本地开启的远程转发端口(22333)绑定在环回地址(127.0.0.1)上,即使显式指定了bind_addr也无法覆盖。例如:
[root@xuexi ~]# ssh -R *:22333:host2:80 host1

[root@xuexi ~]# netstat -tnlp
Active Internet connections (only servers)
Proto Recv-Q Send-Q Local Address               Foreign Address             State       PID/Program name
tcp        0      0 0.0.0.0:22                  0.0.0.0:*                   LISTEN      8405/sshd
tcp        0      0 127.0.0.1:25                0.0.0.0:*                   LISTEN      1422/master
tcp        0      0 127.0.0.1:22333             0.0.0.0:*                   LISTEN      8407/sshd
tcp        0      0 :::22                       :::*                        LISTEN      8405/sshd
tcp        0      0 ::1:25                      :::*                        LISTEN      1422/master
tcp        0      0 ::1:22333                   :::*                        LISTEN      8407/sshd
要允许本地的远程转发端口绑定在非环回地址上,需要在host1的sshd配置文件中启用"GatewayPorts"项,它的默认值为no。启动该选项后,不给定bind_addr或bind_addr设置为"*"都表示绑定在所有地址上。如下:
[root@xuexi ~]# ssh -g -R *:22333:host2:80 host1

[root@xuexi ~]# netstat -tnlp
Active Internet connections (only servers)
Proto Recv-Q Send-Q Local Address               Foreign Address             State       PID/Program name
tcp        0      0 0.0.0.0:22                  0.0.0.0:*                   LISTEN      8466/sshd
tcp        0      0 127.0.0.1:25                0.0.0.0:*                   LISTEN      1422/master
tcp        0      0 0.0.0.0:22333               0.0.0.0:*                   LISTEN      8468/sshd
tcp        0      0 :::22                       :::*                        LISTEN      8466/sshd
tcp        0      0 ::1:25                      :::*                        LISTEN      1422/master
tcp        0      0 :::22333                    :::*                        LISTEN      8468/sshd
和前面的本地转发端口一样,建议的几个选项是:"-g"、"-f"、"-N"。即推荐的命令写法是:
[root@xuexi ~]# ssh -fgN -R 22333:host2:80 host1
现在,就可以通过访问host1:22333达到访问host2:80的目的了。如下图所示。
1.11.3 ssh安全隧道(三):动态端口转发(SOCKS代理)
无论是本地端口转发还是远程端口转发,都是将某固定主机及其端口映射到本地或远程转发端口上,例如将host2:80映射到host1:2222。也就是说,本地或远程转发端口和目标端口所代表的应用层协议是一对一的关系,2222端口必须对应的是http的80端口,使用浏览器向host1:2222端口发起http请求当然没问题,但是使用ssh工具向host1:2222发起连接将会被拒绝,因为host2上http服务只能解析http请求,不能解析ssh连接请求。
ssh支持动态端口转发,由ssh来判断发起请求的工具使用的是什么应用层协议,然后根据判断出的协议结果决定目标端口。
以下图为例进行说明,host1处在办公内网,能和host3互相通信,但它无法直接和互联网和host2通信,而host3则可以和host2以及互联网通信。
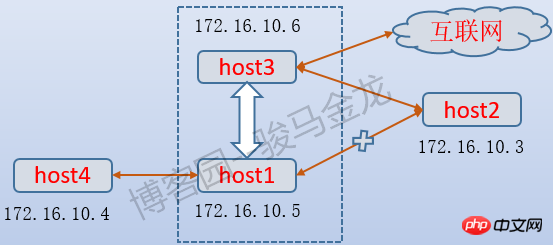
要让host1访问互联网,又能和host2的22端口即ssh服务通信,显然在host1上仅设置一个本地端口转发是不够的,虽然可以设置多个本地转发端口分别映射不同的端口,但这显然比较笨重和麻烦。使用动态端口转发即可。
语法格式为:
ssh -D [bind_addr:]port remote
以上图为例,在host1上执行:
[root@xuexi ~]# ssh -Nfg -D 2222 host3
After executing the above command, host1 will open the SOCKS4 or SOCKS5 service locally to listen to port 2222. As long as the client program tool (implying the type of application layer protocol used) sets its own proxy to host1:2222, all data generated by the program will be forwarded to host1:2222, and then by Host1:2222 forwards the data to host3 through the tunnel, and finally host3 communicates with the Internet or the port of the application layer protocol of the corresponding client tool on host2.
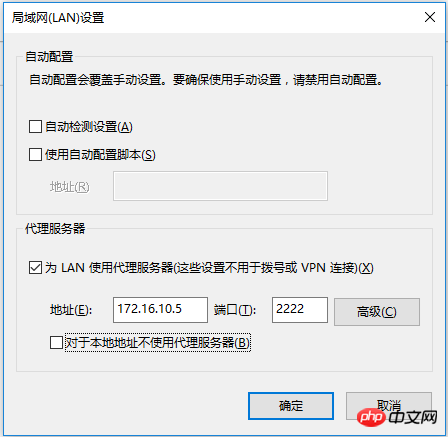
In fact, it is very simple. If host4 uses IE browser as the client tool and sets the proxy of IE browser to host1:2222, since the request initiated by IE browser uses http protocol (not used here) Considering other possible protocols), then the data generated by the IE browser are forwarded to host1:2222, and then host1:2222 forwards it to host3 through the tunnel. Host3 can connect to the Internet, so host4 realizes the networking function. Set as shown below:
#Another example is the QQ client on host4, which can also set a proxy. In this way, the data generated by QQ will be forwarded through host1:2222, and host1:2222 will forward the QQ data to host3. Host3 knows that the protocol used by these data is oicq, so host3 will connect to Tencent's QQ server (corresponding to the oicq service port).
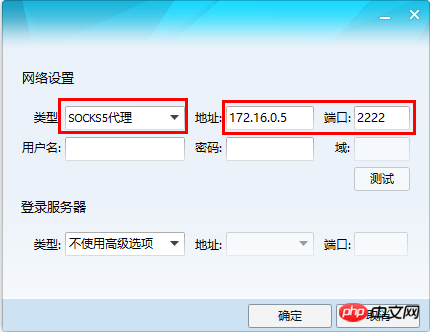
ssh only supports socks4 and socks5 proxies. Some client tools need to clearly indicate the proxy type.
Like local and remote port forwarding, the recommended options are: "-f", "-N" and "-g".
Since ssh dynamic port forwarding is a function of the ssh client, proxy Internet access can be achieved by using ssh client tools such as SecurtCRT and putty without using the ssh command. For example, if the local host cannot access the Internet, but can communicate with the SSH service of 172.16.10.6, and 172.16.10.6 can access the Internet, you can first use SecurtCRT to connect to 172.16.10.6 on the local host, and then make the following settings on the corresponding session options, so that The local host can also access the Internet. (Note: I didn’t say you can FQ, good citizens don’t FQ!!!)
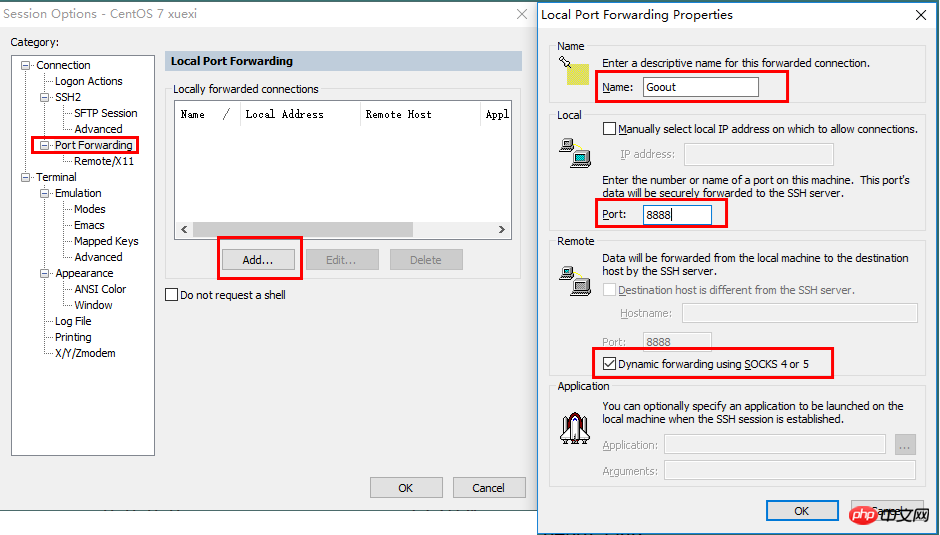
Then, check whether SecurtCRT is monitored on the local host The 8888 dynamic forwarding port specified in .
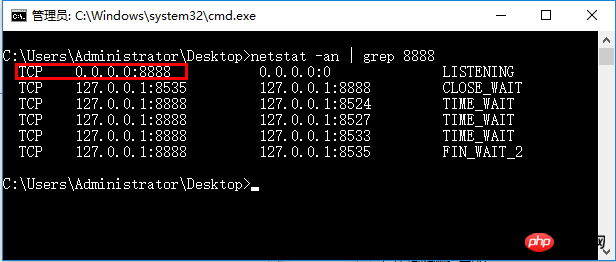
Now, all data packets of this machine flow to the outside world through 172.16.10.6 connected to SecurtCRT.
The above is the detailed content of Basic introduction to ssh and SSH service (including tunnel content). For more information, please follow other related articles on the PHP Chinese website!

