

 Backend DevelopmentPython TutorialExample tutorial on beautifying the bootstrap framework (python)
After the content of the previous chapter, in fact, as far as the page layer is concerned, the function can be easily implemented, but it is obvious that there is still a big lack of aesthetics. Now there are some good front-end css frameworks, such as AmazeUI , Tencent's WeUI, etc. Here is a bootstrap framework that is well integrated with flask
[Related video recommendation: Bootstrap tutorial]
Installation framework
In addition to directly referencing bootstrap’s CDN or local path in the template, you can also directly apply flask’s bootstrap integration package. First, you need to install the integration package:
pip3.6 install flask-bootstrap
This is a flask expansion package. The default package names of all flask expansion packages begin with flask.ext. , the same is true for bootstrap. First, import the package at the head of the default file:
from flask.ext.bootstrap import Bootstrap
and then perform bootstrap Initialization, modify the code:
bootstrap=Bootstrap(app)
After initialization, you can use the inheritance method of Jinja2 to use one of the components contained in this package. A series of base templates for Bootstrap. The base template directly references a series of elements in bootstrap.
Remember how to use template inheritance in jinja2. Before using it, first take a look at the structure of the base template:
{% block doc -%}
<!DOCTYPE html>
<html{% block html_attribs %}{% endblock html_attribs %}>
{%- block html %}
<head>
{%- block head %}
<title>{% block title %}{{title|default}}{% endblock title %}</title>
{%- block metas %}
<meta name="viewport" content="width=device-width, initial-scale=1.0">
{%- endblock metas %}
{%- block styles %}
<!-- Bootstrap -->
<link href="{{bootstrap_find_resource('css/bootstrap.css', cdn='bootstrap')}}" rel="external nofollow" rel="stylesheet">
{%- endblock styles %}
{%- endblock head %}
</head>
<body{% block body_attribs %}{% endblock body_attribs %}>
{% block body -%}
{% block navbar %}
{%- endblock navbar %}
{% block content -%}
{%- endblock content %}
{% block scripts %}
<script src="{{bootstrap_find_resource('jquery.js', cdn='jquery')}}"></script>
<script src="{{bootstrap_find_resource('js/bootstrap.js', cdn='bootstrap')}}"></script>
{%- endblock scripts %}
{%- endblock body %}
</body>
{%- endblock html %}
</html>
{% endblock doc -%}As can be seen from the source code, this base template defines 12 Each block corresponds to the entire document (doc), html attributes (html_attribs), the entire html (html), the entire head part (head), the title part (title), the meta code part (metas), and the css style (styles). body attributes (body_attribs), body part (body), navigation (navbar),
page content (content), js (scripts)
and title, meta, css, and js all have default content , so you need to add {{super()}}
when using it. According to the structure of this base template, modify the code in login.html to:
{% extends "bootstrap/base.html"%}
{% block title%}牛博客 {% endblock %}<!--覆盖title标签-->
{% block navbar %}
<nav class="navbar navbar-inverse"><!-- 导航部分 -->
 导航
</nav>
{% endblock %}
{% block content %} <!--具体内容-->
<p class="container">
 <p class="container">
 <form method="post">
 <p class="form-group">
 <label for="username">用户名</label>
 <input type="text" class="form-control" id="username" placeholder="请输入用户名">
 </p>
 <p class="form-group">
 <label for="passworld">密码</label>
 <input type="password" class="form-control" id="passworld" placeholder="请输入密码">
 </p>
 <button type="submit" class="btn btn-default">登录</button>
 </form>
 </p>
</p>
{% endblock %}
Run the program, now The displayed result is:

Much more beautiful than just now, the generated html code is:
<!DOCTYPE html>
<html>
 <head>
 <title>牛博客 </title>
 <meta name="viewport" content="width=device-width, initial-scale=1.0">
 <!-- Bootstrap -->
 <link href="//cdnjs.cloudflare.com/ajax/libs/twitter-bootstrap/3.3.7/css/bootstrap.min.css" rel="external nofollow" rel="external nofollow" rel="stylesheet">
 </head>
 <body>
 <nav class="navbar navbar-inverse"><!-- 导航部分 -->
 导航
 </nav>
 <!--具体内容-->
 <p class="container">
 <form method="post">
 <p class="form-group">
 <label for="username">用户名</label>
 <input type="text" class="form-control" id="username" placeholder="请输入用户名">
 </p>
 <p class="form-group">
 <label for="passworld">密码</label>
 <input type="password" class="form-control" id="passworld" placeholder="请输入密码">
 </p>
 <button type="submit" class="btn btn-default">登录</button>
 </form>
 </p>
 <script src="//cdnjs.cloudflare.com/ajax/libs/jquery/1.12.4/jquery.min.js"></script>
 <script src="//cdnjs.cloudflare.com/ajax/libs/twitter-bootstrap/3.3.7/js/bootstrap.min.js"></script>
 </body>
</html>
Pay attention to the addresses of these CDNs, this address Sometimes you are blocked by a wall, what should you do?
The modification method is to find the Lib\site-packages\flask_bootstrap folder in the python installation directory. There is an __init__.py file under the folder. After opening it, you will see the following code:

Make modifications. By the way, I often use the bootcdn cdn server.
Let’s use the local method to test. After entering test and 123, the result is:

The previous test login success page is still displayed, which is obviously wrong. Generally speaking, bbs or blogs jump to the page before login or the homepage. Now For convenience, all jumps to the home page. At the same time, if the user name or password is incorrect, a prompt will be displayed on the login page. Modify the default.py code as follows:
from flask import session #导入session对象
@app.route("/login",methods=["POST"])
def loginPost():
username=request.form.get("username","")
password=request.form.get("password","")
if username=="test" and password=="123" :
session["user"]=username
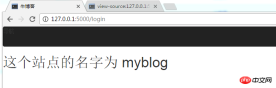
return render_template("/index.html",name=username,site_name='myblog')
else:
return "登录失败"The source code after successful login is:
<!DOCTYPE html>
<html>
<head>
 <meta charset="UTF-8">
 <title>myblog</title>
</head>
<body>
<h1 id="这个站点的名字为-nbsp-myblog-nbsp">这个站点的名字为 myblog </h1>
</body>
</html>
Oh, by the way, the bootstrap base template is not referenced. Modify the template code of index.html and change the
{% extends "base.html" %}# in the first line.
{% extends "bootstrap/base.html" %}
<!DOCTYPE html>
<html>
 <head>
 <title>blog</title>
 <meta name="viewport" content="width=device-width, initial-scale=1.0">
 <!-- Bootstrap -->
 <link href="//cdnjs.cloudflare.com/ajax/libs/twitter-bootstrap/3.3.7/css/bootstrap.min.css" rel="stylesheet">
 </head>
 <body>
 <h1 id="这个站点的名字为-nbsp-myblog-nbsp">这个站点的名字为 myblog </h1>
 </body>
</html>
See that the bootstrap framework has been successfully referenced, but all the navigation parts are missing. Of course, you cannot write the navigation again at this time. You can directly modify the custom base template, and then let other templates reference it. Modify the base template. It is:
{%extends "bootstrap/base.html "%}
{% block title%}牛博客 {% endblock %}<!--覆盖title标签-->

{% block navbar %}
<nav class="navbar navbar-inverse"><!-- 导航部分 -->
 导航
</nav>
{% endblock %}
{% block content %} <!--具体内容-->
<p class="container">
</p>
{% endblock %}
Then modify the homepage code: {% extends "base.html" %}
{% block content %}
<h1 id="这个站点的名字为-nbsp-site-name-nbsp">这个站点的名字为 {{site_name}} </h1>
{% endblock %} Modify the login page code to: {% extends "base.html"%}
{% block content %} <!--具体内容-->
<p class="container">
<form method="post">
<p class="form-group">
<label for="username">用户名</label>
<input type="text" class="form-control" name="username" id="username" placeholder="请输入用户名">
</p>
<p class="form-group">
<label for="passworld">密码</label>
<input type="password" class="form-control" name="password" id="passworld" placeholder="请输入密码">
</p>
<button type="submit" class="btn btn-default">登录</button>
</form>
</p>
{% endblock %} The display result of the successful login page below is:
from flask import flash

@app.route("/login",methods=["POST"])
def loginPost():
 username=request.form.get("username","")
 password=request.form.get("password","")
 if username=="test" and password=="123" :
 session["user"]=username
 return render_template("/index.html",name=username,site_name='myblog')
 else:
 flash("您输入的用户名或密码错误")
 return render_template("/login.html") #返回的仍为登录页
Modify the login.html template: {% extends "base.html"%}
{% block content %} <!--具体内容-->
<p class="container">
{% for message in get_flashed_messages() %}
<p class="alert alert-warning">
<button type="button" class="close" data-dismiss="alter">×</button>
{{message}}
</p>
{% endfor %}
<form method="post">
<p class="form-group">
<label for="username">用户名</label>
<input type="text" class="form-control" name="username" id="username" placeholder="请输入用户名">
</p>
<p class="form-group">
<label for="passworld">密码</label>
<input type="password" class="form-control" name="password" id="passworld" placeholder="请输入密码">
</p>
<button type="submit" class="btn btn-default">登录</button>
</form>
</p>
{% endblock %} Okay, enter test and 1234 below, and the displayed result is:

Continue to beautify
The login page and the basic functions of the controller have been completed, but for this page only, there is no login box that takes up the entire screen. Generally speaking, it is the centering part. This part does not involve flask. It is the turn of bootstrap's grid system to appear.栅格系统简单说就是将一个container或container-fluid中分为12个列,每个列都可以合并或偏移,与html中的table类似,并且支持响应式,通过xs,sm,md,lg来进行不同屏幕尺寸的区分。下面用栅格系统对登录页进行一下修改:
{% extends "base.html"%}
{% block content %} <!--具体内容-->
<p class="container">
<p class="row"></p>
<p class="row">
<#-- col-md-4表示合并4列,col-md-offset-4表示偏移4列 sm意思相同 --#>
<p class="col-md-4 col-md-offset-4 col-sm-6 col-sm-offset-3">
<p class="page-header">
<h1 id="欢迎您登陆">欢迎您登陆</h1>
</p>
{% for message in get_flashed_messages() %}
<p class="alert alert-warning">
<button type="button" class="close" data-dismiss="alter">×</button>
{{message}}
</p>
{% endfor %}
<form method="post">
<p class="form-group">
<label for="username">用户名</label>
<input type="text" class="form-control" name="username" id="username" placeholder="请输入用户名">
</p>
<p class="form-group">
<label for="passworld">密码</label>
<input type="password" class="form-control" name="password" id="passworld" placeholder="请输入密码">
</p>
<button type="submit" class="btn btn-default">登录</button>
</form>
</p>
</p>
</p>
{% endblock %}显示结果如下:

毕竟不是专业美工,没有经过设计,但至少比刚刚美观多了,但登录的用户名和密码写成固定值肯定是不行的,数据库是必不可少的,将在下一章让flask和mysql进行互联。
The above is the detailed content of Example tutorial on beautifying the bootstrap framework (python). For more information, please follow other related articles on the PHP Chinese website!

 Is Tuple Comprehension possible in Python? If yes, how and if not why?Apr 28, 2025 pm 04:34 PM
Article discusses impossibility of tuple comprehension in Python due to syntax ambiguity. Alternatives like using tuple() with generator expressions are suggested for creating tuples efficiently.(159 characters)
 What are Modules and Packages in Python?Apr 28, 2025 pm 04:33 PM
The article explains modules and packages in Python, their differences, and usage. Modules are single files, while packages are directories with an __init__.py file, organizing related modules hierarchically.
 What is docstring in Python?Apr 28, 2025 pm 04:30 PM
Article discusses docstrings in Python, their usage, and benefits. Main issue: importance of docstrings for code documentation and accessibility.
 What is a lambda function?Apr 28, 2025 pm 04:28 PM
Article discusses lambda functions, their differences from regular functions, and their utility in programming scenarios. Not all languages support them.
 What is a break, continue and pass in Python?Apr 28, 2025 pm 04:26 PM
Article discusses break, continue, and pass in Python, explaining their roles in controlling loop execution and program flow.
 What is a pass in Python?Apr 28, 2025 pm 04:25 PM
The article discusses the 'pass' statement in Python, a null operation used as a placeholder in code structures like functions and classes, allowing for future implementation without syntax errors.
 Can we Pass a function as an argument in Python?Apr 28, 2025 pm 04:23 PM
Article discusses passing functions as arguments in Python, highlighting benefits like modularity and use cases such as sorting and decorators.
 What is the difference between / and // in Python?Apr 28, 2025 pm 04:21 PM
Article discusses / and // operators in Python: / for true division, // for floor division. Main issue is understanding their differences and use cases.Character count: 158


Hot AI Tools

Undresser.AI Undress
AI-powered app for creating realistic nude photos

AI Clothes Remover
Online AI tool for removing clothes from photos.

Undress AI Tool
Undress images for free

Clothoff.io
AI clothes remover

Video Face Swap
Swap faces in any video effortlessly with our completely free AI face swap tool!

Hot Article
Hot Tools

MantisBT
Mantis is an easy-to-deploy web-based defect tracking tool designed to aid in product defect tracking. It requires PHP, MySQL and a web server. Check out our demo and hosting services.

EditPlus Chinese cracked version
Small size, syntax highlighting, does not support code prompt function

SublimeText3 Chinese version
Chinese version, very easy to use

ZendStudio 13.5.1 Mac
Powerful PHP integrated development environment

SecLists
SecLists is the ultimate security tester's companion. It is a collection of various types of lists that are frequently used during security assessments, all in one place. SecLists helps make security testing more efficient and productive by conveniently providing all the lists a security tester might need. List types include usernames, passwords, URLs, fuzzing payloads, sensitive data patterns, web shells, and more. The tester can simply pull this repository onto a new test machine and he will have access to every type of list he needs.

