Home >Backend Development >Python Tutorial >Teach you detailed examples of using template engines and form plug-ins (python)
Teach you detailed examples of using template engines and form plug-ins (python)
- Y2JOriginal
- 2017-04-26 10:12:361945browse
After the content of the first chapter, you can already make some simple pages. First, use this method to make a login page. First, you must create a login routing method:
@app.route("/login",methods=["GET"])
def login():
html="<form method='post'>" \
"<table>" \
"<tr><td>请输入用户名</td><td><input type='text' name='username'/></td></tr>" \
"<tr><td>请输入密码</td><td><input type='password' name='password'/></td></tr>" \
"<tr><td><input type='submit' value='登录'/></td></tr>" \
"</table>" \
"</post>"
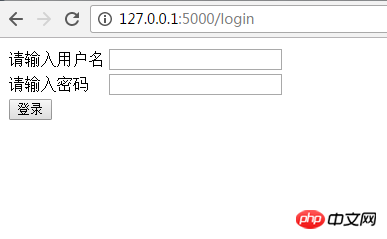
return htmlThis After the page returns, there is a simple login page with the following results:

Then there is a login post return page:
@app.route("/login",methods=["POST"])
def loginPost():
 username=request.form.get("username","")
 password=request.form.get("password","")
 if username=="test" and password=="123" :
 return "登录成功"
 else:
 return "登录失败"
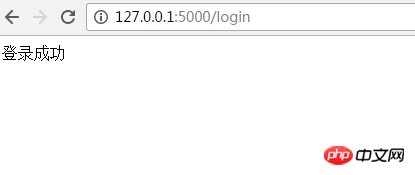
After entering test and 123 , displaying successful login

Functionally, it is of course implemented, but from other aspects, it is difficult to say that it is a program that can be actually applied, even if the js script is not considered And CSS style sheets are a nightmare in terms of simple maintenance, such as adding a verification code box. I don’t think anyone would think this is a pleasant job.
So, first of all, we need to separate the html part of the page. For this, flask provides the jinja2 template engine to achieve this.
jinja2 template engine also complies with the most basic convention of flask, that is, there is a basic default value in many configurations. Compared with jinja2, there is one most important default value, that is, the template file is placed in the templates folder , although this folder can be customized, for now, using the default value is enough.
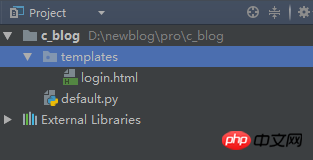
Okay, first create the templates folder in the PyCharm project root directory, and then create the login.html file in the folder. Of course, the directory structure is as follows:

Enter the code in login.html as follows:
<!DOCTYPE html> <html> <head> <title>欢迎您登陆--牛博客</title> </head> <body> <form method='post'> <table> <tr><td>请输入用户名</td><td><input type='text' name='username'/></td></tr> <tr><td>请输入密码</td><td><input type='password' name='password'/></td></tr> <tr><td><input type='submit' value='登录'/></td></tr> </table> </form> </body> </html>
The code is very simple, and there is no beautification of the style. In fact, as far as I am concerned, just because of the intelligent perception, there is enough reason. Use the template, and then modify the login method of default.py and the code is:
from flask import render_template #头部,引入模板渲染方法

@app.route("/login",methods=["GET"])
def login():
 return render_template("/login.html")

 #渲染模板,默认找templates文件夹下的login.html文件
Since the code in the html template is the same as the one written directly in the py file, refresh the page at this time to display the effect. The same as before, although the display effect has not changed significantly, it will be much more convenient if you modify a certain element in the HTML at this time.
About jinja2 template engine also supports some more powerful functions, such as using index to make some instructions:
Basic usage
Modify default Part of the code in .py is:
from flask import render_template #页头,导入渲染函数

@app.route("/")
def index():
 return render_template("index.html",site_name='myblog')
The code in index.html is:
<!DOCTYPE html>
<html>
<head>
 <meta charset="UTF-8">
 <title>{{site_name}}</title>
</head>
<body>
<h1>这个站点的名字为 {{site_name}} </h1>
</body>
</html>
flask’s render_template function supports multiple parameters, where the first parameter of the function is the template name, and then Several parameters can be provided, all of which are key-value pairs, to provide data for variables in the template. In this example, the value of myblog is provided for site_name, and {{parameter name}} is used in the template to represent a variable
At this time, the browser input address output result is:
<!DOCTYPE html>
<html>
<head>
 <meta charset="UTF-8">
 <title>myblog</title>
</head>
<body>
<h1>这个站点的名字为 myblog </h1>
</body>
</html>
jinja2 The template also provides some variable filters, such as code:
<!DOCTYPE html>
<html>
<head>
 <meta charset="UTF-8">
 <title>{{site_name|upper}}</title>
</head>
<body>
<h1>这个站点的名字为 {{site_name}} </h1>
</body>
</html>
The output is:
<!DOCTYPE html>
<html>
<head>
 <meta charset="UTF-8">
 <title>myblog</title>
</head>
<body>
<h1>这个站点的名字为 myblog </h1>
</body>
</html>
Commonly used filters are as follows
safe without escaping
capitalize Capitalize the first letter
lower Convert to lowercase
upper Convert to uppercase
trim Remove trailing spaces
striptages Remove html tags
In addition, Jinja2 variables It can also be some complex types, and you can even use some common methods of complex types, such as:
<!DOCTYPE html>
<html>
<head>
 <meta charset="UTF-8">
 <title>{{site_name[2:]}}</title>
</head>
<body>
<h1>这个站点的名字为 {{site_name}} </h1>
</body>
</html>
The output is:
<!DOCTYPE html>
<html>
<head>
 <meta charset="UTF-8">
 <title>blog</title>
</head>
<body>
<h1>这个站点的名字为 myblog </h1>
</body>
</html>
Control statement
Control statements are the basic functions of a template, and jinja2 also provides corresponding functions:
//选择
{% if name=='test' %}
 这是测试
{% else %}
 {{name}},你好
{% endif %}

//循环
<ul>
 {% for blog in blogs%}
 {{ blog.title }}
 {% endfor%}
</ul>
In addition to these basic usages, templates also provide macro functions for the reuse of some codes. For example, write the following code into the macros.html file
{% macro render_title(blog)%}
 <li>{{blog.title}}</li>
{% endmacro%}
and then in the previous template:
{% import 'macros.html' as macros %}
<ul>
 {% for blog in blogs %}
 {{ macros.render_title(blog) }}
 {% endfor %}
</ul>
The execution result is exactly the same as before
Jinja2 also provides a A more powerful function is template inheritance. This personally feels a bit like Java's sitemesh framework. It first needs to create a base template of base.html:
<!DOCTYPE html>
<html>
<head>
 {% block head %}
 <meta charset="UTF-8">
 <title>{% block title%} {% endblock %} - 牛博客</title>
 <script src="http://cdn.bootcss.com/jquery/2.2.4/jquery.min.js"></script>
 {% endblock %}
</head>
<body>
 {% block body %}
 {% endblock %}
</body>
</html>
The block tag means that it can be used in sub-templates. Modification, specifically in this example, the modifiable parts are head, title, and body. The following is the sub-template code:
{% extends "base.html" %}
{% block title %}{{site_name[2:]}}{% endblock %}
{% block head %}
 {{super()}}
{% endblock %}

{% block body %}
 <h1>这个站点的名字为 {{site_name}} </h1>
{% endblock %}
The execution result at this time is still:
<!DOCTYPE html>
<html>
<head>
 <meta charset="UTF-8">
 <title>blog</title>
</head>
<body>
<h1>这个站点的名字为 myblog </h1>
</body>
</html>
Now that we have the template engine, in any case, it can be done very easily just for the page layer. It has some good functions, but it is obvious that the current interface is not very beautiful. The next chapter will integrate the current mainstream front-end framework bootstrap and flask framework.
The above is the detailed content of Teach you detailed examples of using template engines and form plug-ins (python). For more information, please follow other related articles on the PHP Chinese website!

