
Home >Web Front-end >JS Tutorial >Native JS implements gesture unlock component instance method (picture)
Native JS implements gesture unlock component instance method (picture)

- PHPzOriginal
- 2017-04-23 09:22:462341browse
This is the selection homework question for the third 360 Front-End Star Project. More than 600 students participated in answering questions, and 60 students finally passed. These 60 students have done well, and their ideas, coding style, and function completion are quite promising. However, there are also some things that are not considered. For example, it is found that many students can implement complete functions according to requirements, but do not know how Designing an open API, or in other words, how to analyze and predict product requirements and future changes to determine what should be open and what should be encapsulated. It’s not about whether the answer is correct or not, it’s about experience.
Here, I provide a reference version. This does not mean that this version is the best, but that through this version, we can analyze when we encounter such complex UI requirements. How should we think and implement.
General steps of component design
Component design generally includes the following processes:
Understand the requirements
Technical selection
Structural (UI) design
Data and API design
Process Design
Compatibility and detail optimization
Tools & Engineering
These processes are not encountered when designing every component, but generally speaking, a project will always encounter problems that need to be solved during some of these processes. Let’s briefly analyze it below.
Understanding the requirements
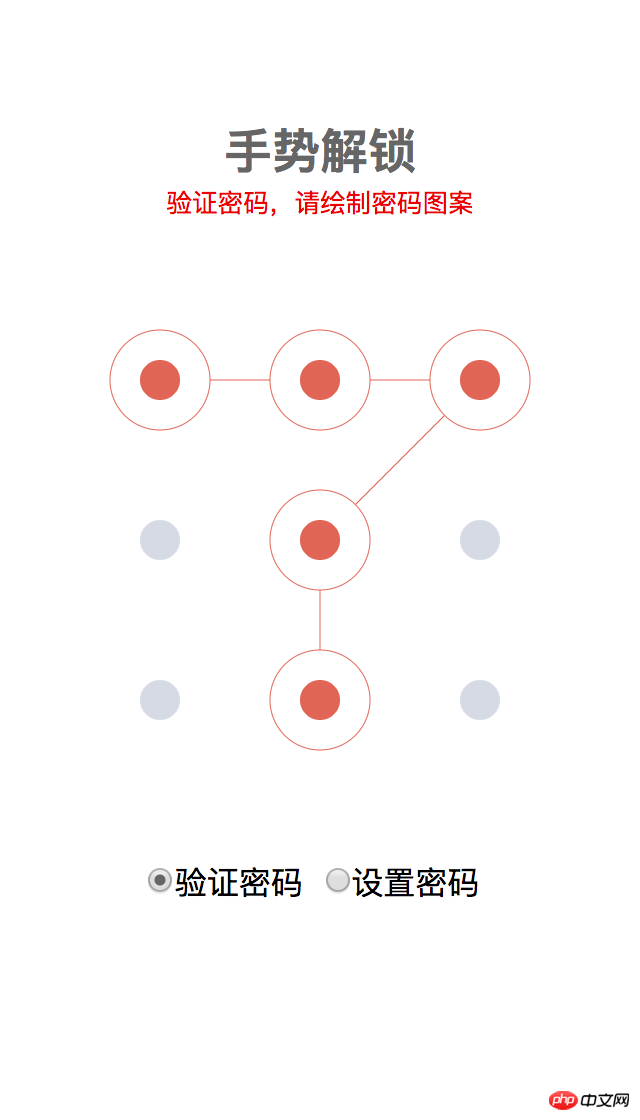
The assignment itself is just about designing a common gesture password UI interaction. You can switch between the two states by selecting the verification password and setting the password. , each state has its own process. Therefore, most students encapsulate the state switching and process of the entire component according to the needs. Some students provide certain UI style configuration capabilities, but basically no students can open up the nodes in the process and state switching process. . In fact, if this component is to be used by users, it is obviously necessary to open the process node. In other words, the user needs to decide what operations to perform in the process of setting the password, the process of verifying the password, and what operations to perform after the password verification is successful. It is a decision that component developers cannot make on behalf of users.
var password = '11121323';

var locker = new HandLock.Locker({
  container: document.querySelector('#handlock'),
  check: {
    checked: function(res){
      if(res.err){
        console.error(res.err); //密码错误或长度太短
        [执行操作...]
      }else{
        console.log(`正确,密码是:${res.records}`);
        [执行操作...]
      }
    },
  },
  update:{
    beforeRepeat: function(res){
      if(res.err){
        console.error(res.err); //密码长度太短
        [执行操作...]
      }else{
        console.log(`密码初次输入完成,等待重复输入`);
        [执行操作...]
      }
    },
    afterRepeat: function(res){
      if(res.err){
        console.error(res.err); //密码长度太短或者两次密码输入不一致
        [执行操作...]
      }else{
        console.log(`密码更新完成,新密码是:${res.records}`);
        [执行操作...]
      }
    },
  }
});

locker.check(password);
Technical Selection
The core of the UI display of this problem is the nine-square grid and the selected small dot. Technically speaking, we have three options: DOM/Canvas/SVG, all three can implement the main UI.
If you use DOM, the simplest way is to use flex layout, which can be made responsive.
DOM implementation drawing
The advantage of using DOM is that it is easy to implement responsiveness, Event processing is simple, and the layout is not complicated (but it is slightly more complicated than Canvas), but The length and slope of the slash (not drawn in the demo) need to be calculated.
In addition to using DOM, it is also very convenient to use Canvas to draw:
Canvas implementation drawing
There are two small details in using Canvas. The first is to achieve responsiveness. You can use DOM to construct a square container:
#container {
  position: relative;
  overflow: hidden;
  width: 100%;
  padding-top: 100%;
  height: 0px;
  background-color: white;
}
Here we use padding-top:100% to expand the container height so that it is equal to the container width.
The second detail is that in order to obtain a clear display effect on the retina screen, we double the width and height of the Canvas, and then reduce it to match the width and height of the container through transform: scale(0.5).
#container canvas{
  position: absolute;
  left: 50%;
  top: 50%;
  transform: translate(-50%, -50%) scale(0.5);
}
Since the positioning of Canvas is absolute, its default width and height are not equal to the width and height of the container, and need to be set through JS:
let width = 2 * container.getBoundingClientRect().width;
canvas.width = canvas.height = width;
In this way we can implement the UI by drawing solid circles and connected lines on the Canvas. The specific method will be explained in more detail in the subsequent content.
Finally, let’s take a look at drawing with SVG:
SVG implementation drawing
Since the API for native SVG operations is not very convenient, the Snap.svg library is used here to implement it. It is very similar to using Canvas, so I won’t go into details here.
The problem with SVG is that mobile compatibility is not as good as DOM and Canvas.
Based on the above three situations, I finally chose to use Canvas to achieve it.
Structural Design
The DOM structure is relatively simple if implemented using Canvas. In order to be responsive, we need to implement a square container with adaptive width. The method has been introduced before. Then create a Canvas in the container. One thing to note here is that we should layer Canvas. This is because in the rendering mechanism of Canvas, in order to update the content of the canvas, the area to be updated needs to be refreshed and redrawn. Because we need to manage frequently changing content and basically unchanged content in layers, this can significantly improve performance.
Divided into 3 layers
在这里我把 UI 分别绘制在 3 个图层里,对应 3 个 Canvas。最上层只有随着手指头移动的那个线段,中间是九个点,最下层是已经绘制好的线。之所以这样分,是因为随手指头移动的那条线需要不断刷新,底下两层都不用频繁更新,但是把连好的线放在最底层是因为我要做出圆点把线的一部分遮挡住的效果。
确定圆点的位置
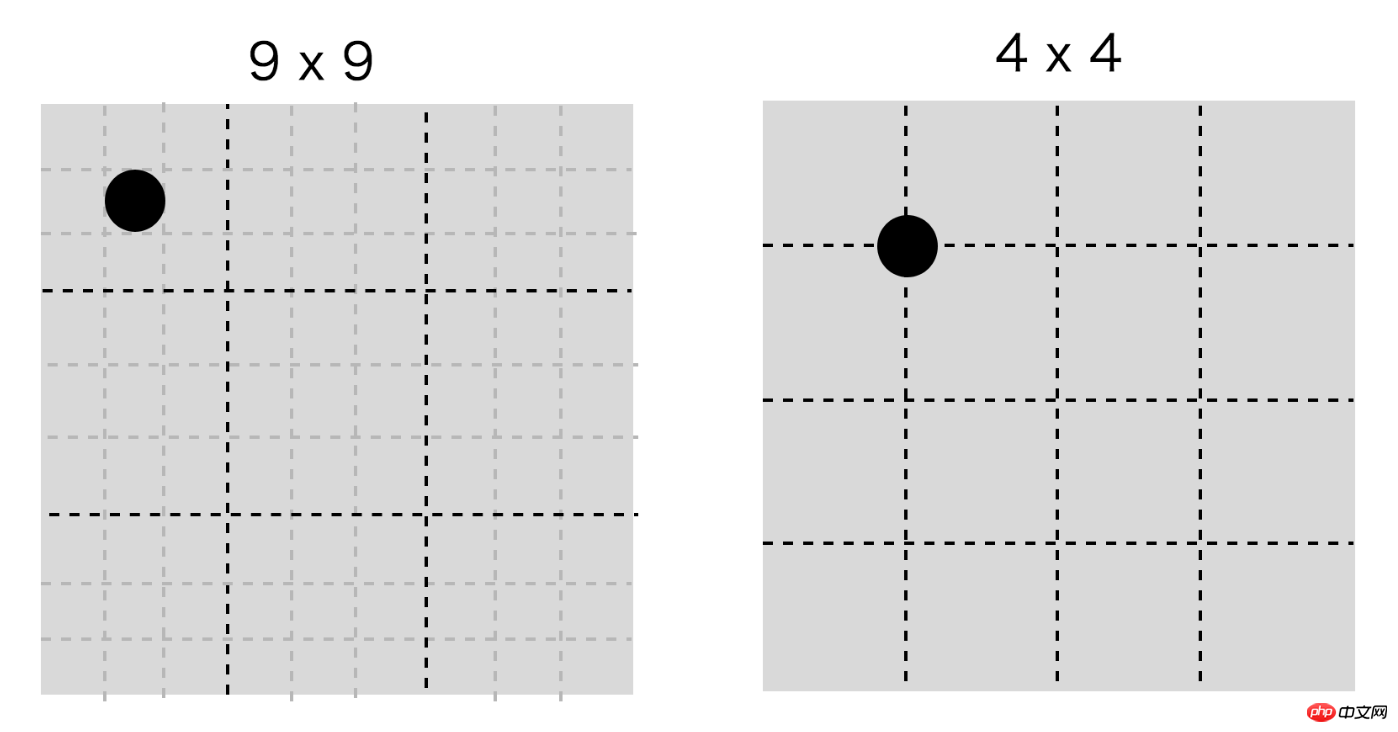
圆点的位置有两种定位法,第一种是九个九宫格,圆点在小九宫格的中心位置。如果认真的同学,已经发现在前面 DOM 方案里,我们就是采用这样的方式,圆点的直径为 11.1%。第二种方式是用横竖三条线把宽高四等分,圆点在这些线的交点处。
在 Canvas 里我们采用第二种方法来确定圆点(代码里的 n = 3)。
let range = Math.round(width / (n + 1));

let circles = [];

//drawCircleCenters
for(let i = 1; i <= n; i++){
  for(let j = 1; j <= n; j++){
    let y = range * i, x = range * j;
    drawSolidCircle(circleCtx, fgColor, x, y, innerRadius);
    let circlePoint = {x, y};
    circlePoint.pos = [i, j];
    circles.push(circlePoint);
  }
}
最后一点,严格说不属于结构设计,但是因为我们的 UI 是通过触屏操作,我们需要考虑 Touch 事件处理和坐标的转换。
function getCanvasPoint(canvas, x, y){
  let rect = canvas.getBoundingClientRect();
  return {
    x: 2 * (x - rect.left),
    y: 2 * (y - rect.top),
  };
}
我们将 Touch 相对于屏幕的坐标转换为 Canvas 相对于画布的坐标。代码里的 2 倍是因为我们前面说了要让 retina 屏下清晰,我们将 Canvas 放大为原来的 2 倍。
API 设计
接下来我们需要设计给使用者使用的 API 了。在这里,我们将组件功能分解一下,独立出一个单纯记录手势的 Recorder。将组件功能分解为更加底层的组件,是一种简化组件设计的常用模式。
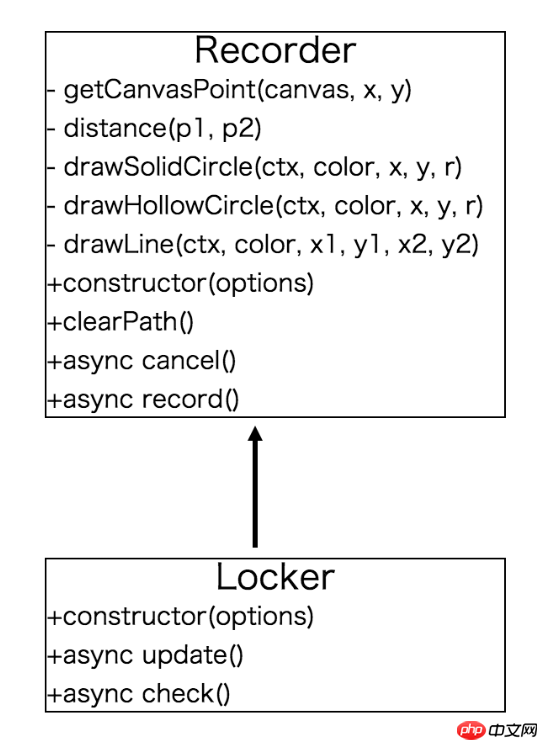
我们抽取出底层的 Recorder,让 Locker 继承 Recorder,Recorder 负责记录,Locker 管理实际的设置和验证密码的过程。
我们的 Recorder 只负责记录用户行为,由于用户操作是异步操作,我们将它设计为 Promise 规范的 API,它可以以如下方式使用:
var recorder = new HandLock.Recorder({
  container: document.querySelector('#main')
});

function recorded(res){
  if(res.err){
    console.error(res.err);
    recorder.clearPath();
    if(res.err.message !== HandLock.Recorder.ERR_USER_CANCELED){
      recorder.record().then(recorded);
    }
  }else{
    console.log(res.records);
    recorder.record().then(recorded);
  }
}

recorder.record().then(recorded);
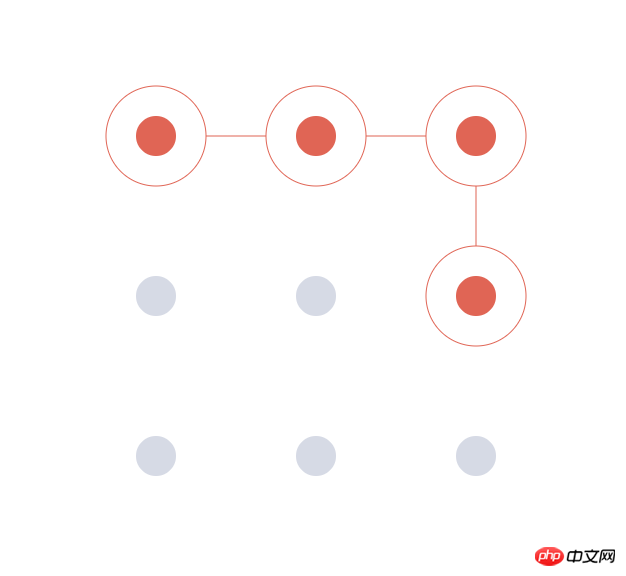
对于输出结果,我们简单用选中圆点的行列坐标拼接起来得到一个唯一的序列。例如 "11121323" 就是如下选择图形:
为了让 UI 显示具有灵活性,我们还可以将外观配置抽取出来。
const defaultOptions = {
  container: null, //创建canvas的容器,如果不填,自动在 body 上创建覆盖全屏的层
  focusColor: '#e06555',  //当前选中的圆的颜色
  fgColor: '#d6dae5',     //未选中的圆的颜色
  bgColor: '#fff',        //canvas背景颜色
  n: 3, //圆点的数量: n x n
  innerRadius: 20,  //圆点的内半径
  outerRadius: 50,  //圆点的外半径,focus 的时候显示
  touchRadius: 70,  //判定touch事件的圆半径
  render: true,     //自动渲染
  customStyle: false, //自定义样式
  minPoints: 4,     //最小允许的点数
};
这样我们实现完整的 Recorder 对象,核心代码如下:
[...] //定义一些私有方法

const defaultOptions = {
  container: null, //创建canvas的容器,如果不填,自动在 body 上创建覆盖全屏的层
  focusColor: '#e06555',  //当前选中的圆的颜色
  fgColor: '#d6dae5',     //未选中的圆的颜色
  bgColor: '#fff',        //canvas背景颜色
  n: 3, //圆点的数量: n x n
  innerRadius: 20,  //圆点的内半径
  outerRadius: 50,  //圆点的外半径,focus 的时候显示
  touchRadius: 70,  //判定touch事件的圆半径
  render: true,     //自动渲染
  customStyle: false, //自定义样式
  minPoints: 4,     //最小允许的点数
};

export default class Recorder{
  static get ERR_NOT_ENOUGH_POINTS(){
    return 'not enough points';
  }
  static get ERR_USER_CANCELED(){
    return 'user canceled';
  }
  static get ERR_NO_TASK(){
    return 'no task';
  }
  constructor(options){
    options = Object.assign({}, defaultOptions, options);

    this.options = options;
    this.path = [];

    if(options.render){
      this.render();
    }
  }
  render(){
    if(this.circleCanvas) return false;

    let options = this.options;
    let container = options.container || document.createElement('p');

    if(!options.container && !options.customStyle){
      Object.assign(container.style, {
        position: 'absolute',
        top: 0,
        left: 0,
        width: '100%',
        height: '100%',
        lineHeight: '100%',
        overflow: 'hidden',
        backgroundColor: options.bgColor
      });
      document.body.appendChild(container);
    }
    this.container = container;

    let {width, height} = container.getBoundingClientRect();

    //画圆的 canvas,也是最外层监听事件的 canvas
    let circleCanvas = document.createElement('canvas');

    //2 倍大小,为了支持 retina 屏
    circleCanvas.width = circleCanvas.height = 2 * Math.min(width, height);
    if(!options.customStyle){
      Object.assign(circleCanvas.style, {
        position: 'absolute',
        top: '50%',
        left: '50%',
        transform: 'translate(-50%, -50%) scale(0.5)',
      });
    }

    //画固定线条的 canvas
    let lineCanvas = circleCanvas.cloneNode(true);

    //画不固定线条的 canvas
    let moveCanvas = circleCanvas.cloneNode(true);

    container.appendChild(lineCanvas);
    container.appendChild(moveCanvas);
    container.appendChild(circleCanvas);

    this.lineCanvas = lineCanvas;
    this.moveCanvas = moveCanvas;
    this.circleCanvas = circleCanvas;

    this.container.addEventListener('touchmove',
      evt => evt.preventDefault(), {passive: false});

    this.clearPath();
    return true;
  }
  clearPath(){
    if(!this.circleCanvas) this.render();

    let {circleCanvas, lineCanvas, moveCanvas} = this,
        circleCtx = circleCanvas.getContext('2d'),
        lineCtx = lineCanvas.getContext('2d'),
        moveCtx = moveCanvas.getContext('2d'),
        width = circleCanvas.width,
        {n, fgColor, innerRadius} = this.options;

    circleCtx.clearRect(0, 0, width, width);
    lineCtx.clearRect(0, 0, width, width);
    moveCtx.clearRect(0, 0, width, width);

    let range = Math.round(width / (n + 1));

    let circles = [];

    //drawCircleCenters
    for(let i = 1; i <= n; i++){
      for(let j = 1; j <= n; j++){
        let y = range * i, x = range * j;
        drawSolidCircle(circleCtx, fgColor, x, y, innerRadius);
        let circlePoint = {x, y};
        circlePoint.pos = [i, j];
        circles.push(circlePoint);
      }
    }

    this.circles = circles;
  }
  async cancel(){
    if(this.recordingTask){
      return this.recordingTask.cancel();
    }
    return Promise.resolve({err: new Error(Recorder.ERR_NO_TASK)});
  }
  async record(){
    if(this.recordingTask) return this.recordingTask.promise;

    let {circleCanvas, lineCanvas, moveCanvas, options} = this,
        circleCtx = circleCanvas.getContext('2d'),
        lineCtx = lineCanvas.getContext('2d'),
        moveCtx = moveCanvas.getContext('2d');

    circleCanvas.addEventListener('touchstart', ()=>{
      this.clearPath();
    });

    let records = [];

    let handler = evt => {
      let {clientX, clientY} = evt.changedTouches[0],
          {bgColor, focusColor, innerRadius, outerRadius, touchRadius} = options,
          touchPoint = getCanvasPoint(moveCanvas, clientX, clientY);

      for(let i = 0; i < this.circles.length; i++){
        let point = this.circles[i],
            x0 = point.x,
            y0 = point.y;

        if(distance(point, touchPoint) < touchRadius){
          drawSolidCircle(circleCtx, bgColor, x0, y0, outerRadius);
          drawSolidCircle(circleCtx, focusColor, x0, y0, innerRadius);
          drawHollowCircle(circleCtx, focusColor, x0, y0, outerRadius);

          if(records.length){
            let p2 = records[records.length - 1],
                x1 = p2.x,
                y1 = p2.y;

            drawLine(lineCtx, focusColor, x0, y0, x1, y1);
          }

          let circle = this.circles.splice(i, 1);
          records.push(circle[0]);
          break;
        }
      }

      if(records.length){
        let point = records[records.length - 1],
            x0 = point.x,
            y0 = point.y,
            x1 = touchPoint.x,
            y1 = touchPoint.y;

        moveCtx.clearRect(0, 0, moveCanvas.width, moveCanvas.height);
        drawLine(moveCtx, focusColor, x0, y0, x1, y1);
      }
    };


    circleCanvas.addEventListener('touchstart', handler);
    circleCanvas.addEventListener('touchmove', handler);

    let recordingTask = {};
    let promise = new Promise((resolve, reject) => {
      recordingTask.cancel = (res = {}) => {
        let promise = this.recordingTask.promise;

        res.err = res.err || new Error(Recorder.ERR_USER_CANCELED);
        circleCanvas.removeEventListener('touchstart', handler);
        circleCanvas.removeEventListener('touchmove', handler);
        document.removeEventListener('touchend', done);
        resolve(res);
        this.recordingTask = null;

        return promise;
      }

      let done = evt => {
        moveCtx.clearRect(0, 0, moveCanvas.width, moveCanvas.height);
        if(!records.length) return;

        circleCanvas.removeEventListener('touchstart', handler);
        circleCanvas.removeEventListener('touchmove', handler);
        document.removeEventListener('touchend', done);

        let err = null;

        if(records.length < options.minPoints){
          err = new Error(Recorder.ERR_NOT_ENOUGH_POINTS);
        }

        //这里可以选择一些复杂的编码方式,本例子用最简单的直接把坐标转成字符串
        let res = {err, records: records.map(o => o.pos.join('')).join('')};

        resolve(res);
        this.recordingTask = null;
      };
      document.addEventListener('touchend', done);
    });

    recordingTask.promise = promise;

    this.recordingTask = recordingTask;

    return promise;
  }
}
它的几个公开的方法,recorder 负责记录绘制结果, clearPath 负责在画布上清除上一次记录的结果,cancel 负责终止记录过程,这是为后续流程准备的。
流程设计
接下来我们基于 Recorder 来设计设置和验证密码的流程:
验证密码
设置密码
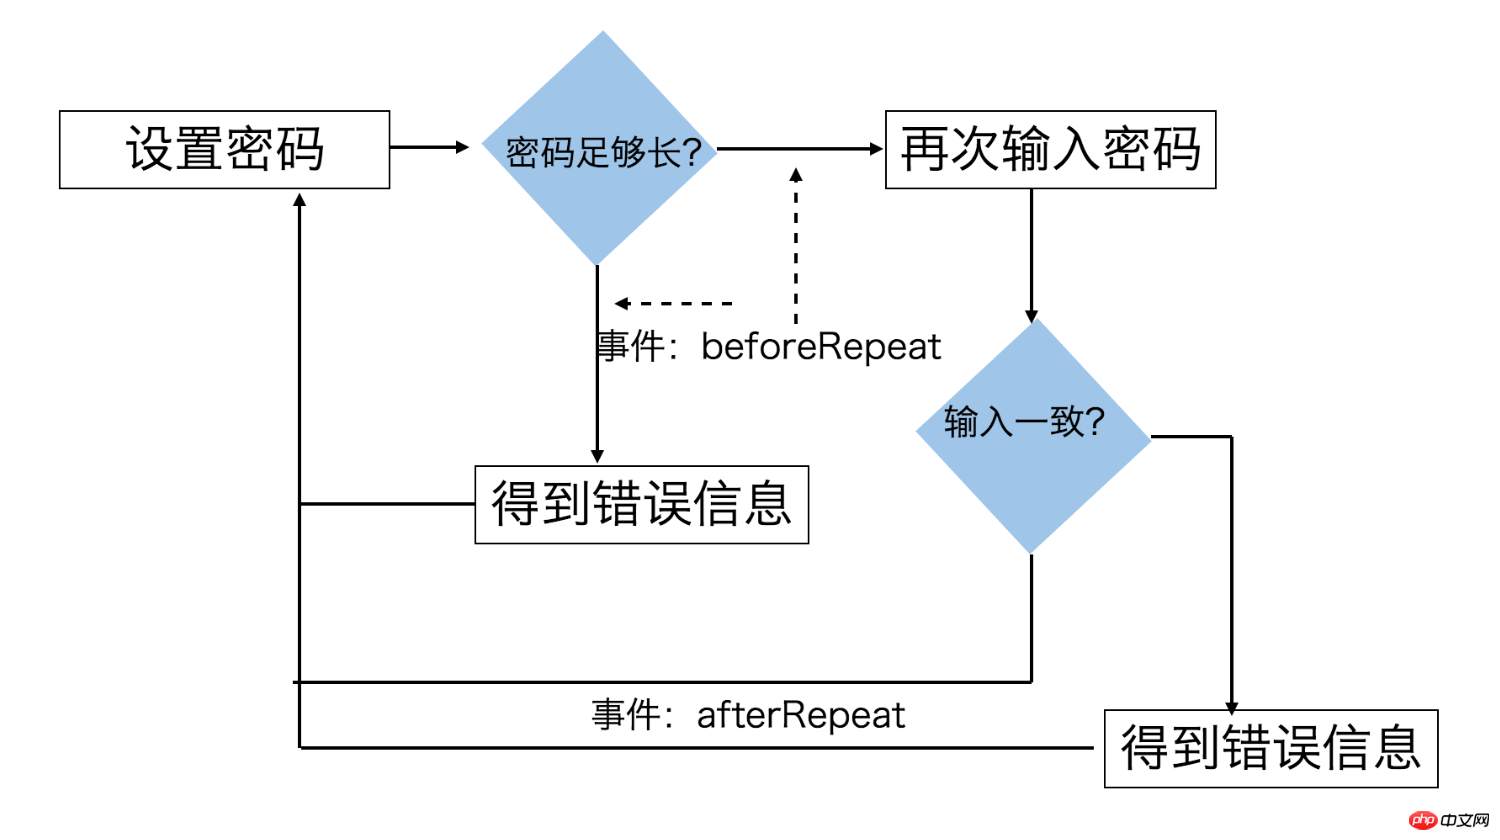
有了前面异步 Promise API 的 Recorder,我们不难实现上面的两个流程。
验证密码的内部流程
async check(password){
  if(this.mode !== Locker.MODE_CHECK){
    await this.cancel();
    this.mode = Locker.MODE_CHECK;
  }

  let checked = this.options.check.checked;

  let res = await this.record();

  if(res.err && res.err.message === Locker.ERR_USER_CANCELED){
    return Promise.resolve(res);
  }

  if(!res.err && password !== res.records){
    res.err = new Error(Locker.ERR_PASSWORD_MISMATCH)
  }

  checked.call(this, res);
  this.check(password);
  return Promise.resolve(res);
}
设置密码的内部流程
async update(){
  if(this.mode !== Locker.MODE_UPDATE){
    await this.cancel();
    this.mode = Locker.MODE_UPDATE;
  }

  let beforeRepeat = this.options.update.beforeRepeat,
      afterRepeat = this.options.update.afterRepeat;

  let first = await this.record();

  if(first.err && first.err.message === Locker.ERR_USER_CANCELED){
    return Promise.resolve(first);
  }

  if(first.err){
    this.update();
    beforeRepeat.call(this, first);
    return Promise.resolve(first);
  }

  beforeRepeat.call(this, first);

  let second = await this.record();

  if(second.err && second.err.message === Locker.ERR_USER_CANCELED){
    return Promise.resolve(second);
  }

  if(!second.err && first.records !== second.records){
    second.err = new Error(Locker.ERR_PASSWORD_MISMATCH);
  }

  this.update();
  afterRepeat.call(this, second);
  return Promise.resolve(second);
}
可以看到,有了 Recorder 之后,Locker 的验证和设置密码基本上就是顺着流程用 async/await 写下来就行了。
细节问题
实际手机触屏时,如果上下拖动,浏览器有默认行为,会导致页面上下移动,需要阻止 touchmove 的默认事件。
this.container.addEventListener('touchmove',
      evt => evt.preventDefault(), {passive: false});
这里仍然需要注意的一点是, touchmove 事件在 chrome 下默认是一个 Passive Event ,因此 addEventListener 的时候需要传参 {passive: false},否则的话不能 preventDefault。
工具 & 工程化
因为我们的代码使用了 ES6+,所以需要引入 babel 编译,我们的组件也使用 webpack 进行打包,以便于使用者在浏览器中直接引入。
这方面的内容,在之前的博客里有介绍,这里就不再一一说明。
最后,具体的代码可以直接查看 GitHub 工程 。
总结
以上就是今天要讲的全部内容,这里面有几个点我想再强调一下:
在设计 API 的时候思考真正的需求,判断什么该开放、什么该封装
做好技术调研和核心方案研究,选择合适的方案
优化和解决细节问题
The above is the detailed content of Native JS implements gesture unlock component instance method (picture). For more information, please follow other related articles on the PHP Chinese website!
Related articles
See more- An in-depth analysis of the Bootstrap list group component
- Detailed explanation of JavaScript function currying
- Complete example of JS password generation and strength detection (with demo source code download)
- Angularjs integrates WeChat UI (weui)
- How to quickly switch between Traditional Chinese and Simplified Chinese with JavaScript and the trick for websites to support switching between Simplified and Traditional Chinese_javascript skills