Home >Web Front-end >H5 Tutorial >Understand the 'past and present life' of HTML 5 History API
Understand the 'past and present life' of HTML 5 History API
- 怪我咯Original
- 2017-04-05 15:42:002034browse
History is interesting, isn't it? In previous versions of HTML, we had very limited manipulation of browsing history. We can go back and forth with what methods we can use, but that's all we can do.
However, using HTML 5’s History API, we can better control the browser’s history. For example: We can add a record to the list of history records, or update the URL of the address bar when there is no refresh.
Why introduce History API?
In this article, we will understand the origin of History API in HTML 5. Before this, we often used hash values to change page content, especially those that were particularly important to the page. Because there is no refresh, it is impossible to change the URL of a single-page application. Additionally, when you change the hash value of a URL, it has no effect on the browser's history.
Then, now with the HTML 5 History API, these are easily implemented, but since single-page applications do not necessarily use hash values, it may require additional development scripts. It also allows us to build new applications in an SEO-friendly way. Additionally, it reduces bandwidth, but how to prove it?
In this article, I will use the History API to develop a single-page application to prove the above problems.
This also means that I must first load the necessary resources on the homepage. From now on, the page only loads the required content. In other words, the application does not load all the content at the beginning. It will be loaded when the second application content is requested.
Note that you need to perform some server-side coding to only serve part of the resource, rather than the complete page content.
Browser support
At the time of writing this article, the support for History API by major browsers is very good. You can click here to view its support status. This link will tell Before you support a browser and use it, it's always good practice to detect support for specific features.
In order to determine whether the browser supports this API by changing the method, you can use the following line of code to check:
return !!(window.history && history.pushState);
In addition, I recommend referring to this article: Detect Support for Various HTML5 Features .(ps: Will be translated later)
If you are using a modern browser, you can use the following code:
if (Modernizr.history) {
    // History API Supported
}
If your browser does not support History API, you can use history. js instead.
Using History
HTML 5 provides two new methods:
1. history.pushState(); 2. history.replaceState();
Both methods allow us to add and update history, they work the same and can add the same number of parameters. In addition to methods, there are also popstate events. In the following article, we will introduce how to use and when to use the popstate event.
pushState()The parameters are the same as replaceState(). The parameter description is as follows:
1. state: StorageJSONString, can be used in the popstate event.
2. title: Most browsers do not support or ignore this parameter now. It is best to use null instead
3. url: Any A valid URL, used to update the browser's address bar, regardless of whether the URL already exists in the address list. What's more, it doesn't reload the page.
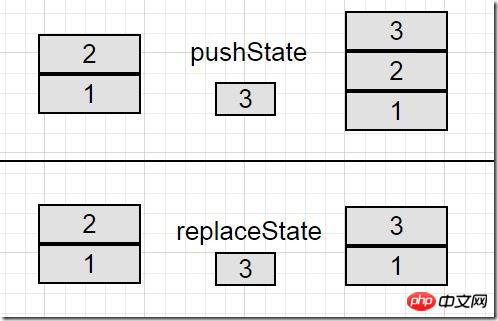
The main difference between the two methods is: pushState() adds a new entry to the history stack, and replaceState() replaces the current record value. If you are still confused about this, use some examples to prove the difference.
Suppose we have two stack blocks, one marked 1 and the other marked 2, and you have a third stack block marked 3. When pushState() is executed, stack block 3 will be added to the existing stack, so the stack has 3 block stacks.
Under the same hypothetical scenario, when replaceState() is executed, block 3 will be placed on the stack of block 2. Therefore, the number of history records remains unchanged, that is to say, pushState() will increase the number of history by 1.
The comparison result is as follows:

到此,为了控制浏览器的历史记录,我们忽略了pushState()和replaceState()的事件。但是假设浏览器统计了许多的不良记录,用户可能会被重定向到这些页面,或许也不会。在这种情况下,当用户使用浏览器的前进和后退导航按钮时就会产生意外的问题。
尽管当我们使用pushState()和replaceState()进行处理时,期待popstate事件被触发。但实际上,情况并不是这样。相反,当你浏览会话历史记录时,不管你是点击前进或者后退按钮,还是使用history.go和history.back方法,popstate都会被触发。
In WebKit browsers, a popstate event would be triggered after document’s onload event, but Firefox and IE do not have this behavior.(在WebKit浏览器中,popstate事件在document的onload事件后触发,Firefox和IE没有这种行为)。
Demo示例
HTML:
<p class="container">
    <p class="row">
        <ul class="nav navbar-nav">
            <li><a href="home.html" class="historyAPI">Home</a></li>
            <li><a href="about.html" class="historyAPI">About</a></li>
            <li><a href="contact.html" class="historyAPI">Contact</a></li>
        </ul>
    </p>
    <p class="row">
        <p class="col-md-6">
            <p class="well">
                Click on Links above to see history API usage using <code>pushState</code> method.
            </p>
        </p>
        <p class="row">
            <p class="jumbotron" id="contentHolder">
                <h1>Home!</h1>
                <p>Lorem Ipsum is simply dummy text of the printing and typesetting industry.</p>
            </p>
        </p>
    </p>
</p>
JavaScript:
<script type="text/javascript">
jQuery('document').ready(function(){
jQuery('.historyAPI').on('click', function(e){
e.preventDefault();
var href = $(this).attr('href');
// Getting Content
getContent(href, true);
jQuery('.historyAPI').removeClass('active');
$(this).addClass('active');
});
});
// Adding popstate event listener to handle browser back button
window.addEventListener("popstate", function(e) {
// Get State value using e.state
getContent(location.pathname, false);
});
function getContent(url, addEntry) {
$.get(url)
.done(function( data ) {
// Updating Content on Page
$('#contentHolder').html(data);
if(addEntry == true) {
// Add History Entry using pushState
history.pushState(null, null, url);
}
});
}
</script>Demo 1:HTML 5 History API – pushState
历史条目在浏览器中被计算,并且可以很容易的使用浏览器的前进和后退按钮。View Demo (ps:你在点击demo1的选项卡时,其记录会被添加到浏览器的历史记录,当点击后退/前进按钮时,可以回到/跳到你之前点击的选项卡对应的页面)
Demo 2:HTML 5 History API – replaceState
历史条目在浏览器中被更新,并且不能使用浏览器的前进和后退按钮进行浏览。View Demo (ps:你在点击demo1的选项卡时,其记录会被替换当前浏览器的历史记录,当点击后退/前进按钮时,不可以回到/跳到你之前点击的选项卡对应的页面,而是返回/跳到你进入demo2的上一个页面)
总结(ps:喜欢这两个字~~~^_^~~~)
HTML 5中的History API 对Web应用有着很大的影响。为了更容易的创建有效率的、对SEO友好的单页面应用,它移除了对散列值的依赖。
The above is the detailed content of Understand the 'past and present life' of HTML 5 History API. For more information, please follow other related articles on the PHP Chinese website!
Related articles
See more- AlloyTouch full-screen scrolling plug-in creates a smooth H5 page in 30 seconds
- HTML5 actual combat and analysis of touch events (touchstart, touchmove and touchend)
- Detailed explanation of image drawing examples in HTML5 canvas 9
- Regular expressions and new HTML5 elements
- How to combine NodeJS and HTML5 to drag and drop multiple files to upload to the server

