Home >Web Front-end >JS Tutorial >Detailed explanation of graphic code for Vue.js quick start
Detailed explanation of graphic code for Vue.js quick start
- 黄舟Original
- 2017-03-28 14:42:061450browse
vuejs is a very popular JavaScript MVVM library. It is built with data-driven and componentized ideas. Today I will share with you a tutorial about Vue.js 60-minute quick start tutorial. Let’s take a look.
vuejs is a very popular Javascript MVVM library. It is built with data-driven and componentized ideas. . Compared with Angular.js, Vue.js provides a simpler and easier-to-understand API, allowing us to quickly get started and use Vue.js.
If you have been accustomed to using jQuery to operate DOM before, please put aside the idea of manipulating DOM manually when learning Vue.js, because Vue.js is data-driven. You don't need to manually manipulate the DOM. It binds DOM and data through some special HTML syntax. Once you create the binding, the DOM will stay in sync with the data, and whenever the data changes, the DOM will be updated accordingly.
Of course, when using Vue.js, you can also use it in conjunction with other libraries, such as jQuery. The Demo and source code of this article have been put on GitHub. If you think the content of this article is good, please give it a like or add a star on GitHub! v-for Demo v-bind Demo Page Demo GitHub SourceMVVM Pattern
The following figure not only summarizes MVVM Mode (Model-View-ViewModel) also describes how ViewModel interacts with View and Model in Vue.js.
ViewModel is the core of Vue.js, it is a Vue instance. The Vue instance acts on a certain HTML element. This element can be the HTML body element or an element with a specified id.
After creating the ViewModel, how is the two-way binding achieved? First of all, we regard DOM Listeners and Data Bindings in the above figure as two tools, which are the key to achieving two-way binding.Hello World Example
To understand a language or learn a new technology, writing Hello World examples is the only way for us .<!DOCTYPE html>
<html>
<head>
<meta charset="UTF-8">
<title></title>
</head>
<body>
<!--这是我们的View-->
<p id="app">
{{ message }}
</p>
</body>
<script src="js/vue.js"></script>
<script>
// 这是我们的Model
var exampleData = {
message: 'Hello World!'
}
// 创建一个 Vue 实例或 "ViewModel"
// 它连接 View 与 Model
new Vue({
el: '#app',
data: exampleData
})
</script>
</html>The process of using Vue is the process of defining the various components of MVVM.
- Define View
- Define Model
- Create a Vue instance Or "ViewModel", which is used to connect View and Model
object, and the option object can contain Data, mounting elements, methods, modulelifecyclehooks, etc.
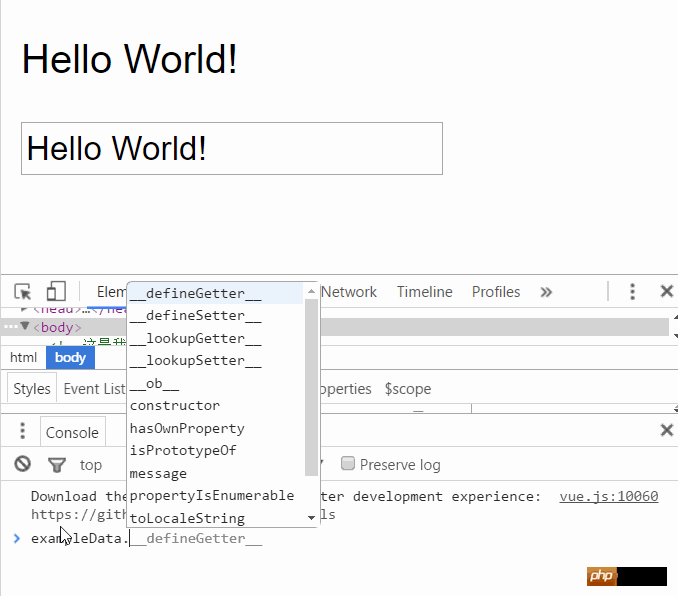
In this example, the el attribute of the options object points to View, el: '#app' means that the Vue instance will be mounted to 4c766faa15dbdc3e0301dfaffd03c28d...056c16e72a5c28f706e54a2bd731c69d{{ message }}94b3e26ee717c64999d7867364b1b4a3 will also be updated./p>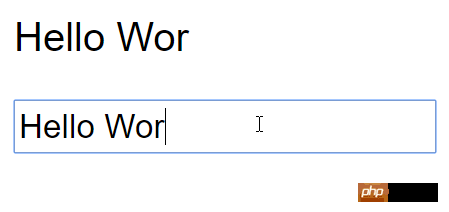
Common instructions for Vue.js
Vue.js的指令是以v-开头的,它们作用于HTML元素,指令提供了一些特殊的特性,将指令绑定在元素上时,指令会为绑定的目标元素添加一些特殊的行为,我们可以将指令看作特殊的HTML特性(attribute)。
Vue.js提供了一些常用的内置指令,接下来我们将介绍以下几个内置指令:
v-if指令
v-show指令
v-else指令
v-for指令
v-bind指令
v-on指令
Vue.js具有良好的扩展性,我们也可以开发一些自定义的指令,后面的文章会介绍自定义指令。
v-if指令
v-if是条件渲染指令,它根据表达式的真假来删除和插入元素,它的基本语法如下:
v-if="expression"
expression是一个返回bool值的表达式,表达式可以是一个bool属性,也可以是一个返回bool的运算式。例如:
<!DOCTYPE html>
<html>
<head>
<meta charset="UTF-8">
<title></title>
</head>
<body>
<p id="app">
<h1>Hello, Vue.js!</h1>
<h1 v-if="yes">Yes!</h1>
<h1 v-if="no">No!</h1>
<h1 v-if="age >= 25">Age: {{ age }}</h1>
<h1 v-if="name.indexOf('jack') >= 0">Name: {{ name }}</h1>
</p>
</body>
<script src="js/vue.js"></script>
<script>
var vm = new Vue({
el: '#app',
data: {
yes: true,
no: false,
age: 28,
name: 'keepfool'
}
})
</script>
</html>注意:yes, no, age, name这4个变量都来源于Vue实例选项对象的data属性。
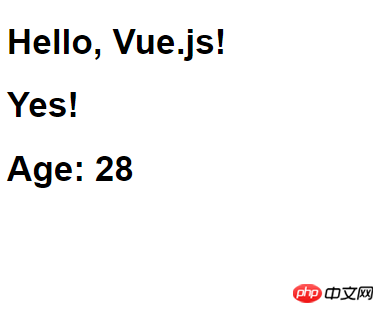
这段代码使用了4个表达式:
数据的yes属性为true,所以"Yes!"会被输出;
数据的no属性为false,所以"No!"不会被输出;
运算式age >= 25返回true,所以"Age: 28"会被输出;
运算式name.indexOf('jack') >= 0返回false,所以"Name: keepfool"不会被输出。
注意:v-if指令是根据条件表达式的值来执行元素的插入或者删除行为。
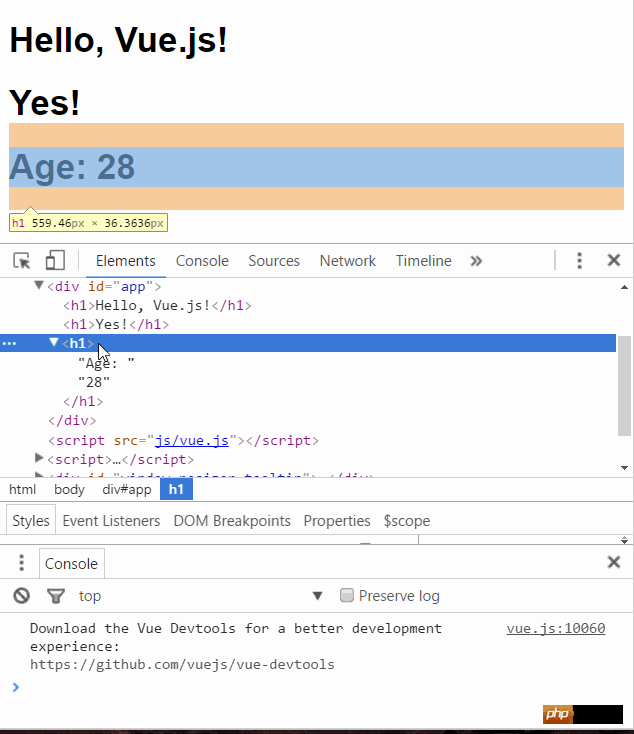
这一点可以从渲染的HTML源代码看出来,面上只渲染了3个4a249f0d628e2318394fd9b75b4636b1元素,v-if值为false的4a249f0d628e2318394fd9b75b4636b1元素没有渲染到HTML。
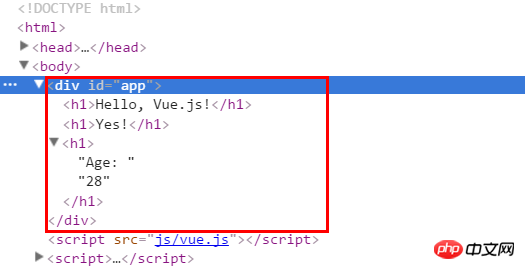
为了再次验证这一点,可以在Chrome控制台更改age属性,使得表达式age >= 25的值为false,可以看到4a249f0d628e2318394fd9b75b4636b1Age: 28473f0a7621bec819994bb5020d29372a元素被删除了。
age是定义在选项对象的data属性中的,为什么Vue实例可以直接访问它呢?
这是因为每个Vue实例都会代理其选项对象里的data属性。
v-show指令
v-show也是条件渲染指令,和v-if指令不同的是,使用v-show指令的元素始终会被渲染到HTML,它只是简单地为元素设置CSS的style属性。
<!DOCTYPE html>
<html>
<head>
<meta charset="UTF-8">
<title></title>
</head>
<body>
<p id="app">
<h1>Hello, Vue.js!</h1>
<h1 v-show="yes">Yes!</h1>
<h1 v-show="no">No!</h1>
<h1 v-show="age >= 25">Age: {{ age }}</h1>
<h1 v-show="name.indexOf('jack') >= 0">Name: {{ name }}</h1>
</p>
</body>
<script src="js/vue.js"></script>
<script>
var vm = new Vue({
el: '#app',
data: {
yes: true,
no: false,
age: 28,
name: 'keepfool'
}
})
</script>
</html>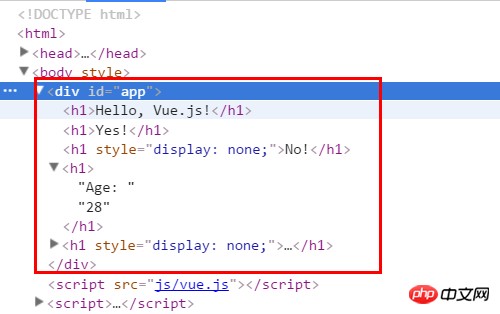
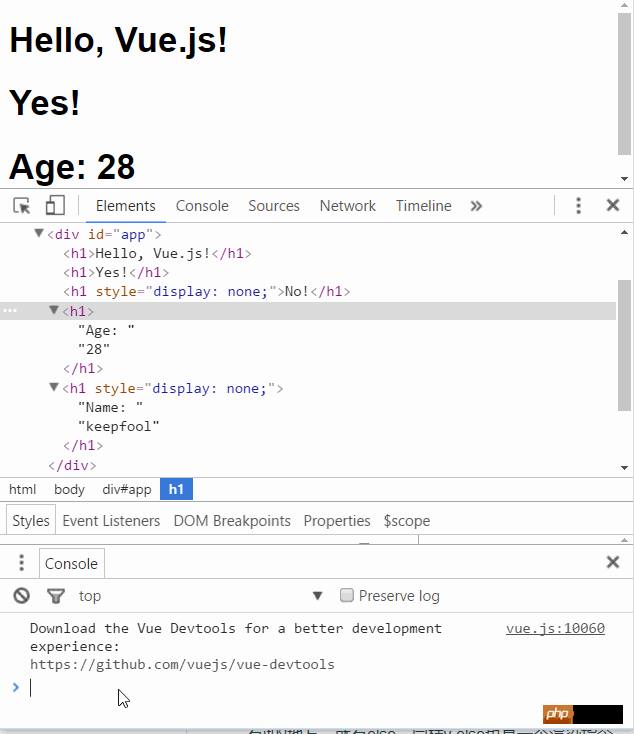
在Chrome控制台更改age属性,使得表达式age >= 25的值为false,可以看到4a249f0d628e2318394fd9b75b4636b1Age: 24473f0a7621bec819994bb5020d29372a元素被设置了style="display:none"样式。
v-else指令
可以用v-else指令为v-if或v-show添加一个“else块”。v-else元素必须立即跟在v-if或v-show元素的后面——否则它不能被识别。
<!DOCTYPE html>
<html>
<head>
<meta charset="UTF-8">
<title></title>
</head>
<body>
<p id="app">
<h1 v-if="age >= 25">Age: {{ age }}</h1>
<h1 v-else>Name: {{ name }}</h1>
<h1>---------------------分割线---------------------</h1>
<h1 v-show="name.indexOf('keep') >= 0">Name: {{ name }}</h1>
<h1 v-else>Sex: {{ sex }}</h1>
</p>
</body>
<script src="js/vue.js"></script>
<script>
var vm = new Vue({
el: '#app',
data: {
age: 28,
name: 'keepfool',
sex: 'Male'
}
})
</script>
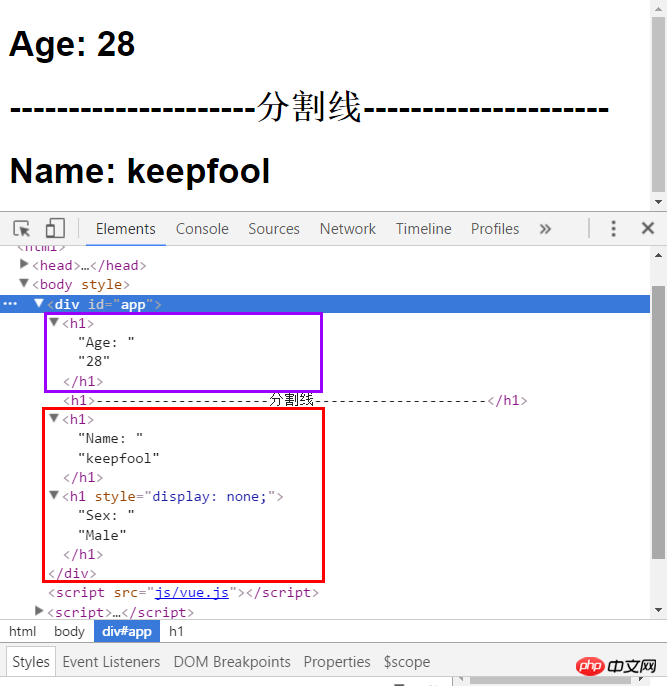
</html>v-else元素是否渲染在HTML中,取决于前面使用的是v-if还是v-show指令。
这段代码中v-if为true,后面的v-else不会渲染到HTML;v-show为tue,但是后面的v-else仍然渲染到HTML了。
v-for指令
v-for指令基于一个数组渲染一个列表,它和Javascript的遍历语法相似:
v-for="item in items"
items是一个数组,item是当前被遍历的数组元素。
<!DOCTYPE html>
<html>
<head>
<meta charset="UTF-8">
<title></title>
<link rel="stylesheet" href="styles/demo.css" rel="external nofollow" rel="external nofollow" rel="external nofollow" />
</head>
<body>
<p id="app">
<table>
<thead>
<tr>
<th>Name</th>
<th>Age</th>
<th>Sex</th>
</tr>
</thead>
<tbody>
<tr v-for="person in people">
<td>{{ person.name }}</td>
<td>{{ person.age }}</td>
<td>{{ person.sex }}</td>
</tr>
</tbody>
</table>
</p>
</body>
<script src="js/vue.js"></script>
<script>
var vm = new Vue({
el: '#app',
data: {
people: [{
name: 'Jack',
age: 30,
sex: 'Male'
}, {
name: 'Bill',
age: 26,
sex: 'Male'
}, {
name: 'Tracy',
age: 22,
sex: 'Female'
}, {
name: 'Chris',
age: 36,
sex: 'Male'
}]
}
})
</script>
</html>我们在选项对象的data属性中定义了一个people数组,然后在#app元素内使用v-for遍历people数组,输出每个person对象的姓名、年龄和性别。
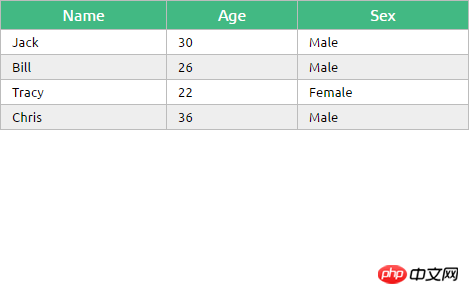
View Demo
v-bind指令
v-bind指令可以在其名称后面带一个参数,中间放一个冒号隔开,这个参数通常是HTML元素的特性(attribute),例如:v-bind:class
v-bind:argument="expression"
下面这段代码构建了一个简单的分页条,v-bind指令作用于元素的class特性上。
这个指令包含一个表达式,表达式的含义是:高亮当前页。
<!DOCTYPE html>
<html>
<head>
<meta charset="UTF-8">
<title></title>
<link rel="stylesheet" href="styles/demo.css" rel="external nofollow" rel="external nofollow" rel="external nofollow" />
</head>
<body>
<p id="app">
<ul class="pagination">
<li v-for="n in pageCount">
<a href="javascripit:void(0)" rel="external nofollow" rel="external nofollow" rel="external nofollow"
v-bind:class="activeNumber === n + 1 ? 'active' : ''">{{ n + 1 }}</a>
</li>
</ul>
</p>
</body>
<script src="js/vue.js"></script>
<script>
var vm = new Vue({
el: '#app',
data: {
activeNumber: 1,
pageCount: 10
}
})
</script>
</html>注意v-for="n in pageCount"这行代码,pageCount是一个整数,遍历时n从0开始,然后遍历到pageCount –1结束。

View Demo
v-on指令
v-on指令用于给监听DOM事件,它的用语法和v-bind是类似的,例如监听3499910bf9dac5ae3c52d5ede7383485元素的点击事件:
<a v-on:click="doSomething">
有两种形式调用方法:绑定一个方法(让事件指向方法的引用),或者使用内联语句。
Greet按钮将它的单击事件直接绑定到greet()方法,而Hi按钮则是调用say()方法。
<!DOCTYPE html>
<html>
<head>
<meta charset="UTF-8">
<title></title>
</head>
<body>
<p id="app">
<p><input type="text" v-model="message"></p>
<p>
<!--click事件直接绑定一个方法-->
<button v-on:click="greet">Greet</button>
</p>
<p>
<!--click事件使用内联语句-->
<button v-on:click="say('Hi')">Hi</button>
</p>
</p>
</body>
<script src="js/vue.js"></script>
<script>
var vm = new Vue({
el: '#app',
data: {
message: 'Hello, Vue.js!'
},
// 在 `methods` 对象中定义方法
methods: {
greet: function() {
// // 方法内 `this` 指向 vm
alert(this.message)
},
say: function(msg) {
alert(msg)
}
}
})
</script>
</html>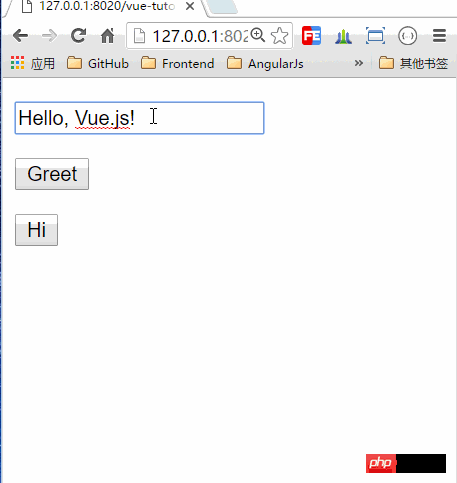
v-bind和v-on的缩写
Vue.js为最常用的两个指令v-bind和v-on提供了缩写方式。v-bind指令可以缩写为一个冒号,v-on指令可以缩写为@符号。
<!--完整语法-->
<a href="javascripit:void(0)" rel="external nofollow" rel="external nofollow" rel="external nofollow"
v-bind:class="activeNumber === n + 1 ? 'active' : ''">{{ n + 1 }}</a>
<!--缩写语法-->
<a href="javascripit:void(0)" rel="external nofollow" rel="external nofollow" rel="external nofollow":class="activeNumber=== n + 1 ? 'active' : ''">
{{ n + 1 }}</a>
<!--完整语法-->
<button v-on:click="greet">Greet</button>
<!--缩写语法-->
<button @click="greet">Greet</button>综合示例
现在我们已经介绍了一些Vue.js的基础知识了,结合以上知识我们可以来做个小Demo。
<!DOCTYPE html>
<html>
<head>
<meta charset="UTF-8">
<title></title>
<link rel="stylesheet" href="styles/demo.css" rel="external nofollow" rel="external nofollow" rel="external nofollow" />
</head>
<body>
<p id="app">
<fieldset>
<legend>
Create New Person
</legend>
<p class="form-group">
<label>Name:</label>
<input type="text" v-model="newPerson.name"/>
</p>
<p class="form-group">
<label>Age:</label>
<input type="text" v-model="newPerson.age"/>
</p>
<p class="form-group">
<label>Sex:</label>
<select v-model="newPerson.sex">
<option value="Male">Male</option>
<option value="Female">Female</option>
</select>
</p>
<p class="form-group">
<label></label>
<button @click="createPerson">Create</button>
</p>
</fieldset>
<table>
<thead>
<tr>
<th>Name</th>
<th>Age</th>
<th>Sex</th>
<th>Delete</th>
</tr>
</thead>
<tbody>
<tr v-for="person in people">
<td>{{ person.name }}</td>
<td>{{ person.age }}</td>
<td>{{ person.sex }}</td>
<td :class="'text-center'"><button @click="deletePerson($index)">Delete</button></td>
</tr>
</tbody>
</table>
</p>
</body>
<script src="js/vue.js"></script>
<script>
var vm = new Vue({
el: '#app',
data: {
newPerson: {
name: '',
age: 0,
sex: 'Male'
},
people: [{
name: 'Jack',
age: 30,
sex: 'Male'
}, {
name: 'Bill',
age: 26,
sex: 'Male'
}, {
name: 'Tracy',
age: 22,
sex: 'Female'
}, {
name: 'Chris',
age: 36,
sex: 'Male'
}]
},
methods:{
createPerson: function(){
this.people.push(this.newPerson);
// 添加完newPerson对象后,重置newPerson对象
this.newPerson = {name: '', age: 0, sex: 'Male'}
},
deletePerson: function(index){
// 删一个数组元素
this.people.splice(index,1);
}
}
})
</script>
</html>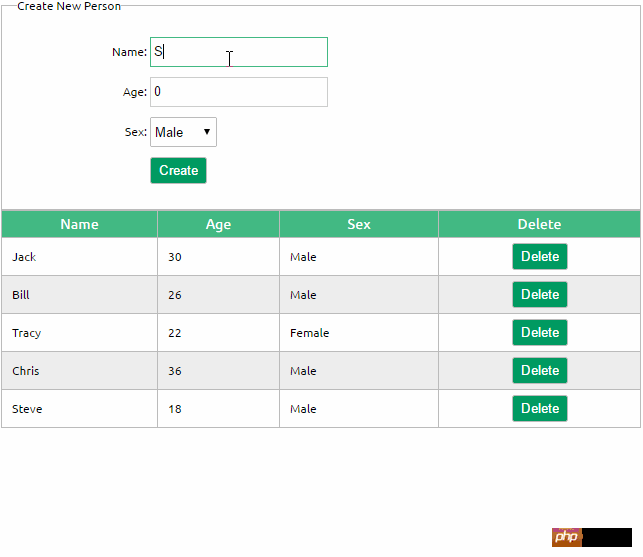
The above is the detailed content of Detailed explanation of graphic code for Vue.js quick start. For more information, please follow other related articles on the PHP Chinese website!
Related articles
See more- An in-depth analysis of the Bootstrap list group component
- Detailed explanation of JavaScript function currying
- Complete example of JS password generation and strength detection (with demo source code download)
- Angularjs integrates WeChat UI (weui)
- How to quickly switch between Traditional Chinese and Simplified Chinese with JavaScript and the trick for websites to support switching between Simplified and Traditional Chinese_javascript skills

