
Home >Web Front-end >H5 Tutorial >HTML5 Guide (3)-Implementing drag-and-drop function
HTML5 Guide (3)-Implementing drag-and-drop function

- 黄舟Original
- 2017-03-22 16:05:521689browse
The content of this article is about how to implement the html element drag and drop function in html5. Before html5, to implement drag and drop, you needed to use js. Now html5 supports the drag and drop function internally, but to implement slightly more complex functions, the help of js is still indispensable. Let's look at a few examples below.
1. Create a drag-and-drop object
We can tell the browser which elements need to implement the drag-and-drop function through the draggable attribute. draggable has three values: true: the element can be dragged; false: the element cannot be dragged; auto: the browser determines whether the element can be dragged.
The system default value is auto, but in the auto case, browsers have different support for the drag and drop function of different elements. For example, the img object is supported but the p object is not supported. Therefore, if you need to drag an element, it is best to set draggale to true. Let’s look at an example below:
<!DOCTYPE HTML><html><head>
    <title>Example</title>
    <style>
        #src > *        {
            float: left;
        }
        #target, #src > img        {
            border: thin solid black;
            padding: 2px;
            margin: 4px;
        }
        #target        {
            height: 123px;
            width: 220px;
            text-align: center;
            display: table;
        }
        #target > p        {
            display: table-cell;
            vertical-align: middle;
        }
        #target > img        {
            margin: 1px;
        }
    </style></head><body>
    <p id="src">
        <img draggable="true" id="car1" src="img/1.jpg" alt="car1" />
        <img draggable="true" id="car2" src="img/2.jpg" alt="car2" />
        <img draggable="true" id="car3" src="img/3.jpg" alt="car3" />
        <p id="target">
            <p id="msg">
                drop here</p>
        </p>
    </p>
    <script>
        var src = document.getElementById("src");
        var target = document.getElementById("target");
        </script>
        </body>
        </html>
Running effect:

2. Processing drag events
Now let’s understand the events related to drag and drop. There are two types of events, one is the event of the drag object, and the other is the event of the drop area. Drag events include: dragstart: triggered when the element dragging starts; drag: triggered during the element dragging process; dragend: triggered when the element dragging ends. Let’s take a look at an example:
<!DOCTYPE HTML><html><head>
    <title>Example</title>
    <style>
        #src > *        {
            float: left;
        }
        #target, #src > img        {
            border: thin solid black;
            padding: 2px;
            margin: 4px;
        }
        #target        {
            height: 123px;
            width: 220px;
            text-align: center;
            display: table;
        }
        #target > p        {
            display: table-cell;
            vertical-align: middle;
        }
        #target > img        {
            margin: 1px;
        }
        img.dragged        {
            background-color: Orange;
        }
    </style></head><body>
    <p id="src">
        <img draggable="true" id="car1" src="img/1.jpg" alt="car1" />
        <img draggable="true" id="car2" src="img/2.jpg" alt="car2" />
        <img draggable="true" id="car3" src="img/3.jpg" alt="car3" />
        <p id="target">
            <p id="msg">
                drop here</p>
        </p>
    </p>
    <script>
        var src = document.getElementById("src");
        var target = document.getElementById("target");
        var msg = document.getElementById("msg");
        src.ondragstart = function (e) {
            e.target.classList.add("dragged");
        }
        src.ondragend = function (e) {
            e.target.classList.remove("dragged");
            msg.innerHTML = "drop here";
        }
        src.ondrag = function (e) {
            msg.innerHTML = e.target.id;
        }    </script></body></html>
Running effect:

3. Create a delivery area
We Let’s look at the events related to the drop area: dragenter: triggered when the drag object enters the drop area; dragover: triggered when the drag object moves within the drop area; dragleave: triggered when the drag object is not placed in the drop area and leaves the drop area. ;drop: Triggered when the dragged object is dropped in the drop area.
Let’s take a look at an example:
<!DOCTYPE HTML><html><head>
    <title>Example</title>
    <style>
        #src > *        {
            float: left;
        }
        #target, #src > img        {
            border: thin solid black;
            padding: 2px;
            margin: 4px;
        }
        #target        {
            height: 123px;
            width: 220px;
            text-align: center;
            display: table;
        }
        #target > p        {
            display: table-cell;
            vertical-align: middle;
        }
        #target > img        {
            margin: 1px;
        }
        img.dragged        {
            background-color: lightgrey;
        }
    </style></head><body>
    <p id="src">
        <img draggable="true" id="car1" src="img/1.jpg" alt="car1" />
        <img draggable="true" id="car2" src="img/2.jpg" alt="car2" />
        <img draggable="true" id="car3" src="img/3.jpg" alt="car3" />
        <p id="target">
            <p id="msg">
                drop here</p>
        </p>
    </p>
    <script>
        var src = document.getElementById("src");
        var target = document.getElementById("target");
        var msg = document.getElementById("msg");
        var draggedID;
        target.ondragenter = handleDrag;
        target.ondragover = handleDrag;
        function handleDrag(e) {
            e.preventDefault();
        }
        target.ondrop = function (e) {
        var newElem = document.getElementById(draggedID).cloneNode(false);
            target.innerHTML = "";
            target.appendChild(newElem);
            e.preventDefault();
        }
        src.ondragstart = function (e) {
            draggedID = e.target.id;
            e.target.classList.add("dragged");
        }
        src.ondragend = function (e) {
        var elems = document.querySelectorAll(".dragged");
        for (var i = 0; i < elems.length; i++) {
                elems[i].classList.remove("dragged");
            }
        }    </script></body></html>
Running results:


4 .Use DataTransfer
We use DataTransfer to transfer data from the drag object to the drop area. DataTransfer has the following properties and methods: types: returns the format of the data; getData(0313a12b65aa20a048ec62b8cf470fd2): returns the data in the specified format; setData(0313a12b65aa20a048ec62b8cf470fd2, 1d029f6197b5a3eb8a3fdf0a088ddf55): sets the data in the specified format; clearData(db67a7d68f7dcf3e1cbb6c58d46c7cd0): removes the specified format data; files: returns an array of files that have been delivered. Let’s take a look at the following example, which achieves the same effect as Example 3:9a78f9382cfffc6c56b2ff1d7da5de14100db36a723c770d327fc0aef2ce13b193f0f5c25f18dab9d176bd4f6de5d30e
b2386ffb911b14667cb8f0f91ea547a7Example6e916e0f7d1e588d4f442bf645aedb2f
c9ccee2e6ea535a969eb3f532ad9fe89
#src > * {
float: left;
}
#src > img {
border: thin solid black;
padding: 2px;
margin: 4px;
}
#target {
border: thin solid black;
margin: 4px;
}
#target {
height: 123px;
width: 220px;
text-align: center;
display: table;
}
#target > p {
display: table-cell;
vertical-align: middle;
}
img.dragged {
background-color: Orange;
}
531ac245ce3e4fe3d50054a55f2659279c3bca370b5104690d9ef395f2c5f8d16c04bd5ca3fcae76e30b72ad730ca86d
d643afa7f44205fa36f73ddcbd859a1f
4ebcc5acaaef9a420126fa5287284026
c0bdd28485ad805bfb7e05724c72c844
e07cff6edccd0ece2caea16e427bd7cd
b542d434cdaa3cd747109219a835c8f5
42e673d36f66c5d00fecbb811523d281
drop here94b3e26ee717c64999d7867364b1b4a3
94b3e26ee717c64999d7867364b1b4a3
94b3e26ee717c64999d7867364b1b4a3
3f1c4e4b6b16bbbd69b2ee476dc4f83a
var src = document.getElementById("src");
var target = document.getElementById("target");
target.ondragenter = handleDrag;
target.ondragover = handleDrag;
function handleDrag(e) {
e.preventDefault();
}
target.ondrop = function (e) {
var droppedID = e.dataTransfer.getData("Text");
var newElem = document.getElementById(droppedID).cloneNode(false);
target.innerHTML = "";
target.appendChild(newElem);
e.preventDefault();
}
src.ondragstart = function (e) {
e.dataTransfer.setData("Text", e.target.id);
e.target.classList.add("dragged");
}
src.ondragend = function (e) {
var elems = document.querySelectorAll(".dragged");
for (var i = 0; i 2cdd3b3430fe4db382eef792693250d536cc49f0c466276486e50c850b7e495673a6ac4ed44ffec12cee46588e518a5e 5. Drag and drop files
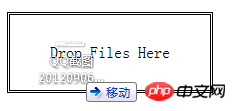
HTML5 supports file api , allows us to operate local files. Generally, we do not use the file api directly. We can use it in combination with other features, such as drag and drop effects, as in the following example:<!DOCTYPE HTML><html><head>
<title>Example</title>
<style>
body > * {
float: left;
}
#target {
border: medium double black;
margin: 4px;
height: 75px;
width: 200px;
text-align: center;
display: table;
}
#target > p {
display: table-cell;
vertical-align: middle;
}
table {
margin: 4px;
border-collapse: collapse;
}
th, td {
padding: 4px;
}
</style></head><body>
<p id="target">
<p id="msg">
Drop Files Here</p>
</p>
<table id="data" border="1">
</table>
<script>
var target = document.getElementById("target");
target.ondragenter = handleDrag;
target.ondragover = handleDrag;
function handleDrag(e) {
e.preventDefault();
}
target.ondrop = function (e) {
var files = e.dataTransfer.files;
var tableElem = document.getElementById("data");
tableElem.innerHTML = "<tr><th>Name</th><th>Type</th><th>Size</th></tr>";
for (var i = 0; i < files.length; i++) {
var row = "<tr><td>" + files[i].name + "</td>
<td>" + files[i].type + "</td>
<td>" + files[i].size + "</td></tr>";
tableElem.innerHTML += row;
}
e.preventDefault();
} </script></body></html> DataTransfer returns a FileList object. We can treat it as a file array object. file contains the following attributes. :name: file name; type: file type (MIME type); size: file size. Running effect:

 ##
##
The following introduces an example of uploading files by dragging ajax.
<!DOCTYPE HTML><html><head>
    <title>Example</title>
    <style>
        .table        {
            display: table;
        }
        .row        {
            display: table-row;
        }
        .cell        {
            display: table-cell;
            padding: 5px;
        }
        .label        {
            text-align: right;
        }
        #target        {
            border: medium double black;
            margin: 4px;
            height: 50px;
            width: 200px;
            text-align: center;
            display: table;
        }
        #target > p        {
            display: table-cell;
            vertical-align: middle;
        }
    </style></head><body>
    <form id="fruitform" method="post" action="/UploadHandler.ashx">
    <p class="table">
        <p class="row">
            <p class="cell label">
                Bananas:</p>
            <p class="cell">
                <input name="bananas" value="2" /></p>
        </p>
        <p class="row">
            <p class="cell label">
                Apples:</p>
            <p class="cell">
                <input name="apples" value="5" /></p>
        </p>
        <p class="row">
            <p class="cell label">
                Cherries:</p>
            <p class="cell">
                <input name="cherries" value="20" /></p>
        </p>
        <p class="row">
            <p class="cell label">
                File:</p>
            <p class="cell">
                <input type="file" name="file" /></p>
        </p>
        <p class="row">
            <p class="cell label">
                Total:</p>
            <p id="results" class="cell">
                0 items</p>
        </p>
    </p>
    <p id="target">
        <p id="msg">
            Drop Files Here</p>
    </p>
    <button id="submit" type="submit">
        Submit Form</button>
    </form>
    <script type="text/javascript">
        var target = document.getElementById("target");
        var httpRequest;
        var fileList;

        target.ondragenter = handleDrag;
        target.ondragover = handleDrag;
        function handleDrag(e) {
            e.preventDefault();
        }
        target.ondrop = function (e) {
            fileList = e.dataTransfer.files;
            e.preventDefault();
        }

        document.getElementById("submit").onclick = function handleButtonPress(e) {
            e.preventDefault();
            var form = document.getElementById("fruitform");
            var formData = new FormData(form);
            if (fileList) {
            for (var i = 0; i < fileList.length; i++) {
                    formData.append("file" + i, fileList[i]);
                }
            }

            httpRequest = new XMLHttpRequest();
            httpRequest.onreadystatechange = handleResponse;
            httpRequest.open("POST", form.action);
            httpRequest.send(formData);
        }        function handleResponse() {
        if (httpRequest.readyState == 4 && httpRequest.status == 200) {
        var data = JSON.parse(httpRequest.responseText);
                document.getElementById("results").innerHTML = "You ordered " + data.total + " items";
            }
        }
        </script>
        </body>
        </html>
Effect:
## Some of the above examples may have different running effects in different browsers. I use the Chrome browser, except for Examples 5 and 6. Except for supporting multiple files, other examples run normally. You can download the demo. 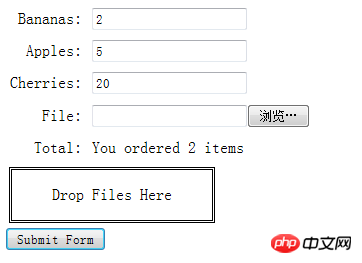
The above is the detailed content of HTML5 Guide (3)-Implementing drag-and-drop function. For more information, please follow other related articles on the PHP Chinese website!
Related articles
See more- AlloyTouch full-screen scrolling plug-in creates a smooth H5 page in 30 seconds
- HTML5 actual combat and analysis of touch events (touchstart, touchmove and touchend)
- Detailed explanation of image drawing examples in HTML5 canvas 9
- Regular expressions and new HTML5 elements
- How to combine NodeJS and HTML5 to drag and drop multiple files to upload to the server