Home >Web Front-end >CSS Tutorial >Detailed explanation of float in CSS
Detailed explanation of float in CSS
- 高洛峰Original
- 2017-03-17 12:47:111944browse
float is probably the most commonly used attribute in web page layout before css3. I often see codes that float when I don’t agree with each other, so let’s dig deeper into this half-angel. Half of the devil's attributes.
This article is some summary and some expanded usage after reading the float video of Zhang Xinxu, the master of MOC.com. This video is boring when you first read it, but you will find it even more boring after you read it carefully. . . . . . However, if you read again after encountering a pitfall, you will find a conscience video, every word of which is precious. Without further ado, let’s start now:
1.The origin of float
The original design of float was to create a wrapping effect for text, which is what the designer wanted. Let's make something.
2.float parameters
There are three parameter values for the float attribute:
left: Indicates that the element floats in left.
right: Indicates that the element floats to the right.
None: Object does not float and follows the standard document flow.
3.Effect display (Take float: left as an example, the case of float: right is just a difference in position)
<style> p{
    height: 20px;}
    .d1{
        width: 50px;
        background: hsl(100,50%,80%);
    }
    .d2{float: left;
        width: 100px;
        background: hsl(150,50%,80%);
    }
    .d3{
        width: 250px;
        height: 100px;
        background: hsl(10,50%,80%);
    }
    .d4{float: left;
        width: 300px;
        background: hsl(250,50%,80%);
    }
    span{
        margin-right: 3px;
        border-right: solid 1px #ccc;
        background-color: hsl(60,50%,80%);
    }
    .s3{
        float:left;
    }</style> <body> <p class="d1">p1</p><p class="d2">p2有float</p><p class="d3">p3</p><span class="s1">span1</span><span class="s2">span2</span><span class="s3">span3有float</span><p class="d4">p4有float</p><span class="s4">span4 </span></body>
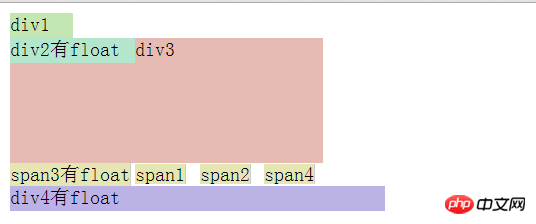
When the browser width is not long enough:

When the browser width is long enough:

We can draw the following conclusions:
When the floating element is a block element, its next adjacent element (not floating) is a block element will overlap the floating element, and the floating element will be above. If the next adjacent element is an inline element, it will follow the floating element.
When a floating element is an inline element, its next adjacent element (not floating) will not move if it is a block element, but overlap will occur if the width is not enough. If the next adjacent element is an inline element, it will follow the floated element.
4.The destructiveness of floating
Elements set to float will break away from the document flow, causing their parent elements to "collapse".
<p style="border:3px dashed #ddd">
    <p>我还没设置float属性</p></p>

##
<p style="border:3px dashed #ddd">
    <p style="float:left">我设置了float属性</p></p>

The wrapping of floating
This is the p ## without float #This is p
 6
6
This is already included in the above code and conclusion What is shown, simply put, is that in normal document flow, there will be a gap between two inline elements as well as between the top and bottom by default. Floating can clear this gap, allowing the two elements to be seamlessly combined, and also clear the gap between the top and bottom.
 7.
7.
Clear the impact of floating 7.1 Use
clearAttribute a. Put
as the last child tag and put it in the parent tag There, it is also the easiest way to clear floats, but it is not recommended.
<p style="border:3px dashed #ddd">
    <p style="float:left">我设置了float属性</p>
    <p style="clear:both"></p></p>

b.after伪元素和zoom
after,就是指标签的最后一个子元素的后面。因此我们可以用CSS代码生成一个具有clear属性的元素
<style>.myp{
        border:3px dashed #ddd    }
    .myp:after{
        content: "";
        clear:both;
        display: block;
    }</style><body><p class="myp">
    <p style="float:left">我设置了float属性</p></p></body>

但是ie6/7无法识别伪元素after,就得用zoom方式,例:
.myp{
        border:3px dashed #ddd;
     zoom:1
    }
  7.2
给父元素添加浮动,或者overflow:hidden,position:absolute等可以使元素BFC化的属性,下节单独探讨BFC的生成条件和布局规则,例:
<style>
    .myp{
        border:3px dashed #ddd;
        overflow: hidden;
    }</style> <body> <p class="myp">
    <p style="float:left">我设置了float属性</p></p></body>

关于float的布局以及清除影响就先到这了,有遗漏和错误的地方欢迎指正,下节来一起看看BFC到底是什么,他是如何布局的,为什么可以用来清除浮动。
The above is the detailed content of Detailed explanation of float in CSS. For more information, please follow other related articles on the PHP Chinese website!

