Home >Web Front-end >CSS Tutorial >CSS box model example explanation and analysis
CSS box model example explanation and analysis
- 高洛峰Original
- 2017-03-07 13:31:371460browse
Box is the basic concept in CSS, we need to use it to configure the appearance of elements and the overall layout of the document.
1. Apply padding to an element
Applying padding adds white space between the element's content and margins. We can set padding individually for each edge of the content box, or use the padding shorthand property to set all values in one declaration.

If you use a percentage value to specify padding, the percentage is always relative to the width of the containing block, and the height is not taken into account. The code below shows how to apply padding to an element.
<!DOCTYPE html>
<html lang="en">
<head>
    <meta charset="UTF-8">
    <title>Example</title>
    <style type="text/css">
        p {
            border:10px double black;
            background-color: lightgray;
            background-clip: content-box;
            width: 380px;
            padding-top: 0.5em;
            padding-bottom: 0.3em;
            padding-left: 0.8em;
            padding-right: 0.6em;
        }
    </style>
</head>
<body>
<p>
    <p>
        15岁的时候再得到那个5岁的时候热爱的布娃娃,65岁的时候终于有钱买25岁的时候热爱的那条裙子,又有什么意义。
        什么都可以从头再来,只有青春不能。
        那么多事情,跟青春绑在一起就是美好,离开青春,就是傻冒。
    </p>
</p>
</body>
</html>
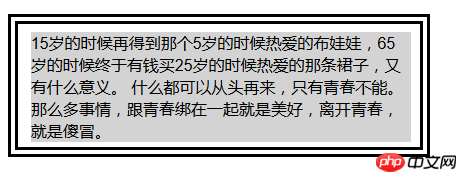
In the code, different padding is applied to each side of the box. The effect can be seen from the rendering below. In addition, the background-clip property is set so that the padding area does not show the background color, which emphasizes the effect of the padding.
You can also use the padding shorthand attribute to set padding for four sides in a declaration. You can specify 1~4 values for this attribute. If 4 values are specified, then they represent the top, right, bottom and left padding respectively. If a value is omitted, the best combination is as follows: if the value on the left is omitted, the value on the right is used by default; if the value on the bottom is omitted, the value on the top is used by default. If only one value is given, the padding on all four sides will be this value.
The following code listing shows how to use the padding shorthand attribute. This example also adds a rounded border, showing how to use padding to ensure that the border does not rise above the element's content.
<!DOCTYPE html>
<html lang="en">
<head>
    <meta charset="UTF-8">
    <title>Example</title>
    <style type="text/css">
        p {
            border:10px solid black;
            background: lightgray;
            width: 380px;
            border-radius:1em 4em 1em 4em;
            padding: 5px 25px 5px 40px;
        }
    </style>
</head>
<body>
<p>
    <p>
        15岁的时候再得到那个5岁的时候热爱的布娃娃,65岁的时候终于有钱买25岁的时候热爱的那条裙子,又有什么意义。
        什么都可以从头再来,只有青春不能。
        那么多事情,跟青春绑在一起就是美好,离开青春,就是傻冒。
    </p>
</p>
</body>
</html>
The effect is shown in the figure below, which shows how the browser displays the rounded borders and padding specified in the code.
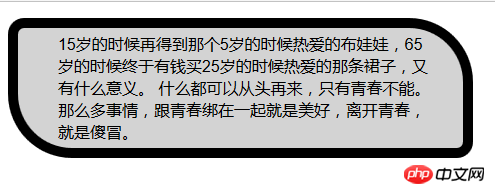
If no padding is set, the border will be drawn on the text. Setting padding ensures that there is enough space between the content and the border so this doesn't happen.
2. Apply margins to elements
Margins are the space between the element’s border and everything surrounding it on the page area. Things surrounding it include other elements and its parent element.

Similar to the padding property, even if padding is applied to the top and bottom edges, the percentage value is relative to the width of the containing block. The following code listing shows how to add margins to elements:
<!DOCTYPE html>
<html lang="en">
<head>
    <meta charset="UTF-8">
    <title>Example</title>
    <style type="text/css">
        img{
            border: 4px solid black;
            background: lightgray;
            width: 150px;
        }
        #second img { margin: 4px 20px;}
    </style>
</head>
<body>
<p>
    <p id="first">
        <img src="/static/imghwm/default1.png"  data-src="imgs/banana.png"  class="lazy"   alt="small banana">
        <img src="/static/imghwm/default1.png"  data-src="imgs/banana.png"  class="lazy"   alt="small banana">
    </p>
    <p id="second">
        <img src="/static/imghwm/default1.png"  data-src="imgs/banana.png"  class="lazy"   alt="small banana">
        <img src="/static/imghwm/default1.png"  data-src="imgs/banana.png"  class="lazy"   alt="small banana">
    </p>
</p>
</body>
</html>
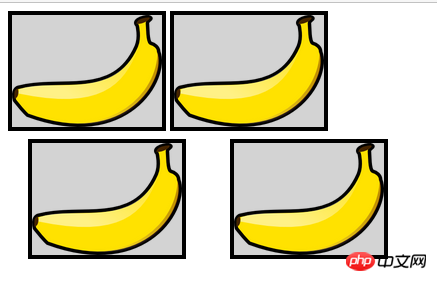
In the code, the following two img elements have a 4-pixel margin applied to their top and bottom edges. , applies a 20-pixel margin to the left and right sides. You can see the blank area created by the margin around the element from the rendering below. The two img elements above and the two img elements below partially show the img elements before and after the margin is set.
#Margins are sometimes not displayed, even if the value of a certain margin attribute is set. For example, when you apply margins to an element whose display attribute is set to inline, the top and bottom margins will not be displayed.
3. Control the size of elements
The browser will set the size of the element based on the flow of content on the page. There are several detailed rules that browsers must follow when allocating sizes. These behaviors can be overridden using size-related properties.

#The default values of the first three attributes are auto, which means that the browser will set the width and height of the element for us. It is also possible to specify dimensions explicitly using length values and percentage values. The percentage value is calculated based on the width of the containing block (the height of the processed element is also based on this width). The following code listing shows how to set dimensions for an element.
<!DOCTYPE html>
<html lang="en">
<head>
    <meta charset="UTF-8">
    <title>Example</title>
    <style type="text/css">
        p { width:75%; height: 100px; border: thin solid lightseagreen;}
        img { background: lightgray; border: 4px solid blueviolet; margin: 2px; height: 50%;}
        #first { box-sizing: border-box; width: 50%;}
        #second { box-sizing: content-box;}
    </style>
</head>
<body>
    <p>
        <img src="/static/imghwm/default1.png"  data-src="imgs/banana.png"  class="lazy"  id="first"  alt="small banana">
        <img src="/static/imghwm/default1.png"  data-src="imgs/banana.png"  class="lazy"  id="second"  alt="small banana">
    </p>
</body>
</html>
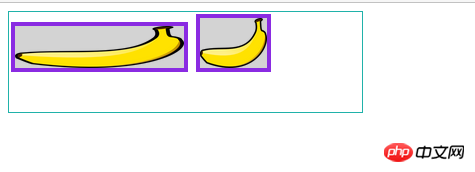
There are three key elements in the above example code. One p element contains two img elements. The following display shows how the browser displays these elements.
p元素是body元素的子元素。当将p元素的宽度表示为75%的时候,意思是告诉浏览器将p的宽度设置为包含块(此处是body内容盒)宽度的75%,而不论其具体值是多少。如果用户调整了浏览器窗口,body元素也会相应被调整,以确保p元素的宽度总是body内容盒宽度的75%。
3.1 设置一定尺寸的盒子
前面示例中两个img元素设置了相同的高度值(50%),但两个图片的高度在屏幕上看起来不一样。这是因为使用box-sizing属性改变了其中一个元素应用尺寸属性的区域。
默认情况下,宽度和高度是需要计算的,之后才能应用到元素的内容盒。这里说的是如果设置了元素的高度属性是100px,那么屏幕上的真实高度就是100px,这也算上了顶边和底边的内边距、边框和外边距的值。box-sizing属性允许指定尺寸样式应用到元素盒子的具体区域,也就是不需要自己计算某些值。
3.2 设置最小和最大尺寸
可以使用最小和最大相关属性为浏览器调整元素尺寸设置一定的限制。这让浏览器对于如何应用尺寸调整属性有了一定的自主权。
<!DOCTYPE html>
<html lang="en">
<head>
    <meta charset="UTF-8">
    <title>Example</title>
    <style type="text/css">
        img {
            background: lightgray;
            border: 4px solid blueviolet;
            margin: 2px;
            box-sizing: border-box;
            min-width: 100px;
            width: 50%;
            max-width: 200px;
        }
    </style>
</head>
<body>
    <p>
        <img src="/static/imghwm/default1.png"  data-src="imgs/banana.png"  class="lazy"  id="first"  alt="small banana">
    </p>
</body>
</html>
在代码中,为一个img元素应用了mix-width 和 max-width属性,并将其出事宽度设置为包含块的50%。这样浏览器就有了一定灵活性来调整图像尺寸,使其在代码中定义的最大尺寸和最小尺寸范围内保持50%的关系。浏览器会利用这种灵活性保留图像的高宽比,如下面的显示效果所示:
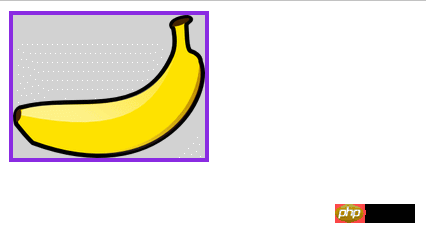
PS:浏览器对box-sizing属性的支持情况各不相同。
4. 处理溢出内容
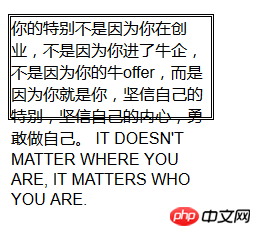
如果尝试改变元素的尺寸,很快就会到达某一个点:内容太大,已经无法完全显示在元素的内容盒中。这时的默认处理方式是内容溢出,并继续显示。下面的代码清单创建了一个固定尺寸的元素,由于尺寸太小,无法显示其中的内容。
<!DOCTYPE html>
<html lang="en">
<head>
<meta charset="UTF-8">
<title>Example</title>
<style type="text/css">
p {width: 200px; height: 100px; border:medium double black;}
</style>
</head>
<body>
<p>
你的特别不是因为你在创业,不是因为你进了牛企,不是因为你的牛offer,而是因为你就是你,坚信自己的特别,坚信自己的内心,勇敢做自己。
IT DOESN'T MATTER WHERE YOU ARE, IT MATTERS WHO YOU ARE.
</p>
</body>
</html>
代码中为p元素的width 和 height 属性指定了绝对值,最终显示在浏览器中的显示效果如下图所示:
可以使用 overflow 属性改变这种行为,下表列出了相关的 overflow 属性。

overflow-x 和 overflow-y 属性分部设置水平方向和垂直方向的溢出方式,overflow 简写属性可在一条声明中声明两个方向的溢出方式。下表展示了这三个属性可能的取值。

下面代码展示了溢出属性的用法:
<!DOCTYPE html>
<html lang="en">
<head>
<meta charset="UTF-8">
<title>Example</title>
<style type="text/css">
p {width: 200px; height: 100px; border:medium double black;}
p:first-child { overflow: hidden;}
p:last-child { overflow: scroll;}
</style>
</head>
<body>
<p>
你的特别不是因为你在创业,不是因为你进了牛企,不是因为你的牛offer,而是因为你就是你,坚信自己的特别,坚信自己的内心,勇敢做自己。
IT DOESN'T MATTER WHERE YOU ARE, IT MATTERS WHO YOU ARE.
</p>
<p>
你的特别不是因为你在创业,不是因为你进了牛企,不是因为你的牛offer,而是因为你就是你,坚信自己的特别,坚信自己的内心,勇敢做自己。
IT DOESN'T MATTER WHERE YOU ARE, IT MATTERS WHO YOU ARE.
</p>
</body>
</html>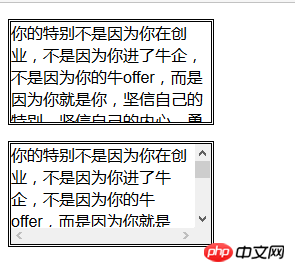
5. 控制元素的可见性
可以使用 visibility 属性控制元素的可见性。这个属性跟Javascript一起使用能创建一些比较复杂的效果。其取值如下:

下面的代码展示了如何使用JavaScript和几个按钮元素改变元素的可见性。
<!DOCTYPE html>
<html lang="en">
<head>
    <meta charset="UTF-8">
    <title>Example</title>
    <style type="text/css">
        tr > th { text-align: left; background: gray; color: white;}
        tr > th:only-of-type { text-align: right; background: lightgray; color: gray;}
    </style>
</head>
<body>
<table>
    <tr>
        <th>Rank</th><th>Name</th><th>Color</th><th>Size</th>
    </tr>
    <tr id="firstchoice">
        <th>Favorite:</th><td>Apples</td><td>Green</td><td>Medium</td>
    </tr>
    <tr>
        <th>2nd Favorite</th><td>Oranges</td><td>Orange</td><td>Large</td>
    </tr>
</table>
<p>
    <button>Visible</button>
    <button>Collapse</button>
    <button>Hidden</button>
</p>
<script>
    var buttons = document.getElementsByTagName("button");
    for(var i = 0;i < buttons.length; i++){
        buttons[i].onclick = function(e){
            document.getElementById("firstchoice").style.visibility = e.target.innerHTML;
        }
    }
</script>
</body>
</html>
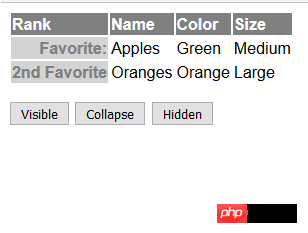
collapse 值只能应用到表相关元素,如tr 和 td。
6. 设置元素的盒类型
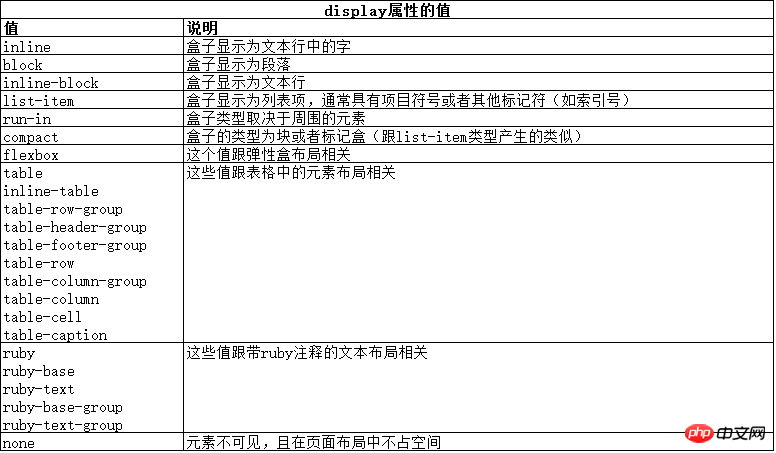
display 属性提供了一种改变元素盒类型的方式,这想要会改变元素在页面上的布局方式。下表列出了display 属性允许的取值。
6.1 认识块级元素
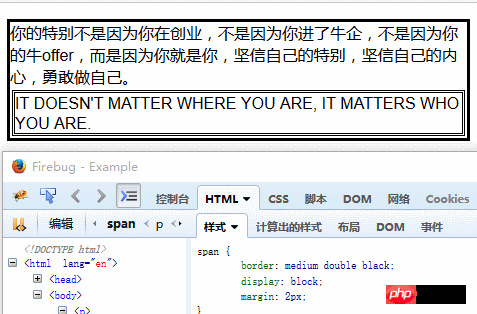
将 display属性设置为block值会创建一个块级元素。块级元素会在垂直方向跟周围元素有所区别。通常在元素前后放置换行符也能达到这种效果,在元素和周围元素之间制造分割的感受,就像文本中的段落。p元素表示段落,其默认样式约定中就包括 display 属性取 block 值。不过block 值可应用到所有元素,其用法如下面代码所示:
<!DOCTYPE html>
<html lang="en">
<head>
<meta charset="UTF-8">
<title>Example</title>
<style type="text/css">
p { border: medium solid black;}
span { display: block; border: medium double black; margin: 2px;}
</style>
</head>
<body>
<p>
你的特别不是因为你在创业,不是因为你进了牛企,不是因为你的牛offer,而是因为你就是你,坚信自己的特别,坚信自己的内心,勇敢做自己。
<span>IT DOESN'T MATTER WHERE YOU ARE, IT MATTERS WHO YOU ARE.</span>
</p>
</body>
</html>
可以从下图看到span 元素的 display属性 是否设置为 block 值的差别。
6.2 认识行内元素
将 display 属性设置为 inline 值会创建一个行内元素,它在视觉上跟周围内容的显示没有区别。
<!DOCTYPE html>
<html lang="en">
<head>
<meta charset="UTF-8">
<title>Example</title>
<style type="text/css">
p { display: inline;}
span { display: inline; border: medium double black; margin: 2em; width: 10em; height: 2em;}
</style>
</head>
<body>
<p>
你的特别不是因为你在创业,不是因为你进了牛企,不是因为你的牛offer,而是因为你就是你,坚信自己的特别,坚信自己的内心,勇敢做自己。
<span>IT DOESN'T MATTER WHERE YOU ARE, IT MATTERS WHO YOU ARE.</span>
</p>
</body>
</html>
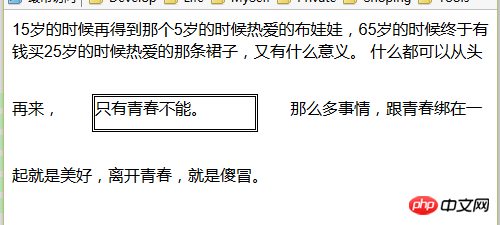
在上述代码中,为p元素和span元素同时使用了inline值,从下面的效果图可以看出应用样式后的效果:p元素和 span元素中的文本跟剩余文本没有分开,都显示在一起。

使用 inline 值的时候,浏览器会忽略某些值,如 width、height 和margin 。上面的示例代码中,为span 元素定义的这三个属性的值都没有应用到页面布局中。
6.3 认识行内-块级元素
将display 属性设置为 inline-block 值会创建一个其盒子混合了块和行内特性的元素。盒子整体上作为行内元素显示,这意味着垂直方向上该元素和周围的内容并排显示,没有区别。但盒子内部作为块级元素显示,这样,width、height 和 margin 属性都能应用到盒子上。
<!DOCTYPE html>
<html lang="en">
<head>
    <meta charset="UTF-8">
    <title>Example</title>
    <style type="text/css">
        p { display: inline;}
        span { display: inline-block; border: medium double black; margin: 2em; width: 10em; height: 2em;}
    </style>
</head>
<body>
<p>
    15岁的时候再得到那个5岁的时候热爱的布娃娃,65岁的时候终于有钱买25岁的时候热爱的那条裙子,又有什么意义。
    什么都可以从头再来,<span>只有青春不能。</span>那么多事情,跟青春绑在一起就是美好,离开青春,就是傻冒。
</p>
</body>
</html>
6.4 认识插入元素
display 属性设置为run-in 值会创建一个这样的元素:其盒子类型取决于周围元素。
下面代码展示了一个相邻兄弟元素为块级元素的插入元素:
<!DOCTYPE html>
<html lang="en">
<head>
    <meta charset="UTF-8">
    <title>Example</title>
    <style type="text/css">
        p { display: block;}
        span { display:run-in; border: medium double black;}
    </style>
</head>
<body>
<p>
    By the time we add the countless types of apples, oranges, and other well-know fruit, we are faced with thousands of choices.
</p>
<span>
    There are lots of different kinds of fruit - there are over 500 varieties of banana alone.
</span>
<p>Hello </p>
</body>
</html>

下面代码展示了一个相邻兄弟元素为行内元素的插入元素,修改上面p的CSS代码:
p { display: inline;}

6.5 隐藏元素
将display属性设置为none值就是告诉浏览器不要为元素创建任何类型的盒子,也就是说元素没有后代元素。这时元素在页面布局中不占据任何空间。
7. 创建浮动盒
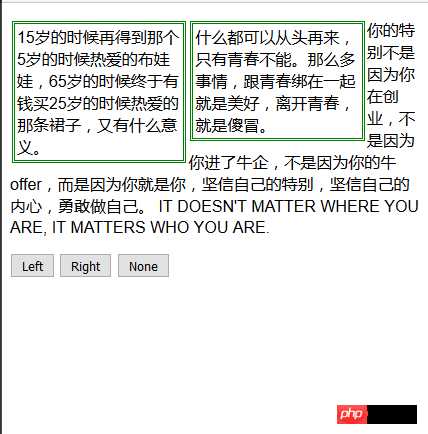
可以使用 float 属性创建浮动盒,浮动盒会将元素的左边界或者右边界移动到包含块或另一个浮动盒的边界。

<!DOCTYPE html>
<html lang="en">
<head>
<meta charset="UTF-8">
<title>Example</title>
<style type="text/css">
p.toggle {
float: left;
border: medium double green;
width: 40%;
margin: 2px;
padding: 2px;
}
</style>
</head>
<body>
<p class="toggle">
15岁的时候再得到那个5岁的时候热爱的布娃娃,65岁的时候终于有钱买25岁的时候热爱的那条裙子,又有什么意义。
什么都可以从头再来,只有青春不能。那么多事情,跟青春绑在一起就是美好,离开青春,就是傻冒。
</p>
<p>
你的特别不是因为你在创业,不是因为你进了牛企,不是因为你的牛offer,而是因为你就是你,坚信自己的特别,坚信自己的内心,勇敢做自己。
IT DOESN'T MATTER WHERE YOU ARE, IT MATTERS WHO YOU ARE.
</p>
<button>Left</button>
<button>Right</button>
<button>None</button>
<script>
var buttons = document.getElementsByTagName("button");
for (var i = 0; i <buttons.length; i++){
buttons[i].onclick = function(e){
var elements = document.getElementsByClassName("toggle");
for(var j = 0; j < elements.length; j++){
elements[j].style.cssFloat = e.target.innerHTML;
}
}
}
</script>
</body>
</html>
阻止浮动元素堆叠
如果设置了多个浮动元素,默认情况下,它们会一个挨着一个的堆叠在一起。使用clear属性可以阻止出现这种情况。clear属性可以指定浮动元素的一个编辑或者两个编辑不能挨着另一个浮动元素。

<!DOCTYPE html>
<html lang="en">
<head>
<meta charset="UTF-8">
<title>Example</title>
<style type="text/css">
p.toggle {
float: left;
border: medium double green;
width: 40%;
margin: 2px;
padding: 2px;
}
p.clear {clear: left;}
</style>
</head>
<body>
<p class="toggle">
15岁的时候再得到那个5岁的时候热爱的布娃娃,65岁的时候终于有钱买25岁的时候热爱的那条裙子,又有什么意义。
</p>
<p class="toggle clear">
什么都可以从头再来,只有青春不能。那么多事情,跟青春绑在一起就是美好,离开青春,就是傻冒。
</p>
<p>
你的特别不是因为你在创业,不是因为你进了牛企,不是因为你的牛offer,而是因为你就是你,坚信自己的特别,坚信自己的内心,勇敢做自己。
IT DOESN'T MATTER WHERE YOU ARE, IT MATTERS WHO YOU ARE.
</p>
<button>Left</button>
<button>Right</button>
<button>None</button>
<script>
var buttons = document.getElementsByTagName("button");
for (var i = 0; i <buttons.length; i++){
buttons[i].onclick = function(e){
var elements = document.getElementsByClassName("toggle");
for(var j = 0; j < elements.length; j++){
elements[j].style.cssFloat = e.target.innerHTML;
}
}
}
</script>
</body>
</html>
这里的代码示例是对前一个例子的简单扩展,只是添加了一个新的样式,为第二个p元素清除了左边界的浮动元素。从下面的效果图可以看出这个设置引起了页面布局的改变。(现在两个元素都浮动在包含块的左边界)
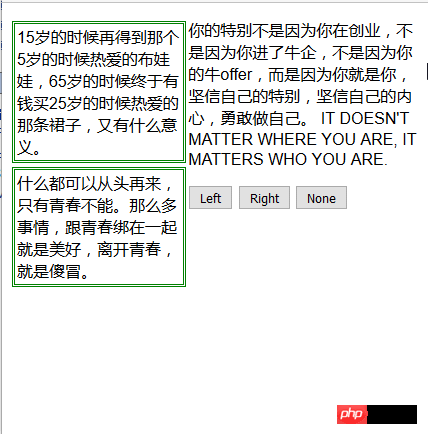
第二个p元素的左边界不允许挨着另一个浮动元素,因此浏览器将这个元素已到了页面下方。元素的右边界没有清楚,也就是说如果将两个p元素的float属性设置为right,它们在页面上还是会挨着。
以上这篇CSS使用盒模型实例分析就是小编分享给大家的全部内容了,希望能给大家一个参考,也希望大家多多支持PHP中文网。
更多CSS box model example explanation and analysis相关文章请关注PHP中文网!

