Home >Backend Development >Python Tutorial >python simulates Django framework
python simulates Django framework
- 高洛峰Original
- 2017-03-02 16:27:451371browse
1. Python implements web server
Web development must first have a web server. For example, apache, but in the development stage it is best to have a simple and convenient development server,
which is easy to restart for debugging. After the development and debugging is completed, the code can be deployed to a mature, stable and efficient web server.
# -*- coding: utf-8 -*-
from wsgiref import simple_server

# 定义一个输出 hello world 和环境变量的简单web应用程序
def hello_app(environ, start_response):
 # 输出 http 头,text/plain 表示是纯文本
 start_response('200 OK', [('Content-type','text/plain')])
 # 准备输出的内容
 content = []
 content.append('Hello world')
 for key, value in environ.items():
  content.append('%s : %s' % (key, value))
 # 输出,根据 wsgi 协议,返回的需要是一个迭代器,返回一个 list 就可以
 return ['\n'.join(content)]

# 构造开发服务器对象,设置绑定的地址和端口,并把 hello world 应用程序传给他
server = simple_server.make_server('localhost', 8080, hello_app)
# 启动开发服务器
server.serve_forever()
After executing the above program, open the browser and visit a URL starting with http://www.php.cn/:8080 You can see what environ contains.

(Cut out a small part)
2. Basic knowledge
The http protocol is used between browsers and web applications, which specifies the format of requests and responses.
1. Request package (Http Request)
The request mainly includes the request method, the requested URL, the request header, and the request body.
The request method http stipulates GET, POST, PUT, and DELETE, but web requests initiated through the browser generally only involve GET and POST requests.
GET is generally used to obtain server content, POST is similar to modifying content, PUT is added, and DELETE is deleted.
Generally, a POST request is initiated by submitting an html form. Redirection is required after success.
Looking at GET from the protocol perspective, the biggest difference between HTTP requests is that GET requests do not have a request body, while POST requests do. This means that a large amount of data can be sent to the server through POST request
, such as uploading files, etc. Of course, GET request can also pass parameters to the server through the URL itself and its parameters, such as
url?arg1=value&arg2=value
The request header contains the description information of the request package. Such as encoding, packet length, etc.
2. Response package (Http Response)
The format of the http response package is simpler, including status code, response header and response body. The status code indicates the The result of the request, such as
200 means success
404 means the resource was not found
500 means server error
301 means the resource has changed its address and the client needs to jump.
The response header is similar to the request header, including some description information. The response body is generally the output content, most of which is the page html code.
3. Request life cycle
1. After the web server receives the original http request, it packages it to a certain extent and then delivers it to the web application
2 . After processing by the web application, the data is returned to the web server in a certain format
3. The web server then packages the data into an http response packet and returns it to the browser.
4. About cgi
cgi (common gateway interface) is an ancient protocol between web servers and web applications. In the cgi protocol,
The web server puts various information of the http request into the environment variables of the cgi application, and the cgi application outputs its response header
and corresponding content to the web server through standard output.
The protocol used between the development server and the application used above is called wsgi. It is similar to cgi. It also packages the request into a key-value pair,
except that cgi is passed to the cgi application through environment variables program, and wsgi directly uses Python's dictionary object to pass it.
The first parameter environ of hello_app is a dictionary object containing the request information. The second parameter is a function. The web application needs to call it to output the status code and response header before outputting the response content
.
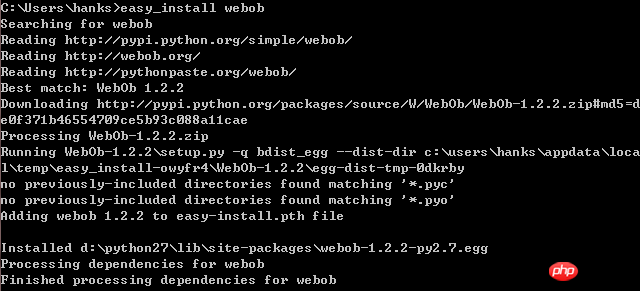
Processing web requests and responses The webob module is used to process requests and responses. It needs to be installed. Here, you must first install the setuptools module, a package management tool. You can use this tool to automatically download the required software packages, similar to ubuntu app- get. The following is the address: http://www.php.cn/ After the installation is complete, you can directly enter: easy_install webob in the command line and it will automatically download and install.

## Simple use:
>>> # Import the Request object>>> from webob import Request>>> environ = {}##>>> # Use Request to wrap the environ dictionary
>>> req = Request(environ)
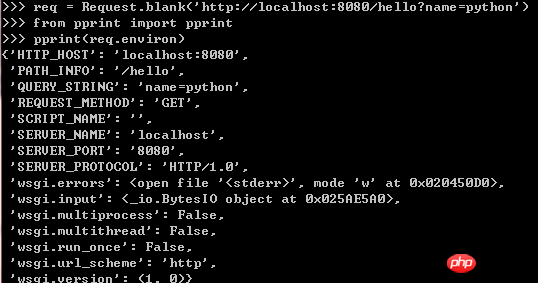
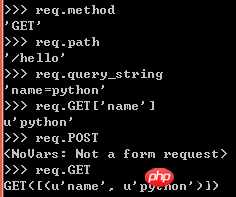
Use a Request class to wrap environ, and then access environ through the properties and methods of the Request object. Since a real environ dictionary can only be obtained in a web environment, in order to facilitate testing in the shell, webob provides a method to simulate simple web requests:

也可以通过req查找其它有用的信息

同时也可以通过webob模块中的Response对象来包装响应信息。

下面使用webob模块重写之前的hello_app
# -*- coding: utf-8 -*-
from wsgiref import simple_server
from webob import Request, Response


# 我们顺便增加了一个功能,就是根据用户在 URL 后面传递的参数
# 显示相应的内容
def hello_app(request):
 content = []
 # 获取 get 请求的参数
 content.append('Hello %s'%request.GET['name'])
 # 输出所有 environ 变量
 for key, value in request.environ.items():
  content.append('%s : %s' % (key, value))

 response = Response(body='\n'.join(content))
 response.headers['content-type'] = 'text/plain'
 return response

# 对请求和响应进行包装
def wsgi_wrapper(environ, start_response):
 request = Request(environ)
 response = hello_app(request)
 # response 对象本身也实现了与 wsgi 服务器之间通讯的协议,
 # 所以可以帮我们处理与web服务器之间的交互。
 # 这一句比较奇怪,对象使用括号是什么意思。。。。
 return response(environ, start_response)

server = simple_server.make_server('localhost', 8080, wsgi_wrapper)
server.serve_forever()
为了让 wsgi_wrapper 更加通用一点,可以把它设计成装饰器的形式:
# -*- coding: utf-8 -*-
from wsgiref import simple_server
from webob import Request, Response

# 写成装饰器的 wsgi_wrapper
def wsgi_wrapper(func):
 def new_func(environ, start_response):
  request = Request(environ)
  response = func(request)
  return response(environ, start_response)
 new_func.__name__ = func.__name__
 new_func.__doc__ = func.__doc__
 return new_func

# 应用程序
@wsgi_wrapper
def hello_app(request):
 content = []
 content.append('Hello %s'%request.GET['name'])
 for key, value in request.environ.items():
  content.append('%s : %s' % (key, value))

 response = Response(body='\n'.join(content))
 response.headers['content-type'] = 'text/plain'
 return response

server = simple_server.make_server('localhost', 8080, hello_app)
server.serve_forever()
三、模板
果然,还是需要用到模板,不能总是直接在Response中写上长串的html代码。
python中的模板引擎主要有mako, genshi, jinjia等。
mako 主要特点在于模板里面 可以比较方便的嵌入Python代码,而且执行效率一流;
genshi 的特点在于基于 xml, 非常简单易懂的模板语法,对于热爱xhtml的朋友来说是很好的选择,
同时也可以嵌入Python 代码,实现一些复杂的展现逻辑;
jinja 和genshi 一样拥有很简单的模板语法,只是不 依赖于 xml 的格式,同样很适合设计人员直接进行模板的制作,
同时也可以嵌入Python 代码实现一些复杂的展现逻辑。
这里使用Mako,地址ttp://pypi.python.org/pypi/Mako,下载python setup.py install进行安装
简单的模块例子:
## -*- coding: utf-8 -*-
<html>
 <head>
 <title>简单mako模板</title>
 </head>
 <body>
 <h5>Hello ${name}!</h5>
 <ul>
  % for key, value in data.items():
  <li>
  ${key} - ${value}
  <li>
  % endfor
 </ul>
 </body>
</html>
保存为simple.html文件,然后需要给模板对象传递data和name两个参数,然后进行渲染,就可以输入html内容
# -*- coding: utf-8 -*-
# 导入模板对象
from mako.template import Template
# 使用模板文件名构造模板对象
tmpl = Template(filename='./simple.html', output_encoding='utf-8')
# 构造一个简单的字典填充模板,并print出来
print tmpl.render(name='python', data = {'a':1, 'b':2})
保存为test_template.py文件,运行就可以输入内容:
$ python test_template.py
<html>
 <head>
 <title>简单mako模板</title>
 </head>
 <body>
 <h5>Hello python!</h5>
 <ul>
  <li>
  a - 1
  <li>
  <li>
  b - 2
  <li>
 </ul>
 </body>
</html>
下面对hello_app程序进行重构:
1. 把 wsgi_wrapper 单独放到通用模块 utils.py:
# -*- coding: utf-8 -*-
from webob import Request

def wsgi_wrapper(func):
 def new_func(environ, start_response):
  request = Request(environ)
  response = func(request)
  return response(environ, start_response)
 new_func.__name__ = func.__name__
 new_func.__doc__ = func.__doc__
 return new_func
2. 把 hello_app 给彻底独立出来,形成单独的模块 controller.py :
# -*- coding: utf-8 -*-
from utils import wsgi_wrapper
from webob import Response
from mako import Template

# 整合了模板功能的 hello_app
@wsgi_wrapper
def hello_app(request):
 tmpl = Template(filename='./simple.html', output_encoding='utf-8')
 content = tmpl.render(name=request.GET['name'], data=request.environ)
 return Response(body=content)
3. 这样 main.py 就变成这样了:
# -*- coding: utf-8 -*-
from wsgiref import simple_server
from controller import hello_app

server = simple_server.make_server('localhost', 8080, hello_app)
server.serve_forever()
四、ORM(Object Relation Mapping, 对象关系映射)
终于也要这一步了,作为web应用,还是需要与数据库进行合作。
这里使用sqlalchemy,是一个 ORM (对象-关系映射)库,提供Python对象与关系数据库之间的映射。和Django的models
用法很像,也是可以通过python代码来创建数据库表,并进行操作。
sqlalchemy 还可以自动映射 Python 对象的继承,可以实现eager loading、lazy loading, 可以直接将 Model 映射到自定
义的 SQL 语句,支持n多的数据库等等等等。 可以说 sqlalchemy 既有不输于 Hibernate 的强大功能,同时不失 Python
的简洁优雅。
使用方法:
# -*- coding: utf-8 -*-
from sqlalchemy import *
from sqlalchemy.orm import sessionmaker, scoped_session
from sqlalchemy.ext.declarative import declarative_base

# 创建数据库引擎,这里我们直接使用 Python2.5 自带的数据库引擎:sqlite,
# 直接在当前目录下建立名为 data.db 的数据库
engine = create_engine('sqlite:///data.db')
# sqlalchemy 中所有数据库操作都要由某个session来进行管理
# 关于 session 的详细信息请参考:http://www.sqlalchemy.org/docs/05/session.html
Session = scoped_session(sessionmaker(autocommit=False, autoflush=False, bind=engine))
Base = declarative_base()

class Dictionary(Base):
 # Python 对象对应关系数据库的表名
 __tablename__ = 't_dictionary'
 # 定义自动,参数含义分别为:数据库字段名,字段类型,其他选项
 key = Column('key', String(255), primary_key=True)
 value = Column('value', String(255))

# 创建数据库
Base.metadata.create_all(engine)

session = Session()
for item in ['python','ruby','java']:
 # 构造一个对象
 dictionary = Dictionary(key=item, value=item.upper())
 # 告诉 sqlalchemy ,将该对象加到数据库
 session.add(dictionary)

# 提交session,在这里才真正执行数据库的操作,添加三条记录到数据库
session.commit()

# 查询数据库中Dictionary对象对应的数据
for dictionary in session.query(Dictionary):
 print dictionary.key, dictionary.value
上面的代码你执行两遍就会报错,为什么。。。因为插入数据库的主键重复了。。。。
这样就可以整合到之前的controller.py文件中
# -*- coding: utf-8 -*-
from utils import wsgi_wrapper
from webob import Response
from mako.template import Template
# 导入公用的 model 模块
from model import Session, Dictionary

@wsgi_wrapper
def hello_app(request):
 session = Session()
 # 查询到所有 Dictionary 对象
 dictionaries = session.query(Dictionary)
 # 然后根据 Dictionary 对象的 key、value 属性把列表转换成一个字典
 data = dict([(dictionary.key, dictionary.value) for dictionary in dictionaries])

 tmpl = Template(filename='./simple.html', output_encoding='utf-8')
 content = tmpl.render(name=request.GET['name'], data=data)
 return Response(body=content)
五、URL分发控制
给不同的资源设计不同的 URL, 客户端请求这个 URL,web应用程序再根据用户请求的 URL 定位到具体功能并执行之。
提供一个干净的 URL 有很多好处:
1. 可读性,通过 URL 就可以大概了解其提供什么功能
2. 用户容易记住也方便直接输入
3.设计良好的 URL 一般都更短小精悍,对搜索引擎也 更友好
使用selector模块来处理url映射
下载地址http://pypi.python.org/pypi/selector, 下载那个source文件进行python setup.py install
首先把urls的配置单独放到urls.py中
# -*- coding: utf-8 -*-
from controller import hello_app
mappings = [('/hello/{name}', {'GET':hello_app})]
修改main.py
# -*- coding: utf-8 -*-
from wsgiref import simple_server
from urls import mappings
from selector import Selector

# 构建 url 分发器
app = Selector(mappings)
server = simple_server.make_server('localhost', 8080, app)
server.serve_forever()
然后,在 hello_app 中就可以通过 environ['wsgiorg.routing_args'] 获取到 name 参数了,
不过在 wsgi_wrapper 其实还可以进一步简化 hello_app 的工作: 直接把解析得到的参数
当作函数参数传过去!修改 utils.py:
from webob import Request

def wsgi_wrapper(func):
 def new_func(environ, start_response):
  request = Request(environ)
  position_args, keyword_args = environ.get('wsgiorg.routing_args', ((), {}))
  response = func(request, *position_args, **keyword_args)
  return response(environ, start_response)
 new_func.__name__ = func.__name__
 new_func.__doc__ = func.__doc__
 return new_func
那 hello_app 就可以改成这样了:
...
@wsgi_wrapper
def hello_app(request, name=''):
 ...
 content = tmpl.render(name=name, data=data)
 return Response(body=content)
执行main.py,访问http://localhost:8080/hello/Python
总结
以上部分的实现,就是类似Django框架中的几个主要的功能模块,希望对大家的学习有所帮助。
更多python simulates Django framework相关文章请关注PHP中文网!

