Home >Web Front-end >H5 Tutorial >HTML5 Game Development-Angry Birds-Open Source Lecture (3)-The Impact of Collision
HTML5 Game Development-Angry Birds-Open Source Lecture (3)-The Impact of Collision
- 黄舟Original
- 2017-03-02 13:40:272426browse
We have already achieved the use of external force to fly the bird out, and also achieved the follow-up of the camera. This time we will study the impact of the collision between the bird and other objects, and the deformation and disappearance of the objects caused by the collision. Below are the links to the first two lectures. It is best for friends to understand before reading this tutorial. one time.
In fact, in box2d, as long as we set the density, friction, elasticity and other properties of the objects, they will simulate the real world collision. If you want to use these If you want to perform some special processing on collisions, you need to obtain the impact of the collision between them, so that you can do what you want to do based on the impact. Use the following line of code in the lufylegend library to detect collisions.
LGlobal.box2d.setEvent(LEvent.POST_SOLVE,postSolve);
The collision function is as follows, accepting two parameters
function postSolve(contact, impulse){
}
and then using impulse.normalImpulses[0] to obtain the magnitude of the impact generated by the collision.
Next, we will control the state of the pig head according to the impact of the collision. First prepare the following two pictures


Then, create The Pig class is as follows
function Pig(){
	base(this,LSprite,[]);
	var self = this;
	self.hp = 200;
	self.name = "pig";
	self.list = ["pig01","pig02"];
	self.bitmap = new LBitmap(new LBitmapData(imglist[self.list[0]]));
	self.addChild(self.bitmap);
	self.addBodyCircle(24,self.bitmap.getHeight()*0.5,self.bitmap.getWidth()*0.5,1,5,.4,.13);
}
Pig.prototype.hit = function(value){
	var self = this;
	if(value < 10)return;
	if(self.hp == 200)self.bitmap.bitmapData = new LBitmapData(imglist[self.list[1]]);
	self.hp -= value;
}
The above code first sets a healthy status picture for the pig's head in the constructor, and then changes the picture of the pig's head into an injured picture in the hit function.
With the above Pig class, as long as the impact of the collision occurs between the pig head and other objects, the impact of the collision is passed into the hit function, and the status and hp value of the pig head can be controlled. Of course, you can also prepare for the pig head. Pictures of various states, such as minor injuries, serious injuries, etc., and then use the hit function to set different display pictures for him according to his HP value.
In addition, in the Angry Birds game, each object also has its own different states. For example, the two pictures below represent the two states of the wooden bars


In order to facilitate the operation of these objects, we create a Stage class like the pig head above, as follows
function Stage(list,rotate,m,ctrl){
	base(this,LSprite,[]);
	var self = this;
	self.name = "stage";
	self.ctrl = ctrl;
	self.list = list;
	self.bitmap = new LBitmap(new LBitmapData(imglist[self.list[0]]));
	self.hp = 200;
	self.addChild(self.bitmap);
	self.addBodyPolygon(self.bitmap.getWidth(),self.bitmap.getHeight(),1,m,.4,.2);
	if(rotate != 0)self.setRotate(rotate*Math.PI/180);
}
Stage.prototype.hit = function(value){
	var self = this;
	if(!self.ctrl)return;
	if(value < 1)return;
	if(self.hp == 200)self.bitmap.bitmapData = new LBitmapData(imglist[self.list[1]]);
	self.hp -= value;
}
The principle is the same as the Pig class, no More explanation.
Then, add some objects to the main function, as follows
	setStage(["desk"],800,430,0,10,false);
	setStage(["desk"],970,430,0,10,false);
	setStage(["st11","st12"],935,410,0,1,true);
	setStage(["st01","st02"],905,370,90,1,true);
	setStage(["st01","st02"],965,370,90,1,true);
	setStage(["st11","st12"],935,310,0,1,true);
	setStage(["st31","st32"],817,370,90,1,true);
	setStage(["st31","st32"],970,370,90,1,true);
	setStage(["st31","st32"],895,250,0,1,true);
	setStage(["st21","st22"],955,230,0,1,true);
	setStage(["st31","st32"],858,150,90,1,true);
	setStage(["st31","st32"],925,150,90,1,true);
	setStage(["st11","st12"],935,50,0,1,true);
	setStage(["st21","st22"],950,30,90,1,true);
	setStage(["st21","st22"],800,430,90,1,true);
	setStage(["st21","st22"],1100,430,90,1,true);
	var pig = new Pig();
	pig.x = 950;
	pig.y = 173;
	backLayer.addChild(pig);
The setStage function is as follows, in order to instantiate an object
function setStage(list,x,y,rotate,m,ctrl){
	var stageLayer = new Stage(list,rotate,m,ctrl);
	stageLayer.x = x;
	stageLayer.y = y;
	backLayer.addChild(stageLayer);
	return stageLayer;
}
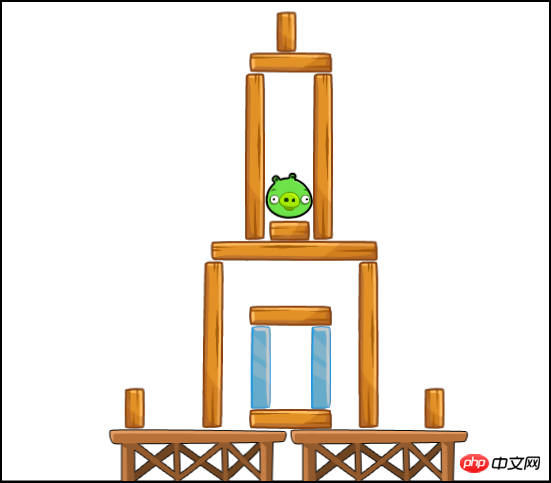
The screen generated by the above code is as follows

If you have played the game Angry Birds, you should be familiar with the picture above. It is the picture of the first level of Angry Birds.
Next, modify the collision detection function, because I set the body's UserData to the LSprite object itself in the lufylegend library, so here I get the LSprite object through GetUserData
function postSolve(contact, impulse){
	if(contact.GetFixtureA().GetBody().GetUserData().hit)contact.GetFixtureA().GetBody().GetUserData().hit(impulse.normalImpulses[0]);
	if(contact.GetFixtureB().GetBody().GetUserData().hit)contact.GetFixtureB().GetBody().GetUserData().hit(impulse.normalImpulses[0]);
}
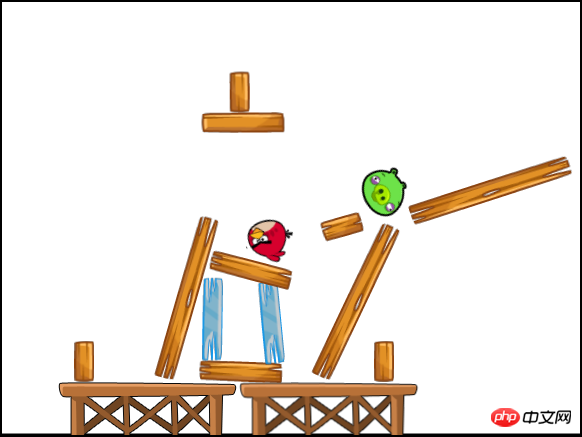
With the above The collision, if you run the game now, you can get the following effect
You can see that the status of the pig head and some wooden bars in the picture have changed, so we have completed the process according to the collision Let’s change the state of the object. When the pig head’s HP becomes 0, remove it from the game screen.
Generally when the pig head disappears, there will be an explosion-like effect, as shown below

The following creates a RemoveObject class to achieve this Effect
function RemoveObject(){
	base(this,LSprite,[]);
	var self = this;
	self.name = "remove";
	self.index = 0;
	self.bitmap = new LBitmap(new LBitmapData(imglist["remove"]));
	self.addChild(self.bitmap);
}
RemoveObject.prototype.run = function(){
	var self = this;
	if(self.index++ > 20){
		self.parent.removeChild(self);
	}
}
In the above run function, the reason why it is removed after running the loop 20 times is to allow the above explosion state to last for a short period of time before disappearing.
The last processing left is to monitor the status of these objects in the loop function to control when they disappear
function onframe(){
	if(bird){
		backLayer.x = LGlobal.width*0.5 - (bird.x + bird.getWidth()*0.5);
		if(backLayer.x > 0){
			backLayer.x=0;
		}else if(backLayer.x < LGlobal.width - 1600){
			backLayer.x = LGlobal.width - 1600;
		}
		LGlobal.box2d.synchronous();
	}
	var child;
	for(var key in backLayer.childList){
		child = backLayer.childList[key];
		if(child.name == null)continue;
		if(child.x < -child.getWidth() || child.x > backLayer.getWidth()){
			backLayer.removeChild(child);
			if(child.name == "bird01"){
				bird = null;
				backLayer.addEventListener(LMouseEvent.MOUSE_DOWN,moveStart);
				backLayer.addEventListener(LMouseEvent.MOUSE_MOVE,moveRun);
				backLayer.addEventListener(LMouseEvent.MOUSE_UP,moveEnd);
			}
		}else if((child.name == "stage" || child.name == "pig") && child.hp <= 0){
			if(child.name == "pig"){
				var removeObj = new RemoveObject();
				removeObj.x = child.x;
				removeObj.y = child.y;
				backLayer.addChild(removeObj);
			}
			backLayer.removeChild(child);
		}else if(child.name == "remove"){
			child.run();
		}
	}
}
The above codes are very simple and will not be explained. Among them, the smallest After the bird disappeared, I added three events to move the screen. Finally, the complete code will be given. You can take a look at it
backLayer.addEventListener(LMouseEvent.MOUSE_DOWN,moveStart);
backLayer.addEventListener(LMouseEvent.MOUSE_MOVE,moveRun);
backLayer.addEventListener(LMouseEvent.MOUSE_UP,moveEnd);
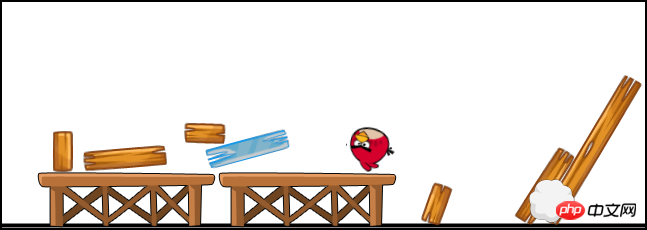
Okay, here are the renderings and test connections , try it
http://lufy.netne.net/lufylegend-js/lufylegend-1.4/box2d/sample04/index.html

As you can see, the bird above has smashed the pig's head!
The source code of this tutorial is given below. The lufylegend library and box2dweb need to be downloaded and configured by yourself. For the extension of library 1.4.1, please go to the first page. Download during lecture.
http://fsanguo.comoj.com/download.php?i=AngryBirds3.rar
This lecture series ends here. The basic functions of Angry Birds have been implemented. All that is left is to diversify the elements. Everyone can use their imagination as much as they want. , make your own physics game.
## The above is HTML5 game development-Angry Birds-Open Source Lecture (3)- For more information on the impact of collision, please pay attention to the PHP Chinese website (www.php.cn)!
Related articles
See more- AlloyTouch full-screen scrolling plug-in creates a smooth H5 page in 30 seconds
- HTML5 actual combat and analysis of touch events (touchstart, touchmove and touchend)
- Detailed explanation of image drawing examples in HTML5 canvas 9
- Regular expressions and new HTML5 elements
- How to combine NodeJS and HTML5 to drag and drop multiple files to upload to the server

