
Home >Web Front-end >H5 Tutorial >HTML5 super cool animation production - the wonderful use of LTweenLite
HTML5 super cool animation production - the wonderful use of LTweenLite

- 黄舟Original
- 2017-03-01 15:37:163135browse
lufylegend.js is an open source HTML5 game engine. There are often various animations in the game. These Some animations are flash files, and some are video files. This time I will use lufylegend to create a handsome game animation, as shown below . 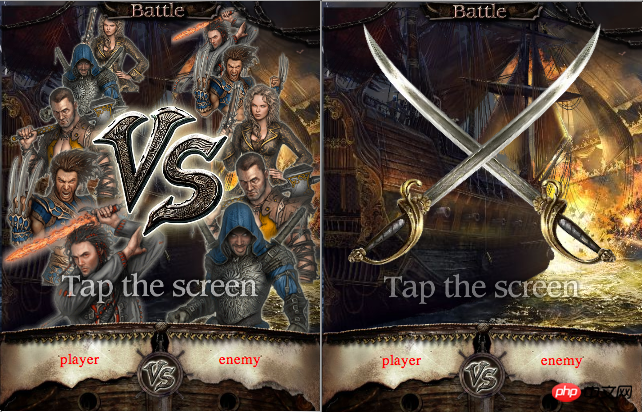
The test connection is as follows
http://lufylegend.com/demo/effects01/
1. Preparation
The preparation is of course the downloading of the engine.
lufylegend.js engine official website
##http://lufylegend.com/lufylegend
lufylegend.js engine online API documentation link
http://lufylegend. com/lufylegend/api
To do animation, you usually need to use the timeline, in lufylegend The usage of timeline events in the .js engine is as follows
layer.addEventListener(LEvent.ENTER_FRAME, onframe);For example, if we want an object A to continuously move to the right, we can do this
layer.addEventListener(LEvent.ENTER_FRAME, onframe);
function onframe(event){
	A.x += 1;
}
Timeline is the most commonly used method in the production of games and animations, but this time to make animations, we use Another approach is LTweenLite. LTweenLite is the easing class in the lufylegend.js engine. It is very useful in the animation production process. It is even more convenient than ordinary timeline events. In the following development, all animations will be eased through LTweenLite. Implemented by class class.
1, of course, you must first prepare HTML
##<!DOCTYPE html>
<html lang="en">
<head>
<meta charset="utf-8" />
<title>effects01</title>
<script type="text/javascript" src="http://lufylegend.com/js/lufylegend-1.8.0.simple.min.js"></script>
<script type="text/javascript" src="http://lufylegend.com/js/lib/lufylegend.LoadingSample4-0.1.0.min.js"></script>
</head>
<body style="margin:0px 0px 0px 0px;">
<p id="legend"></p>
<script>
</script>
</body>
</html>
var imgData = [
	{name:"background",path:"background.jpg"},
	{name:"background_ad",path:"background_ad.jpg"},
	{name:"card01",path:"card01.png"},
	{name:"card02",path:"card02.png"},
	{name:"card03",path:"card03.png"},
	{name:"card04",path:"card04.png"},
	{name:"card05",path:"card05.png"},
	{name:"effects",path:"effects.png"},
	{name:"stable_assets",path:"stable_assets.png"}
];
var dataList;
var loadingLayer,charaLayer,stageLayer;
var warshipDown,playerText,enemyText,windowUp,title,big_vs,background,swords,swords02;
if(LGlobal.canTouch){
	LGlobal.stageScale = LStageScaleMode.EXACT_FIT;
	LSystem.screen(LStage.FULL_SCREEN);
}
init(20,"legend",320,410,main);
function main(){
	loadingLayer = new LoadingSample4();
	addChild(loadingLayer);
	/**读取图片*/
	LLoadManage.load(imgData,
		function(progress){
			loadingLayer.setProgress(progress);
		},gameInit);
}
is coded above. When browsing on a mobile phone, the interface will be set to full screen.
##
/**
 * 背景
 * */
function BackGround(bg01,bg02){
	var self = this;
	base(self,LSprite,[]);
	self.bitmapBG01 = new LBitmap(new LBitmapData(bg01));
	self.addChild(self.bitmapBG01);
	self.bitmapBG02 = new LBitmap(new LBitmapData(bg02));
	self.addChild(self.bitmapBG02);
	self.run();
}
/**
 * 让背景类的两个图片中的上层图片,不断的交替显示和隐藏状态,以达到明暗交替闪烁的效果
 * */
BackGround.prototype.run = function(){
	var self = this;
	var tween = LTweenLite.to(self.bitmapBG02,0.5,{alpha:0,ease:Bounce.easeIn}).
	to(self.bitmapBG02,0.5,{alpha:1,ease:Bounce.easeIn,onComplete:function(){
		self.run();
	}});
}
The above code uses lufylegend.js The new function of the engine version 1.8.0 is continuous easing, and when the easing is completed, its own run function is called, thus realizing a loop.
4, a warship that continuously fires cannonballs
/**
 * 战舰
 * */
function Warship(shipData,shotData){
	var self = this;
	base(self,LSprite,[]);
	self.bitmapShip = new LBitmap(shipData);
	self.addChild(self.bitmapShip);

	self.bitmapShot = new LBitmap(shotData);
	self.bitmapShot.x = -10;
	self.bitmapShot.y = self.bitmapShip.y + 123;
	self.addChild(self.bitmapShot);
	self.bitmapShot.rotate = -75;
	self.bitmapShot.alpha = 0;

	self.bitmapShot02 = new LBitmap(shotData);
	self.bitmapShot02.scaleX = self.bitmapShot02.scaleY = 0.7;
	self.bitmapShot02.x = 65;
	self.bitmapShot02.y = self.bitmapShip.y + 220;
	self.addChild(self.bitmapShot02);
	self.bitmapShot02.rotate = -80;
	self.bitmapShot02.alpha = 0;

	self.run();
	self.shot();
}
/**
 * 让战舰上下浮动
 * */
Warship.prototype.run = function(){
	var self = this;
	LTweenLite.to(self.bitmapShip,1,{y:5,ease:Quad.easeInOut}).
	to(self.bitmapShip,1,{y:0,ease:Quad.easeInOut,onComplete:function(){
		self.run();
	}});
}
/**
 * 让战舰开火发炮
 * */
Warship.prototype.shot = function(){
	var self = this;
	LTweenLite.to(self.bitmapShot,0.1,{delay:1.5,alpha:1,ease:Quad.easeInOut,onUpdate:function(obj){
		obj.y = obj.parent.bitmapShip.y + 123;
	}})
	.to(self.bitmapShot,0.1,{alpha:0,ease:Quad.easeInOut})
	.to(self.bitmapShot02,0.1,{delay:0.5,alpha:1,ease:Quad.easeInOut,onUpdate:function(obj){
		obj.y = obj.parent.bitmapShip.y + 220;
	}})
	.to(self.bitmapShot02,0.1,{alpha:0,ease:Quad.easeInOut,onComplete:function(){
		self.shot();
	}});
}
The above code is implemented using the same method cycle.
5, a flashing title
/**
 * 标题
 * */
function Title(bitmapData){
	var self = this;
	base(self,LSprite,[]);
	self.bitmap = new MiddleBitmap(bitmapData);
	self.bitmap.scaleX = self.bitmap.scaleY = 0.5;
	self.addChild(self.bitmap);
	self.run();
}
/**
 * 通过改变标题的透明状态,让标题明暗交替闪烁
 * */
Title.prototype.run = function(){
	var self = this;
	LTweenLite.to(self.bitmap,1,{alpha:0.4,ease:Quad.easeInOut}).
	to(self.bitmap,1,{alpha:1,ease:Quad.easeInOut,onComplete:function(obj){
		obj.parent.run();
	}});
}
The above code achieves this by continuously changing the transparency of the image. Flashing display of title.
6, you can flip the sword class that displays the picture
/**
 * 剑,通过参数scale的直,来设定剑的图片是否翻转
 * */
function Swords(bitmapData,scale){
	var self = this;
	base(self,LSprite,[]);
	self.bitmapSwords = new LBitmap(bitmapData);
	self.bitmapSwords.x = -self.bitmapSwords.getWidth()*0.5;
	self.bitmapSwords.y = -self.bitmapSwords.getHeight()*0.5;
	if(scale == -1){
		self.bitmapSwords.scaleY = scale;
		self.bitmapSwords.y += self.bitmapSwords.getHeight();
	}
	self.addChild(self.bitmapSwords);
}
7, move the picture to the vertex object. If the center of the childObjectLBitmap is moved to the origin of the object, the advantage is that the displayed position of the object will not change no matter whether the object is stretched or rotated. /**
* 将LBitmap对象的中心放到一个对象的原点,并返回这个对象
* */
function MiddleBitmap(bitmapData){
var self = this;
base(self,LSprite,[]);
self.bitmapTitle = new LBitmap(bitmapData);
self.bitmapTitle.x = -self.bitmapTitle.getWidth()*0.5;
self.bitmapTitle.y = -self.bitmapTitle.getHeight()*0.5;
self.addChild(self.bitmapTitle);
}8, a special effects class
/**
 * 特效类,特效图片加入后,特效显示完毕之后自动消失
 * */
function Effect(index){
	var self = this;
	base(self,LSprite,[]);
	var bitmapData;
	switch(index){
		case 0:
			bitmapData = new LBitmapData(dataList["effects"],99,45,116,96);
			break;
		case 1:
			bitmapData = new LBitmapData(dataList["effects"],102,278,110,88);
			break;
		case 2:
			bitmapData = new LBitmapData(dataList["effects"],357,85,122,127);
			break;
		case 3:
			bitmapData = new LBitmapData(dataList["effects"],346,357,108,99);
			break;
		case 4:
			bitmapData = new LBitmapData(dataList["effects"],246,918,57,62);
			break;
	}
	self.item = new MiddleBitmap(bitmapData);
	self.item.scaleX = self.item.scaleY = 0.1;
	self.addChild(self.item);

	LTweenLite.to(self.item,0.1,{scaleX:2,scaleY:2,ease:Quad.easeInOut})
	.to(self.item,0.2,{scaleX:3,scaleY:3,alpha:0,ease:Quad.easeInOut,onComplete:function(obj){
		var eff = obj.parent;
		eff.parent.removeChild(eff);
	}});
}
. When the special effects object is added to the screen, it will gradually disappear automatically.
9, add characters to the screen
/**
 * 添加人物图片到界面里
 * */
function setChara(){
	charaLayer = new LSprite();
	stageLayer.addChild(charaLayer);
	var charaBitmap,sy = 220;
	var charaBitmap = new MiddleBitmap(new LBitmapData(dataList["card01"]));
	charaBitmap.scale = 0.4;
	charaBitmap.x = 110;
	charaBitmap.ty = 50;
	charaBitmap.y = sy;
	charaBitmap.alpha = 0;
	charaLayer.addChild(charaBitmap);

	charaBitmap = new MiddleBitmap(new LBitmapData(dataList["card02"]));
	charaBitmap.scale = 0.45;
	charaBitmap.x = 85;
	charaBitmap.ty = 90;
	charaBitmap.y = sy;
	charaBitmap.alpha = 0;
	charaLayer.addChild(charaBitmap);


	charaBitmap = new MiddleBitmap(new LBitmapData(dataList["card03"]));
	charaBitmap.scale = 0.55;
	charaBitmap.x = 70;
	charaBitmap.ty = 140;
	charaBitmap.y = sy;
	charaBitmap.alpha = 0;
	charaLayer.addChild(charaBitmap);

	charaBitmap = new MiddleBitmap(new LBitmapData(dataList["card04"]));
	charaBitmap.scale = 0.65;
	charaBitmap.x = 75;
	charaBitmap.ty = 215;
	charaBitmap.y = sy;
	charaBitmap.alpha = 0;
	charaLayer.addChild(charaBitmap);

	charaBitmap = new MiddleBitmap(new LBitmapData(dataList["card05"]));
	charaBitmap.scale = 0.75;
	charaBitmap.x = 85;
	charaBitmap.ty = 280;
	charaBitmap.y = sy;
	charaBitmap.alpha = 0;
	charaLayer.addChild(charaBitmap);

	//right
	charaBitmap = new MiddleBitmap(new LBitmapData(dataList["card05"]));
	charaBitmap.scale = 0.4;
	charaBitmap.x = 215;
	charaBitmap.ty = 50;
	charaBitmap.y = sy;
	charaBitmap.alpha = 0;
	charaLayer.addChild(charaBitmap);

	charaBitmap = new MiddleBitmap(new LBitmapData(dataList["card04"]));
	charaBitmap.scale = 0.45;
	charaBitmap.x = 240;
	charaBitmap.ty = 90;
	charaBitmap.y = sy;
	charaBitmap.alpha = 0;
	charaLayer.addChild(charaBitmap);


	charaBitmap = new MiddleBitmap(new LBitmapData(dataList["card01"]));
	charaBitmap.scale = 0.55;
	charaBitmap.x = 260;
	charaBitmap.ty = 140;
	charaBitmap.y = sy;
	charaBitmap.alpha = 0;
	charaLayer.addChild(charaBitmap);

	charaBitmap = new MiddleBitmap(new LBitmapData(dataList["card03"]));
	charaBitmap.scale = 0.65;
	charaBitmap.x = 260;
	charaBitmap.ty = 215;
	charaBitmap.y = sy;
	charaBitmap.alpha = 0;
	charaLayer.addChild(charaBitmap);

	charaBitmap = new MiddleBitmap(new LBitmapData(dataList["card02"]));
	charaBitmap.scale = 0.75;
	charaBitmap.x = 242;
	charaBitmap.ty = 280;
	charaBitmap.y = sy;
	charaBitmap.alpha = 0;
	charaLayer.addChild(charaBitmap);
}
Add five characters to the left and right sides, and set them to be displayed on the screen eventually target location and target size.
Use the following function to add a special effect
##
function addEff(index,x,y){
	var eff = new Effect(index);
	eff.x = x;
	eff.y = y;
	stageLayer.addChild(eff);
}
10, first add all the objects to the screen. For objects that are not to be displayed at the beginning, set their visible attribute to false;
/**
 * 将所有对象和图片都添加到界面上
 * */
function addItem(){
	backLayer = new LSprite();
	stageLayer.addChild(backLayer);
	backLayer.scaleX = backLayer.scaleY = 2;

	background = new BackGround(dataList["background"],dataList["background_ad"]);
	background.x = -60;
	background.y = -50;
	backLayer.addChild(background);

	var warship = new Warship(new LBitmapData(dataList["stable_assets"],0,0,409,480)
			,new LBitmapData(dataList["stable_assets"],754,0,270,250));
	warship.scaleX = warship.scaleY = 0.8;
	backLayer.addChild(warship);


	setChara();

	warshipDown = new LSprite();
	warshipDown.y = LGlobal.height;
	stageLayer.addChild(warshipDown);

	var warship02 = new LBitmap(new LBitmapData(dataList["stable_assets"],0,505,720,310));
	warship02.scaleX = warship02.scaleY = 0.5;
	warship02.x = (LGlobal.width - warship02.getWidth())*0.5;
	warshipDown.addChild(warship02);

	var small_vs = new MiddleBitmap(new LBitmapData(dataList["stable_assets"],726,502,120,120));
	small_vs.scaleX = small_vs.scaleY = 0.6;
	small_vs.x = LGlobal.width*0.5;
	small_vs.y = LGlobal.height - 355;
	warshipDown.addChild(small_vs);

	playerText = new LTextField();
	playerText.color = "red";
	playerText.text = "player";
	playerText.x = (LGlobal.width*0.5 - playerText.getWidth())*0.5;
	playerText.y = 30;
	warshipDown.addChild(playerText);

	enemyText = new LTextField();
	enemyText.color = "red";
	enemyText.text = "enemy";
	enemyText.x = LGlobal.width*0.5 + (LGlobal.width*0.5 - enemyText.getWidth())*0.5;
	enemyText.y = 30;
	warshipDown.addChild(enemyText);

	windowUp = new LSprite();
	windowUp.y = -50;
	stageLayer.addChild(windowUp);
	var title_battle = new MiddleBitmap(new LBitmapData(dataList["stable_assets"],897,469,45,239));
	title_battle.rotate = -90;
	title_battle.scaleX = title_battle.scaleY = 0.55;
	title_battle.x = LGlobal.width*0.5;
	title_battle.y = 10;
	windowUp.addChild(title_battle);

	var chain = new LBitmap(new LBitmapData(dataList["stable_assets"],880,264,71,180));
	chain.rotate = -90;
	chain.scaleX = chain.scaleY = 0.5;
	windowUp.addChild(chain);

	var chain01 = new LBitmap(new LBitmapData(dataList["stable_assets"],851,740,100,173));
	chain01.rotate = -90;
	chain01.scaleX = chain01.scaleY = 0.6;
	chain01.x = 240;
	windowUp.addChild(chain01);

	title = new Title(new LBitmapData(dataList["stable_assets"],415,425,405,80));
	title.x = LGlobal.width*0.5;
	title.y = 290;
	title.alpha = 0;
	title.visible = false;
	stageLayer.addChild(title);

	big_vs = new MiddleBitmap(new LBitmapData(dataList["stable_assets"],420,5,340,330));
	big_vs.rotate = -90;
	big_vs.x = LGlobal.width*0.5;
	big_vs.y = 170;
	big_vs.alpha = 0;
	big_vs.visible = false;
	stageLayer.addChild(big_vs);

	swords = new Swords(new LBitmapData(dataList["stable_assets"],405,335,454,89),1);
	swords.x = LGlobal.width*0.5;
	swords.y = LGlobal.height*0.5 - 60;
	swords.rotate = -135;
	swords.scaleX = swords.scaleY = 0.8;
	swords.visible = false;
	stageLayer.addChild(swords);

	swords02 = new Swords(new LBitmapData(dataList["stable_assets"],405,335,454,89),-1);
	swords02.x = LGlobal.width*0.5;
	swords02.y = LGlobal.height*0.5 - 60;
	swords02.rotate = -45;
	swords02.scaleX = swords02.scaleY = 0.8;
	swords02.visible = false;
	stageLayer.addChild(swords02);
}
11, use the easing function to realize animation.
Watch the first animation first##
/*
 * 第一个动画开始播放
 * */
function animation01Start(event){
	if(event){
		stageLayer.die();
		stageLayer.removeAllChild();
	}
	/*添加所有对象*/
	addItem();
	/*所有人物开始缓动*/
	var charaList = charaLayer.childList,chara,delayValue,duration;
	for(var i=0,l=charaList.length;i= 5){
			delayValue = 0.1*(i - 5);
		}
		duration = 1 - delayValue;
		chara.y = 220;
		LTweenLite.to(chara,duration,{delay:delayValue,alpha:1,scaleX:chara.scale,scaleY:chara.scale,ease:Strong.easeOut})
		.to(chara,1,{y:chara.ty,ease:Strong.easeOut});
	}
	/*背景缓动,变大左移上移→变小右移下移*/
	LTweenLite.to(backLayer,1,{scaleX:1.3,scaleY:1.3,x:-100,y:-50,ease:Strong.easeOut})
	.to(backLayer,1,{scaleX:1,scaleY:1,x:0,y:0,ease:Strong.easeOut});

	/*下面窗口缓动,延时→上移→标题可显示+VS可显示*/
	LTweenLite.to(warshipDown,0.5,{delay:1.5,y:320,ease:Elastic.easeOut,onComplete:function(){
		title.visible = big_vs.visible = true;
	}});

	/*上面窗口缓动,延时→下移*/
	LTweenLite.to(windowUp,0.5,{delay:1.5,y:0,ease:Elastic.easeOut});

	/*上面窗口缓动,延时→不透明*/
	LTweenLite.to(title,0.2,{delay:1.5,alpha:1,ease:Elastic.easeOut});

	/*VS标题缓动,延时→不透明缩小→缩小→添加特效并且进入第二个动画初始化*/
	LTweenLite.to(big_vs,0.5,{delay:1.5,alpha:1,scaleX:1,scaleY:1,ease:Elastic.easeOut})
	.to(big_vs,1,{scaleX:0.45,scaleY:0.45,ease:Elastic.easeOut,onComplete:function(){
		addEff(1,big_vs.x,big_vs.y);
		addEff(1,big_vs.x,big_vs.y);
		/*所有缓动后,动画2开始准备*/
		animation02Init();
	}});
}
The second animation
/*
 * 第二个动画开始播放
 * */
function animation02Start(event){
	stageLayer.removeEventListener(LMouseEvent.MOUSE_UP, animation02Start);
	/*VS缓动,变大变透明→然后消失*/
	LTweenLite.to(big_vs,1,{scaleX:2,scaleY:2,alpha:0,ease:Elastic.easeIn,onComplete:function(){
		big_vs.parent.removeChild(big_vs);
	}});
	/*背景缓动,变大→变大→变小*/
	LTweenLite.to(backLayer,2,{delay:1,scaleX:1.2,scaleY:1.2,x:-100,y:-50,ease:Sine.easeInOut})
		.to(backLayer,1,{scaleX:1.5,scaleY:1.5,ease:Sine.easeInOut})
		.to(backLayer,0.5,{scaleX:1,scaleY:1,x:0,y:0,ease:Sine.easeInOut});
	/*下面窗口缓动,下移→上移*/
	LTweenLite.to(warshipDown,0.5,{delay:0.5,y:LGlobal.height,ease:Strong.easeOut})
	.to(warshipDown,0.5,{delay:3,y:320,ease:Strong.easeOut});
	/*上面窗口缓动,上移→下移*/
	LTweenLite.to(windowUp,0.5,{delay:0.5,y:-50,ease:Strong.easeOut})
	.to(windowUp,0.5,{delay:3,y:0,ease:Strong.easeOut});
	/*标题缓动,无效果→不显示+人物缓动开始→显示*/
	LTweenLite.to(title,0.5,{delay:0.5,ease:Strong.easeOut,onComplete:function(obj){
		obj.visible = false;
		charaBattle();
	}})
	.to(title,0.5,{delay:3,ease:Strong.easeOut,onComplete:function(obj){
		obj.visible = true;
	}});
	/*宝剑变为可显示,且坐标设定在画面之外*/
	swords.visible = true;
	swords02.visible = true;
	swords.x = -200;
	swords02.x = LGlobal.width + 200;
	var wait = 4;
	/*左边宝剑缓动,向右移动屏幕中间*/
	LTweenLite.to(swords,0.5,{delay:wait,x:LGlobal.width*0.5,ease:Elastic.easeOut});
	/*右边宝剑缓动,向左移动屏幕中间*/
	LTweenLite.to(swords02,0.5,{delay:wait,x:LGlobal.width*0.5,ease:Elastic.easeOut});
	/*stageLayer缓动,无效果延时,结束后添加特效并且进入第一个动画初始化*/
	LTweenLite.to(stageLayer,0.2,{delay:wait,onComplete:function(){
		addEff(Math.random()*5 >> 0,LGlobal.width*0.5,LGlobal.height*0.4);
		addEff(Math.random()*5 >> 0,LGlobal.width*0.5,LGlobal.height*0.4);
		addEff(Math.random()*5 >> 0,LGlobal.width*0.5,LGlobal.height*0.4);
		animation01Init();
	}});
}
12. Finally, after the two animations are over, a click event must be added. Click on the screen so that the two animations can switch to each other/*
* 点击画面后,第一个动画开始播放
* */
function animation01Init(){
stageLayer.addEventListener(LMouseEvent.MOUSE_UP, animation01Start);
}
/*
* 点击画面后,第二个动画开始播放
* */
function animation02Init(){
stageLayer.addEventListener(LMouseEvent.MOUSE_UP, animation02Start);
}
完成了,以上是所有代码。欢迎大家一起交流
三,源码
就不单独发源码文件了,我把所有代码都写进一个html文件了,大家直接鼠标右键查看页面源码吧
测试连接如下
http://lufylegend.com/demo/effects01/
以上就是HTML5超帅动画制作-LTweenLite的妙用的内容,更多相关内容请关注PHP中文网(www.php.cn)!
Related articles
See more- AlloyTouch full-screen scrolling plug-in creates a smooth H5 page in 30 seconds
- HTML5 actual combat and analysis of touch events (touchstart, touchmove and touchend)
- Detailed explanation of image drawing examples in HTML5 canvas 9
- Regular expressions and new HTML5 elements
- How to combine NodeJS and HTML5 to drag and drop multiple files to upload to the server