Home >WeChat Applet >WeChat Development >'Getting Started to Mastering the WeChat Public Platform' Vol.4
'Getting Started to Mastering the WeChat Public Platform' Vol.4
- 高洛峰Original
- 2017-02-20 16:25:571880browse
Chapter 4 Introduction to the editing mode of the WeChat public platform
1. Turn on the editing mode
Click on the "Advanced Functions" in the background navigation of the public platform to enter. The page has two mode options, namely "Edit Mode" and "Development Mode", as shown below: 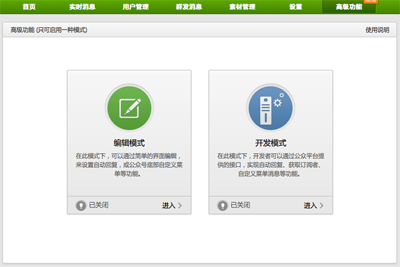
Both modes are turned off by default, and the two modes cannot be turned on at the same time. This time we first click on the edit mode area to enter the edit mode setting page, as shown below: 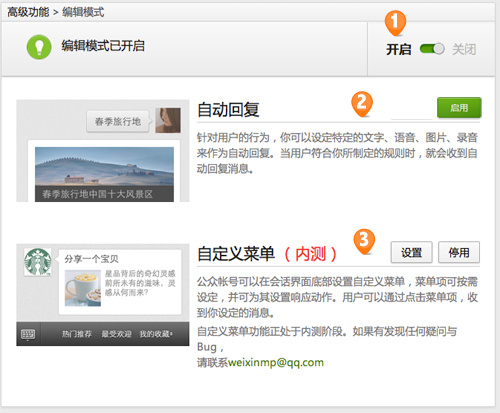
Mode master switch. After clicking Enable, the Settings and Enable buttons will appear in the following two areas.
Auto reply switch. After clicking Enable, you can use the user attention automatic reply, user default reply and user keyword reply functions.
Customized menu switch. After clicking Enable, you can use the custom menu to give users a better experience.
2. Introduction to automatic reply
Auto reply is a powerful tool officially provided by WeChat for public accounts without development capabilities, and can be used flexibly The automatic reply function can not only guide users to obtain self-service information, but also improve the user experience, and can even complete some complex interactive functions. After enabling automatic reply, click the "Settings" button to enter the automatic reply setting page, as shown below: 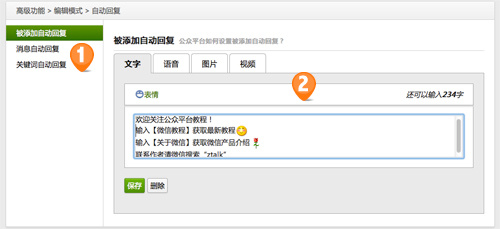
Auto reply type. The added auto-reply refers to the welcome message automatically sent by the public account when the user follows it; the message auto-reply refers to the default reply when the keyword auto-reply cannot match when the user sends the message; the keyword auto-reply refers to the user sending the message that matches the Automatically reply to the corresponding content when setting the rules;
Reply message setting box. The message settings box for added auto-reply and message auto-reply are the same. Only text, voice, picture and video replies are supported. Text can be up to 300 characters, and English and Chinese characters are calculated the same. Voice, pictures and videos are selected from the material library.
3. Introduction to keyword auto-reply
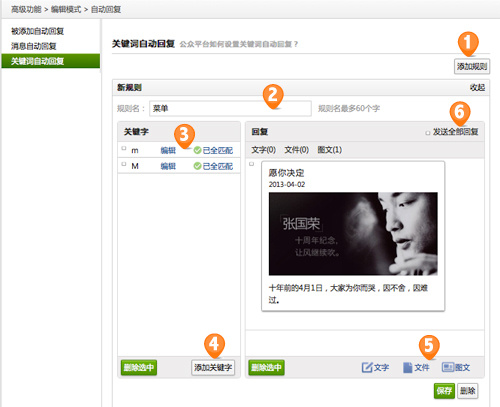
Add New rule button. After clicking, a new rule editing form will appear.
New rule name. This naming rule is mainly to make it easier to remember the rule settings.
Keyword list. When the user enters those characters, a message is automatically returned. What should be noted here is to remember to check the full match, otherwise the message will be sent as long as the string of text entered by the user contains this keyword.
Add keyword button. After clicking, a keyword adding box will pop up.
Select reply message content. There are three types of text, files, and graphics. The text cannot exceed 300 words. Files refer to multimedia content such as voice, pictures, and videos, and graphics refer to graphic messages.
When there are multiple reply messages, you can choose to send them all, so that the user will receive multiple replies at the same time, otherwise the user will receive one of the replies randomly.
4. Custom menu introduction
Custom menu is currently still in the official beta stage, with only a small number of media categories and Enterprise public accounts are eligible to use, but ZTalk did not apply for it and could only introduce it through other people's background screenshots. Let me tell you something scandalous before the introduction. For the sake of demonstration, I deleted all the menus of bianews. I thought it would be fine without previewing and saving, but it turned out that deleting it just disappeared. Then I tried it again according to the menu settings on my mobile phone. Here By the way, I would like to remind everyone, please be careful when deleting menus... The main setting page of the custom menu is as follows: 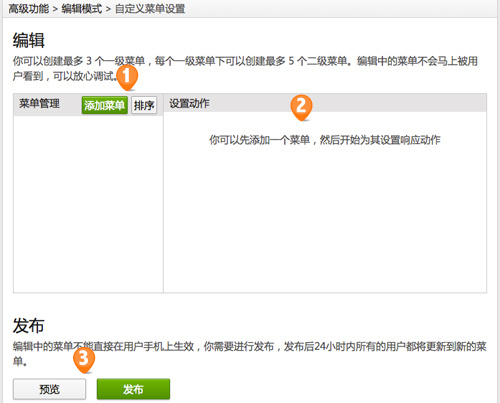
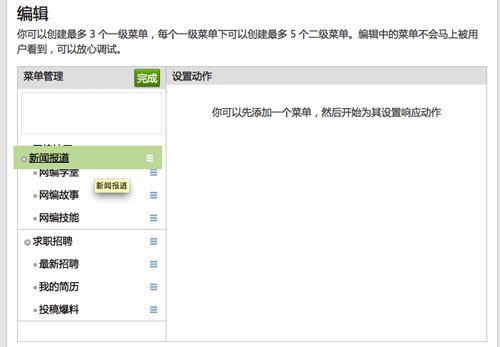
Add the main menu button, which is the most popular one on the public platform. Only three menus can be created at the bottom.
Sorting can reorder the menu, just drag the menu directly, as shown below:
Menu action setting box. The custom menu currently only has two actions, one is to click to display the submenu, and the other is to click to send a message.
Preview and publish buttons, the release will be synchronized to the mobile phone of the public account, and users will be updated within 24 hours.
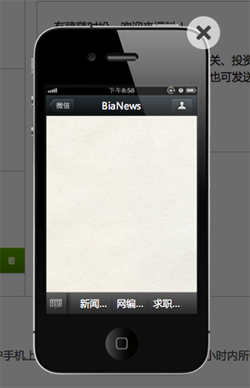
The preview will pop up a simulated mobile phone box for the editor to see the effect, as shown below:
Click the Add Menu button and enter the menu name in the pop-up window. Add a new main menu, as shown below: 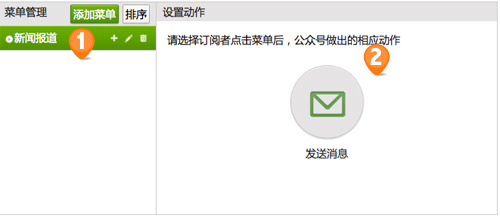
Main menu settings. The plus sign is to add a submenu, the pencil is to modify the main menu name, and the wastebasket is to delete the main menu. When deleting, it will be deleted together with the submenu below.
Main menu action settings.
The main menu can also add the action of sending messages when no submenu is added, that is, when the public account clicks on the main menu, a graphic message or multimedia message is sent;
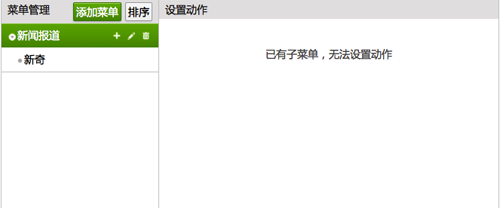
After adding a submenu, it will become the following picture , that is, the main menu is automatically given the function of clicking to display the submenu, and the function of sending messages cannot be bound:
Click the plus sign on the main menu and enter in the pop-up window Menu name, you can add a new submenu, as shown below: 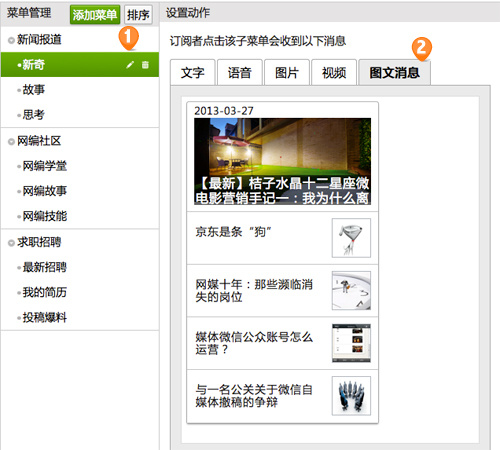
Submenu options. Pencil is used to modify the menu name, and Trash is used to delete the submenu. No more submenus can be created under the submenu. Each main menu can only create a maximum of 5 submenus.
Submenu action settings. Submenu actions can only be bound to send messages. The message types include text, voice, pictures, videos and graphic messages.
The basic introduction to the editing mode of the public platform is these. It is relatively simple, but the simpler things are, as long as you are willing to think carefully, you can play different things. The next issue will bring you Let's take an example operation. Since most public accounts do not have custom menus, the example is mainly implemented using the automatic reply function.
For more articles related to "Getting Started to Mastering the WeChat Public Platform" Vol.4, please pay attention to the PHP Chinese website!
Related articles
See more- Detailed explanation and simple usage of WeChat mini program textarea
- PHP WeChat public account development (2) Baidu BAE construction and database use
- php WeChat public account development (3) php implements simple WeChat text communication
- php WeChat public account development (4) php implements custom keyword reply
- PHP version of WeChat store calling api sample code


